Navigation

Ventuz 5 Quick Guide

  • Introduction
  • Getting Started
  • Ventuz Editions
  • Designer Overview
  • Ventuz System Requirements
  • Configuration
  • Video/Audio Configuration
  • Machine Configuration
  • GPI Configuration for Runtime or Director
  • Optimize Rendering Performance
  • Supported Formats
  • Supported Hardware
  • Multisampling / Anti-Aliasing
  • Input Subsystem
  • Ventuz Proprietary Files
  • What's new
  • FAQ
  • Common Mistakes
  • Deployment
  • Migration Guide
  • Summary Shortcuts

Ventuz 5 Designer

  • Index
  • Getting Started
  • Designer Options
  • Designer Overview
Projects & Scenes
  • Projects and Scenes
  • Project Browser
  • Project Properties
  • Project Maintenance
  • Project and Scene Data
  • Scene Tree
  • Scene Management
  • Scene Statistics
  • Deployment
Interface
  • Designer Interface
  • Renderer Window
  • Realtime Rendering
  • Optimize Scene Performance
  • Performance Statistics
  • Transformation Gizmo
  • Render to Disk
  • Camera Navigation
  • Isolated Objects
  • Manipulate Objects with Gizmos
  • Layer Editor
  • Common Layer Properties
  • IPP Effects
  • Color Correction FX
  • Distortion FX
  • Filter FX
  • Layer Editor Shortcuts
  • Hierarchy Editor
  • Working with Nodes
  • Containers
  • Find and Replace
  • Shortcuts Hierarchy Editor
  • Content Editor
  • Working with Nodes
  • Containers
  • Content Editor Shortcuts
  • Toolbox
  • Available Nodes
  • Property Editor
  • Project Data and Scene Data
  • Shader Editor
  • Text Editor
  • Scene Tree
  • Message View
  • Stage Editor
  • Animation Nodes
  • Animation Editor
  • Animation and State Engine
  • Templates
  • Template Engine
  • Shortcuts Animation Editor
  • Text Nodes
  • Text Rendering
  • Text Editor
  • Character Sets
  • Geometry Import
  • World Nodes
  • Geometry Nodes
  • Texture Nodes
  • Material&Color Nodes
  • Render Option Nodes
  • Interaction Nodes
  • Input Subsystem
  • Multitouch
  • TUIO Protocol
  • Open Sound Control
  • VR Nodes
  • How to work with Head Mounted Displays
  • Cluster
  • Multi Display Setups and Shaping
  • Warping, Soft Edging and Masking

Ventuz 5 Node Reference

ANIMATION
  • Mover
  • Alternator
  • Simple Control
  • Timeline Control
  • Keyframe Animation
  • Animation Group
GEOMETRY
  • Rectangle
  • Rounded Rectangle
  • Gradient Rectangle
  • Overlay Rectangle
  • Cube
  • Circle
  • Sphere
  • Cylinder
  • Cone
  • Torus
  • Chart
  • Random Points
  • Mesh Loader
  • Geometry Import (Live)
  • Volume
DATA
  • Database
  • Excel
  • JSON
  • RSS Feed
  • Resource Linker
  • Text File
  • XML
INTERACTION
  • Touch Button
  • Touch Excluder
  • Touch Marker
  • Touch Paint
  • Touch Pattern
  • Touch Proxy
  • Touch Ripples
  • Touch Transformations
  • Web Browser
  • Touch Teleport
  • Touch Simulator
INPUT/OUTPUT (I/O)
  • GPI
  • Joystick
  • Keyboard
  • MIDI
  • Mouse
  • Network
  • Open Sound Control
  • Serial
  • Timecode
LOGIC
  • Array Processing
  • Convert To Text
  • Cluster Synchronization
  • Counter
  • Date Time
  • Directory
  • Dispatcher
  • Enumeration
  • Expressions
  • Invert
  • Log
  • Loop Breaker
  • Math Effects
  • Matrix Operations
  • Scene Event
  • Script
  • String Operations
  • System ID
  • Text Splitter
  • Timer
  • Toggle
  • URL
  • Value Switch
  • Value Buffer
  • Variables
  • Visual Indexer
COLOR/MATERIAL
  • Alpha
  • Fog
  • Ground Fog
  • Sky Box
  • Color to RGBA
  • HSLA to Color
  • RGBA to Color
  • Color Transformer
  • HLSL Shader
  • Color
  • Material
LAYER
  • 3D Layers
  • 3D Layer Reference
  • 2D Layers
  • PSD Import Layer
  • Others
RENDER OPTIONS
  • Alpha Blending
  • Alpha Testing
  • Clip Plane
  • Filter
  • Mask
  • Mirror
  • Effect
  • Point Options
  • Render Cube Map
  • Render Options
  • Stencil
  • ZTesting
LIGHT
  • Light Sources
TEXT
  • Text Effects
  • Text Layouts
  • Text Rendering
VR/AR
  • Tracked Devices
  • Draw Tracked Devices
WORLD
  • Axis
  • Billboard
  • GetWorld
  • SetWorld
  • Arrange
  • Ticker
  • Layout
  • Group
  • World Z Sort
  • YesNo
  • Switch
  • Spread
  • Filter Pass
  • Set Pass
  • Hierarchy Container
  • Scene Port
  • Content Container
  • Template Port
  • Container Info
  • Camera
TEXTURE
  • Background
  • Hatch
  • Image
  • Texture
  • SVG Loader
  • Live Video
  • Movie Stream
  • Movie Frame
  • Movie Clip
  • Texture Loader
  • Snapshot
  • Gradient Texture
  • Texture Saver
  • Video Source Selector
  • VIO Input
SOUND
  • Audio Clip
  • Sound
  • Volume Control
  • FFT Audio Analysis
SLIDES
  • Slide Manager
  • Slide
  • Slide Port
  • Pivot

Ventuz 5 Director

  • Application Settings
  • Assets
  • Channels
  • Command Line Options
  • Content References
  • Designing Templates
  • Environment
  • Glossary
  • Index
  • Introduction
  • Pages
  • Playlist
  • Plug-Ins
  • Project Data
  • Property Editor
  • Shortcuts
  • GPI Configuration
  • Shot Box
  • Show
  • Taking Action
  • Timeline
  • Topology
  • User Interface
  • Director Mode

How To

  • How to Run Ventuz
  • How to Work with Designer
  • Ventuz Designer Drag&Drop workflow
  • How to use Head Mounted Displays
  • How to work with Shadows
  • How to use Emoijs
  • How to Build a Template
  • How to use Newtek NDI
  • How to Create Visuals Loader Node
  • How to Remote Control with a Phone
  • How to Setup a Cluster Render
  • How to use a Mixed Frame Rate Cluster
  • How to use Tracking
  • How to work with 3D Reference Layers

Keyboard Shortcuts

  • Summary Shortcuts
  • Layer Editor Shortcuts
  • Hierarchy Editor Shortcuts
  • Content Editor Shortcuts
  • Animation Editor Shortcuts
  • Director Shortcuts

Advanced and Development

  • Command Line Options
  • Remoting Overview
  • Remoting 4
  • Deprecated Remoting
  • Ventuz IP Ports
  • Ventuz Machine Service
  • Remoting Machine Signature
  • TUIO
  • .NET Scripting
  • HLSL Shader Programming
  • Ventuz API and SDK
  • Ventuz VIO API

General Reference

  • Terminology
  • Manual Index

Miscellaneous

  • Presets
  • PropertyGroups
« Previous Article
» Index «
Next Article »

Nodes and Bindings

Nodes are the fundamental elements from which a Ventuz Scene is constructed. Each node is either a Layer, Content or Hierarchy Node and thus belongs either in the Layer Editor, Content Editor or Hierarchy Editor. This is visualized by the orientation of the brackets around the node icon.

A hierarchy node has vertical brackets, a content node horizontal brackets and a layer node corners around the node icon.

A content node describes an asset (i.e. a texture, an XML file, ...), a numeric constant, an event or any other item that does not directly influence the rendering process. In contrast, a hierarchy node is like an instruction to the Ventuz Rendering Engine, for example to activate a certain material or texture, to render a mesh and so forth. Layer Nodes are somewhat special in that they represent a 2D Compositing Layer - everything inside a Layer will be rendered onto a dedicated texture and then composited together with all other Layers using the Layer Effects and the Layer Blending and Masking.

While Content Nodes are available everywhere in the scene, Hierarchy Nodes and the Hierarchy can only be used inside a 3D Layer.

All nodes can be browsed via one of the Toolboxes. These can be accessed either through the toolbox window (accessible via View/Toolbox in the menu bar) or by clicking into the Layer Editor, Hierarchy Editor or Content Editor and then pressing the Space key to open the Fast Toolbox.

Properties and Bindings

Each node has a number of Input Properties that are parameters which affect the nodes behavior (i.e. the size of a Rectangle or the speed a video is played). A node can also have a number of Output Properties that can be used to feed the input properties of other nodes. This is done via Bindings.

As long as an Input property is bound, it will update its value whenever the Output property of the bound node changes. For example, the X-Rotation property of a Axis node can be bound to a Mover node to continuously have objects under the Axis rotate around the X-axis. Binding of node properties is at the heart of Ventuz and allows the creation of very complex logic without having to program a single line of code.

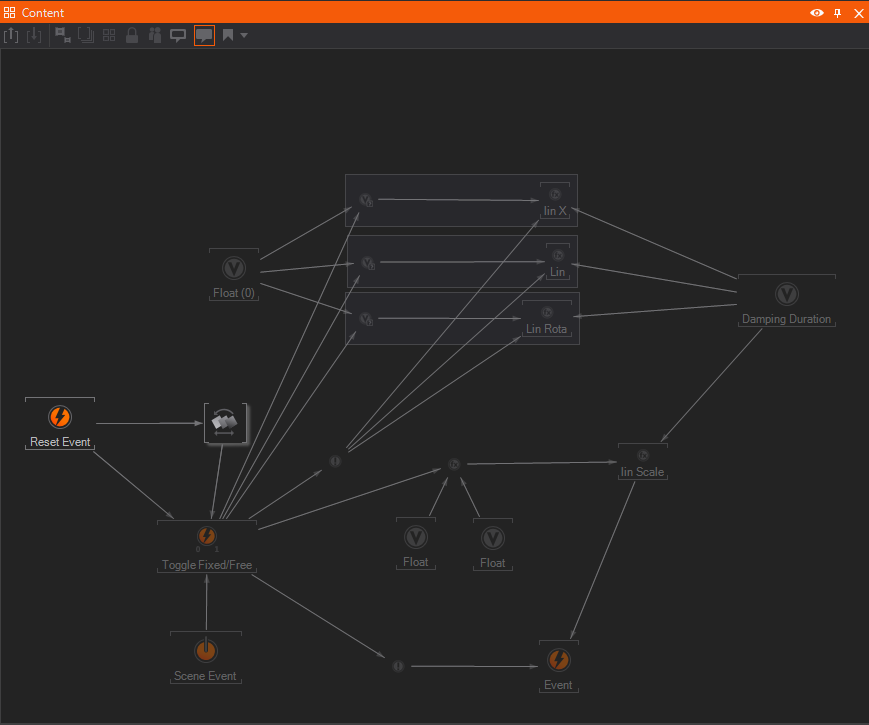
Bindings are visualized as arrows which connect nodes in the Content Editor. To create a binding, select a node, go to the Properties Editor and drag the input property onto another node. When released, Ventuz will open up a list of compatible output properties of that second node. Upon choosing one of the properties, a connection is created and visualized by an arrow going from the output node to the input node. For more information, see Property Editor.

For some nodes like the Keyframe Animation, dropping a property can have a different effect than just binding the property. For these nodes, drag the property to the target node and wait until the Property Editor switches to the new node. Continue dragging the property over the Outputs button, waiting and then releasing on the specific output property.

A binding can be removed by clicking on the arrow that represents the binding. A list of all bindings will appear and by clicking any of the crosses, the respective binding will be removed.

Layer to Layer Bindings

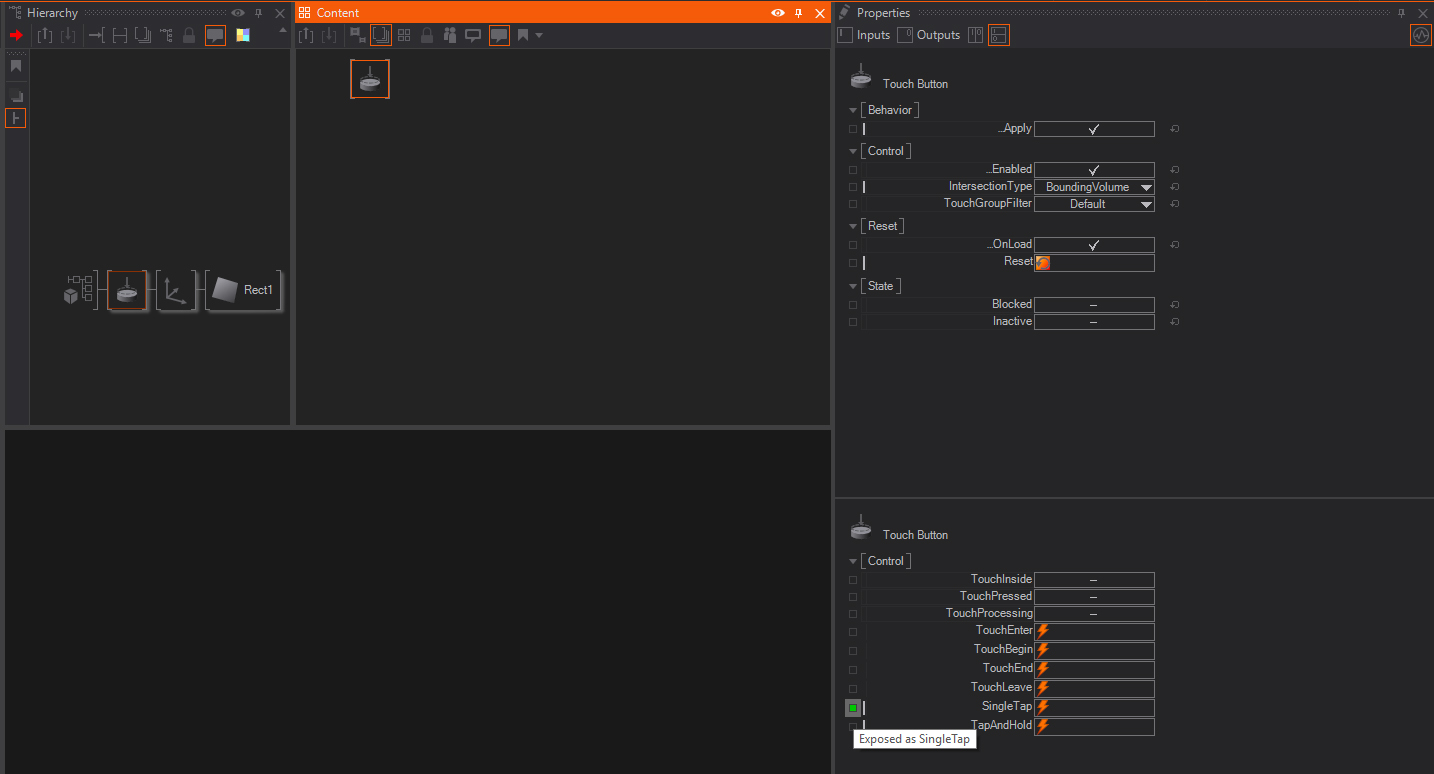
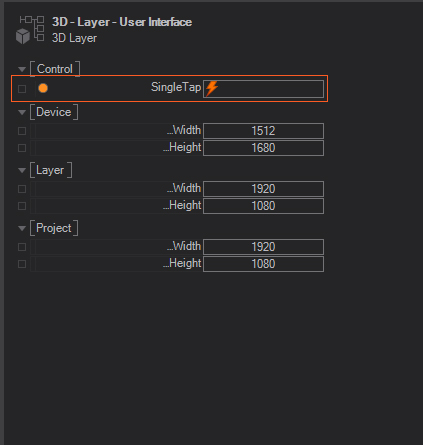
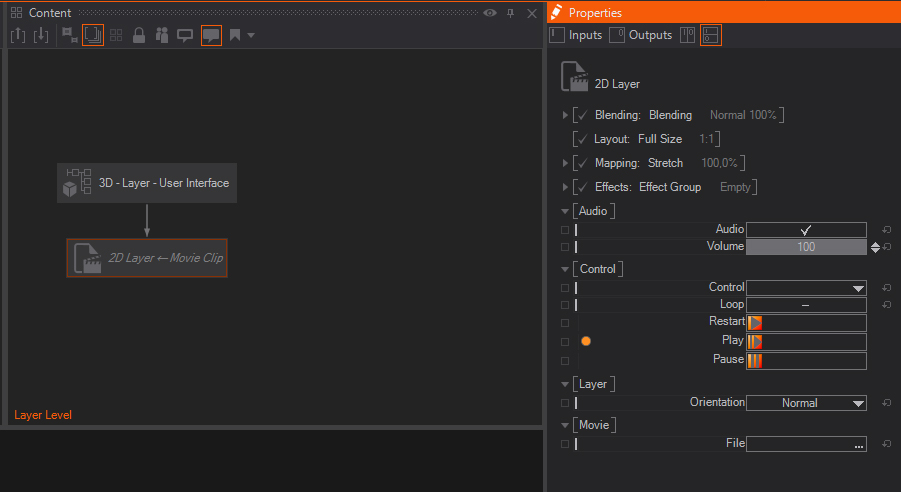
It is possible to have bindings across Layers. Before you can use a property and bind it from one to another layer, or bind the property to the Layer Level content nodes you have to expose the values up to the Layer Level. The following screenshots show a Touch Button which has the TouchPressed exposed from the 3d Layer (User interface) and is bound to the 2D Movie Clip Layer to control the Play.

Inside the Layer3D - exposed the SingleTap
Layer Level - The exposed SingleTap is visible and can be bound
The Play event from the 2D Movie Clip Layer is bound to the SingleTap

Validation and Rendering

What makes Ventuz unique is that a scene is not a static or linearly animated collection of assets but a flexible construct. As input changes, geometries are moved or scaled, materials changed, animations played or stopped, certain areas become responsive to touch and others ignore it. To handle all of this in realtime, the amount of processing has to be reduced to the absolute required minimum.

Ventuz uses a two-step approach, first validating each node to ensure that its values have been updated and only once all nodes are valid, rendering is performed in a second step. During validation, a node uses the values of its input properties to drive the internal functional implementation, thus updating the values of its output properties and/or data used during rendering. For example, a Rectangle Node might recreate its mesh as the tessellation level changes or an Expression Node might calculate its new output value based on a changed input.

To do all of this in an efficient manner, each node stores its validation state. If the output property of a node changes its value, all nodes bound to that output get invalidated. If none of the bound outputs changes and neither does the user change an input property by hand, there is no reason to re-validate the node.

In most cases however, the user luckily does not have to worry about any part of this. Ventuz will utilize all means available to it in order to update the scene as fast as possible, making it ready to render the next frame.

See also:
  • Layer Editor
  • Hierarchy Editor
  • Content Editor
  • PropertiesEditor
  • Node Descriptions
  • Containers and Interfaces

« Previous Article
» Index «
Next Article »
Copyright 2004-2017 Ventuz Technology Group