Channel Configuration
Table of Contents
As stated in the beginning, a Channel is a stream of user content (templates, images, etc.). All user operations are performed on a channel which then uses the Topology to talk to one or more Ventuz runtimes which perform the actual 3D rendering. But despite it having such a central role, it hasn't really been discussed in any of the previous chapters. This is for a simple reason: For the majority of applications, it simply does what is expected so the user won't have to care about it!
This chapter though will get more into detail what a channel really is, how its behavior can be adjusted and how multiple channels can be used to run even complex setups with a single instance of Director.
Usage Scenarios
There are various situations that are only made possible by using multiple channels, the most common one of which is layering content. Imagine a TV show playing the top 40 music videos. The main content of course are the movie clips, each of which would be typically be an entry in a Playlist. However, there is usually additional content that is not dependent on any specific clip. For example, the program's logo might be spinning in the top right corner and and advertisement for the program to follow might come in from the bottom at some point in the show. Although it is theoretically possible to use sub-templates for this, the operator would be limited to adding/removing sub-templates whenever he switches to a new movie clip.
Instead, with Director, the operator can create three separate, dedicated channels: one for the music videos, one for logos and one for advertisements. This allows him to cue/take each one individually or even automate the playlist of music videos while manually managing the advertisements and logos. All channels would be routed to the same machine which layers the content on top of each other to produce the final output.
A completely different scenario would be managing an information system in a large building, lets say an airport: There might be displays distributed throughout the waiting area to show some form of entertainment program, other displays near the cafeteria to show internal information for the staff and yet another set of displays in the parking lot to show when which plane arrives when. While completely independent, having them all attached to the same Director instance would for example allow the operator to show an important message (e.g. in case of a fire emergency) on all displays simultaneously. Again, he would create a show containing one channel per independent content feed and have the power to either use them separately or together.
Managing Channels
When creating a new show, by default, a channel is allocated for each Channel Slot in the active topology. Since the default topology is a local setup with just one Channel Slot, this results in the familiar setup a show containing only one channel. Additional channels can be added/removed via the Channel Manager at Show / Channels... in the main menu. Each channel has a name that is used throughout the application, a channel slot in the Topology active topology it is assigned to and an optional set of rules. When  double-clicking on a channel or selecting one and pressing the edit button, its properties can be modified.
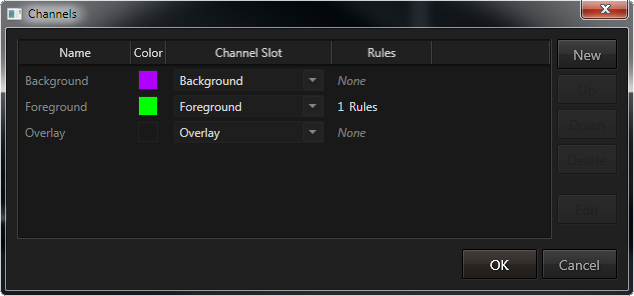
The most important information for a channel is of course the Channel Slot it is assigned to. Without a channel slot, the channel will not be able to communicate with the rendering backend and therefore to cue/take any content.
Although the channel manager shows the names of the channel slots in the active topology, the channel actually stores the ID of the channel slot. This way different topologies can be used for the same show and channels will reconnect automatically if the new topology contains a slot with the same ID. If a slot is not available, the channel will log an error message that it is disconnected and show a red status message in the Timeline window.
Each channel can also be assigned a custom color. All windows that operate on a specific channel will color their outer border based on the channel's color. This is an optional feature but very useful when working with multiple playlist or property editor windows.
Finally, channel rules can be used to modify a channel's cueing behavior. They will be discussed later in this chapter.
Working with Multiple Channels
When working with multiple channels, the major portion of Director will behave exactly the same as with a single channel. However, there are some important details:
Channel-Based Windows
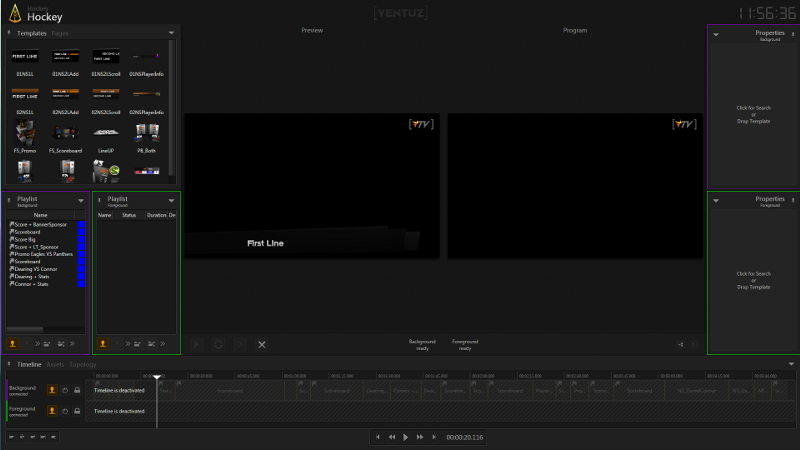
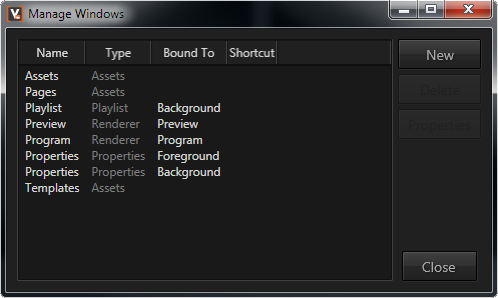
Some windows (e.g. the Property Editor, Playlist Window) require a channel to work on. Which channel a window is bound to can be changed in the Window Manager at Window / Windows ... in the main menu bar.
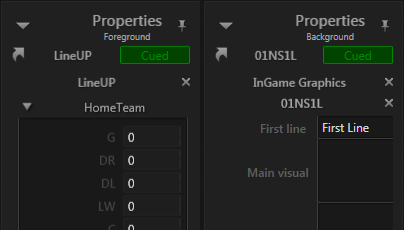
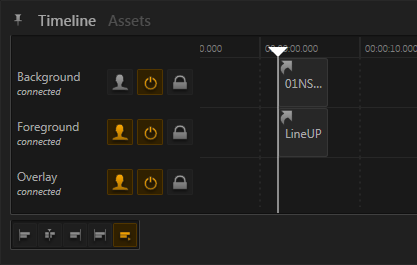
In the example above, two property editors have been added to the window layout, one is working in the channel "Foreground" while another is working on the channel "Background".
Since window layouts are shared among all shows based on the same project, a window does not directly bind to a channel but the index of a channel (e.g. is bound to the second channel in a show). The window manager just displays the current channel names for easier association.
Cueing / Taking
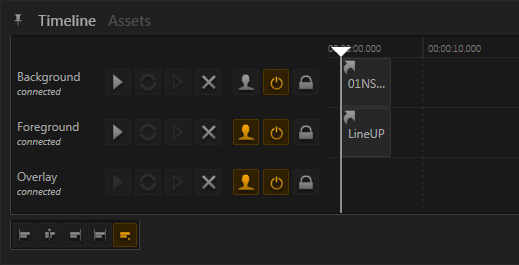
Each channel-based window contains a button showing a human shape to enable/disable user-interaction on that channel. If an operator cues a template, presses F1 or the take button in the Show Control, that action is performed on all channels that are user-interaction enabled. If for example one channel is automated via a Playlist, one generally will want to disabled user-interaction so pressing F1 will not disturb its operation. In the screenshot below, all channels have activated their Timelines but the first channel has its user-interaction disabled.
Although the user-interaction mode can be used to have a channel completely ignore all take/cue operations done by the user, there often are situations where one wants to do a take on only a specific channel. For this reason, the playlist, property and timeline window each have configurable button toolbars that can customized via the configuration option button in the top right corner of a dockable window. These buttons work exactly the same as the ones in the Show Control but act only on that specific channel.
The quickest way to activate a channel is by pressing Ctrl plus the number of the channel (e.g. Ctrl+1, Ctrl+2, etc). This short cut will automatically de-activate all other channels unless the shift key is pressed also.
Example
Let's go through a quick example of how to get a multi-channel setup running from start to finish: We assume a project has templates for a background and a foreground which are supposed to run on a cluster of machines. To support multiple in parallel on the same machine, the project requires an appropriate layout scene. However, this is usually done by the designer of the template in Ventuz Designer. Therefore the following assumes that the project is already correctly set up.
- Topology: Launch Ventuz Director and open the Topology Editor. Create a new topology, as type choose "Cluster" and increase ports to 2. Rename the existing channel slot to "Background" and add a second channel slot "Foreground". Connect the new slot's program output to the second port on both the cluster's and the local machines's Pipe 0. Connect the preview port to the local machine's second port in Pipe 1. Assign machines to the cluster and make sure they have proper cluster/machine IDs as well as configurations. This should resolve all errors. Save the topology.
- Show: Create a new show for the project. Usually Director will create a channel for each channel slot but depending on the project's default settings, a different configuration may have been created. Go to the Channel Manager, rename the channels to "Background" and "Foreground", then make sure they are assigned to their respective channel slots. Optionally you may want to assign colors to the channel to better keep them apart.
- Window layout: Go to the window manager and add windows depending on the user interface you need e.g. playlists, property editors, etc.
Channel Rules
Each channel can have a set of rules applied to it which modify its behavior. Whenever the operator cues something, either manually or from the playlist, a channel will apply its rules. Each rule consists of a condition to check if the rule should be applied and an action. Note that in addition to the build-in conditions/actions discussed below, custom plug-ins can be developed to add new conditions and actions.
Channel rules are not applied for content that already is on the Timeline. It is only applied to content that is being cued by the user. The reason for this is that the timeline is intended as a perfect record of what has happened and/or is supposed to happen.
Conditions
- Always: The rule's action is always applied.
- Asset Type: The rule's action is applied if the user cued an asset of that type (e.g. an image).
- Name: The rule's action is applied if the specified regular expression (as explained in the chapter Shot Box) is a match.
- Keyword: Same as name but at least one keyword has to match the expression.
- Template: The selected template is part of the content that is being cued, either as main or as sub-template.
Name and Keyword match against the main item that is being cued. If the operator double-clicks on a template in the template browser, the name/keyword of the template is checked. If the operator double-clicks on an entry in a playlist, the name/keyword of the playlist entry is checked - which may or may not be the same information, depending on whether the operator did modify the playlist entry.
Invert
This is used to invert the condition. For example, if a rule says to match a specific template, inverting the condition would cause the rule to match all templates except for the specified one.
Actions
- None: Does nothing, usually used to temporarily deactivate a rule.
- Allow/Block: Whenever something is cued, it starts as being allowed to be cued. Each rule can modify that state by allowing or blocking the content. After all rules have been applied, a blocked content will not be cued. This is usually used to restrict templates to specific channels, such as foreground templates only on the foreground channel while putting background template on the background channel.
- Migrate: The specified template is inserted into the content. If the template can be inserted into the content, that sub-part will be replaced. Otherwise the whole content will be replaced by the specified content. This can for example be used to replace an SD version of a template with an HD version for a specific channel.
- Replace: Same as migrate except that the argument is a page and the existing data is not copied over to the new template instance. This can for example be used to replace a sponsor template with a specific sponsor page each time the sponsor template is cued.
The replace action is completely independent of the template condition. In a template-hierarchy, there is always only one place where a page could be inserted. So the replace action tries to find that place solely based on the replacement page. One can create a rule where it matches against certain templates and replaces them with a completely different page!
Example
Let's look at an example: A channel called "foreground" has been given two rules.

The first rule restricts the channel to only cue content that contains the "foreground" keyword. Why is that? The condition "keyword: foreground" would usually match only content that contains the keyword "foreground". However, it is inverted, so the rule matches all content that does not have that keyword. And for all such content, the state is set to blocked, preventing them from being cued.
The second rule matches whenever the content contains the template "SponsorText". if so, it replaces parts of the content by the page "Score + LT_Sponsor".