Importing 3D Geometry
Table of Contents
Introduction
Ventuz currently supports the import of four 3D file formats: DAE, OBJ, RTG and X. Models in these formats have to be imported and converted to the native Ventuz Mesh Format (.vzm) before they can be used in a scene via a Mesh Loader node. For further information on these formats see the Supported Formats page.
Although some of these formats store information about lights, cameras, animation and so forth, Ventuz only imports the geometric data, the geometric hierarchy, material properties and textures. Currently, only the DAE (Collada) importer supports import of camera data and animations.
In order to import geometry from any of the above formats select a node in the Hierarchy Editor to which the geometry should be linked. Select File > Import > Geometry from the main menu. After selecting a geometry file in the File Open dialog the Import Preview will be launched. By changing the Import Options some basic adjustments can be applied to the imported model. Although the supported formats are standardized, modeling applications vary in how exactly they use a format. Some trial and error can be necessary when using models from an unknown source of origin or establishing a new production tool chain.
An import is only possible if the Render Window of Ventuz Designer is set to Windowed or Virtual Fullscreen mode. In Exclusive Fullscreen mode DirectX does not allow the setup of an additional render window.
Once the import is complete, a .vzm version of the model is stored in the Projects Folder Structure and a Mesh Loader node is added to the scene hierarchy.
Mesh Capabilities
A Ventuz mesh has the following limitations and capabilities:
- Per-vertex position, normal, texture, tangential and binormal information.
- Only a single texture coordinate containing U/V-values is stored per vertex. Three-dimensional coordinates or multiple UV sets are not supported.
- Tangential and binormal information is never imported. Instead, it is generated on demand when for example required by a particular shader node.
Import Preview
Before any geometry data is finally imported to a Ventuz scene or Project it can be reviewed and manipulated in the Import Preview dialog. Note that a geometry import is not available if Ventuz Designer is running in Exclusive Fullscreen mode.
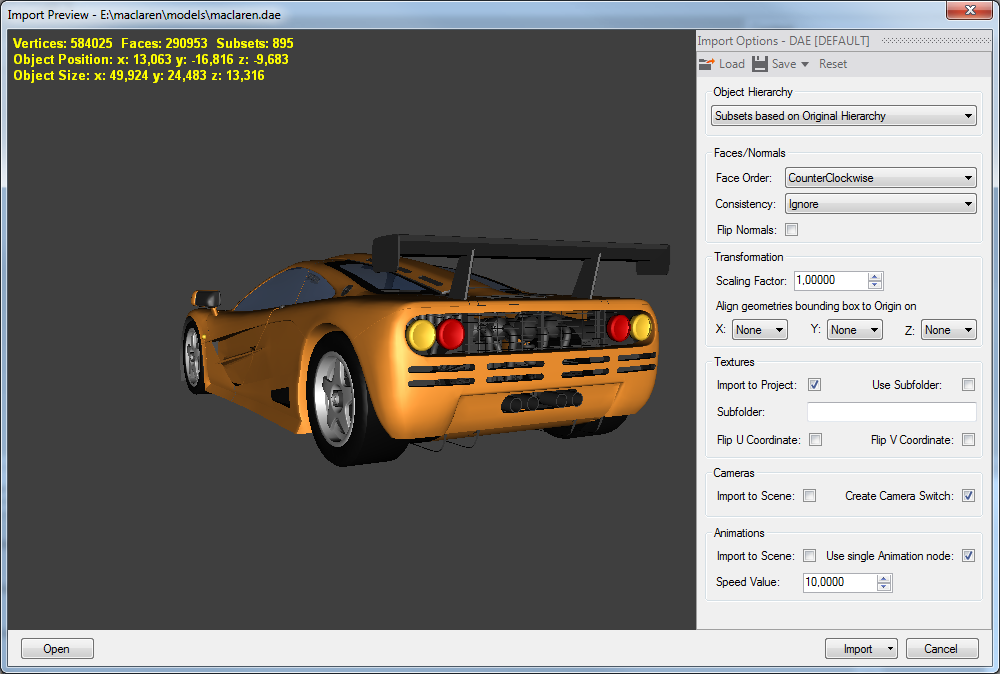
The Import Preview window is divided into two areas: the main part shows the preview rendering of the imported model; the right side provides the active import options which have been applied to the rendered model. The panel on the window bottom contains buttons to load new geometry and to import geometry and images/textures to the current Ventuz Scene and Project. Press the Open button to select a new 3D model file. The previously rendered model will be discarded. Press the Import button to import the current model in its active configuration to the currently active Ventuz scene. Pressing the arrow on the Import button provides a drop-down menu with the possibility to import the model (and its textures) to the active Ventuz Project folder only. In this case no nodes are added to the open scene.
Preview Renderer
The preview renderer shows the imported version of the previously selected geometry file. The rendering always reflects the settings in the Import Options. In the top-left corner some geometry statistics are displayed: beside the number of vertices, faces and subsets, the model positions and size are displayed. Position means the center of the geometries bounding box. Size also refers to the bounding box size. The preview renderer provides the possibility to rotate the model and to rotate and move the camera:
 drag drag | Rotate object | |
 drag drag | Rotate camera | |
 drag drag | Pan camera | |
| turn | Zoom camera | |
| doubleclick | Reset camera |
The zooming and panning graduation can be modified with CTRL, ALT and SHIFT keys:
| ALT | Normal increase | |
| ALT + SHIFT | Large increase | |
| CTRL | Normal decrease | |
| CTRL + SHIFT | Large decrease |
Import Options
The settings in the Import Options panel specify parameters for the import process and subsequent model manipulations. The Import Options automatically adapt to the imported file format. Currently only the COLLADA format provides some additional import parameters. All other formats provide the same set of parameters.
The options are separated into different categories and described below. It is possible to save and load import option configurations to file. This makes it possible to create settings dependent on the 3D file format or type of exporter.
Object Hierarchy
Changing this option has an impact on the resulting geometry tree in the Hierarchy Editor. To understand the effects of this Import Option, it is necessary to know how DirectX and thus Ventuz handle geometries. The object that manages geometry within DirectX is called a Mesh. A Mesh can be divided into several subsets where each of these Mesh subsets can have different materials and textures assigned to it. In general this is used to separate areas of an object with different material properties from each other but can also be used to store multiple independent objects within a single mesh.
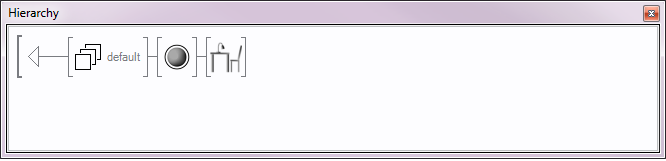
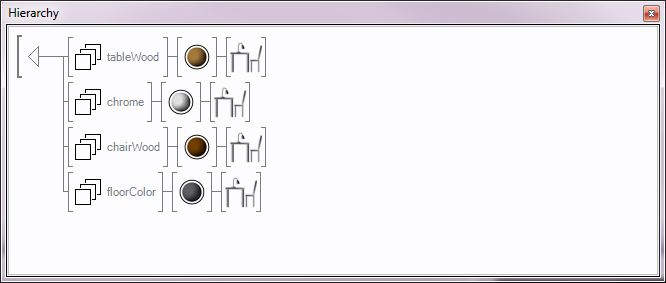
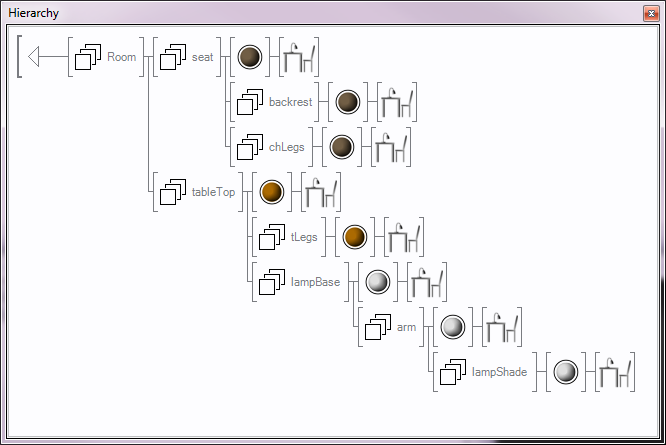
If a Mesh, containing multiple subsets, should be rendered, the Subset property of the Mesh Loader node can be used to restrict rendering to a specific subset. In the following example, a file has been imported that contains geometries of a table, chair and a desk lamp. Applying different Object Hierarchy options results in different subset assignments and different node trees in the Hierarchy Editor.
If Single Subsets is selected, all available geometry objects are merged to one single Mesh subset. In this case only one single material can be assigned to the complete model.
Setting the Object Hierarchy to Subsets based on Materials assigns objects with the same material to the same Mesh subset. This means that our table-legs and tabletop would end up in the same Mesh subset, provided that they have the same material. The lamp would be assigned to a different subset because it has a different material.
The last Object Hierarchy option is Subsets based on Original Hierarchy. In this case any single geometry is assigned to its own Mesh subset. The tabletop and the table-legs lie in separate Mesh subsets. Additionally the object hierarchy saved in the 3D file is reconstructed in the Ventuz Hierarchy Editor. If the table-legs were originally build subordinate to the tabletop, and the tabletop subordinate to the room, this hierarchy will be visible in the Hierarchy Editor tree.
In case of OBJ there is a forth option: Subsets based on Original Hierarchy and Material.
This one is needed because of a special feature of the OBJ file format. It allows the assignment of multiple materials to one single geometry group. This makes it possible to have one table-leg (the group) with two materials. Importing this geometry with the option Subsets based on Original Hierarchy and Material conserves the internal group hierarchy but also displays the geometry with the correct materials.
Faces/Normals
The category Faces/Normals generally speaking allows the manipulation of visibility of polygon faces.
The Face Order controls the order of assembling three vertices to one face or polygon. In real-time rendering, this order is important because it is used to distinguish between front-facing and back-facing parts of a surface and indirectly affects the visibility of a face (see Back-face Culling). The vertex order may differ dependent on the software that was used for the 3D export.
Via the Consistency parameter a kind of mesh clean-up can be performed to ensure that face order fits to the according normals direction or vice versa. If this parameter is set to Ignore no clean-up is performed. In Adapt Normals direction to Faces mode those normals are flipped which point in a direction that does not fit to the vertex order of the according face. In Adapt Faces to Normals direction mode the vertex order of those faces is changed which do not fit to the normals direction. If Flip Normals is enabled, the direction of the imported normal vector is inverted.
If objects appear "inverted" or are black, try a different combination of Face Order and Flip Normals settings.
Transformation
The category Transformation provides some simple functionality to manipulate the size and position of the imported model. The Scaling Factor allows to scale up/down the imported model. Via the XYZ Alignment it is possible to re-locate the geometry. The alignment sets the center or the bounding of the geometry to the origin of the coordinate system.
Textures
The Textures category contains four options. If the Import to Project option is enabled, any texture that comes with the 3D file will be copied to the Textures or Images folder of the current Ventuz project. DDS textures will be copied to the Textures folder and non-DDS textures will be copied to the Images folder. Use Subfolder allows the user to store the imported textures in a specific subfolder. The options Flip U/V Coordinates affect the sign of the UV coordinates that are assigned to the vertices. For a proper texture mapping on geometries, Ventuz needs UV coordinates in the range 0 – 1.
If Use Subfolder is enabled and a subfolder name is specified, the texture belonging to a model are imported to <projectpath>/Images/<subfolder> respectively <projectpath>/Textures/<subfolder> in case of DDS files.
A geometry does not necessarily have to contain UV coordinates. It is rather at the liberty of the artist to assign proper UV values or not.
Cameras
Only available for the COLLADA format!
The option Import to Scene in the Cameras category defines if camera data should be imported and according camera nodes are created in the Ventuz scene. If the option Create Camera Switch is enabled, multiple cameras are merged to one Container node. The imported cameras are linked to a Switch node which enables the change of the camera views.
Animations
Only available for the COLLADA format!
In the category Animations the Import to Scene option enables the import of animations.
If Use Single Animation node is checked all imported animation channels are stored in one single Keyframe Animation node. Otherwise every channel gets a separate Animation node. The Speed Value defines the playback speed of imported animations. The default value 10 matches the speed of animations originally created in Ventuz. A higher speed value increases the necessary time to play back the complete animation (animation speed is slower). A lower value decreases the animation time.
In order to import animation data the Object Hierarchy option must be set to Subsets based on Original Hierarchy! Only in this mode the original object hierarchy of the scene is imported and the animations can be linked to the appropriate elements.