The User Interface
Table of Contents
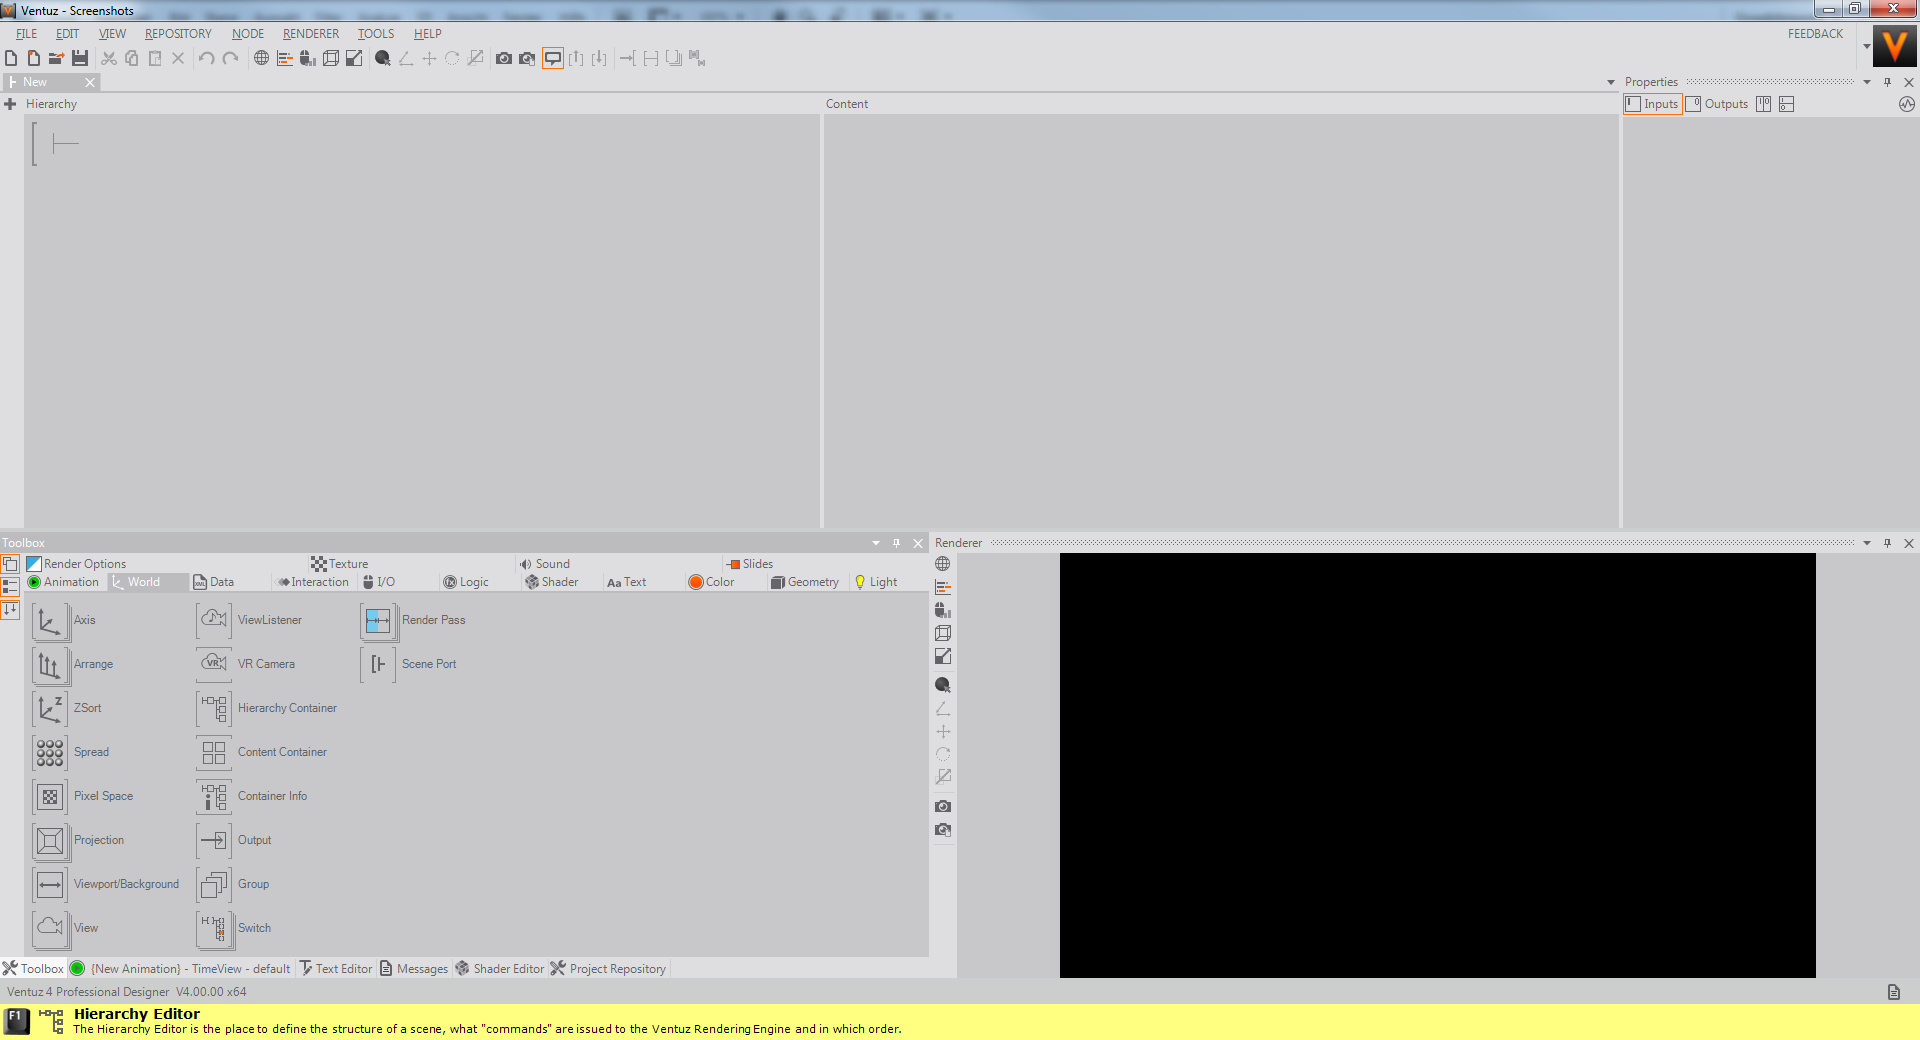
When launching Ventuz and either having created a new or opened an existing project, the graphical user interface will look something like the following. Please note that the application might look slightly different on your machine due to the Color Scheme set under Tools/Options/Layout/Color Scheme. Also the size and position of the various docking windows can be adjusted by the user. One can reset the layout in the menu under View/Layout/Reset Layout or re-open one of the docking windows under View if it has been closed.
Scene
The Ventuz Designer user interface can load multiple scenes at the same time. Loaded scenes are show as tabs at the top of the scene editing area. Switching between scenes is simply done by clicking the desired tab. If a scene is opened for editing the scene edit area shows two editor windows:
Hierarchy Editor
The left window is the Hierarchy Editor which is used to edit the overall structure of the scene and define the rendering order and dependencies of the different elements in a scene. Usually it shows a tree of Nodes but as this is a new scene, it is empty except for the Scene Root (the black bracket and gray T-junction in the top left corner). It can be filled by dragging Nodes on to the scene root, either from the Toolbox (the window shown below it in the screenshot) or by clicking into the Hierarchy Editor to set the focus on it and then pressing SPACE to access them via name in the Fast Toolbox. Note that only Hierarchy Nodes (brackets at left and right of a node icon) can be dragged to the Hierarchy Editor.
Content Editor
The right window is the Content Editor. In contrast to the Hierarchy Editor, the Nodes in it do not form a tree structure but a network of dependencies. A Content Node (brackets at top and bottom of the node icon) represents a value, asset or other piece of information that is used to parametrize the rendering elements in the Hierarchy Editor. If a Hierarchy Node is selected in the Hierarchy Editor, it is also shown in the Content Editor so that connections can be created. A connection between the Input Property of one node and the Output Property of another is called a Binding. If an input property of a node is bound to another property, the node will update itself every time the output changes.
Project Button
At top-right corner you find the Project Button. It shows the icon of the currently open project. This icon can be changed in the Project Properties. By clicking on the arrow on the left of the button, one can access the Project Properties or switch to another Project.
Property Editor
| F4 |
The window following the Content Editor is the Property Editor. It is used to access the input and output properties of a node, either to bind them to other nodes ( drag the name of an input property onto another node in the Content Editor) or to change them manually ( click on the value). This is where one, for example, adjusts the size or tessellation of a geometric primitive, connects a property to an Animation or, as said before, binds it to other Nodes.
Renderer
| F10 |
The Renderer window shows the render result of the scene as created by the hierarchy and content. Since there is currently nothing in the Hierarchy Editor, the result is simply a black window. Try for example to drag a Rectangle Node from the Toolbox to the Hierarchy Editor and see it appear in the renderer output. The buttons on the left of the renderer window access some common functionality like showing render performance statistics or going to fullscreen mode.
Toolbox
| F8 |
Think of the Toolbox as a palette of all Nodes available in Ventuz. They are grouped by various Categories such as Geometry or Color. Some of the entries represent multiple, similar Nodes (shown by the stacked appearance of for example the Texture node) which can be accessed by  click on the icon. For some of those stacks of nodes (like the Texture node), one can simply drag the entry itself and will be presented with a pop-up when the dragging is complete. Choosing the specialized variant of the Node now will automatically create additional nodes if they are required for correct operation. For example, drag the Texture Node, release the mouse button while in the Hierarchy Editor and then choose Image Loader. The Content Editor will show four nodes: The Image Loader, an Image to Texture node, a 2D Mapping node and a Texture node.
Repository
The Repository is similar to the Toolbox in that it presents a collection of nodes. In contrast to the Toolbox however, the Repository can be used to store reoccurring design patterns of nodes. The Ventuz Designer can open multiple Repositories at the same time. Each Repository will be hosted in its own window where the location can be defined by the user.
Animation Editor
| F9 |
The window behind the Toolbox is the Animation Editor where all Keyframe Animations are edited. Since Ventuz isn't a linear animation system this editor doesn't show a common linear timeline of the entire scene. It allows to edit animation fragments which are combined together into more complex interactive logic or data related triggering. See Animation and State Engine for more details.
Text Editor
| F6 |
The next window behind the Toolbox is the Text Editor. It is used to edit plain text, XML or expression code. This editor is directly bound to the Property Editor and allows editing the text/string values of a property shown in the Property Editor. If an input property is connected to the Text Editor its editing area in the Property Editor is highlighted in orange color.
Messages
| F11 |
While there are other windows like the Animation Editor which we will omit in this document, it is important to mention the Message View. This contains a log of error messages and general information that might be important when something is not working properly. Since it is so important, there is a small messages icon in the lower-right corner of the application, right next to the current date and time. When a new error has been added to the log, a red exclamation mark will blink over the icon.
Stage Editor
| CTRL + F12 |
Another window which is not shown in the image above is the Stage Editor. This editor gives a global overview of all loaded scenes and the structure they are nested in each other. It also helps to track scenes loaded or unloaded by Remote Control Applications. See Scene Management and Stage Editor for more details about the Stage Editor.
Project Data Editor & Scene Data Editor
| SHIFT + F12 | , | F12 |
The Project Data contains properties that do not belong to any individual node but the project itself. They can be bound to any node in a scene regardless of their location, whether they are on the root level or deep within a hierarchy of containers. They are also shared between all scenes in a project. Scene Data works similar to Project Data but belongs to a particular scene. See Project Data and Scene Data for more details.
Texture Shading Editor
| F7 |
The non-dockable Texture Shading Editor is used to adjust low-level texture shading or blending options for the selected Texture Node.
Shader Editor
| Ctrl + F7 |
Ventuz supports customized shaders via the HLSL Shader Node. The Shader Editor is a dedicated docking window to develop shader code. See for more information.
Dynamic Help
| SHIFT + F1 |
A great way to learn Ventuz is by activating the Dynamic Help via Menu/Help/Dynamic Help. This adds a yellow bar at the bottom of the application which will show the name and a short description of the item under the mouse cursor. Press F1 to open the Ventuz documentation and get even more information.
Changing the Layout and Docking Windows
The Ventuz interface is entirely customizable. In order to change the layout, simply tear off a window by drag it by its name or tab, at which point it will become a floating window. To dock it, simply place it according to the onscreen hints that appear. Naturally, if things get out of hand and windows are closed, hidden or the layout has gone entirely off the deep end, you can always reset it via the menu point as mentioned at the top. You can also save your layouts and switch between them for different tasks, for example.
Fullscreen
Screen space is at almost as important as reliable hardware if it you need to work on small displays. Therefore you can switch to either of two fullscreen modes in Ventuz under View, or by pressing F11.