Property Editor
Table of Contents
The Property Editor lists the input and output "parameters" of the node selected in the Hierarchy Editor or Content Editor. It also displays the properties of selections in other editors, such as the Animation Editor or Project and Scene Data. Only the properties of Nodes can be bound to other nodes or can be animated. Other properties shown in the Property Editor can only be viewed or edited.
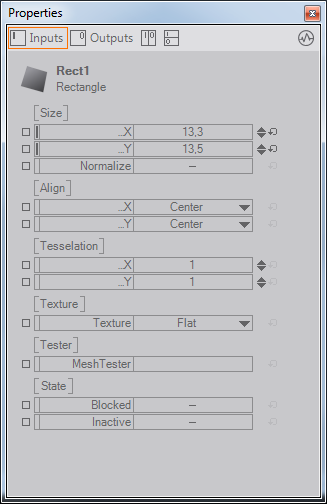
The following screenshots shows the properties of a Rectangle node:
The top row of buttons selects whether only input, only output or both property types in a split view should be shown. The button on the top right is the Monitor Values button. When activated, the user interface will update the shown values every frame. This causes a small performance penalty but is great for understanding what is happening in a scene. When deactivated, the values are only updated when the selection changes or the user chooses another of the four view buttons (input, output, splits).
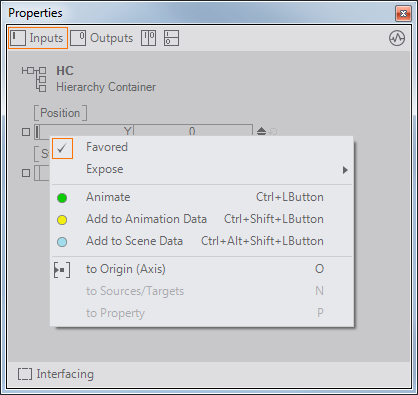
Favored
Below the icon, name and type of the Node, the properties are listed, grouped in categories.
You might not see all these properties depending on your Ventuz configuration. The default behavior is to only show Favored properties when the selection is done in the Hierarchy Editor but show all when the selection is done in the Content Editor.
A property is favored to indicate that it is among the ones that are most often used by a typical user. This is visualized by a black bar on the left of the name column (in this case only the X/Y properties). One can access all properties by either selecting the node in the Content Editor as opposed to the Hierarchy Editor or by unchecking the "Show only favored Properties" option under Tools/Options/Tree Editors.
To mark a property as favored, double click on the small, left-most column (not the little box at the very left!). This column is only present when the selection has been done in the Content Editor.
If a hierarchy node is selected in the Hierarchy Editor, all favored properties of all content nodes bound to that hierarchy node are shown as well. For example, the file property of an Image Loader attached to a Texture Node is shown when the texture node is selected.
Editing Values
Each row in the Properties Editor represents a single property. In the middle are the two rows for the name of the property and its current value. The value can be changed by double  click on the value row or by using the arrows to the right. The bent arrow resets a property to the default value. One can also click and drag the value row to decrease a value by going to the left or increase it by going to the right. The CTRL, ALT and SHIFT modifier keys can be used to slow this down or speed it up. During this interactive editing with , a click
  or pressing Esc will reset the property to the last start value.
TAB navigates through all editable properties also for siblings.
Integer values when entered with a leading 0x or a leading # are interpreted in hexadecimal. Examples: 0xA5=165, #400=1024
Binding Values
Instead of manually setting a property to a specific value, it can be bound to the Output Property of another node. Click and drag the name row entry of the property to another node in the Hierachy Editor or Content Editor. When releasing , a list of compatible output properties will appear if multiple compatible output properties exist; otherwise the binding will be established immediately.
An Input property is bound to an Output property, not the other way round. Think: This gets changed, by that.
There are two other slightly different possibilities to bind properties:
- Drag the input property with to another node: this will provide a pop-up with all available output properties. There you can select the desired output.
- Drag the input property with to another node and wait until the Property Editor displays this node. With pressed move to the Output tab of the Property Editor and drop the input property on one of the output properties.
As long as an Input Property is bound, it will update its value whenever the output property changes. For example, the X-Rotation property of a Axis node can be bound to a Mover node to continuously have objects under the Axis rotate around the X-axis. Binding of node properties is at the heart of Ventuz and allows the creation of very complex logic without having to program a single line of code.
For more information, see Nodes and Bindings.
Animated
Instead of binding a property, it can also be animated by a Keyframe Animation. To animate a property, either drag it to the Animation Editor or press CTRL while clicking on the property name. For more information on animation, see Animation and State Engine.
Data bindings
Similar to the animated binding, properties can be added to Project, Scene and Animation Data by either draging them to the desired editor, using the context menu entries or the shortcuts CTRL SHIFT and clicking to add a property to Animation Data and CTRL ALT SHIFT and clicking to add a property to Scene Data.
Events
Most properties represent values that influence or are generated by a node. A number of nodes also generate or listen to events that fire when a certain situation arises. The following screenshot of the Touch Button node show both input and output properties and events.
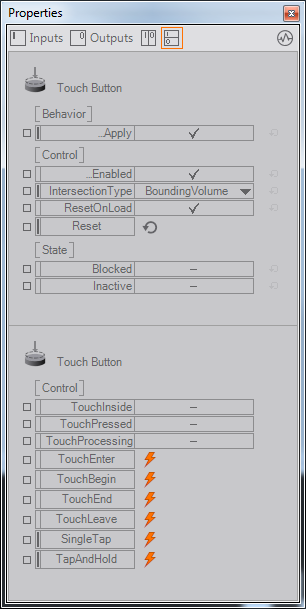
The red square next to the Reset property can be clicked to fire the Reset event, in this case causing the button to reset to its internal state. The output events on the other hand fire when a certain situation occurs, for example the SingleTap event is fired when the user presses and releases the button within a short timeframe. Apart from triggering the action the button is intended for, this could, for example, also be used to animate the color when the button is pressed to give the user a visual feedback.
Exposing
The small square on the left indicates the exposure state of the property. By double-clicking on it, the user can assign a name, category and default value of how the property should appear on the parent container level. For more on exposing, see Containers and Interfaces.
Navigation
If properties are exposed or bound to other nodes, it might be necessary to see where a value actually comes from. It is possible to navigate to these source nodes via a context menu in the Property Editor.
If one wants to navigate to the node that exposes its properties to the higher container level, a long click on the interesting property will display a context menu. Not all menu entries are enabled. This depends on the exposing level and the binding state of the selected property. For the navigation in an Exposing hierarchy the menu entries to Origin and to Origin Root are useful. to Origin navigates inside a container to the node that exposes the selected property. This can be any of the Ventuz node. to Origin Root navigates to the root of an exposing chain over multiple container nodes. In this case the destination node can be any of the Ventuz nodes except the container nodes.
If an input property is bound, the menu entry to Source Node will navigate to the node which is bound to the selected property. The navigation to Property is only possible if the Favored option is enabled. In this case a Hierarchy node inherits the favored input properties of all bound nodes for display in the Property Editor. Selecting to Property on such an inherited property will navigate to the real owner of this property.
Folding/Collapsing
A category of properties (for example the "Size" category in the above screenshot) can be collapsed by right-clicking on its name.
Custom Model
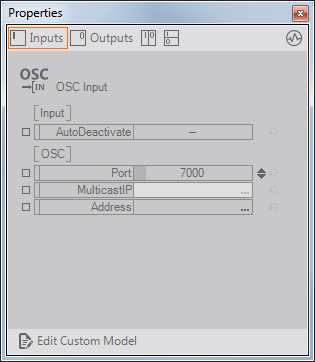
Some Nodes like OSC Input Node or the Script Nodes can have a user-defined number of Properties. The ability to add or remove properties is called a Custom Model. It is usually accessed by a button at the bottom of the Property Editor.
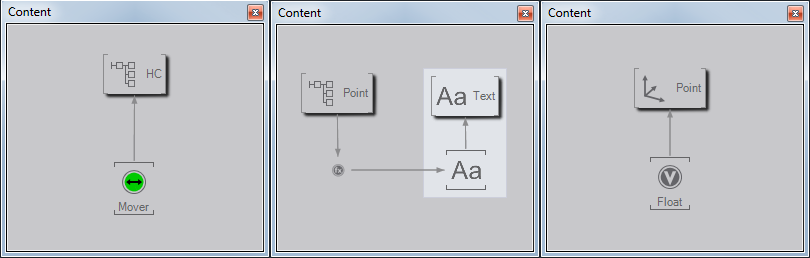
Color Highlights
In some of the above screenshots, one of the boxes containing the name or value of a property has a different color than the rest:
- Green: The property is bound to an Animation Channel. Any changes done to this property will be lost when the animation is played.
- Light Red: The string property is currently linked to the Text Editor window. Instead of changing its value in the Property Editor, use the Text Editor instead.