C# / VB Scripts
Table of Contents
 | C# Script | A content node that can host a piece of C# source code in order to extend Ventuz with custom functionality. |
 | VB Script | A content node that can host a piece of Visual Basic source code in order to extend Ventuz with custom functionality. |
BE AWARE OF THE FACT THAT FAULTY SCRIPTS CAN FREEZE OR CRASH THE WHOLE VENTUZ APPLICATION! E.g. unhandled exceptions in background threads will crash Ventuz. There are no mechanisms in .Net to safeguard such cases: https://msdn.microsoft.com/en-us/library/ms228965%28v=vs.110%29.aspx
Although some fairly complex scenes can be created using the existing Node functionality, there are certain effects that cannot be achieved by simply using Nodes and Bindings. For other cases, it is simply easier to add a small piece of code to the Ventuz scene that performs additional computations than implementing that functionality via nodes.
Each Script node provides three Compiler Options properties. These properties affect the result of the internal compiler output and they cannot be bound. The compiler creates a DLL from the source code and links it dynamically to the main Ventuz application. The Platform property specifies which version of Ventuz can link the resulting DLL. If the property is set to AnyCPU, the resulting DLL can be linked to 32 bit and 64 bit Ventuz. More important, the script can link all DLLs that where build to AnyCPU and those with the version of the currently running Ventuz application. If Platform is set to Current, only those DLLs with the bit-version of the running Ventuz application can be used in the script.
A 32 bit Ventuz cannot use 64 bit DLLs and a 64 bit Ventuz cannot use 32 bit DLLs in the Script nodes!
The Optimized property specifies if the compiler should perform code optimizations for the resulting DLL.
The property UnsafeCode defines if the unsafe keyword and thus pointer operations are allowed in the C# script source code. Visual Basic .Net does not support unsafe code.
Each Script node can be given a number of additional input and output properties by the author via the Custom Model mechanism. Each of those properties is reflected in the script source code, thus providing a connection between the source code and the Ventuz scene.
Upon loading a scene, each script node has to compile its source code into executable operations. A large number of scripts in a Scene can increase the load time of that Scene quite substantially!
Script Editor
By double-clicking on a script node, the Script Editor is opened. The dock window on the left shows the input and output properties added to this node by the author of the script. By pressing the add button, new properties for float values, strings, methods and so on can be created. The dock window also contains a tab for showing the references to assemblies (i.e. DLLs) that can be used in the script.
The main area of the Script Editor is of course assigned to the source code. The editor offers many comforts of professional IDEs like context highlighting and auto-completion. While changing the code, the Script Editor tries to detect syntax errors on the fly and will list them in the Error List at the bottom of the Script Editor.
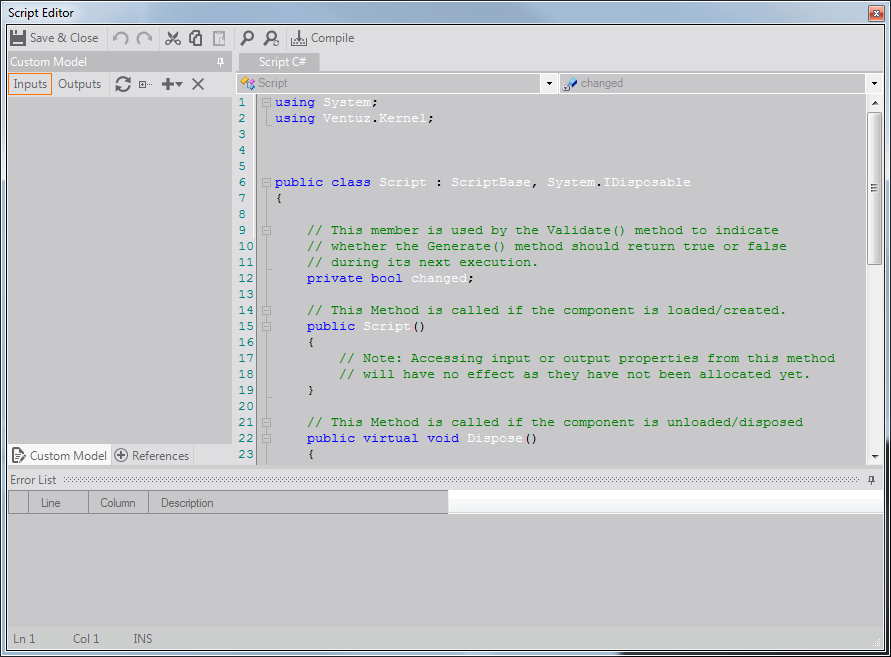
The code can also be explicitly compiled by pressing the Compile button in the menu bar at the top of the Script Editor. In order to be able to execute a script, the code has to compile without errors.
The Script Editor usually does a fairly good job of detecting problems. However, there are errors that the syntax highlighter will not be able to detect but the compiler will. Do not assume that just because the syntax highlighter does not detect any errors there are none!
By pressing Save & Close, the changes will be saved, the code compiled and the editor closed.
Script Structure
When a script node is dragged to the Content Editor, a source code skeleton which contains all mandatory member functions is generated automatically. The following will discuss the C# script code only, the Visual Basic version being exactly the same except for the obvious language differences.
using System;
using Ventuz.Kernel;


public class Script : ScriptBase, System.IDisposable
{
    // This member indicates whether the Generate() method has to return true or false.
    // If the Output values of this script change, Generate() has to return true to
    // trigger a validation of the Nodes that are bound to the Output values of this script.
    private bool changed;

    // This Method is called if the component is loaded/created
    public Script()
    {
    }

    // This Method is called if the component is unloaded/disposed
    public virtual void Dispose()
    {
    }

    // This Method is called if an input property has changed its value
    public override void Validate()
    {
    }

    // This Method is called every time before a frame is rendered
    public override bool Generate()
    {
        // return true, if output values have been changed
        if (changed)
        {
            changed = false;
            return true;
        }

        return false;
    }
}
For the content of the following discussion, it is assumed that the reader is familiarly with the concepts of Bindings and Validation as well as with the C# programming language itself.
Any reader proficient in C# should be familiar with the concepts of construction and disposing. The constructor (i.e. Script()) is called when the node is created (usually as part of loading the scene) while Dispose() is called when the node is destroyed (usually as part of closing the scene). It is the authors responsibility to de-allocate unmanaged resources and close critical resources like file handles or net sockets in the Dispose method. For more information, please refer to the MSDN documentation on garbage collection in general and disposing in particular.
The Validate() and Generate() methods however directly mirror the way the standard Ventuz nodes are implemented internally. Since re-performing a nodes functionality every frame is too expensive for realtime applications (imagine a mesh node allocating its memory and recomputing vertex positions every frame), a node should perform as much of its computations only as a reaction to input properties changing. As long as the input properties keep the same values, there is little need to do any computation. One exception are nodes like the Mover node which react on time progressing, another one are nodes which react on external sources of information.
To support this "caching" mechanism, the scripts Validate() method is called whenever one of the input properties changes. This is the place to perform the majority of computation and update the output values or store the results in internal variables.
In contrast, the Generate() method is called every frame, therefore computation should be kept to a minimum. There is however one very important task the Generate() has to perform and that is to cause nodes bound to the scripts output properties to validate themselves. Assigning a value to a scripts output property will only change the value but not trigger the bound nodes Validate() method. Unless the Generate() method returns true, bound nodes will not be invalidated.
The values of output properties can be updated at any place in the script including the Validate() method. However, properties bound to those outputs are only notified of the change when the Generate() method returns true.
Obviously, the Generate() method should only return true if and only if the values output properties have really changed, for very much the same performance considerations as above. The script skeleton therefore has declared a Boolean called changed. If the Validate() method updates output properties, it simply should set changed to true and the default implementation of Generate() will do the right thing.
Accessing Properties
Input and Output Properties that have been added to the Script node via the Custom Model dialog are accessible from the script code by their (case-sensitive) names. If an input property Amount and an output property Sum has been added, the script code might look like this:
public override void Validate()
{
    // Read value of input property
    float len1 = this.Amount;

    // Do some arbitrary logic or code (here we check if the
    // input variable is larger than 12)
    if ( len1 > 12.0f )
    {
        // Assign a new value to the output.
        this.Sum = len1 * 10;

        // Set changed to true so Generate will return true during
        // it's next call.
        changed = true;
    }
}
Output properties of type Array cannot be set component-wise! The complete array must be set at the same time. E.g.: MyFloats_out[8] = 2.3f; is not possible and results in a compiler error!
Adding an Input Method property to the script and then double-click on the entry will generate a method declaration with the name of the property with an added prefix On. If an Input Method Reset is added the corresponding method in the script code is called OnReset(). To trigger Events that have been added via Custom Model the name of the Event must be called from the script code. To trigger the Event Activate, the script code should look like this:
public override bool Generate()
{
    //... some arbitrary code before the call

    Activate();

    //... some arbitrary code after the call
}
Note that Methods and Events can receive and send integer arguments so e.g. the Activate event code can look like this: Activate(12).
Extended Scripting
While it is possible to use external DLLs or dynamically load .net assemblies via C# language constructs (P/Invoke; .Net Reflection), the Script Editor provides the possibility to select external .Net DLLs and use them from within the script. To add external DLLs go to the References section of the Script Editor and click  on the GAC Assemblies folder. Clicking Add References will bring up the browser to select external DLLs. To remove a DLL click on it and select Remove Reference.
Only .Net Assemblies which are registered in the Global Assembly Cache (GAC) can be added to the GAC Assemblies list!
If an external custom DLL was updated and it is referenced from a script, it is necessary to restart Ventuz to make sure that the script references the newest version of the external DLL and the changes have been taken into account.
Automation
In addition to reading and writing input and output properties of the Script node itself it is possible to load scenes and resources, configure loaded scenes and de/activate them on ScenePorts.
The script provides access to Scene Data properties and methods and allows setting of input properties, reading output properties and triggering methods. All not locked and not bound ScenePorts can also be accessed to host and de/activate scenes. These scenes can be loaded and validated (asynchronously) from within the script. The possibilities are similar to those of the Remoting API.
The class Script contains the member Scene which provides methods and properties for the described functions above through the IScriptScene interface.
The full documentation of all methods and properties can be found in the separate Ventuz Remoting API Help File in the Ventuz installation folder.
It is important to know that there are some commands on the IScriptScene interface which are processed asynchronously in a non-blocking manner. These commands are:
- LoadScene() if the loadAsync flag is set to true. The duration of this command is undetermined but the loading status can be queried by the GetLoadValidateProgress() method.
- ReleaseScene() if the releaseAsync flag is set to true. The duration of this command is undetermined.
- Set(), Invoke(), SetScene(), SetPortActive() commands are processed in the next possible frame to assure the correctness of the node validation process.
Here is an example how to iterate through all images in the project folder and set the according VentuzUri to the File property of an ImageLoader node added to SceneData? as ImageUri:
public override void Validate()
{
    IScriptScene iss = this.Scene;

    // get all image file names in the project folder
    if ( this.images == null )
    {
        this.images = iss.GetFiles(Ventuz.Remoting2.DataPool.Images);
    }

    if (ImageIndex < this.images.Length)
    {
        // construct VentuzUri for current ImageIndex property
        VentuzUri uri = VentuzUri.FromDataPool(Ventuz.Remoting2.DataPool.Images, this.images[ImageIndex]);
        // set File property to SceneData property 'ImageUri'
        iss.Set(new string[]{"/ImageUri"}, new object[]{uri}, null, null);
    }

    changed = true;
}
The following example shows how to initiate asynchronous loading and validation of a scene from a script:
IScriptScene newScene = null;
float lastProgress = 0.0f;
SceneStatus lastStatus = SceneStatus.None;

public bool OnLoadScene(int arg)
{
    // reset parameter
    Progress = 0;                   // output property on this Script node
    lastProgress = 0;
    lastStatus = SceneStatus.None;
    changed = true;

    // schedule async scene loading
    newScene = this.Scene.LoadScene("MyTicker", true, false);

    return false;
}

public override bool Generate()
{
    // check load/validation status
    if ( newScene != null )
    {
        // get load/validation status for newScene
        SceneStatus status;
        Progress = this.Scene.GetLoadValidateProgress(newScene, out status);

        if ( lastProgress != Progress )
        {
            // if anything changed set output property
            lastProgress = Progress;
            changed = true;
        }

        if ( status == SceneStatus.Ready && lastStatus != status )
        {
            // load/validation done - trigger event on this Script node to inform about success
            lastStatus = status;
            Loaded();
        }
    }

    // return true, if output values have been changed
    if (changed)
    {
        changed = false;
        return true;
    }

    return false;
}
Logging messages
It's possible to write Log messages to the Designer Message View window and the Ventuz Log files. To do so use the VLog class and its static log methods like Info(...), Warning(...) or Error(...):
   VLog.Info("Info only");
   VLog.Info("Module name", "Info text");
   VLog.Info("Module name", "Info text", VPopup.Never);
Debugging with external Debugger
It is possible to attach an external Debugger to the Ventuz Script nodes. This provides the user with the full functionality of the attached Development Environment. Supported Debuggers are:
- Visual Studio 2008
- Visual Studio 2010
- Visual Studio 2012
- any other JIT debugger for .net 3.5 and higher.
Enable Debug for the selected Script node by pressing the respective button at the bottom of the Property Editor. The state of the Debug option is not saved with the node. After re-loading a scene, the Debug option is always off.
A programmatic break-point can be triggered by calling the method BREAK(). This will automatically attach one of the available Debuggers if not already done.
| C# |
|---|
public bool OnMethod1(int arg)
{
        BREAK();
        return false;
}
| VB |
|---|
Public Function OnMethod1(ByVal arg As Integer) As Boolean
        BREAK
        Return False
End Function
Do not edit code in the text editor of the Debugger as changes will not be transferred back to the script node. Only edit the script's code inside the Ventuz Script Editor! If the script source code is modified inside Ventuz, it gets recompiled into a new assembly and loaded (linked) into the Ventuz process. Since the .net Runtime does not provide any way to unload an assembly, all previous versions of a script are kept in memory (see http://msdn.microsoft.com/en-us/library/ms173101%28v=VS.100%29.aspx)! As soon as the code has been modified and recompiled in Ventuz, the code displayed within the Debugger as well as bound breakpoints become invalid as they still refer to the old assembly!
If a Debugger is attached to the Ventuz process, the script can print text to the Debug output.
Console.WriteLine("This is a message from the Script");
The Debugger can be detached from the Ventuz process by simply closing it.
The DEBUG symbol is defined if the Debug option is enabled! Compiler directives such as #if or ConditionalAttribute are interpreted as expected.
#if DEBUG
  // ...
#else
  // ...
#endif
[Conditional("DEBUG")]
private void Print( string message, params object[] args )
{
  Console.WriteLine( message, args );
}