Render To Disk
Ventuz supports two ways to create image sequences from any Ventuz scene. First there is a GUI-based Render-To-Disk functionality available in Ventuz Designer. Additionally it is possible to create image sequences via a dedicated Remoting API.
Restrictions
If a custom Render Setup is used Ventuz always renders in the resolution of the current Render Setup in the current mode (Machine or Cluster Preview or Production Preview). The result is scaled down to the actual output resolution. This may result in scaling artifacts!
Since rendering to disk is usually faster than real-time, any live video source appears with a corrupted timing
In internal software key mode the Live Video background is not part of the Render To Disk result.
For both cases, the Render-To-Disk process is divided into two main steps:
- Recording of user interaction or remote commands (only in interactive mode)
- Playout or rendering of the loaded scene with the previously recorded data
In this second step the actual creation of the image sequence takes place.
GUI-based Render To Disk
Overview
To start the GUI-based Render-To-Disk functionality, select Render To Disk in the Renderer menu of your Ventuz Designer. This will bring up a dialog which initially looks as follows for the Control tab in the Interactive mode:
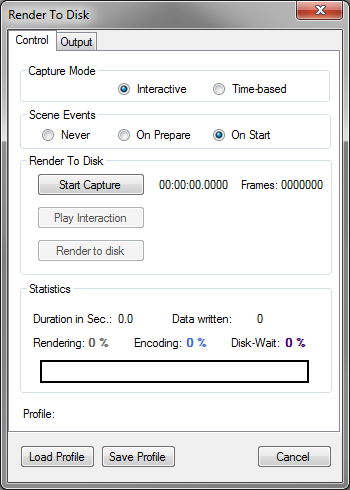
The Control tab provides some scene initialization options and the main controls for the recording and playout steps. The Scene Events option specifies if the active scene should receive a Scene Activate event when the playout starts. If this option is either set to On Prepare or On Start, the scene will act as if it just has been loaded. The option On Prepare is only available in Interactive capture mode. In this case the event gets fired before the initialization phase of the recorded interaction. Nodes like Scene Event, Movie Clip as well as state based Keyframe Animations react on Scene activation.
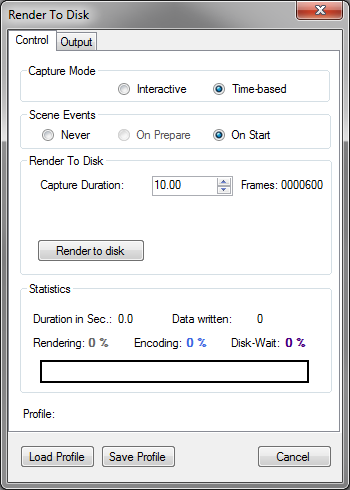
The option Capture Mode specifies if interaction with the scene via mouse, keyboard, touch devices or TUIO devices should be captured during the recording step (Interactive mode). In Time-Based mode, only a capture duration can be specified and scene interaction is only possible via the Scene Activate event.
In Interactive mode, the Render To Disk section provides controls to start and stop the recording steps. If user interaction has been recorded, it can be played back by triggering the Play Interaction button. The actual playout to disk is started by pressing the Render to disk button. Note that both buttons are disabled if no recorded data is available.
The interaction recording is divided into two phases: in the first phase (preparation) the user can record, reset and initialize inputs; in the second phase the inputs for the actual playout are recorded.
In time-based mode only a capture duration can be specified which defines the number of frames to capture.
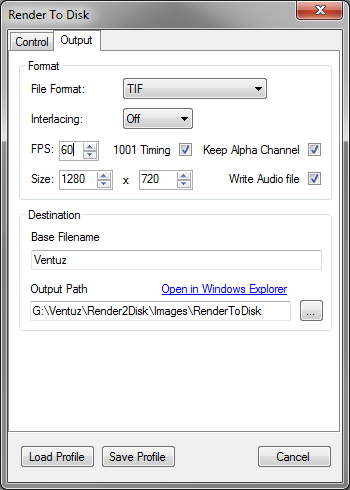
The Output tab provides options to specify the image or clip format of captured frames, the frame resolution, the capture frequency, the file naming and the destination folder.
Four Image File Formats are currently available, all of them supporting an alpha channel: BMP, PNG, TGA, TIF. Following movie formats are available: the QT Animation format writes a Quicktime Animation (loss-less RLE compression) in a MOV container; the HuffYuv writes a movie with the according codec to an AVI container; the XDCAM format creates movies in XDCAM 442 format to MXF container. Note that the XDCAM format only supports the standard 720p, 1080p and 1080i broadcast formats.
For Render-To-Disk in XDCAM format an additional encoding License Option is required! Please contact Ventuz Sales for license questions. Without license the created movie is branded with a Ventuz logo.
The Interlaced Mode option specifies if the captured frames are saved in a progressive mode (Off) or two consecutive frames are saved in an interlaced format (On).
Keep Alpha Channel option specifies if the alpha channel of a captured frame should be preserved or dismissed. The removal of alpha is a separate operation because a Ventuz scene frame is always captured with alpha.
If the option Write Audio file is enabled a .WAV file is written. This file is always two channel, 48000Hz PCM, 16bit that contains the audio passed to the first stereo pair of the Ventuz audio output device. See also Audio Devices
If speed is an important factor, PNG is not a good choice. It is the slowest format to encode, although generating the smallest files...
The FPS value defines the frame-rate of the image sequence. A value of e.g. 30 will generate 30 images for every second of rendering. If 1001 Timing is enabled, the resulting frame-rate is calculated by FPS * 1000 / 1001. This provides the possibility to capture with frame-rates like 59.94 and 29.97.
There is an important difference regarding timing between the Interactive and Time-based mode:
In Interactive mode, the rendering timing during the input recording and playout phase is based on the FPS settings in the active Ventuz Project. This is necessary because the input is recorded during normal rendering with the Project frame-rate. To provide a correct animation timing of dynamic elements like Damper or the Interaction nodes, the rendering during playout is done with the same frame-rate. This means that in interactive mode capturing with e.g. 30 FPS will capture every second frame if the rendering/timing FPS is 60. In Time-Based mode timing and capture FPS are equal according to the value set in the FPS box. This makes it possible to create image sequences with e.g. 120 FPS.
In Interactive mode, the FPS value cannot be changed. It is taken from the frame-rate configured in the Ventuz Machine Configuration. Thus it is not possible to capture interaction in a scene running at 60 FPS and create a playout with 50 FPS!
The two Size values specify the render and capture frame resolution. The default value is set according to the Direct3D Project Properties. On graphics cards with sufficient memory this value can be set up to 16384 x 16384! Note that extreme resolutions will make the playout very slow and need huge disk-space!
The Base Filename defines the naming for the image files written to disk. A five-digit number is automatically appended to the base name so that the resulting image names look as follows:
<baseFilename>_xxxxx.<imageFormat>
The Output Path specifies the destination folder for the image sequence. Click on the Open in Windows Explorer link and a new Windows Explorer window with the specified path will be opened if the path is valid.
A Render-To-Disk profile with all settings and recorded user interaction can be saved and loaded for re-uses. Such a profile is not scene-dependent and can be used with any other scene.
Creating an Image Sequence
To create an image sequence from a Ventuz scene in Interactive mode, the scene must be loaded in the Ventuz Designer.
- Configure the Render-To-Disk dialog as required and press the Start Capture button.
- The button changes to Start Recording and a reminder to prepare the scene so that recording can be started is shown. This preparation phase is also recorded but will not be captured during playout.
- After triggering Start Recording, the recording start time will be saved as well as all user interaction with the scene. During recording, a red R will be flashing in the upper right corner of the Renderer output. If all user interaction has been fed in or the required recording duration has been reached, press the Stop Recording button.
- If recording succeeded, the Render to disk and Play Interaction buttons will be enabled. Play Interaction will start a playback of the recorded interaction data. Make sure that the scene is in the same state as when the recording started - otherwise the interaction playback might not match the scene states.
- The concluding playout of the image sequence is triggered by pressing Render to disk. Again make sure that the scene is initialized to the same state as when the recording started if this is not already handled by the recorded preparation phase.
Note that in Interactive mode only the interaction with the Renderer is recorded and not the interaction with the Designer GUI (e.g. Property Editor)!
Remote Render To Disk
For Remote-Render-To-Disk either a valid Ventuz Designer or a Ventuz Runtime + Remote R2D option license is required!
If it is necessary to create an image sequence of a remote controlled Ventuz scene, the Remote Render To Disk API comes into play. In combination with the Ventuz Remoting2 API, a fully automated and frame accurate image sequence playout system can be built. For further information on Remoting2, refer to the Remoting section and the separate Ventuz Remoting API help file in your Ventuz installation folder. The full documentation of the RemoteRenderToDisk class, which is used to remote control the render-to-disk process, can be found there as well.
A schematic Render-To-Disk Control Application would have to do the following steps to create an image sequence from a Ventuz scene:
- connect via Remoting2 to Ventuz
- load the appropriate scene
- connect to the render-to-disk service via RemoteRenderToDisk.Connect()
- start the render-to-disk mode in Ventuz via StartRenderToDiskMode()
- bring the scene to the necessary state by setting properties and invoking methods via Remoting
- start recording of remote commands by calling StartCommandRecording()
- feed in remote commands by setting properties and invoking methods arbitrary times; mind the correct time codes
- stop recording of remote commands by calling StopCommandRecording()
- bring the scene to the initial state that is the same as when recording started
- start the image sequence playout by calling StartPlayoutToDisk()
- stop the render-to-disk mode in Ventuz via StopRenderToDiskMode()
The timecode, necessary as parameter for starting/stopping the recording and for the remote commands, is actually a frame index. This implies that timings and the duration of the playout are dependent on the playout frame-rate. So if an image sequence of 10 seconds with a frame-rate of 30 FPS is the goal, 300 frames have to be recorded. An image sequence of 10 seconds with a frame-rate of 60 FPS would however require a recording of 600 frames.
Note that only recorded remote commands with a timecode greater or equal the start-recording and lower or equal the stop-recording timecode are processed during playout. It is not necessary to send remote commands in the chronological order during recording because they are ordered by time anyway before the playout starts.
During render-to-disk mode, it is not allowed to load, unload or validate a scene or to change the assignments of ports via remoting.
Remote render-to-disk mode is not yet supported by Remoting 4