Scene Management
Table of Contents
Introduction
The Scene Management enables a modular project design where complex scenes can be split into multiple sub-scenes, thus simplifying workflows in Ventuz substantially. It also covers the internal scene handling which is necessary for Remoting features (like loading multiple instances of the same scene) and the principle of Project Layout scenes. The integral parts of the Scene Management are the Scene Port node and the Stage Editor which visualizes the structure of nested scenes.
Scene Ports
The Scene Port (and its relative, the Slide Port node) can load scenes and integrate them in the host or master scene. This Host-Sub-scene construct acts the same way as if it had been built as one scene. Splitting a Ventuz Presentation into several sub-scenes which are loaded to a master scene has a number of advantages:
- If a Port is blocked by its Blocked property or by any parent node (Alpha, Switch, etc.) the loaded scene gets inactivated and the internal scene logic is turned off completely. In this state, the inner scene will not affect the overall performance at all!
- A Port can reference a scene by its name (URL) but can also reference a scene from memory. Thus Remoting is able to load a scene and assign it to a Port later. This technique allows switching or cycling scenes between Ports in Ventuz.
- Ports can load scenes asynchronously (i.e. in the background). A Progress value from 0% to 100% informs the hosting scene about the load progress. The Port also provides a Loaded and a Failed event to trigger scene logic inside the hosting scene (like a fade in/out animation).
A Port can be locked. This means Remoting or the Stage Editor (see below) are not able to change the scene-to-port assignment. One can either lock a port by checking its Lock property or simply bind the File property to a data source (e.g. URL node or Excel).
Every Scene can have an unlimited number of Scene Ports to host sub-scenes. The level of nesting is called the Scene Level. The scene level one usually works with is Level 1, the next lower level is Level 2 and so forth. Layout Scenes work at Level 0!
Every Scene Port has a name (the normal node name) and an Ordinal number starting at zero. This number is used to address Ports within a scene via Remoting. It is also important for Layout Scenes. The ordinal number can be changed via the node context menu in the Hierarchy Editor or the buttons at the bottom of the Property Editor.
A scene assigned to a Port can be opened and edited on-the-fly without the need to reload it into its current scene ports.
A scene-to-scene communication can be realized via the Interfacing mechanism as will be discussed later.
Stage Editor
When working with nested scenes and Remoting, one can easily lose an overview of which scene is rendered where. That is why Ventuz provides the Stage Editor (Ctrl-F12):
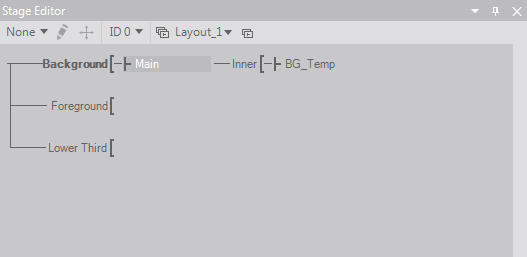
This editor shows all scenes in memory along with their available ports. Scenes can be loaded by Ventuz Designer, by a Scene Port or by Remoting. The editor uses a tree-like visualization similar to that used in the Hierarchy Editor. Drag&Drop makes it easy to assign scenes to Ports and track assignment changes via Remoting. The scenes currently opened in the Designer as well as the current Layout scene are visually marked in the Stage Editor.
The screen-shot above shows following situation:
- The Layout scene 'Layout 1' has 3 Scene ports: Background, Foreground, Lower Third.
- The Port 'Background' is selected as the Port where new scenes are assigned to (bold font).
- Scene 'Main' is assigned to Port 'Background' and is active/rendered in this Port.
- Scene 'New' is assigned to Port 'Background' too but is not active.
- Scene 'Main' contains another Scene Port ('Inner') which has loaded the scene 'BG_Temp'.
- Scene 'BG_Temp' is opened in the Designer to work on it.
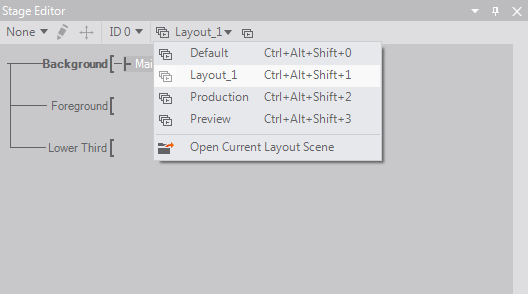
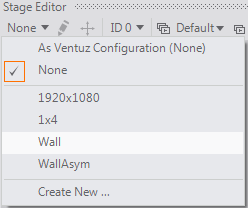
Inside the Stage Editor one can switch the Layout to be used by the current project (see below) as well as temporarily change the MachineID for the local machine in order to test cluster setups. The MachineID also influences the Clustermode Preview.
Both features are also accessible via keyboard shortcuts.
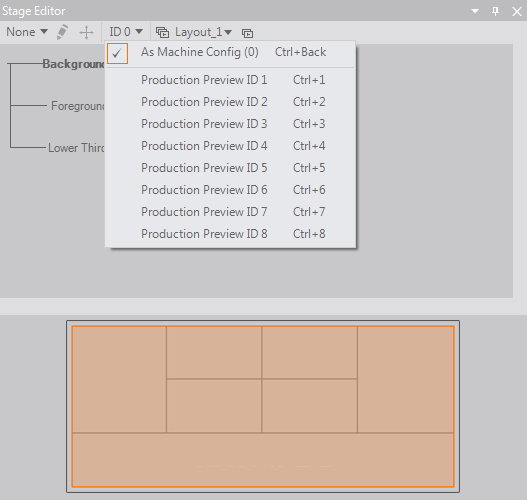
The editor itself is quite simple and has no hidden key shortcuts for special operations, only  drag & drop and the tool-bar on top!
  click and
  double-click on scenes and Ports to activate them.
Layout Scenes
A Layout is a scene loaded by the project in front of the first 'user-scene' on Level 1. Layouts are placed on Level 0 and can be used to create complex scene setups like multi-screen, stereoscopy, cube-projections, layering, etc. The big advantage of using Layouts is that one does need to modify the scene to switch to a different setup. E.g. the switch between a Design (used to build a scene) and Production (used to present the final result) setup in a 3-Projector-Shaping project just requires the change of the Layout in the Stage Editor.
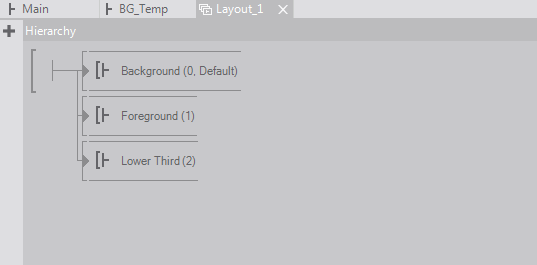
Layouts are usually very simple scenes holding at least one unlocked Scene Port, preferably Port Ordinal 0 (the default port) is not locked. A Layout scene is a normal scene: one can use all nodes, add properties to Project and Scene Data and insert layout related content. The possibilities of Layouts are numerous:
- A Split Layout with two ports (left and right) by using two Viewport/Background nodes splitting the screen in two parts.
- A layered scene Layout: imagine three Ports: Background, Content and Overlay!
- An effect-layout making a standard glow and mirror rendering!
- …
Layout scenes opened in the Designer via Stage Editor are marked with a special icon in the scene tab!
The configuration of Layouts is done in the Project Properties. The Layout section in the Project Properties dialog provides possibilities to create and edit Layouts.
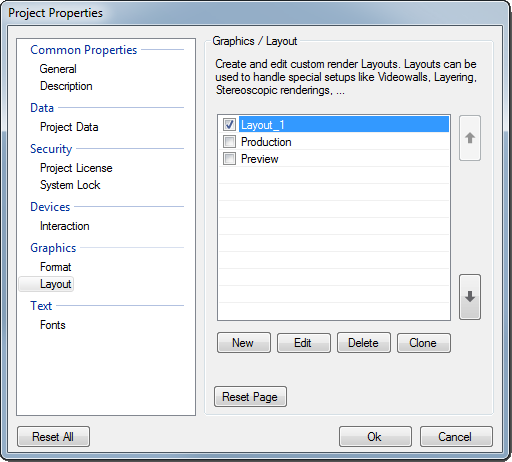
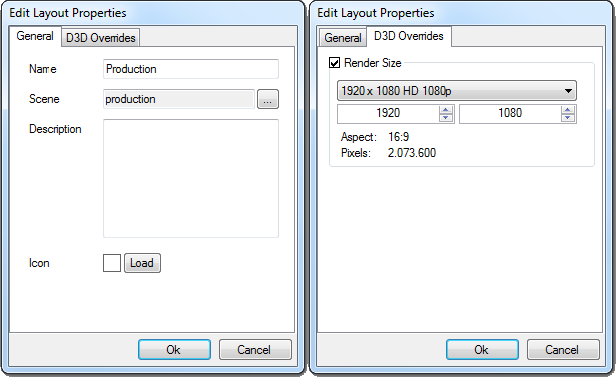
A Layout setup is created by  click the New button. In the General tab, a name for the Layout and the actual Layout scene file can be chosen. The fields Description and Icon can be used to help other users who work on the same project.
Every entry in the Layout list has a prepended check-box. The checked Layout is selected as the Runtime Layout which is automatically used if a scene is exported as Presentation (VPR) or the Ventuz Runtime is started in Director mode.
A very important feature of Layouts is the possibility to override the actual rendering and screen settings of the actual Ventuz project. In the D3D Overrides tab, a small check-box on every configuration group can be checked to specify new values for each particular Layout.
Clustermode preview
The Clustermode preview shows a preview of the currently active Render Setup.
To change the active Render Setup select one in the drop down menu on the top-left corner or in the Ventuz Configuration Editor.
Three different preview modes are available:
- Cluster Preview : Shows a preview of the whole Multimachine Setup, this mode is for designing content for a cluster. To activate the mode
 click on the border.
- Machine Design Preview: Sometimes it is worth to just see one machine of cluster to get a closer look to the content. To activate the mode
 click on the desired machine.
- Machine Production Preview: This mode shows the real production output your displays, projectors or the like will get fed with. To activate the mode shift +
 click on the desired machine.

Interfacing
Interfacing allows communication between Layout scenes and the inner scenes loaded via the corresponding Scene Ports. The properties which should be used for the inter-scene communication have to be exposed in the inner scene at the Scene Root level. To create the interface counterpart on Layout scene level, an inner scene with the appropriate exposings has to be loaded to a Scene Port.
If this Scene Port is selected in the Stage or Hierarchy Editor, the exposed properties of the inner scene should be displayed in the Property Editor. In this state it is only possible to modify these properties in the Property Editor but not to bind them to other nodes. To enable binding, the property has to be double-clicked or the context-menu via right-mouse-button has to be opened and Edit Interface… has to be selected. Do not forget to save the scene after this modification. After this the Interface is complete and reading and writing properties of the inner scenes from within the Layout scene is possible.
Export Scenes and Projects
Inside Ventuz Designer all Layouts of a project are loaded into memory to allow the user to switch between them without delay. The Ventuz Runtime only loads one Layout and does not provide the ability to switch Layouts during presentation!
If you export scenes/projects to archives, please note the following:
- Exporting a scene to VZA (Ventuz Design Archive)
A VZA export saves the current open scene of the Designer into an archive including all nested scenes and their resources. Resources can be deselected in the Resource dialog during export. - Exporting to VPR (Ventuz Presentation)
A Presentation export does not just export the currently opened scene! It actually exports the Runtime Layout as defined in the Project Properties (see above) and the current scene assigned to the Default Port of the Runtime Layout. If you need to add more scenes to your VPR, you can use the Resource Linker node to embed more scenes. The main scene can decide which scene to load during runtime! - Director Mode
If Ventuz is started in Director mode, it automatically loads the Runtime Layout if any is selected in the Project Properties.