Director Plug Ins
Table of Contents
Plug-Ins are small portions of custom code that can be loaded into and used by Ventuz Director to extend existing functionality. Instead of using some arcane scripting language, the Ventuz development team decided to use the standard Visual Studio tool chain. As a result:
- basically everyone who can use Visual Studio (the vast majority of software developers out there) can develop a Director plug-in
- there is a mature development pipeline including debuggers, profilers and more
- integration of 3rd party libraries (for example for database integration) is easy
Developing a plug-in requires knowledge of C#/WPF (Windows Presentation Foundation) as well as the Director Plug-In API. However, for an end user, using a plug-in is as easy as copying a DLL into the right folder.
Development Environment
There main requirements for developing a Director plug-in:
- An installation of Microsoft Visual Studio 2012 Express Edition (free) or higher (the Director SDK is built against .NET 4.0).
- At least some basic knowledge of the C# programming language as well as WPF (a recommended book for learning WPF is "WPF Unleashed" by Adam Nathan).
- A working Ventuz Director installation, most importantly the VentuzVS.vsix Visual Studio Extension file.
The Visual Studio Extension file provides a project template for creating Director plug-ins that will automatically setup everything required to build and deploy a plug-in. Inside the Windows Explorer, double-click the vsix file to install the extension. Since most users will not be developing plug-ins, this is not automatically done by the Ventuz installer but has to be done manually. Open Visual Studio and under Tools/Extensions and Updates verify that the extension has correctly been installed.
Creating a Project
To start a new plug-in, selectFile/New/Project... from the Visual Studio main menu. due to the extension, a new entry DirectorWindow is available under the Visual C# section. Select this entry, choose a name and location for your plug-in project and press OK. Next, the Ventuz Director Plugin Settings dialog will appear.
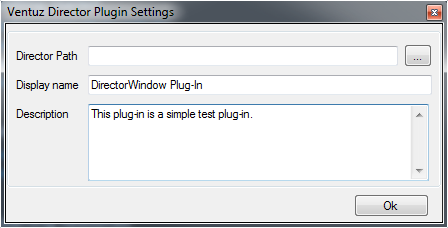
To test a plug-in, a Director instance is required. The extension will auto-detect the last Ventuz installation and use that application path. If for some reason the auto-detection fails or the plug-in should be developed against a specific Director version, the appropriate Director Path can be entered in the first text box.
The other two fields represent the end user name of the plug-in (not to be confused with the project name which can be any arbitrary name) and an end-user description of what the plug-in does. Once satisfied, press OK and a Visual Studio project will be created based on the specified values.
Currently, there is only one type of Director Plug-In supported which is that of a control which will be hosted inside Director in its own docking window along the build-in windows. Further plug-in types will be added with future releases.
The project automatically contains:
- The Plugin.cs main plug-in class file. Think of this as the main application class in a standalone program. Director will call methods in this class as the plug-in is used by the user.
- A WPF UserControl in Window.xaml: This will host the content the plug-in shows to the user inside its docking window.
- A WPF UserControl in Popup.xaml: This is shown inside a popup when the user clicks on the settings button in the top-right corner of the plug-ins docking window.
This is already a fully functional Director plug-in although it does not do anything besides showing an empty control. Before filling it with functionality, we will take a look at debugging a plug-in.
Debugging
Due to the Visual Studio Extension, debugging a Director plug-in is exactly the same as debugging any other c# program. Just hit F5 to launch the debugger. Behind the scenes, Visual Studio will launch the Director installation specified in the plug in settings dialog and inject the plug-in such that it can be used without copying it into your installation.
Set a breakpoint into the first line of
Plugin.Initialize(IDirectorApplication application)
by setting the cursor on that line and pressing F9. Inside Director, either create a new or open an existing show. To activate the plug-in, select Window/Windows... from the main menu. When clicking the New button, your new plug-in should part of the list of available windows. Select it and Visual Studio will come to the front as the breakpoint will be hit.
Interfaces and Libraries
A Director plug-in is a DLL that contains a class which conforms to the IWindowPlugin (or more general IPlugin interface defined in Director.Shared.dll. When Director tries to allocate a plug-in instance, it calls the Initialize method on that interface. The application parameter of this method contains an instance of the IDirectorApplication interface which is the plug-ins entry point to access Director functionality. Any operation the plug-in wants to perform inside Director is done via this interface.
#region IPlugin
public void Initialize(IDirectorApplication application)
{
    this.Application = application;
    this.window = new DirectorWindow3.Window(this);
    this.popup = new DirectorWindow3.Popup(this);
}

public void SetSettings(Dictionary<string, string> settings)
{
}

public Dictionary<string, string> GetSettings()
{
    return null;
}
#endregion

#region IWindowPlugin
public System.Windows.FrameworkElement PopupContent
{
    get { return this.popup; }
}

public System.Windows.FrameworkElement WindowContent
{
    get { return this.window; }
}
#endregion
The project template stores a reference to that interface for later usage and allocates both the main window control and the popup control. When scrolling further down one can see that the IWindowPlugin interface implementation does not do anything than just returning those pre-allocated controls when the PopupContent and WindowContent property getters are called by Director.
What remains in this class is the SetSettings/GetSettings methods which are called by Director whenever the plug-in should save/load its settings. This usually happens when the plug-in window is created, the window layout is changed or the Director show is saved. Also there is the IDisposable interface implementation. This method is called when the plug-in is de-allocated.
Cueing a Template
As an example for a simple, functional plug-in, let's create two buttons, one for cueing a specific template and one for taking the template.
User Interface
To create the user interface, open Window.xaml and replace the two Grid-tags with
<StackPanel>
    <Button Content="Cue" Click="Cue"/>
    <Button Content="Take" Click="Take"/>
</StackPanel>
Those are two WPF-buttons inside a stackpanel that will align the buttons vertically inside the plug-in window. The Content property specifies what is shown inside the button (i.e. the label) and the Click property associates each button with a method in the UserControl's code behind.
Inside Window.cs, we'll now define those two methods:
public void Cue(object sender, EventArgs args )
{

}

public void Take(object sender, EventArgs args )
{

}
Retrieving a Template
In order to cue a template, we have to retrieve it from the set of available templates and then tell Director where to cue it. To retrieve the template called "NS1L", we go through the plugin interface as follows:
Template template = plugin.Application.Show.Templates.GetTemplate("NS1L");
The quickest way find out what's accessible via the plug-in API is to double-click on the Ventuz.Director.Shared entry under References in the Solution Explorer. This opens the Object Browser window where one can navigate the various interfaces and their methods.
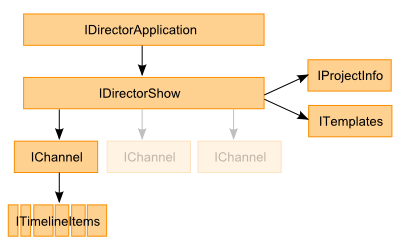
The interface follows a top down approach. plugin.Application returns an interface that can talk to the Director application as a whole. plugin.Application.Show access the currently loaded show. Inside the show is a collection of available templates and from that one we get the template with the right name. Quite obviously, the interfaces match the structure of how a user would access a template inside the Director user interface. He would go to the application, open a show, go to the templates window and then look for the correct name.
Creating an Instance
Once we have the Template, we have to create an instance of that template and the corresponding data. This is done with the DirectorTemplateData class. Besides the template itself, it also contains a Data object. This is a special kind of object called a Dynamic Object as its Properties are generated only the fly during program execution. For example, to set the template parameter FirstLine, one simply writes:
DirectorTemplateData templateData = new DirectorTemplateData(template);
templateData.Data.FirstLine = "Test";
Visual Studio will not know at compile time whether or not the dynamic object actually has such a member as for that it would have to analyze the template. When accessing a member which is not part of the Template's DataModel, an exception will occur which might even crash the whole application! Make sure to use try/catch-blocks and watch out for unexpected exceptions.
Cue & Take
Now that the template instance is ready, we have to cue it. The respective call is
plugin.Application.Show.Channels[0].CueAsync(templateData);
At the time of writing, Director only supports one Channel. However, multi-channel support will be added soon which is why the plug-in interface already requires addressing a specific channel number here.
Implementing the take button is even simpler. Again we go via the IPlugin interface from the application level down to the channel and then tell it to do a take.
plugin.Application.Show.Channels[0].TakeAsync();
Asynchronous Programming
Director is a multi-threaded application that places great emphasis on the fact that the application and its user interface should always be responsive, no matter what functionality is executed. But what happens when the user clicks one of the buttons in the plug-in? The main WPF UI thread processes the click and calls the plug-in method, preventing any UI updates until that method is done. This can easily freeze the user interface for a couple of seconds depending on how much work is done inside the method.
To prevent this, Director makes heavy use of C# Task objects and the Async framework. The latter allows the compiler to split a method into multiple parts and at certain points of the execution return to the caller (i.e. let the UI do other work) and resume at the same position later on.
Any method that wants to use that mechanism has to have the async keyword in its declaration. As a convention, one usually adds the suffix Async to the method name to visualize to the caller that this method may return prematurely. To prevent the user from clicking the button again once its operation has started, it is also a good idea to disable it.
public async void CueAsync(object sender, EventArgs args )
{
    this.IsEnabled = false;

    ...

    this.IsEnabled = true;
}

public async void TakeAsync(object sender, EventArgs args )
{
    this.IsEnabled = false;

    ...

    this.IsEnabled = true;
}
Just adding the async does not change the methods' behavior yet. The compiler needs to be told at what point it can safely jump out of the method with the await keyword. An await can be done on any Task object and the majority of potentially long running methods exposed in the Director SDK return a Task object. We want to await on the cueing and the taking as those will be the most time-consuming operations.
So the final implementation looks like this:
public async void CueAsync(object sender, EventArgs args )
{
    this.IsEnabled = false;

    Template template = plugin.Application.Show.Templates.GetTemplate("NS1L");
    DirectorTemplateData templateData = new DirectorTemplateData(template);
    templateData.Data.FirstLine = "Test";

    ITimelineItem timelineItem;
    try
    {
        timelineItem = await plugin.Application.Show.Channels[0].CueAsync(templateData);
    }
    finally
    {
        this.IsEnabled = true;
    }
}

public async void TakeAsync(object sender, EventArgs args)
{
    this.IsEnabled = false;

    try
    {
        await plugin.Application.Show.Channels[0].TakeAsync();
    }
    finally
    {
        this.IsEnabled = true;
    }
}
For the cue, retrieving the template and creating the template data should be reasonably fast so we do that before awaiting. Once the cueing is done and we have been returned the ITimelineItem instance, we might use it to present some further information to the user but that has been omitted for brevity. Finally, we re-enable the button. For the take, the plug-in control is disabled, the task is performed asynchronously and once it has finished, the control is re-enabled.
Modifying Project Data
Another common use case is developing a custom control panel that should modify project data (e.g. goals scored in a match). We'll use this to give an example on how to create WPF binding between a UI element and its respective data object. Let's assume we have a color each for the home and guests team that is part of the project data. How do we achieve something like shown in the following screenshot?
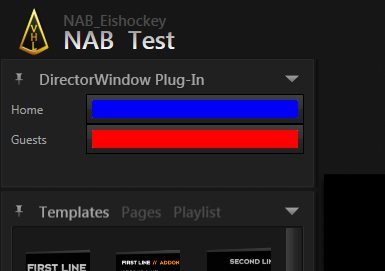
This example contains a number of standard WPF mechanisms like bindings, resources, converters, and using components from other DLLs. It is beyond the scope of this document to give the reader even a concise overview over WPF functionality and therefore this is only intended as something to follow through while using some other form to learn WPF!
User Interface
Again we start with a new Director plugin project. In Window.xaml, we add:
- a Grid for layouting purposes
- two TextBlocks (as labels)
- two ColorPickers
The row and column definitions of the grid either specify a fixed height/wide (i.e. 75), auto (take exactly as much space as the content in that cell needs) or * (take as much space as possible). Each of the controls inside the Grid use the Grid.Row and Grid.Column Attached Properties to specify what goes into which cell of the Grid.
However, WPF does not come with a pre-build color picker, so we are going to use the exact same one as used in Director!
<UserControl x:Class="DirectorWindow3.Window"
             xmlns="http://schemas.microsoft.com/winfx/2006/xaml/presentation"
             xmlns:x="http://schemas.microsoft.com/winfx/2006/xaml"
             xmlns:mc="http://schemas.openxmlformats.org/markup-compatibility/2006"
             xmlns:d="http://schemas.microsoft.com/expression/blend/2008"
             xmlns:ventuzControls="clr-namespace:Ventuz.WPF.Controls;assembly=Ventuz.WPF"
             mc:Ignorable="d"
             d:DesignHeight="300" d:DesignWidth="300">
    <Grid>
        <Grid.RowDefinitions>
            <RowDefinition Height="Auto"/>
            <RowDefinition Height="Auto"/>
        </Grid.RowDefinitions>
        <Grid.ColumnDefinitions>
            <ColumnDefinition Width="75"/>
            <ColumnDefinition Width="*"/>
        </Grid.ColumnDefinitions>
        <TextBlock Grid.Row="0" Grid.Column="0" Text="Home" VerticalAlignment="Center"/>
        <ventuzControls:ColorPicker Grid.Row="0" Grid.Column="1" Height="30"/>
        <TextBlock Grid.Row="1" Grid.Column="0" Text="Guests" VerticalAlignment="Center"/>
        <ventuzControls:ColorPicker Grid.Row="1" Grid.Column="1" Height="30"/>
    </Grid>
</UserControl>
For this to work, we added a reference to the Ventuz.WPF.dll to the project by right-clicking on the References entry in the project's Solution Explorer (the DLL is part of your Director installation, just browse for it). Then we added an XML namespace so we can access the controls in the XAML.
xmlns:ventuzControls="clr-namespace:Ventuz.WPF.Controls;assembly=Ventuz.WPF"
Value Binding
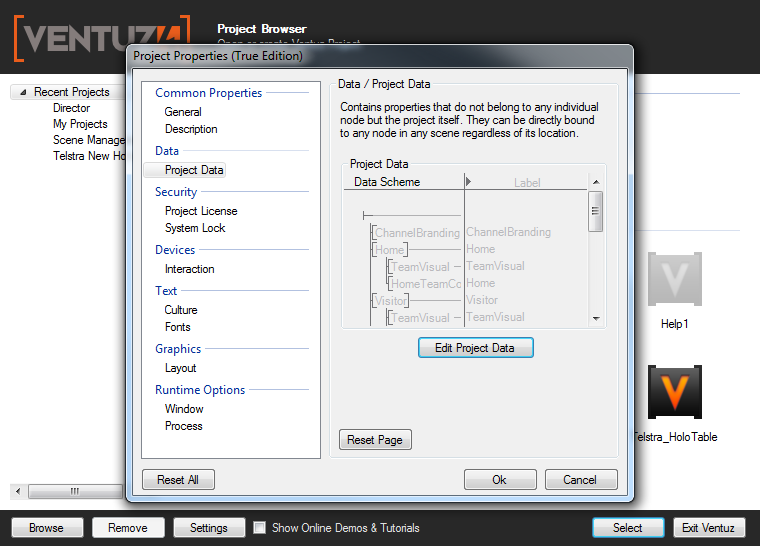
Now we have two color pickers, but they do not do anything yet. We need to connect the value of the ColorPicker with the project data. First, we open Ventuz Designer and right-click on the icon for our project and choose Properties / Data / Project Data Edit / Project Data and look for where the colors are. In this case, their path is Home/HomeTeamColor and Visitor/VisitorTeamColor respectively.
We close the Ventuz Designer and continue inside Visual Studio. By double-clicking on the Ventuz.WPF reference in the Solution Explorer, the Object Browser opens up and we can see that the ColorPicker has a property named DisplayColor. To connect those two ends, we add a WPF Binding:
<ventuzControls:ColorPicker Grid.Row="0" Grid.Column="1" Height="30" DisplayColor="{Binding Application.Show.ProjectData.Data.Home.HomeTeamColor}"/>
<ventuzControls:ColorPicker Grid.Row="1" Grid.Column="1" Height="30" DisplayColor="{Binding Application.Show.ProjectData.Data.Visitor.VisitorTeamColor}"/>
For a binding to work, the DataContext of the control needs to be set properly and from there the path specified in the binding should lead to the desired property. By checking the code behind, we see that the DataContext is set to our plugin interface and from there we can again drill down to the property we want.
Converters
Unfortunately, this still does not work. When launching the debugger and opening our plug-in, the Output window will print the following lines:
System.Windows.Data Error: 1 : Cannot create default converter to perform 'two-way' conversions between types 'System.Drawing.Color' and 'System.Nullable`1[System.Windows.Media.Color]'. Consider using Converter property of Binding. BindingExpression:Path=Application.Show.ProjectData.Data.Home.HomeTeamColor; DataItem='Plugin' (HashCode=50714607); target element is 'ColorPicker' (Name=''); target property is 'DisplayColor' (type 'Nullable`1')
System.Windows.Data Error: 5 : Value produced by BindingExpression is not valid for target property.; Value='Color [A=255, R=25, G=25, B=254]' BindingExpression:Path=Application.Show.ProjectData.Data.Home.HomeTeamColor; DataItem='Plugin' (HashCode=50714607); target element is 'ColorPicker' (Name=''); target property is 'DisplayColor' (type 'Nullable`1')
In plain English, both ends don't match! We need a converter for this which luckily is also part of Ventuz.WPF.dll. We add another namespace:
xmlns:ventuzConverters="clr-namespace:Ventuz.WPF.Converters;assembly=Ventuz.WPF"
Then we add an instance of the RGBAToColorConverter as part of our UserControl's resources (usually added as the first thing right after the end of the opening UserControl tag).
<UserControl.Resources>
    <ventuzConverters:RGBAToColorConverter x:Key="colorConverter"/>
</UserControl.Resources>
And finally, we use the converter in our bindings:
<ventuzControls:ColorPicker Grid.Row="0" Grid.Column="1" Height="30" DisplayColor="{Binding Application.Show.ProjectData.Data.Home.HomeTeamColor, Converter={StaticResource colorConverter}}"/>
<ventuzControls:ColorPicker Grid.Row="1" Grid.Column="1" Height="30" DisplayColor="{Binding Application.Show.ProjectData.Data.Visitor.VisitorTeamColor, Converter={StaticResource colorConverter}}"/>
Now everything works as expected. When the plug-in window is opened, the color pickers will contain the current color set in the project data and when making any changes, they are reflected inside the presenter runtime.
Deployment
Installing a plug-in on a end-user machine is fairly straight forward. In the Ventuz installation directory, create a folder called Plugins. Copy the DLL output of the Visual Studio Director Plug-In project into that folder and restart Director. That's it!