How to Add a Mirror Reflection
Table of Contents
Introduction
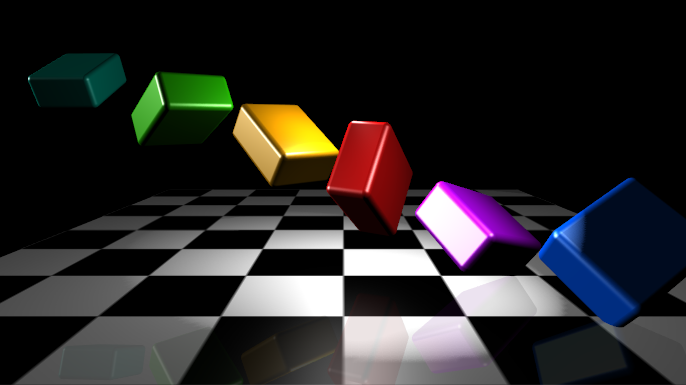
The following How To will show you how to add a reflective ground to a scene. While this is not a particular realistic reflection and only suitable for planar surfaces, it can be quite useful as a stylistic effect.
Principle
Realtime Rendering, as opposed to Raytracing, is generally not capable of calculating reflections. There are however two common techniques to fake reflections. Environment reflections are done by using a texture to map an image of the environment on to an object (see Simple Reflection Node). While this can be used for any surface regardless of its shape, its generally not very realistic and only suitable if the environment does not change.
A mirror reflection on the other hand tries to simulate an exact reflection but only works for a planar surface. The idea is to render the scene two times, one time correctly and one time flipped for the reflection.
The Scene
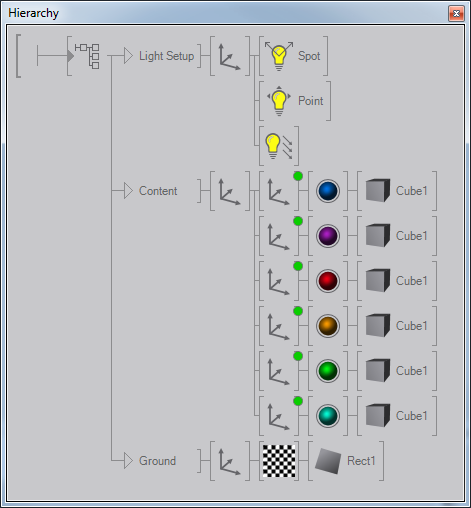
We will use a Hierarchy Container to put all the nodes required for the mirror in one place. Inside the container, add two more outputs to a total of three and rename them to "Light Setup", "Content" and "Ground":
- Light Setup: This will contain all the light sources that illuminate the scene. In our example, those are three different lights combined to give the scene an interesting look and feel. There is a Directional Light coming hard from the left, a Point Light in hovering over the center of the scene and a Spot Light shining from the upper right.
- Content: As content, we've used six Cube nodes, each given a different color and slowly spinning with the use of a couple of Mover nodes. The content itself is pretty much arbitrary for the purpose of this how to.
- Ground: This is a Rectangle that has been rotated by 90 degrees along the x-Axis using an Axis node. In addition, a texture has been applied to make it look less dull.
Finally, we added a Camera node to position the camera slightly up and tilt it back down a bit. To make things easier later on, we've arranged the scene so the ground plane is lying in the origin but that is no hard requirement.
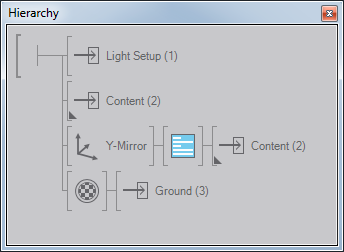
Mirror Container
As discussed, the main idea is to flip the scene and render it a second time. So add an Axis node and change its Y-scale to -1. If the mirror does not lie in the origin of the coordinate system, we would also have to add a translation to compensate for the offset.
After the Axis, we need to render the content again, so select the "Content" output and drag  it behind the axis while pressing CTRL + SHIFT. This will create a linked reference instead of a copy. If we would have created a normal copy, the Hierarchy Container now would have 4 outputs instead of 3. Finally, add an Alpha node before the "Ground" output and set it to 95% Value.
Since we flipped the world for the reflection, the orientation of the triangles is inverted. We need to add a Render Options Node to change the culling behavior to "Clockwise", otherwise we would only see the back-facing triangles instead of the front-facing ones.
Thus we have achieved a simple reflection shining through the ground, but there are still a number of things we can improve on.
Lighting
You may or may not have noticed that the lighting of the reflection is incorrect. The geometry is rendered upside down but the light sources still are at the same position, making the world in the reflection inconsistent with the rest of the world. If the point light for example sits above the ground for the real world, it has to be below the mirror for the reflection.
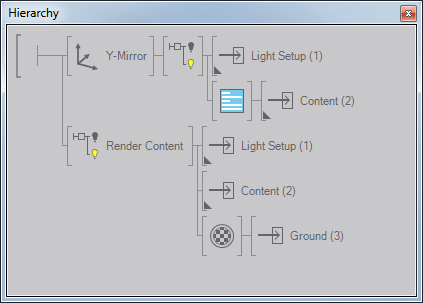
If we just add another reference to the "Light Setup" output behind the Axis, things will get to bright since there are now six lights in the scene. Light sources by default use the next free light index when they are rendered so each render call "adds" another instance of the light source (see Index property on Light Source Nodes). We have to isolate the lighting situation of the reflection and the normal rendering.
So we add two Light Groups and set their Inherit flag to false. Move the reflection part in one group and the rest into another. This will have Ventuz only use the lights defined in a group to render the objects in that group.
Transparency
One flaw that the above version has is that the ground is not drawn 100% opaque. While this lets the reflection shine through, parts of the background also can be seen. This can be fixed by rendering the group twice: Once with no transparency before the reflection is rendered and once afterwards with transparency to dim the reflection. The only drawback is that if we draw the ground before the reflection, the Depth Buffer will think the reflection is occluded and does not have to be rendered. So we add a Z-Testing node when the ground is drawn the first time to disable writing to the Depth Buffer.
Masking
Finally, the ground may or may not cover all the area the reflection is rendered in. We need to restrict the reflection to the area the ground is drawn. This is done using the Stencil Buffer. We add a Stencil Set Node and another reference to the "Ground" output. Activate the Layer 1 property in the Stencil Set and this will create a mask of the area the ground is drawn in. At the time the reflection is rendered, add a Stencil Test, activate Layer 1 as well as Inverse. This will restrict rendering to only those pixels where the ground was rendered during the Stencil Set.
Review
Lets have a final look of the complete container. First, we render the content with its light setup. The ground is rendered without writing to the Depth Buffer so the reflection will not be excluded. Also we create a stencil mask of the pixels covered by the ground.
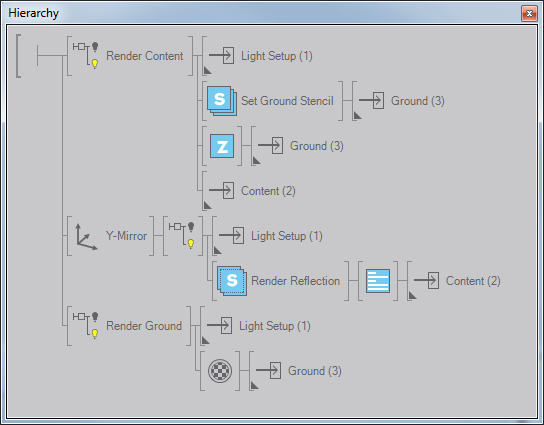
Then, we flip the world and render the content again as the reflection. Since the light setup is also affected and its isolated by a lighting group, the lighting will be consistent with the original.
Finally, we render the ground again with a small amount of transparency to cover the pixels rendered by the reflection. This way the ground will appear fully opaque in regions where the reflection doesn't shine through.
Conclusion
While there are still some minor issues with this reflection, it looks very plausible as long as the alpha value of the ground is not set too low. In particular the specular highlights on the objects will be inconsistent between the reflection and the original, but there is only so much we can do about that. Based on what you actually need, you might even want to use the simple first version we started with as it requires the least amount of render calls.
The mirror technique presented here is quite flexible. The mirror plane can have any orientation, just the properties in the axis have to be adapted. Using the stencil technique presented here, the ground can also have any shape as long as it is planar.