Importing 3D Geometry
Table of Contents
Introduction
Ventuz currently supports the import of five 3D file formats: DAE, 3DS, OBJ, RTG and X. Models in those formats have to be imported and converted to the native Ventuz Mesh Format (.vzm) before they can be used in a scene via a Mesh Loader Node.
Although some of these formats store information about lights, cameras, animation and so forth, Ventuz only imports the geometric data, the geometric hierarchy, material properties and textures. Currently, only the DAE importer supports import of camera data and animations.
In order to import geometry from any of the above formats select a node in the Hierarchy Editor to which the geometry should be linked to. Select File > Import > Geometry from the main menu and change the import options to best suite the way the model was created. Although the supported formats are standardized, modeling applications vary in how exactly they use a format. Some trial and error can be necessary when using models from an unknown source of origin or establishing a new production tool chain.
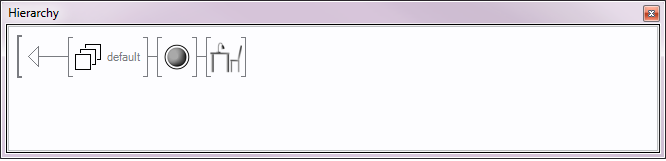
Once import is complete, a .vzm version of the model is stored in the Projects Folder Structure and a Mesh Loader Node is added to the scene hierarchy.
Common Import Options
The options are separated into different categories, the first of which is Faces. This option controls the order of assembling three vertices to one face or polygon. In real-time rendering, this order is important because it is used to distinguish between front-facing and back-facing parts of a surface and indirectly affects the visibility of a face (see Back-face Culling). The vertex order may differ dependent on the software that was used for the 3D export. If objects appear "inverted" or are invisible, try importing the file again with a different triangle-order.
Changing the option Flip Coordinates makes it possible to change the sign of any of the three coordinates of the vertices. This is usually used to counter the effects of using a right-handed coordinate system during modeling while Ventuz uses a left-handed coordinate system for rendering.
The option Flip Texture Coordinates affects the sign of the UV coordinates that are assigned to the vertices. For a proper texture mapping on geometries, Ventuz needs UV coordinates in the range 0 – 1.
A geometry does not necessarily have to contain UV coordinates. It is rather at the liberty of the artist to assign proper UV values or not.
A very interesting option category is Grouping. It contains the options Grouping and SingleMesh. Changing these options has impact on the resulting geometry tree in the Hierarchy Editor. To understand the effects of this Import Option, it is necessary to know how DirectX and thus Ventuz handle geometries.
The object that handles any geometry within DirectX is called a Mesh. A Mesh can be divided into several subsets where each of these Mesh subsets can have different materials and textures assigned to it. In general this is used to separate areas of an object with different material properties from each other but can also be used to store multiple independent objects within a single mesh. Storing many objects in one Mesh can result in better rendering performance than using a single Mesh per object.
If a Mesh containing multiple subsets should be rendered, the Subset property of the Mesh Loader Node can be used to restrict rendering to a specific subset. In the following example, a file has been imported that contains geometries of a table, chair and a desk lamp in one single Mesh, each object lying in its own subset.
Setting the Grouping option to ByMaterial assigns objects with the same material to the same Mesh subset. This means that our table-legs and tabletop would end up in the same Mesh subset, provided that they have the same material. The lamp would be assigned to a different subset because it has a different material.
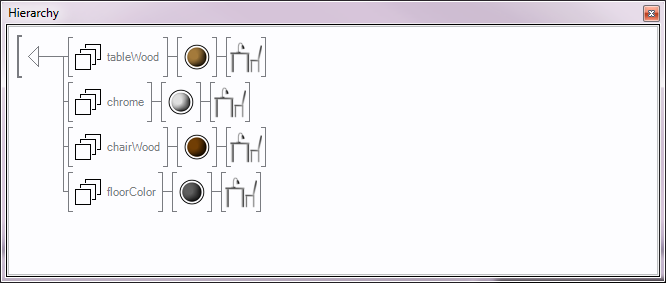
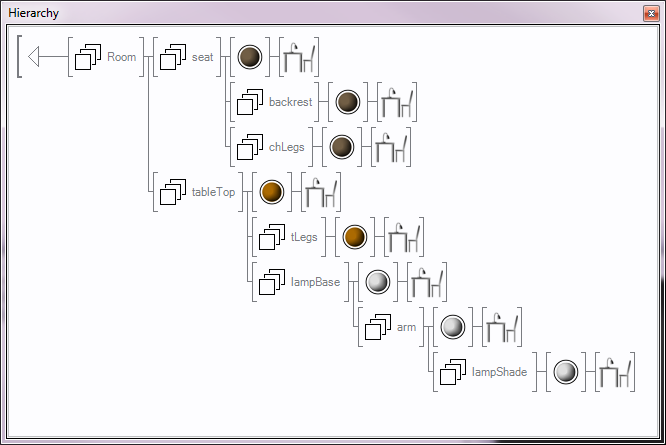
The last Grouping option is ByObjectGroup. In this case any single geometry is assigned to its own Mesh subset. The tabletop and the table-legs lie in separate Mesh subsets. Additionally the object hierarchy saved in the 3D file is reconstructed in the Ventuz Hierarchy Editor. If the table-legs were originally build subordinate to the tabletop, and the tabletop subordinate to the room, this hierarchy will be visible in the Hierarchy Editor tree.
If you enable the SingleMesh option the Mesh and its subsets are constructed as described above but only one copy of the Mesh is linked in the Hierarchy Editor.
The last option category is Textures. If the Import option is enabled, any texture that comes with the 3D file will be copied to the Textures or Images folder of the current Ventuz project. DDS textures will be copied to the Textures folder and non-DDS textures will be copied to the Images folder.
COLLADA File Format
The COLLADA Digital Asset Exchange (DAE) format was introduced by Sony Computer Entertainment and is now maintained by the Khronos Group. Collada defines an open XML-based database schema that enables 3-D authoring applications to freely exchange digital assets without loss of information, enabling multiple software packages to be combined into extremely powerful tool chains.
In the meantime all of the important DCC tools have built-in exporter for the Collada format or there exist third-party plug-ins. Collada is a very powerful and flexible 3D format which seems to evolve to an industry standard. In addition to the common 3D features the Collada specification supports amongst others animations, shaders and physics. In the current version of the Collada importer, Ventuz supports the import of geometry, material, texture, camera and animation data. All other Collada features are not supported yet.
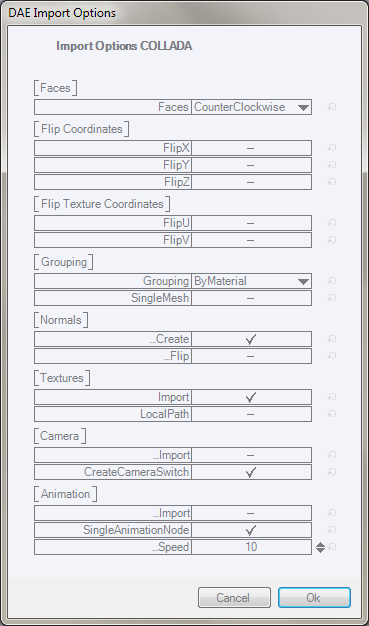
The Collada Import Options Dialog contains the same categories as most of the other supported 3D formats. Additionally it provides the categories Camera and Animation. In the category Camera the Import option enables the import of camera data to the Ventuz scene. If the option CreateCameraSwitch is enabled, multiple cameras are merged to one Container node. The imported cameras are linked to a Switch node. The Switch node enables the change of the camera view.
In the category Animation the Import option enables the import of animations.
In order to import animation data the Grouping option must be set to ByObjectGroup! Only in this mode the original hierarchy of the scene is imported and the animations can be linked to the appropriate objects.
If SingleAnimationNode is enabled all imported animation channels are stored in a single Keyframe Animation node. Otherwise every channel gets a separate Animation node. The Speed value defines the playback speed of imported animations. The default value 10 matches the speed of animations originally created in Ventuz. A higher Speed value increases the necessary time to play back the complete animation (animation speed is slower). A lower value decreases the animation time.
3DS File Format
The 3DS file format was introduced in the early 1990s as the native file format of the Autodesk "3D Studio R1-R4" software. In the meantime it became a widely spread 3D file format. Although no official specification was published for the 3DS format, nowadays there are many 3D modeling tools that support the export to this file format.
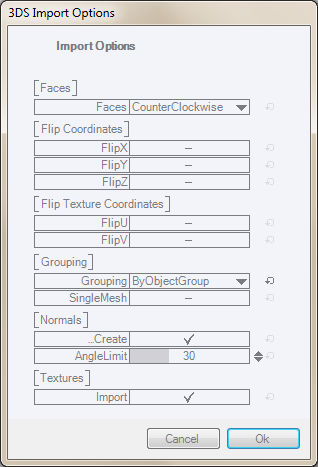
The 3DS file format has some restrictions: It does not store vertex normals. The number of vertices and polygons per mesh is limited to 65536. The texture filenames are limited to 8.3 DOS character lengths.
As mentioned above the 3DS format does not provide vertex normals. They must be calculated within Ventuz. If you don't need normals, disable the Create option. The AngleLimit value controls the smoothing of the polygons. Two vertices with the same position but different normal vectors will be merged to one vertex if the angle between the normals is smaller than the AngleLimit value.
The Import Options Dialog for the 3DS format looks as follows. It is very similar to the dialogs of the OBJ and RTG import.
OBJ File Format
The OBJ file format was introduced by Alias/Wavefront and is similar in status to the 3DS format. The OBJ file only stores geometry information. The material and texture properties are stored in a separate file, it is the .MTL file. Similar to 3DS, nearly every 3D software is able to export to the OBJ format. The OBJ Import Option dialog looks similar to the 3DS dialog. Therefore we will just discuss the options that differ from those of the 3DS import.
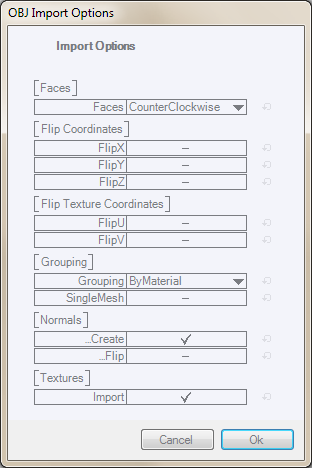
In the OBJ import the Grouping option has four choices: Simple, ByMaterial, ByObjectGroup and ByObjectsAndMaterial. The first three choices have the same effect as described in the Common Import Options section. The last one is needed because of a special feature of the OBJ file format. The OBJ format allows the assignment of multiple materials to one single geometry group. This makes it possible to have one table-leg (the group) with two materials. Importing this geometry with the option ByObjectsAndMaterial conserves the internal group hierarchy but also displays the geometry with the correct materials.
The category Normals consists of two options. The option Create is described in the 3DS section. Unlike 3DS the OBJ format is able to store vertex normals. But not every OBJ file must necessarily have vertex normals. If the Create option is enabled normals will only be created by Ventuz if the file does not provide any. Enabling the Flip option will turn the original normal vectors by 180°. As mentioned in the Common Import Options section, the visibility of a face or polygon depends on the vertex order that is controlled by the Faces option. But additionally the visibility depends on a correct normal vector direction. If you import geometry but can't see anything in the render output this can have two reasons. The first reason can be a wrong vertex order. The second, additional reason can be a wrong normal direction. Just try the import with different combinations of the Faces and Normals Flip options until you get a correct result in the render window.
RTG File Format
The RTG file format is a proprietary format of the Maya software. Its advantage is the possibility to stores the pivot information for any geometry in a 3D scene. This gives you the ability to build complex hierarchical models and import them in Ventuz. The hierarchy and the rotation pivots are preserved. This makes it easy to animate such complex models. The RTG Import Option Dialog looks as follows.
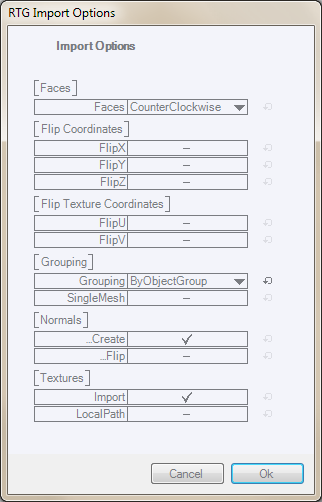
The options are the same as for the 3DS or OBJ import. The only difference is an additional option in the category Textures. The LocalPath option is used to change the location where Ventuz looks for geometry textures if they should be imported into a Ventuz project. The RTG format stores the full path to required textures. But if you move the RTG file and textures to a different location, Ventuz can search the folder that contains the RTG file, provided that the LocalPath option is enabled.
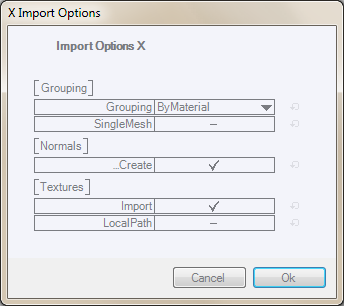
X File Format
The X file format belongs to Microsoft's DirectX API. This is the API that was used to build Ventuz graphics engine.
Unlike the three previous formats, the X format has only few options. This is because Ventuz uses the DirectX API to load X files. It does not parse them on its own like the other formats. This avoids the access to some low-level options. The effects of the existing options are described in the 3DS and RTG sections.