The Timeline
Table of Contents
The Timeline is probably the most advanced feature inside Director. It can be used to schedule, record or playback events in a show. Internally, all user operations are routed through the Timeline such that it can create a perfect record of what the operator did as well as play back those operations in exactly the same way.

The Timeline, similar to the Playlist, is a completely optional feature. It will have no effect unless the Channels on it are activated.
Each channel has it's own functionally independent timeline but all are connected to the same time source. They are therefore presented together in the Timeline window which is part of the Default Window Layout. Having all channels in one window makes the Timeline window great to see what's going on in the show.
Activation
As mentioned above, all channels on the Timeline are inactive by default. This way neither any user operation is recorded nor does any information stored on the timeline interfere with what the operator wants to do. A channel's timeline is activated by  pressing the respective toggle button on the far left side of the channel's time strip.

Show Time
The Timeline introduces a new, central component to Director: Time. Regardless of whether the operator cues templates directly, loads pages or uses a Playlist, all of those approaches have no chronological relationship. There is no history and no future, just what is currently on-air and what is cued. One could argue that due to auto-cueing, the Playlist has some sort of chronological order. But this is only true as long as the operator does not jump around in it and does not modify template instances once they are re-called from the playlist.
In contrast, the Timeline sets everything into relation with the current point in time. As soon as the timeline is activated, all user cueing and taking is recorded to the timeline instead of modifying the channel's pipes directly. Instead, the Timeline itself will perform the cue/take as time progresses.
The assumption is that a show represents some live event where there is a start and an end. The operator might prepare pages or do other things before the show begins but at some point, the show starts. From there on everything that goes on air stays there for a period of time as it is presented to the audience before it is replaced with the next template. It is the task of the Timeline to visualize this: Everything that has happened, is currently happening and everything that is already known will happen.
At the time of writing, modifications done or events fired in the Project Data Panel will not be recorded to the Timeline. The same is true for triggerable events (i.e. buttons) on templates.
Current Time
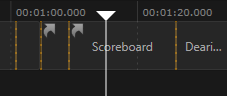
Inside the Timeline window, the current point in time is visualized as a white vertical line with a triangle on top. The Timeline Item that lies beneath it is currently on air (in this case "Scoreboard") and the next one will automatically be cued ("Deari..."). The orange lines symbolize Takes. So shortly after 01:20:000, a take will be executed to bring "Deari..." on air and thus take "Scoreboard" off air.
Let's have a look at what happens as time moves on. The following example shows three different points in time within the same show:
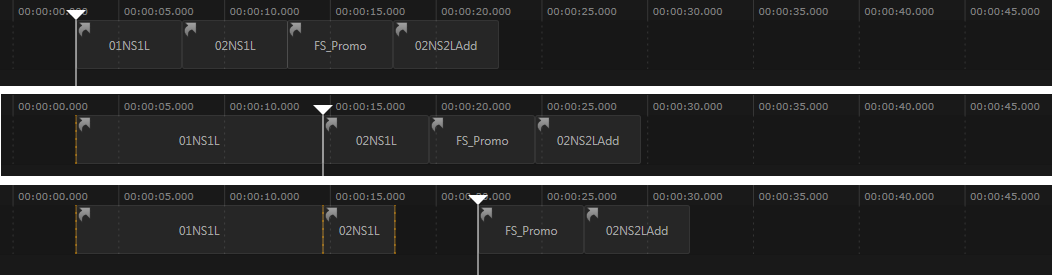
- In the first image, the show has just started and there are four items cued. As time progress the cued item stay cued and thus move forward with the current time marker.
- Shortly after the first image was taken, the operator performed a Take (orange line). As time progressed, the first item stays on air and its length grows with the current time marker.
- Shortly after the second image was taken, another take was performed followed by a take out. As time moves on, the gap between the last item on air and the next cued item becomes bigger as nothing has been on air.
Transport Control
The current point in time within a show is controlled by the Transport Control at the center-bottom of the Timeline window. This should look familiar to anyone that has used an audio/video application. When pressing the start button, time begins to run as can be seen by the numbers on the right side. They indicate the hour, minutes, seconds and milliseconds since the start of the show.
![]()
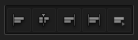
- Jump to Start (F8)
- Rewind (F6)
- Play (F5) / Pause (Ctrl + F5)
- Forward (F7)
- Jump to End (Ctrl + F8)
Another way to change the current time is to drag the current time marker inside the Timeline to the correct position. This is called Scrubbing. While scrubbing, time is paused and Director will skip animations to update its program and preview pipe to the new position as quickly as possible. If holding shift while scrubbing, the current time marker will snap to the time resolution shown in the time bar.
Navigation
There are two ways to navigate inside the Timeline. For one, by moving the mouse cursor over the time bar portion at the top of the Timeline, the cursor changes to horizontal arrows. dragging horizontally will change the viewing window while dragging vertical will change the zoom.
The other way are the 5 viewing buttons in the lower left corner of the Timeline window:
- View Start: Change the viewing window such that it is centered around the start of the show.
- View Now: Change the viewing window such that it is centered around the current time marker.
- View End: Same as View Start but for the last item of the show recorded on the timeline.
- View All: Changes the zoom to fit the whole show into the viewing window.
- Auto-Follow: When activated, the viewing window will follow the current time while time is running.
Recording & Playback
Recording to the Timeline is simple: Activate the timeline and start cueing/taking templates, using pages and/or running through the Playlist. All should behave exactly the same as if the Timeline would not be activate except for items appearing on the timeline.
If the timeline is active, performing a take will automatically start the show time in case it is not already running. This is the typical way to kick-start a show.
To playback a show, change time to the desired start of the playback and start the playback using the Transport Control.
When scrubbing backwards, any items already cued will stay cued and any takes performed pin items to their position. Moving backwards with the time mark can therefore move cued items in front of the taked items which may or may not be the intended behavior. If the intention of the scrubbing is to "undo" part of the show, one should first select the items that will be redone and choose Timeline / Reset Takes from the main menu to re-cue them.
Selection & Editing
The true power of the Timeline starts when it is used for more than simple recording/playback. One example usage has already been shown above: multi-cueing. By dragging templates and/or pages to the Timeline, multiple items can be added to the cue. As one item is taken on-air, the next one will be cued. This functionality is similar to the Playlist except that puts a context to everything: what has been in the past, will the show run over time?
The editing capabilities of the Timeline are currently limited to basic operations such as removal or re-ordering using the main menu. Adjusting the expected duration of a template or setting takes within the Timeline directly has been scheduled for future updates.
One or more items can be selected by clicking (Ctrl for multi-, Shift for range-selection). All items can be deselected by clicking into the empty part of the timeline.
If there is a selection, the Property Editor will automatically switch from showing the cued item to whatever item is selected. This way values in already aired items can be reviewed or multi-cued items can be prepared.
Working on a selected item shows that item in Preview but does not affect the program pipes cue! This allows editing of future items while the Timeline performs already recorded takes as expected.
Properties such as the name of a Timeline Item can be edited as described in the chapter on Content References.
Non-Editing Mode
The selection-based behavior of the Property Editor and the fact that Preview not necessarily equals Cue can be overwhelming for new users. By pressing the button next to the timeline activation button, the Non-Editing Mode can be enabled. In this mode Preview is forced to always show the Cue and one cannot perform any selecting/editing on the Timeline directly. It is limited to recording only!.

Use-Cases
There are various non-obvious applications for using the Timeline, here are just a few:
- Post-show evaluation: Since the timeline is stored inside the show file (which is a straight forward XML), doing a recording of a show allows post-show analysis of running times. For example, this could be used to figure out how much air-time a specific sponsor got.
- Pre-scheduled events: A show might require to show a specific template at every full hour. This can be pre-scheduled by moving the current time marker to that specific position, cueing and taking the template and then moving on to the next position. The operator can then restart and record the show as normal but the pre-scheduled item will move closer to the current time marker and push cued items backward automatically.
- Rehearsal: When a show is recorded to the timeline during rehearsal, the operator can always pause time, reset takes and move time backward to start over again.
- Show repeats: often one might want to repeat the same show several times, this allows it to be played identically every time, while at the same time allowing for the actual data in the templates to be changed from show to show.