Designing Templates
Table of Contents
In the previous chapters, we have seen how to cue and take templates as well as various ways to fill their data fields and use them in the context of a Director Show. Generally, a Director operator usually will not be a designer and thus rarely change templates. In fact, for larger productions, he may not even be allowed to do so since the design has been agreed on by the art department long before the show. For small productions, design artist and operator might be the same person. But the rather more likely case is that a Director operator might be asked to do some minor changes (e.g. adding a second line of text, changing a background image) to a set of templates right before the show.
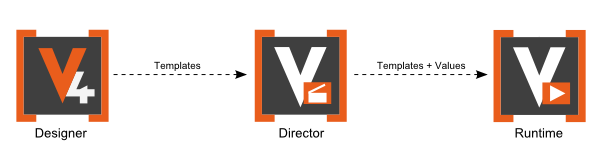
Templates are created in a separate application called the Ventuz Designer. For the remainder of this chapter, it is assumed that the reader has at least some basic knowledge of working inside Designer. If not, please refer to the Ventuz User Manual.
What is a Template?
The Ventuz Template Engine directly builds upon Ventuz's Animation System, most importantly it's State Engine. A state in an animation defines a set of animated values, for example the position of a label, the transparency of the text on that label and so on in that state. A very simple animation might for example have a Begin state where a label is off screen, a Present state where the label is shown to the audience and an End state that takes the label off the screen again. A more complex example would be a car presentation where states define certain points of interest like a close up on the bonnet or one where the car doors are open.
The designer defines the animations between states and could for example fade in/out the label and have it rotate in some form. It's really up to the creativity of the designer.
Each template is an animation state inside a Ventuz scene that is
- a Present state (yellow in the previous image) - as opposed to a Begin or End state
- its animation has been made controllable from outside Ventuz
- and the state has optionally been associated with data
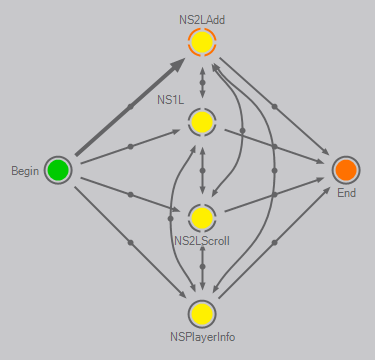
The first point should be quite familiar for anyone that has worked with the Slide Manager Node or more generally the Keyframe Animation Node. The second part is achieved by simply adding the animation's control property to the scene's Scene Data. Upon importing a scene, Ventuz Director scans the scene's Data Model for all animations and then creates entries in the Template Browser for each present state in them. In the example shown above, there would be four templates visible inside Director: NS1L, NS2LAdd, NS2LScroll and NSPlayerInfo.
Routing
When creating templates, one of the very first steps is to define which templates relate to each other and which ones are independent. The former should be part of the same animation node, the latter should probably even be in different scene files to allow the operator to only import the templates he needs.
Let's take a look at what really happens in the Ventuz Runtime when the operator cues a template from Director:
- Unless it is already in memory, the scene file the template is part of is loaded.
- The template engine tries to find a route from the current template to the cued template using the transitions defined in the animation state logic.
- If both templates are part of different scenes or different animation nodes inside the same scene, the task is split into two: Find a route from current to any End state and then find a route from any Begin state to the cued template.
- If both templates are part of the same animation node, a direct route is searched for. If none exists, the task is again split into two routes via Begin/End states as in the previous case.
- If no route to a Begin/End state exists, a jump to that state is performed instead.
- Once the operator performs a take, the calculated route is used to play the transitions that lie on the route.
- The template engine stops at any non-begin/end state on the route and will require the user to perform another take, resulting in a so called multi-take template.
Note that each transition can be valid in only one of its two directions or both at the same time. For example, there is a transition from NS2LAdd to NS1L that works in both directions. If one is currently active and then replaced by the other, that special transition is used instead of going to End and then starting at Begin again. On the other hand, the template engine cannot go from NS2LAdd to NS2LScroll via Begin as the transition from NS2LAdd to Begin is not valid in that direction. The direction of a transition can be changed by selecting a transition and pressing R.
The R-key will have no effect and no arrow heads will be drawn on transitions unless the animation is part of the Scene Data.
If there are multiple possible routes, the Template Engine always chooses the shortest route possible based on the number of transitions that have to be traveled along. The actual duration of a transition is not part of this criteria.
A Minimal Example
So let's quickly go through the minimum steps to create a template:
- Create a new empty scene
- Add a Keyframe Animation node to the content editor
- Select the Keyframe Animation node and drag it's Control property to the Scene Data editor. A light blue dot should appear next to the property in the Property Editor and the icon of the animation node turns yellow.
- Switch to the Animation Editor and inside it to the Logic View. Add three states by
 double-clicking on the blank canvas and moving the mouse cursor to a new position every time. Select S2 and press P, then select S3 and press E to turn them into a present and end state respectively.
 click and drag from S1 to S2, releasing the button and then doing the same from S2 to S3.
- Now add some content to the scene and animate its properties as usual using the state and transitions.
- Select S2 and inside the Property Editor, create the thumbnail of the template and add a description.
- Save the scene and import it in Director to cue and take the template.
A Multitake Example
As mentioned in the Routing section, Templates can be designed to have multiple takes. To achieve that, add States of the type Normal on the route to the Present State. Each of these represents one take.
Assuming a line-up for a team sports match should be designed. At the first take the home team should be shown, at the second take the guest team and at the third take both teams at once. The according State Logic could look like this:
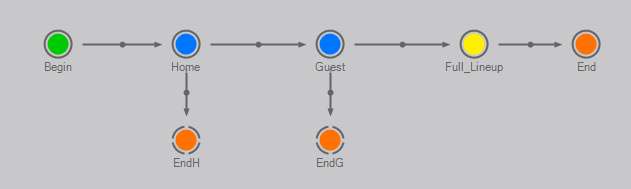
Adding additional End States to the State Logic gives the possibility to add animation paths to take the Template off air with a defined animation from any State.
Template Data
To add some form of data to a template, switch to the Data View inside the Animation Editor. Similar to Animation Channels, any property can be made accessible by a template by simply dragging it from the Property Editor to the Data View which will create a new Data Channel. Also, a yellow dot appears next to the property to visualize this is now bound to the Animation Data of some Keyframe Animation node.
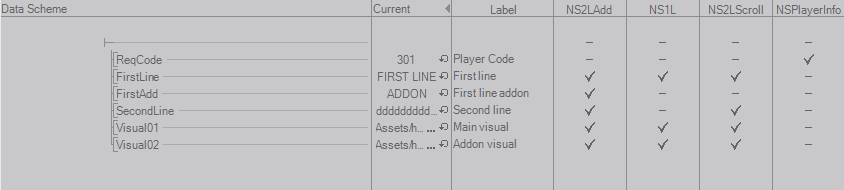
Since there is one set of data channels for all states in an animation, data needs to be associated with the specific states for which they make sense. For example, if one state shows only one line of text and another has another line of text for a sub-title, the sub-title should not appear as a data entry field inside Director when the first template is cued. This is done by setting/removing check marks in a states column inside the Data View. In the image above, the ReqCode data channel is for exampled only valid for the NSPlayerInfo state/template.
Transition Points
If two templates share the same data channel and there is a crucial point in the transition between them. Imagine the first template currently being active, the operator cues the second template and then changes the value in the common data field. What happens when the operator does a take? At which time does the data channel switch from the old to its new value?
![]()
The default behavior is that the new value is immediately applied which might or might not be what the designer intended to happen. Usually the designer wants to fade out a text label showing a headline before it fades in with the new text instead of the text suddenly changing. So there is an amount of time on the transition where the old value should remain before the new one is applied. That value can be defined by one or more transition points along a transition curve by pressing M instead the Time View.
When a transition is performed, the Template Engine checks if there are any transition points:
- If there is no transition point, the values of all data channels is immediately updated.
- If there are any, the values are updated once the animation has passed the first transition point.
So why should there be more than one transition point along a transition? Because the transition might be valid in both directions (see the section on Rounting) and the point of update might not be the same. Especially if the update requires resources (e.g. images) to be loaded, it should be triggered as soon as possible such that the data uses the time before the animation actually makes the new values visible to the user. For example, the new image might already start loading while the current image is still fading out.
Sub-Templates and Animation Groups
One of the most exciting features of Ventuz's Template Engine is the support of sub-templates or optional addons. Inside Director, sub-templates are visualized as slots inside a template property sheet that can be filled with further templates. For example, a news ticker might have an optional breaking news field added to it or a scoreboard might have an optional sponsor message.
For the Template Engine, a sub-template is a keyframe animation with template states in it that is controlled not by the Scene Data but by another keyframe animation. Since the sub-animation is a full-featured keyframe animation, it again can have multiple template states and transitions between them which would show up inside Director as different variants of the add-on.
Animation Groups on the other hand combine multiple independent controlled keyframe animations to one control that is then bound to the Scene Data. This is handy when there are multiple independent animations but only one of them should be used at the same time. In theory, one could merge all those template states into one animation but the amount of data channels and transitions can easily get overwhelming.
Sub-Templates and Animation Groups allow the designer to create a hierarchy of templates and carefully restricting for which animation the control is actually passed over to Director. For simple templates however, a single keyframe animation node that is directly bound to the Scene Data will be more than enough.
Testing Inside Designer
When a show is opened, Ventuz Director starts looking for any running Ventuz Runtime and if necessary start a new one. However, for testing purposes, working with a Ventuz Designer instance is much more convenient than switching between Runtime and Designer all the time. To connect Director to a Designer, simply make sure the Designer is up and running at the time the show is opened.
To successfully connect Director to a Ventuz Designer, the projected loaded in the Designer must match the one the Show is based on. Note that no preview render output will be available while connected to Designer.
During the initial design/development of templates however, it might be even easier to leave Director out of the equation entirely and solely work inside Designer. To test transitions and routing, go to the Logic View inside the Animation Editor and double-click on a state to activate it. Then select another state by single-clicking on it. Press R to perform steps on the route until the target state is reached.
The Monitor Values button in the Animation Editor needs to be active to see the effects of routing inside the Logic View.
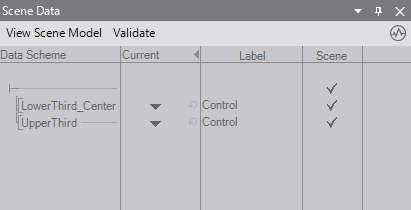
Another way to test transitions is via the Scene Data Editor. Click on the downward pointing triangle in the Current column that is next to any controlled keyframe animation. A list of present and end states appears and clicking on any of them will again perform one step of the route towards that state.
The context menu will only appear if the scene's data model is valid. Make sure there is no error sign visible in the toolbar of the Scene Data Editor.
Project Data
The Project Data Editor is very similar to the Scene Data Editor and the Animation Data View. There are three main differences however:
- All scenes inside a project use the same set of data channels. This is great for properties that are shared by a lot of templates like the name of playing teams or the current score.
- No channels can be created in the Editor. To add new project data channels, close the project and click-and-hold on the project icon, to access the project properties where the Project Data Model can be edited.
- Project Data are hosted inside their own docking window inside Director.
Multi-Channel Support
Starting with Ventuz V4.5, Director is capable of managing multiple channels which can be used to layer multiple independent templates on top of each other. For example, a project might have a set of templates that are used as backgrounds, another set of templates that serve as foreground (e.g. to play movies or show images) and yet another set of templates to overlay text labels. The final result would be achieved by rendering the overlays on top of the foreground on top of the background.
This is achieved by creating a layout scene with multiple scene ports (see Scene Management in the Ventuz Designer user manual). Each port can independently be addressed by Director to load a template.
To create a new layout scene, create a normal Ventuz scene, add multiple scene ports to it (in our case 3) and give them proper names to better identify them later on. Save the scene and open the project properties dialog. Select the section Graphics/Layout and press "new" to create a new entry. Name the entry "Background/Foreground", choose the scene we just created and press Ok. Set the check mark next to the new entry to mark it as the default layout scene.
If such a layered approach is used, make sure to assign keywords to the templates that identify to which port they belong (e.g. "foreground", "background", etc). This allows the Director operator to assign Channel Rules that automatically limit where a template can appear.