How to Create a Turntable State Logic
Table of Contents
This How To will show you how to create a turntable animation as commonly used in product presentations. It features a step by step introduction to the State Engine and is written for beginner to intermediate level users.
Introduction
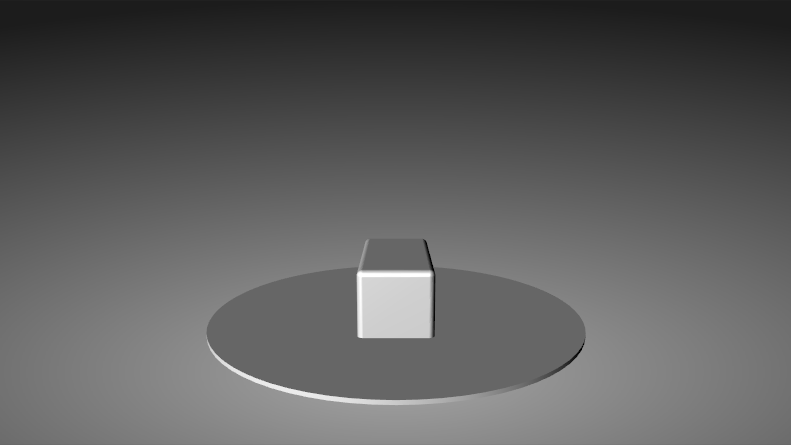
In case you don't know what a turntable animation is, imagine a car in a show room. You're standing in front of the car as it sits on a large cylinder that appears to be part of the ground. While you're looking at it, the car slowly turns and shines as the reflections and your viewing angle change all the time.
The simplest way to achieve something like this is to use an Axis Node and bind its Y-rotation to the output of a Mover Node. Set the Mover to Linear function without Swing, Minimum to 0, Maximum to 360, Duration to 100 ... and we're done. So why write a How To about it? Well, this is fine if you just want it to be rotating all the time. Putting some extra effort into it and using the State Engine instead can bring your presentation to a completely new level.
Setup of the Scene
We will keep the general setup of the scene pretty simple. In fact, it will be pretty much the same as if we had used a Mover as described above:
Background
- Drag
 the Texture node from the Toolbox to the Hierarchy Editor. When asked, choose Image Loader and in the Property Editor click on the three dots at the end of the File row. You can use any image you have available but in general some gradient or abstract background texture will work well.
- Now drag an Overlay Rectangle from the Toolbox to the right side of the previously created Texture Node and drop it when the Red Arrow appears. Your texture should become visible and completely fill the screen.

Turntable
- Drag an Axis Node from the Toolbox to the Hierarchy Editor and let it drop anywhere else than on the two existing nodes. The Axis should appear on the top most level (i.e. under the Texture Node). Double click on the Axis and type "Turntable" to give it a name for easy reference.
- Add a Cylinder to the right of the Turntable Axis. In the Property Editor, set X and Y to 20 to make it bigger. This big it does not look very nice as we can see the triangle edges in the silhouette. Right click on the "Tessellation" label in the Property Editor to expand that section and increase the Segment value until it looks nice.
- Since we're looking straight on top of the turntable, add another Axis to the left of the Turntable axis. Set the X-Rotation to about 80 degrees and move it down by setting Y-Position to -5.
- Looking at it from the side, the Cylinder looks a bit thick, so select it in the Hierarchy Editor and lower the Z-Size to about 0.2.
- While we're at it, the light looks a bit dull too. That is because we have not placed any Light Source and therefore Ventuz uses a Headlight, a directional light set to the viewer position and looking straight forward. Add a Directional Light below the Texture so it appears between the texture and the first axis in the Hierarchy. Setting Pitch to 15 and Yaw to 30 makes the scene a bit more interesting.
Object of Interest
- Now we need something to put on the turntable. Go to Menu/File/Import/Geometry and select some 3D model you have. Drag the new node (a Hierarchy Container) so that it is underneath the cylinder. If you got nothing available, add a Cube under the Cylinder.
- The object probably will be sunk into the turntable. So add an Axis before it and use Z-Position (remember? We rotated the whole thing by the first axis so up is Z not Y) to move it up a bit.
- You should probably add textures or materials to make the scene look less grayish but that's up to you.
Animation
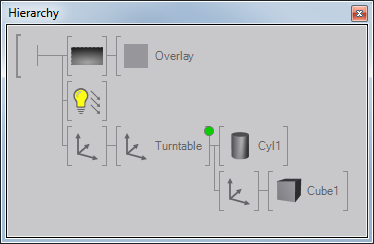
All that remains is to animate the Z-Rotation of the Turntable axis. If everything worked, the hierarchy of your scene should look like this:
Setup the State Machine
- Select the Turntable Axis, press CTRL and click on the Z-Rotation property in the Property Editor. A Keyframe Animation Node should appear in the Content Editor and its connected to the Turntable Axis.
- Open up the Animation Editor (Menu/View/Animation Editor). You'll see an Animation Channel on the left of the Animation Editor that is connected to the Z-Rotation of your Axis. Click on the word "Turntable" in the Animation Editor to select the channel. Without selecting it, we cannot add any keyframes to it.
- Inside the Animation Editor, switch to Logic View by pressing the button that looks like a triangle.
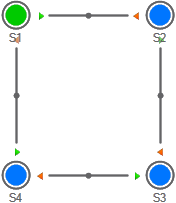
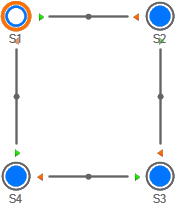
- Double click four times in the big white area to create four States. You should see four big circles named S1 to S4. S1 is green as it has been marked as the beginning of your state logic.
- Move the mouse over S1, press and drag
 to S2. This will create a connection between them. Do the same for S2 to S3, S3 to S4 and S4 to S1.
Animating the Transitions
Double click in the middle of the connection between S1 and S2. This should bring you back to the Time View. Most likely the Animation is too long to fit into the editor, so press the "Zoom into View" button (looking glass with 1:1). You'll see your Animation Channel, five blue lines representing
the four states (S1 is used two times) and blue squares representing the keyframes.
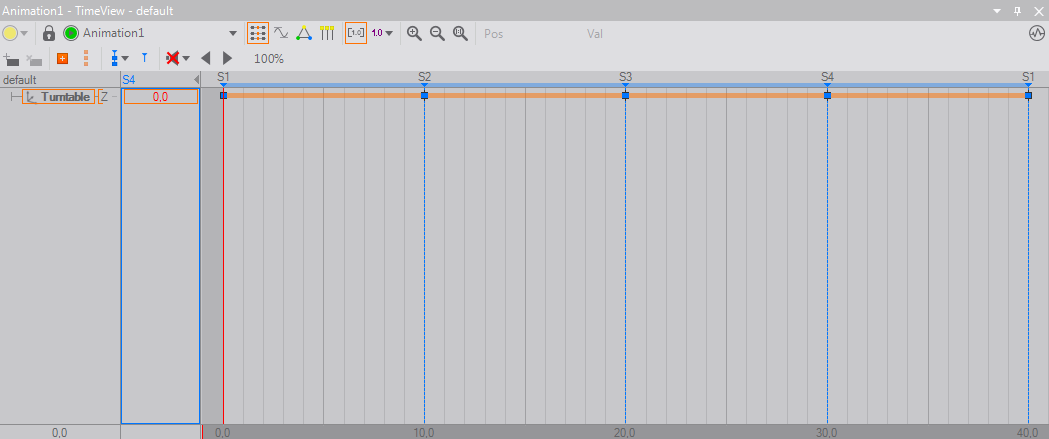
- Move the red line (current time) to the S1 on the left by pressing and dragging to the correct position. If done right, a blue box should appear around column which currently says "0,0". This is the current value column and the blue box shows that changing the value will affect a keyframe.
- Leave S1 at 0.0 and go over to S2. Move the mouse to the current value, press and drag until it is at 90. You should see the turntable rotate in the renderer.
- Proceed with S3 (180 degrees) and S4 (270 degrees).
Lets review what we have achieved. Drag the red line around. Start at the left and move it over to the right. Up to S4, everything looks great. But S4 to S1 rotates from 270 to 0, not 270 to 360. We cannot simply set S1 to 360 as there is only one keyframe for that state and using anything than 0 will break the transition from S1 to S2.
The solution is to use a state that has more than one keyframe, which is called a Soft State. Go back to the Logic View, click on the green circle to select S1 and press delete to remove it. Now use the button on the left showing a circle with a hole in it. Press it and you get a new Soft State. Since S1 no longer exists, the Soft State will use that name. We need to reconnect the state to S2 and S4. So again right click and drag from S1 to S2 and from S4 to S1. Do not drag from S1 to S4 but S4 to S1, we will see later why.
Go back to the Time View. We now have multiple tabs, each showing a different Slice. As long as its possible, the Animation Editor will try to put all the transitions you create on to a single slice. But since we removed stuff, the new transitions get separate slices.
S2 to S4 are the remains of our old animation. Make sure the keyframe still say 90, 180 and 270. Then start with S1 to S2 by switching to that tab. You will notice that S1 no longer has a keyframe. So make sure the Animation Channel is still selected, move the red line to S1 and press the "add keyframe" button (two orange dots with a plus sign). Change the value of the new keyframe to 0. Go to "S4 to S1", do the same for S1 here and set the value to 360.
Go back to the Logic View to check if things have improved. We are not going to scrub the time line (i.e. moving the red line) but use the state logic. First, we have to fix one more thing. Did you notice that the new Soft State is blue and not green like S1 previously was? That means the State is no longer marked as the "Begin" state. Select S1 and in the Property Editor, change the Type property to "BeginDefault".
Now we're ready. In the Animation Editor, there is a button with a green circle. Press it and the State Machine will go to S1. Right next to it is a green "play button". Press it and your turntable should start to rotate to 90 degrees. Press it again and it will continue from 90 to 180 degrees and so on and so on. You can press it as often as you want, it will always rotate to the next multiple of 90 degrees.
This is why we set connect from S4 to S1 and not from S1 to S4. Did you notice the little green and orange triangle on the connections? When you press next, the State Engine will check at which State it currently is and use the connection that has the green triangle.
You can either let the user trigger next by binding it to some navigation element (i.e. using Touch Button) or bind it to a Mover that fires an event every time its duration is reached.
Conclusion
If you're still asking yourself why all the hard work, consider this:
- The Keyframe Animation Node fires events when the State Engine reaches a new state. You can for example use this to show additional information depending on which orientation the object is currently shown.
- In/Out Animations: Next and Prev are not the only methods that can be used to switch between States. You can for example create custom methods to go in and out of the turntable part of the logic.
- Keyframes: We have only used the linear interpolation between keyframes. You can change the interpolation behavior and speed for each transition in the Diagram View.
- You can animate multiple properties with the same states. Why not change the lighting or material for each orientation. Or play a movie?
- Use OSC nodes to have next triggered by an external device, for example a music sequencing software or some customized hardware.
- ...
We hope you got inspired by seeing this very basic usage of the State Engine. Using States can give a presentation a higher level structure while still giving the user complete freedom of timing and order of events. After working with it for a while, you will not want to go back to linear animation systems found in other 3D software ever again...
For more information, see Animation and State Engine.