How To Create Templates without Keyframe Animations
Table of Contents
In another How-To you learned about creating a Template via Keyframe Animations whose Control Properties were added to the Scene Data Channels. This tutorial teaches you how to build such a template in a fast way by omitting the Keyframe Animations.
Introduction
Sometimes building spectacular animations for use in the Ventuz Director is entirely unnecessary. When transition animations are not needed, one can create Templates for the Director without having to use Keyframe Animations. This way it is possible to create simple static Templates in a short period of time.
Normally you would use this technique to create a simple template that only shows a background image or a movie via the Ventuz Director. In order to teach you how to use the Scene Data Channels, the goal of this tutorial is to create a Scoreboard template. It shows a selectable background image and a modifiable text in the foreground which can be used to display some kind of score for a game show or an intern event of one's company.

Setup
For this tutorial you will need a Viewport node on which a selectable background will be rendered and some text that the operator will be able to modify. We need at least three 2D Text nodes to display a score. Two will be used for the current points of two teams and one for the colon in between them. We will use two more nodes to be able to add team names.
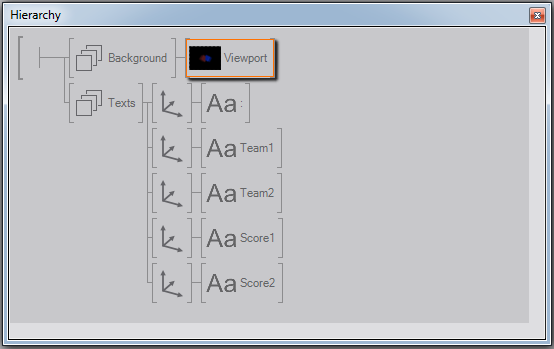
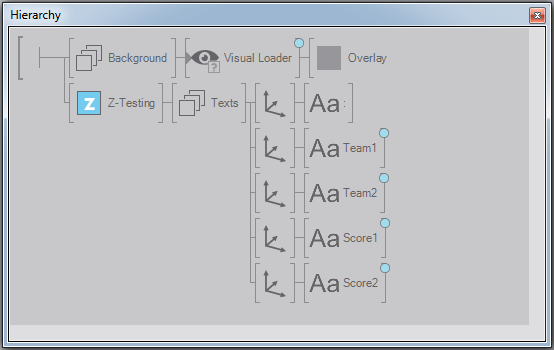
You may want to use the Visuals Loader node for the background that you may already have created via this tutorial. If so you need an additional node to avoid the following problem: If you load a scene via the Visual Loader it will not necessarily stay in the background and they will eventually occlude the Text in the foreground.
To solve this there are multiple ways, so just create a Z-Testing node, place it in front of the "Texts" group and uncheck its Enabled property. Now the texts of its subtree will render regardless of their Z-Position, so that only the render order of the hierarchy takes effect. This way the geometries of the Scene will always be rendered behind the 2D Texts, although their actual position may be in front.
Bind Properties to Scene Data
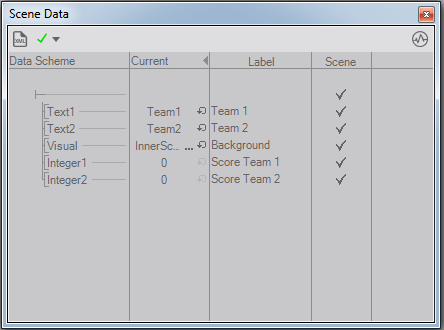
You will now have to open the Scene Data Editor window. Click on "View"->"Scene Data Editor" in the main menu bar to do so. You can now add input properties of nodes to the Scene Data to be able to modify them from the Ventuz Director. Drag and drop  a property anywhere in the Scene Data Editor but the first column. Do this for both 2D Text nodes that define a teams name.
You should now notice an error in the top right of the Scene Data window which says that two Data are named identically. If you ignore this message the Director won't be able to load your template properly later. So rename the Data names differently to avoid this.

You can change some Attributes of Scene Data in the property window when selected. For example you can restrict the input string of the team names to a single line or set default value.
Now you have a properly working Template for the Ventuz Director with two modifiable text properties. You can test it by saving the Scene, exitting the Designer and starting the Director. Create a new Director Show and choose your project file and the current scene in the following dialogues. If you now drag the template on the left to the cue on the right you can change its two name values before airing it.
Scene Data Channels
The input properties of the other nodes have a speciality: They need input values of certain types. The two 2D Text nodes both need an integer value and the Viewport needs a proper texture to display. To achieve this kind of restriction you may use Scene Data Channels.
Double click  (or make a longer single click ) on the root symbol
  in the Scene Data Editor and choose "Create Data Channel"->"Visual". Select the channel and change its Visuals booleans in the property window. If you use the Visual Loader check all booleans to make all of them accessible. Otherwise only check the Images and Textures properties because the Viewport's Texture Loader can handle only them.
Now you can bind the input value to the Visual Data Channel. Drag and drop the Texture input of the Texture Loader or the Uri input of the Visual Loader onto the Visual Data Channel. Now the operator will be able to customize the background in the Ventuz Director.
Next we will add two Integer Data Channels (double click on the root symbol again and choose "Create Data Channel"->"Integer"). Bind the Text inputs of the 2D Texts to the channels. Again an error appears. This time you need to set a default value to make the template usable. Do so in the property window and also set the Min property to zero.
The last thing to do now is to add a thumbnail to this template. Click onto the Hierarchy Editor and two buttons should appear on the bottom of the property window. Take a snapshot of your template and you are ready.
Now you have created a fully modifiable template for the Ventuz Director without using a single Keyframe Animation. Save the scene, exit the Designer and go back to the Director to try out the new template.
Differences to Animation Driven Templates
You may have noticed the main difference between templates that have been created this way and usual templates with Keyframe Animations: They cannot be animated for a smooth fade in, fade out or a transition between two templates. The second main difference is the way the Template Engine now interprets the scene. Normally there is one template per Present State in a Scene. But since we have not a single of such states the Template Engine uses the whole scene as one Template. The last of the most visible differences is the lack of Subtemplates. You won't be able to design such Templates with Scene Data only because there is no possibility to define the dependencies of two Templates.
Conclusion
You have now learned a fast way to create simple Templates, that can come in handy when it is not important to have visually perfect transitions between different Templates. However you may still want to learn more about the Template Engine like using Project Data or adding Subtemplates. Have a look at the Ventuz Demo Projects for more ideas and usages of the Template Engine and the Ventuz Director.