Hierarchy Editor
Table of Contents
The Hierarchy Editor is where the structure of a scene is defined, what "commands" are issued to the Ventuz Rendering Engine and in which order it happens. In general, each Hierarchy Node results in one or more calls to the graphics card, such as setting a texture or rendering a geometry.
Rendering Order
The Hierarchy Nodes of a scene are part of a horizontal tree structure which starts at the Scene Root, symbolized by a horizontal T-junction in the top left corner of the Hierarchy Editor.

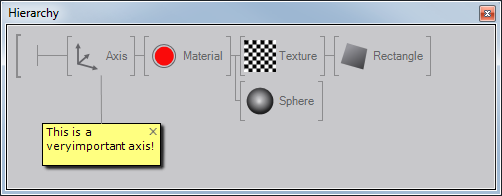
The Ventuz Rendering Engine starts at the Scene Root and traverses down in a depth-first traversal order. The effect of a node will be active until all children of the node have been traversed and traversal goes back to the parent of the node. In the example below, the red Material node affects both the Rectangle and the Sphere node which will thus be rendered with a red color. However, the Texture node will only affect the Rectangle, not the Sphere.
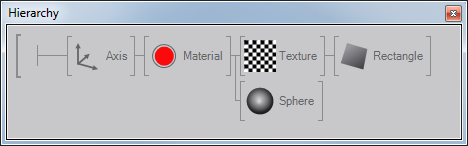
All DirectX graphic cards work with a so called State Engine which basically applies a command (i.e. setting the material to red) to all successive rendering calls until another command changes the state (in this case material) to another value. To improve rendering performance, it is important to keep this in mind and move items common to multiple nodes as far up in the hierarchy as possible. In the above example, we could theoretically add two identical material assignments just before the respective geometry instead of the one in the example. This would achieve the same rendering result but would carry the performance penalty of an additional state change.
Inserting a Node
A new node can be added to the hierarchy by selecting it from either the Toolbox or Fast Toolbox and dragging  it into the hierarchy. Depending on where it is released, the node will be inserted in a different fashion:
| Icon | Drop Zone | Area | Effect |
|---|---|---|---|
 | Top | Upper third of the node icon. | The new node will have the same parent as the node it is dropped on but will be added such that it is rendered before the target. |
 | Bottom | Lower third of the node icon. | The new node will have the same parent as the node it is dropped on but will be added such that it is rendered after the target. |
 | Right | Right third of the node icon. | The new node will have the node it is dropped on as parent. It is added as the last child of that node. |
 | Left | Left third of the node icon. | The new node will be inserted between the node it is dropped and its parent. |
 | Left (first) | Left third of the node icon but only works for the top-most child. | The new node will be inserted between the node it is dropped on and its parent. All children of that node will be children of the new node. |
Selection
Clicking on a node selects it, which is represented by an orange box drawn around the node's icon. This simple click will also add a shadow below the selected icon and all of its children. This visualizes that any operation affecting the current selection such as deletion will also affect the children.
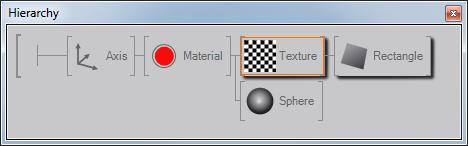
In the example, the Texture node has been directly selected but the Rectangle has also been indirectly selected. To select a node without indirectly selecting its children, press and hold CTRL while clicking on the node.
If nodes have already been selected, holding SHIFT will add the new selection to the existing one.
It is possible to store the current selection of Hierarchy nodes in a bookmark. Such a Selection Bookmark is created by clicking on the green plus on the left side of the Hierarchy Editor.
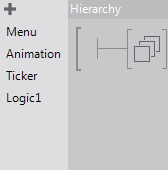
By clicking on an existing bookmark the saved selection is restore in the editor. It is possible to rename bookmarks by clicking  on an entry.
Moving and Copying
A selection can be moved to a different position in the hierarchy by dragging the selection to its new place. The drop zones as mentioned here still apply.
By pressing CTRL while dragging, the selection will not be moved but a duplicate will be inserted at the new position instead. All content nodes that are bound to the select will be duplicated as well so that a truly independent copy is created.
If CTRL + ALT are held during the drag, a so called reference copy is created, duplicating the Hierarchy Nodes but not the bound content nodes. For example, if an Axis is bound to a Mover, the reference copy will create an additional Axis that is bound to the same Mover.
If CTRL + SHIFT are pressed, a link (in some programs also called a reference) to the existing nodes will be inserted instead of a duplicate. This is a very powerful but also potentially error-prone and complex feature when working with tree structures. It is powerful in that the same nodes can be used multiple times in a scene although only one copy resides in memory. The problem with multiple linking is that the linked nodes appear at multiple positions in the Hierarchy Editor but the user still has to keep in mind that there is in fact only one instance. Any change done to the one item in the tree will also affect the other because there is only one node. Similarly, deletion of linked nodes can create unintendend or unforseen consequences when linked references are forgotten about. Nodes that have multiple links are designated with a gray triangle in the lower left corner of the node icon, see here.
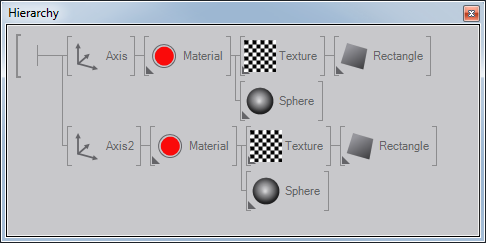
In the example above, there are two axis nodes but only one material node. The material node has been linked to each of the Axis nodes.
Multi-Replication
A special replication operation is available if a selection is dragged with the right mouse button clicking a menu will popup right after the clicking was released on the drop target. This allows the user to create multiple links or copies of a selected node/sub-tree easily.
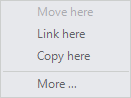
This menu let you perform the operations described above without using the modifier keys during the drag&drop operation. The menu entry More... opens the Replicate Dialog:
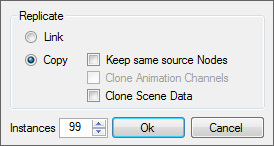
This dialog let you create one or multiple replicates of the dragged selection while the way how the replicates should be created can be selecetd:
- Link: Links the dragged selection at the targeted position. (same as holding CTRL + SHIFT in normal drag&drop operations)
- Copy: Copies the dragged selection at the targeted position. (same as holding CTRL in normal drag&drop operations)
- Keep same source Nodes: Performs a reference copy as described above. (same as holding CTRL + ALT in normal drag&drop operations)
- Clone Animation Channel: If Keep same source Nodes is selected this option indicates wheather the referenced animation channel of the kept referenced Animation nodes should be cloned or not.
The Instances number indicates how often the selected operation should be performed.
Collapsing
By right-clicking on a node, its subtree is collapsed or expanded. This is very useful when hierarchies grow to still keep a good overview. Pressing and holding the right mouse button will however open the Context Menu.
Blocking and Inactive
A selection of nodes can be "deactivated" in one of two ways:
- Inactive: By choosing Menu/Node/Inactive (or pressing CTRL + A), the inactive flag of a node will be toggled. An inactive node does all its internal computations as normal but will just be skipped during rendering. An inactive node will be drawn with a "bypass" line through it in the Hierarchy Editor.
- Blocked: By choosing Menu/Node/Blocked (or pressing CTRL + B), the blocked flag of a node will be toggled. A blocked node neither is rendered nor does it perform its internal computation. The blocking state is inherited to the node's children.
There is still a small overhead of traversing a blocked node. Therefore nodes that are no longer needed should be deleted, not just blocked.
Unlinked Items
All Hierarchy Node shown in the Hierarchy Editor are by default it a linked state. That means a Node is linked to another one, which again is linked to another and so forth until the container's or scene's root has been reached. An Hierarchy Node also can be in unlinked state if its node part of such a link-chain described above. Unlinked nodes are part of the scene (or container) but are not traversed by the Renderer.
To unlink a selected Hierachy Node, either select the menu entry Edit/Unlink or press SHIFT + DEL. Unlinked nodes are display in a special area at the bottom of the Hierarchy Editor.
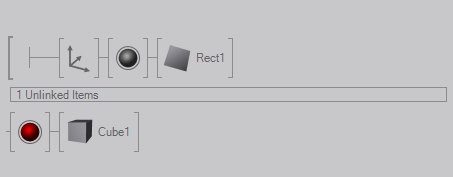
To re-link nodes that have been unlinked before, simply drag&drop or copy paste them into the normal, linked area. If no more unlinked nodes are in the container or scene the Unlinked Items area disappears.
Node Name and Color
Each node can be given an individual name by double-clicking on the node (or pressing F2). This is a great way to mark certain subtrees, for example as "main menu", "red button", and so on.
As a further functionality to keep an overview in complex scenes, nodes can be assigned a node color by choosing a selection and then selecting a color from Menu/Node/Set Node Color or from the context menu (pressing and holding until the menu appears).
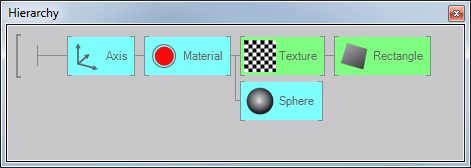
If a color is set at one node, it will be inherited by all its children. In the above example, only the Axis and the Texture node have been explicitly assigned a color. Note that only Hierarchy nodes can be colored. The coloring is generally most effective when used sparingly to avoid a colorful chaos in the Hierarchy Editor.
Render Point
Selecting a node and pressing CTRL + R or selecting Set Render Point from the Node menu will start the Render Point functionality. The selected node will be decorated with a red arrow on the left border. This forces the render engine to start scene tree traversing at the selected node. All other parts of the scene tree are ignored.
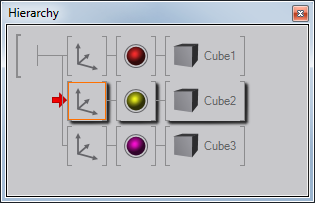
For the screenshot above this means that only the yellow Cube 2 will be visible in the Renderer Window. This feature is helpful if one wants to get an overview over a complex scene or needs to concentrate on a certain sub-tree. The Renderer Window documentation provides a list with the possible RenderPoint operations.
Use the mouse in combination with some modifier key to change the viewing parameters:
Move the camera:
Rotate object Rotate camera drag
Pan camera Zoom camera Reset camera
The zooming and panning graduation can be modified with CTRL, ALT and SHIFT keys:
ALT Normal increase ALT + SHIFT Large increase CTRL Normal decrease CTRL + SHIFT Large decrease
Annotations
When coloring is not enough, the user can also add a "note" to a node by selecting the node and then choosing Menu/Node/Edit Annotation or from the context menu (pressing and holding the right mouse button until the menu appears). The box can contain any HTML formatted text, thus being the ideal place to leave notes (i.e. keyboard shortcuts, ...) to the person that will actually run the show or to a colleague also working on the same scene.
The visibility of annotations can be toggled with CTRL + SHIFT + A.
Decorations
The visual representation of a node can have a number of visual markers in addition to the icon itself and the brackets. The different decorations will be explained in more detail when discussing the individual topics that create them.

- Blue Corner: Node is connected to a Data Source (XML, Excel, RSS, ...)
- Yellow Corner: Node is connected to an interactive Input Node (Mouse, Keyboard, ...)
- Green Dot: Node is connected to an Animation Node (Keyframe Animation, Mover, Alternator,...), for more information see Animation and State Engine.
- Yellow Dot: Node is connected to Template Data
- Lightblue Dot: Node is connected to Scene Data
- Purple Dot: Node is connected to Project Data
- Grey Corner: Node is linked multiple times within a hierarchy
If a node is rendered in a light grey, it has been blocked. If a line is drawn through the node icon, the node has been set inactive. For both, see Blocked and Inactive.
Container & Families
Since complex scenes can require a large rendering hierarchy, Ventuz offers a number of features to give further structure to a scene. The Content Editor can group nodes in Families by drawing a gray rectangle around them. This does not change the functionality but is simply a visual queue to the user that these nodes belong together. To create a family, select multiple nodes in the Content Editor and then click on Menu / Node / Create Family or press CTRL + SHIFT + F.
Even more powerful is the usage of containers which are provided in the form of the Hierarchy Container and the Content Container. Nodes can be dragged into a container to create a "meta-node" that contains multiple nodes and bindings but looks and acts in the Hierarchy like a single node. Containers can be entered by double-clicking on the arrow on the left side inside the node icon.
As an example, a customized slider functionality might be implemented as a container containing multiple geometries, textures and logical elements. Copying them to every place in the scene that a slider should be used, would be tiresome and error-prone. Creating a container and then using that as a customized node is much more effective.
The topic of containers is so important that it will be discussed more in-depth under Containers and Interfaces