How To Get Ventuz Running
Table of Contents
Introduction
Taking the first steps in a new software can be a daunting task, especially if it is one that is as complex as Ventuz. This How To will guide you from the very first steps of installing the application to creating a simple Ventuz scene.
Requirements
- Windows 7 or Windows 8 with latest service pack installed. Neither Windows XP nor Vista are supported from Ventuz 3 upward.
- Graphics Card: This can either be a consumer or professional grade card but it should have dedicated graphics memory. Although it is technically possible to run Ventuz on even a cheap built in laptop 3D chip (as long as it supports DirectX 9), those chips can exhibit weird behavior for demanding 3D applications. If you plan to run Ventuz in a professional environment, we recommend buying a professional card such as an ATI Fire Pro or nVidia Quadro. Trust us, in the long run they will be cheaper than hunting down weird last minute problems just before running a show...
- Latest Graphics Card drivers installed
- A user account with administrator rights. Depending on your machine's security policies, it may suffice to have an ordinary user account.
Ventuz License Features
Ventuz comes in a number of optional Features which vary in price and functionality. Detailed information can be found under Ventuz License Features.
For this How To, we'll assume that you haven't purchased a license yet and simply requested a PLE license key as described on the Getting Started page.
Scenes created with the Professional Learners Edition cannot be loaded in any other Ventuz version even if you buy a license key later on. Therefore it is not possible to use the PLE version to build a scene and then just buy a license last minute to run the show!
The only difference between the Features is the available license, they all use the same installer.
Installer
All installers can be found on the Ventuz Download page. Get the latest one as it will contain all bugfixes and features available at that point.
Once it has finished downloading, double click on the installer. You will be presented with the End-User License Agreement which you have to read and accept in order to proceed. Choose the type of installation and location and you're ready to go. Hit Install and after a few minutes you will have your very own installation of Ventuz. If you keep the box at the end of the installer checked, it will automatically launch the Ventuz Designer where you can create your scene.
Because there is no license found the License Manager Dialog opens and you can request a Professional Learner Edition license and than start the Ventuz Designer.
Using the Designer
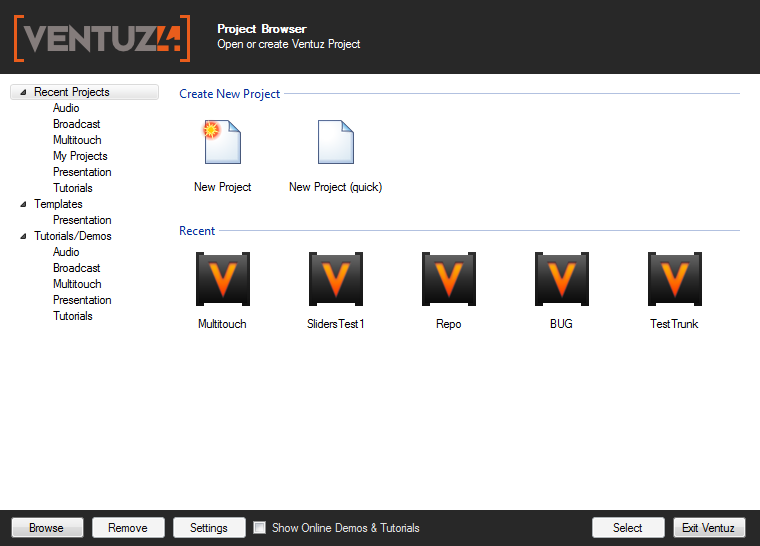
The first thing you'll see after the Ventuz Designer has finished launching is the Project Browser. A project is a collection of presentations (called scenes) that use common resources (Assets) such as images, movie clips and so on. Since you don't have one yet, choose "New Project". Once you have created and used some projects, they will be listed in the "Recent" section of the browser for quick access.
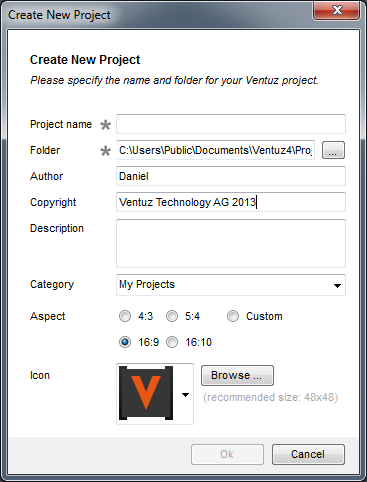
A project stores global information about the project like Project name, Folder , Aspect Ration and do forth. Fill out the fields and press Ok to create the project.
Once you're done, the project will be created, opened and you'll see the Ventuz User Interface which consists of multiple dockable windows. Ventuz automatically has created a new empty scene and since there is nothing in there yet, the render output in the lower right corner is black. Let's change that. In the lower left corner you'll find a tab saying Toolbox. Click on it to activate the Toolbox which hosts all the Nodes that are available in Ventuz.
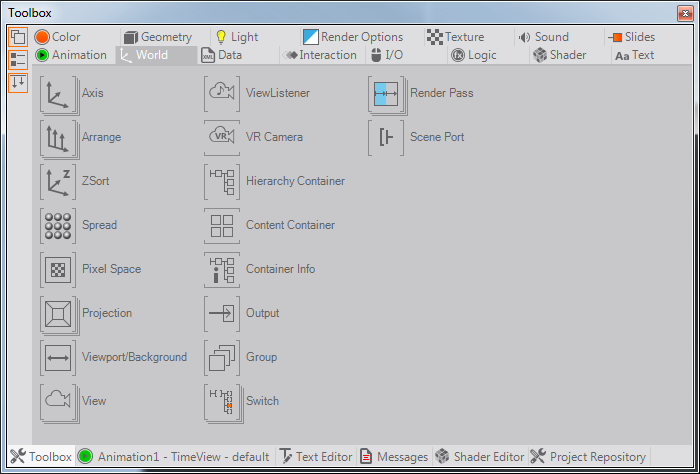
Nodes are the building blocks for constructing a Ventuz scene. Each node has a name, an icon and some function it fulfills. There is, for example, a node to render a Cube. Click on the Geometry tab inside the Toolbox and locate the icon next to the label saying "Cube".  Left-click on the icon and hold the mouse button. Continue to hold the button and move the mouse cursor straight up to the big area with the label Hierarchy on top of it. Release the mouse button and you should see a white square in the render output. You have added your very first node to a scene.
Hierarchy and Content
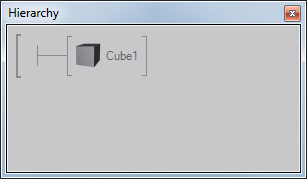
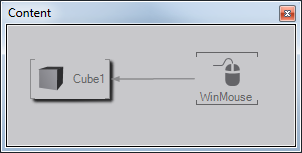
The area you dropped the node in is called the Hierarchy Editor. The Hierarchy of a scene is a tree of nodes that tells the graphics card what elements and in what order it should use to render the scene. This can be geometry, Axis to position elements, material assignments, and much, much more. You may have noticed in the Toolbox that there are nodes that have black brackets to the left and right of the icon and others with orange brackets at the top and bottom. The former ones are Hierarchy Nodes which belong to the Hierarchy, the latter are content nodes which belong to the Content of a scene. As you can see in the Content Editor (right next to the Hierarchy Editor), the cube belongs both to the Hierarchy and the Content. This is true for all Hierarchy Nodes. In contrast, Content Nodes only exist in the Content Editor. They provide or process information but do not directly interact with the way the scene is rendered. For example, the Windows Mouse node can be used to track the current mouse position which in itself does not change the render output. Go to the I/O tab and drag a mouse node to the Content Editor. Did you note that the Mouse icon had multiple lines around its icon? This is because there are multiple nodes listed under that icon. When releasing the mouse button after dragging to the Content Editor, Ventuz will ask which of the nodes in the list you want to insert. Choose Windows Mouse.
Properties
You may have noticed the dock window on the right with the label "Properties". This is the Property Editor which shows attributes of whatever node is currently selected. To select a node, click on it in the Hierarchy or Content Editor. The selected node is marked with an orange rectangle. Click on the Cube and you will see a table with multiple rows. Locate the one saying "X" and double click on the number right next to it. Enter another value - let's say 5 - to change the cubes size in X direction. Notice how the white square in the render output gets larger. The input properties of a node influence how a node performs its function. Now click on the "Outputs" button in the Property Editor. As you can see, there is nothing here.
Select the WinMouse node. Unlike the Cube, this node actually generates output values. To check what the current values are, click on the small magnifying glass icon on the top right of the Property Editor (Monitor Values). Now click into the renderer window and as you move the mouse, see how the values change. So what can we do with this? Actually, quite a lot. We can actually use the outputs of one node to feed the inputs of another.
Select the Cube again and switch the Property Editor back to inputs. Again, locate the row with the label "X" but now drag the name on to the mouse node. When you release the mouse button over the node, Ventuz will pop up a list of all outputs on the mouse node that are compatible with the input you dragged. Let's say we choose "ClippedX". A black arrow is created between the two nodes in the Content Editor to show the binding. Now move the mouse cursor inside the renderer window and see what happens. The farther the mouse goes to the right boundary, the bigger the cube gets!
Okay, this may be a silly example, let's delete it. click on the arrow between the two nodes and click on the little cross to delete the binding. Let's try something else:
- Add a mover node to the content (hint: it's in the Animation tab)
- Change its properties: min to 0, max to 360 and duration to 5
- Add an axis in front of the cube in the hierarchy (hint: it's in the World tab. To insert it, drag it to the left side of the cube icon until a red arrow pointing to the left appears)
- Bind the Axis Y-rotation to the Mover's Value output.
We've got a rotating cube! Do you get how it works? The mover takes 5 seconds to go from 0 to 360. It puts its current value into the output property which than feeds the rotation around the Y-axis in the Axis node. But wait, the mover moves from 0 to 360 and back. Let's change that... but we're not going to tell you how. Move the mouse over the Mover node and press F1. This will open the user manual description for this node where you find all the properties described. See if you can find out yourself what you have to change so it continues to rotate into one direction...
Conclusion
Well, we hope you had fun. We barely scratched the surface in this How To! There are tons of nodes, each offering its own functionality. But every single one of them is documented in the user manual and each one has a help scene that shows how it works. To access a help scene, go to the node of interest, press F1 and choose "Example Scene". Another way to approach Ventuz is to just open the user manual (also via F1) and start reading. You'll find lots of stuff to explore in there...