How To Create a Traditional 2D Slide Show
Table of Contents
This How To will show you how to create a plain traditional 2D slide show with a few twists. The Slide Manager Node will be used to set up multiple locations for slides and to transition between them.
Introduction
Although Ventuz truly shines at 3D graphics, a lot of people use it as an alternative to traditional presentation software such as Microsoft's PowerPoint or Apple's Keynote. While it can be a bit more tricky to put together a presentation compared to other applications, there are various aspects of Ventuz that make it worth the effort. In the course of this How To, we will create a 2D-style slide show and show just a few things that are not possible in a 2D-oriented software package.
Setup
Our scene will consist of two parts: The slides themselves and an overlay layer for a header and footer. Start with adding a Slide Manager node and a Viewport to the scene. Double click  on the Slide Manager and rename it to World. Rename the Viewport to Overlay.
For now, deactivate the Viewport by selecting it ( click) and then pressing CTRL + A. We will use it later to add a header/footer to the presentation. For now, lets focus on the slides.
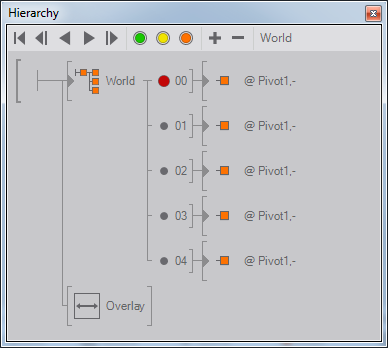
After adding the Slide Manager to the scene, a button bar appears on the top of the Hierarchy Editor. This is called the Slide Manager Toolbar. Use the plus/minus buttons to adjust the number of slides you require. For this How To, we're just going to need three. The slides that no longer have a connection to the Slide Manager will be listed on the bottom of the Hierarchy Editor underneath the label "Unlinked Item". Simply select all nodes there and remove them.

Slide Content and Animation
Each Slide is a Hierarchy Container that can contain any number of nodes. Double click on the triangle on the left inside the Slide node icon. This will take you to the inside of the slide. For now, we'll just add some text to act as a placeholder. Drag a Text2D from the Toolbox to the Hierarchy Editor and choose Block Text from the popup. Click on the three dots in Text Property field and change the text to Slide 1.
The only requirement of a Slide (besides having some content) is to have a single Keyframe Animation. The Slide Manager uses the animation to fade into a Slide, go through the different steps of a slide and then fade out the slide again. To be more precise, the Manager expects the Slide to contain an Animation State Logic, a network of States and Transitions.
Always make sure there is exactly one keyframe animation on the top level of a Slide. If other animations are required, put them into Deeper Container Levels with the Slide.
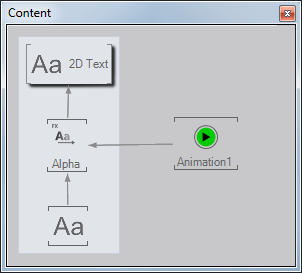
Let's make the text appear and disappear when fading in/out a slide. Select the Text2D and drag a Text Effects node from the Toolbox to the Content Editor. Drag it over the connection line between the Block Text and the Text2D node until the connection line is drawn completely black instead of the usual dark grey. Dropping it now will insert the new node between the two connected nodes and automatically adjust all bindings. Choose Alpha Effect from the popup. We are going to animate the Progress property of this Alpha Effect node. Drag a Keyframe Animation node from the Toolbox to the Hierarchy Editor while inside a Slide. Re-select the Alpha Effect node and bind the Progress property to the animation.
Head over to the Animation Editor by choosing View/Animation Editor from the main application menu bar. In the left column, an Animation Channel for the Alpha Progress has already been created. Select it by clicking on the label "Alpha". Now go to the Logic View by clicking on the button that looks like a triangle. Double click in the big white right column to create your first State. A green circle will appear. Move the mouse a bit to the right and again double click to create a second state which will be drawn blue. single click on that state to select it and in the Property Editor change the Type property to Presented. Create a third state and change its type to EndDefault. These three states represent the situation when the slide manager activates a slide ("Begin"), the slide is fully visible and all animations are complete ("Presented") and the slide has completed its fade out animations ("End").
Move the mouse over the first state, press  and drag it over the second state. Release to create a connection/transition between the two states. Do the same for S2 to S3.
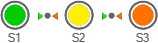
Note the green and red triangles at the ends of the connections. Those decide which outgoing connection of a State is used when the Next/Prev buttons are pressed in the Slide Manager Toolbar. Make sure to draw the connection from S1 to S2, not S2 to S1!
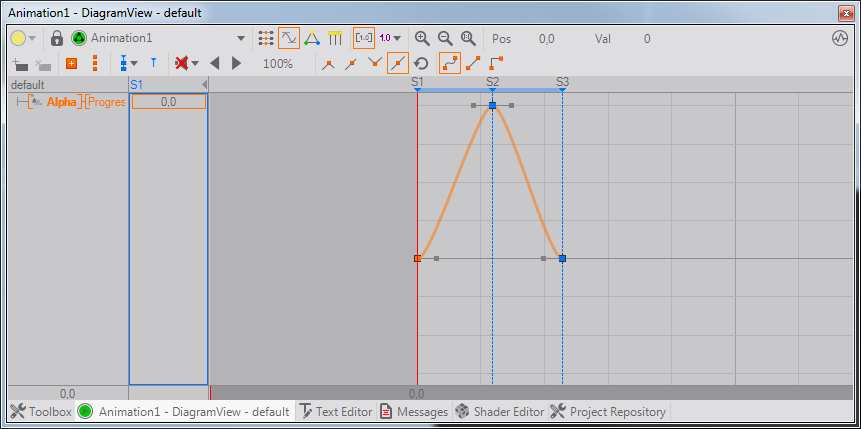
Switch to the Diagram View by pressing the button left of the Logic View button. This shows the function curve of the progress value over time. Press  to pan and turn to zoom. Initially, the value will be constant at 100%. Move the mouse over the left of the three blue boxes and drag it down to the zero line. Do the same for the box on the right. This will have the progress at 0% when in S1 or S3 and 100% when in S2. Click and drag anywhere in the empty region to move the red time line and see how the value changes in the middle column.
The three States Begin, Presented and End of the currently active Slide can also be tested by pressing the green, yellow or red button in the Slide Manager Toolbar.
Step outside of the Slide, delete the other two slides and replace them with copies of our animated Slide by dragging the Slide to the other outputs while holding CTRL. Go into each copy and change the text to Slide 2 and Slide 3 respectively.
World
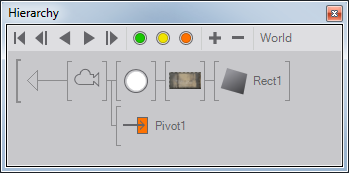
With that in place, we're now going to design the world our slide show is running in. This is kind of like the background in a traditional presentation software. The world contains everything that is not directly related to an individual slide. Double click on the triangle of the Slide Manager node to enter the container. You'll see one Pivot node already existing inside the Slide Manager. A pivot defines at which location and orientation in 3D space a slide can be shown. But for now, we can safely ignore it and come back to it later.
Pretty much any node can be used inside a Slide Manager to create the "background" or world. What we are going to do for this example, however, is comparatively simple:
- Drag a View node from the Toolbox to the Hierarchy Editor and choose Camera. Insert the camera in front of the Pivot.
- Above the Pivot, add a Rectangle and change its size to 55/55.
- In front of the rectangle, insert a Color node and a Texture node. When dropping the latter, choose Image Loader. Select the Texture node and click on the three dots on the right of the File property in the Property Editor.
Choose a texture that has a number of interesting details in it but is unobtrusive. What usually works best are so called grunge textures, of which are many freely available on the Internet. We will later use a number of regions from this texture as backgrounds for our slides and then move the camera between them to transition between different slides.
Reviewing the Slide Show
This is a good time to review what we got so far. Use the Reset button in the Slide Manager Toolbar and then press the Next Button. The first Slide should fade in. Pressing next again should fade it out again and have the next Slide fade in. Each press of the Next Button will advance a Slide by one State of its Animation Logic, always using the connection that is marked as the next transition (green triangle in Logic View). If the End State is reached, the Slide Manager activates the next Slide, sets it to the Begin State and starts the transition marked as next. A Slide can of course have more than just Begin/Presented/End States, for example to have a Slide unveil its content step by step. The important thing is to correctly set the next transitions and to assign the Presented type to the State that represents the full Slide content.
By default, only the active Slide is rendered. Select the Slide Manager and change the VisibleMode to CurrentAndNeigbhors (if the property is not visible, see favorized properties). This will have the previous and next Slide be rendered as well. Then go to each Slide and change the EaseIn and EaseOut properties to -1. This will make the fade in/out of successive Slides overlap.
Pivots
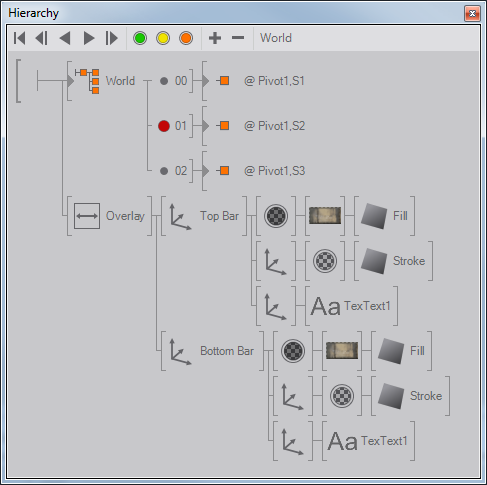
To make the presentation more interesting, we'll assign each Slide to a different position in the World. Go into the Slide Manager node and add two more Pivot nodes. Insert an Axis before each of the three Pivots. Then step out of the container and select the second Slide. Change its Pivot property to Pivot2 and the third Slide to Pivot3. Then go back into the Slide Manager.
Use the input properties of the Camera node to find a nice looking region of the texture. Make sure to not use the Pan or Tilt property to always keep the camera looking orthogonally on to the rectangle. However, feel free to use the Roll property! When having located an interesting region, use the Axis in front of the first Pivot to move the placeholder text we created inside the first slide right into the center of the interesting region. It may help to temporarily use the camera to zoom out, roughly position the pivot and then zoom back in to do the fine tuning. Have the text in the center of the camera view and correctly horizontally aligned.
Repeat the steps for the second Pivot. Before placing the third, step outside the Slide Manager Container and double click on the circle next to number 02. This activates the third Slide (the circle will change from gray to green) which was not rendered before. Step back into the container and proceed as with the other pivots. Make sure to choose a different position and Roll rotation for each pivot!
Slide Transitions
Now each Slide is in its own location but the Camera stays fixed in one place. To solve this, add a Keyframe Animation to the inside of the Slide Manager node and bind the Camera nodes X/Y/Z and Roll to the animation. Go to the Animation Editor, select all Animation Channels by clicking on the label "Camera" in the left most column. Go to Logic View and create three Animation Logic States with connections between them. Then step outside the container and change the State property of each Slide such that Slide2 uses S2 and Slide3 uses S3. When a Slide is activated, the Slide Manager will look for a connection between the current State and the one specified on the Slide and use it if it exists.
Go back into the Slide Manager and open the Diagram view in the Animation Editor. Make sure the Animation Channels are still selected. Click and drag in the diagram area to move the red line exactly to S1 until a blue rectangle is drawn around the middle column of the Animation Editor. Use the values in the middle column to move the Camera to the position/orientation of your first Pivot. Then move the red line to S2 and again change the parameters to match the Camera with the second Pivot and so on. Optionally, you can adjust the shape of the parameter curves to change the interpolation behavior between the different states.
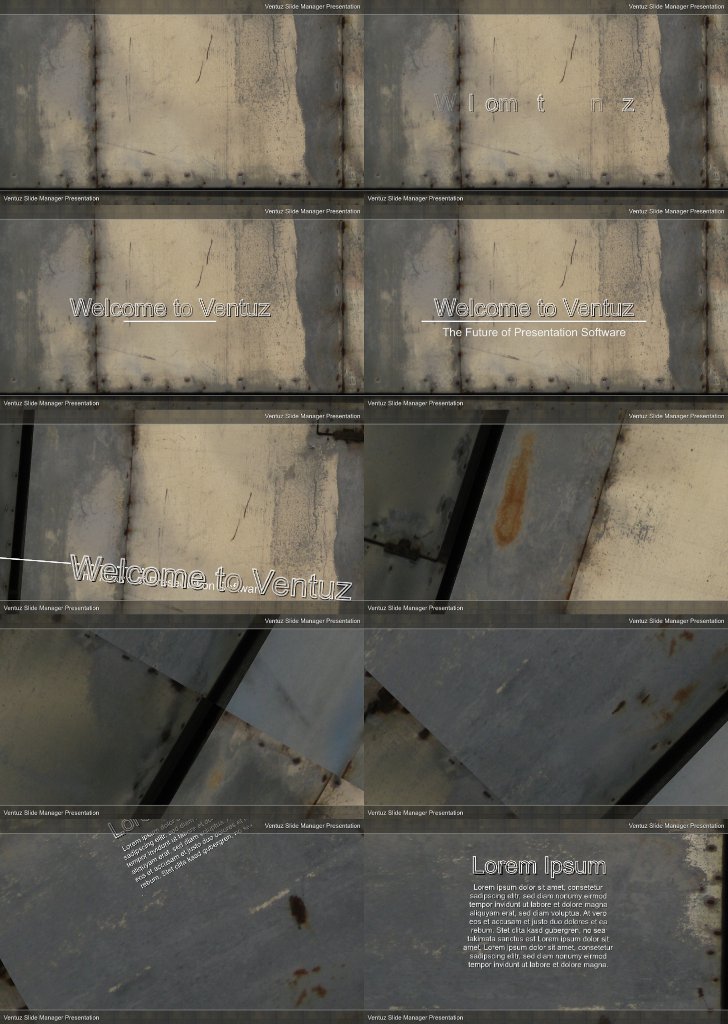
Now use the Slide Manager Toolbar to review your slide show once again. When jumping to the next slide, the camera animation should be triggered and the view will change to the next Pivot. While not strictly necessary, using a different orientation for each Pivot will create an interesting effect, so does going closer to or farther away from the Rectangle. The effect can be enhanced by having the Slide contents not just simply fade in/out but move towards the camera or in any other direction while the Camera moves away.
Overlay
The final touch on our presentation is a nice header/footer. Select the Viewport in the Hierarchy Editor and re-activate it by pressing CTRL + A once again. Uncheck the Background/ClearColor property (if not visible, see favorized properties). The viewport will now clear the depth buffer (allowing the nodes under the viewport to paint over whatever was rendered before the viewport) but keep the color information of what was previously rendered.
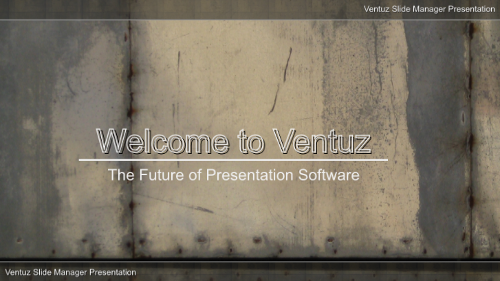
To create the header, add a Rectangle with an Axis in front of it to the Viewport. Make the Rectangle wide enough to fill the entire length of the rendering output and adjust the height to an appropriate level. Then use the Y-Position of the Axis to align it with the top of the screen. Add a Color node with a dark color and an Alpha at 60%. Optionally, add a Texture node with the same grunge texture as the background and change the Scaling property in the Mapping node to have it repeat multiple times over the length of the header. This will add just a bit of subtle structure to the header.
Add another Rectangle with a bright color. Make it also wide enough to stretch over the whole screen but very thin. Move it to the bottom edge of the bigger Rectangle. This will create a nice Stroke that separates header from main content. Place some text or logo on top of the header, for example the title of your presentation. Create a footer with the same technique to get the final result.
Conclusion
The most difficult part about creating a Ventuz slide show is to create a style or template. Designing a nice background/world, fade in/out transitions for individual slides, Slide content, ... once those are created, filling a presentation with content is pretty simple. Even more so if the designer properly used Interfaces to expose relevant properties so the user does not have to concern about the Slide implementation.
The major advantages of using Ventuz for a slide show are:
- Everything is 3D: We only used a static 2D background, but the background can be a complex, animated world and pivots can be used to connect different stages in the world. Presenting 3D objects/content is much easier as in a 2D oriented software.
- Full flexibility: Transitions between and animations within a Slide can harness the full power of the Ventuz Animation Engine. Using the State Logic, a truly non-linear way of presenting is possible.
- Data processing: Ventuz's capabilities for integrating external devices and data enables the user to integrate databases, custom presentation devices, live data coming from online sources and much more.
- Performance: Ventuz allows for the seamless integration of large textures, video footage, 3D objects, or any other assets without breaking the presentation. Naturally, this is limited by your hardware, but different than most presentation software, adding complexity or media rich content will not put your presentation at risk!
Most users design a world and a small number of template slides and add them to their Repository. This is great if more than one talk is done with the same look and feel as creating a new talk then amounts to dragging slide nodes into the scene and changing their content.