Texture
 | Texture | This node maps textures from images, movies or live video on geometries. |
A Texture node can be bound to any node that has an output property of the type Texture to activate that texture in the render process. Most of the times, it is used in conjunction with one of the Image Loader, Video or RenderTarget nodes. The texture will be set and enabled on the graphics card for all nodes below (to the right in the Hierarchy Editor) the Texture.
In Ventuz, it is important to distinguish between an Image and a Texture. A Texture is an image that has been specially converted, loaded into the graphics card memory and thus is ready for rendering. To bind an Image-type property to a Texture-type property, use the Image To Texture node.
Mapping
A texture is applied to an object by mapping each point of an objects surface to a texel (the name for a pixel in a texture). This is done by assigning an additional set of coordinates to each vertex of a mesh called U/V-coordinates. U/V-coordinates can have any arbitrary value but are usually assigned so that they lie between 0/0 (lower left corner of the texture) and 1/1 (upper right of the texture). When a triangle is rasterized into fragments, the vertices' U/V coordinates are interpolated and the texel at that interpolated U/V coordinate is mapped to that fragment.
All geometric primitives (i.e. Rectangle, Sphere, ...) have a Texture property that specifies how automatic U/V-coordinates should be generated for a mesh. When importing geometry from another program, it is the designers responsibility to assign and ensure proper U/V-coordinates when creating and exporting the model.
By attaching a Mapping Node to a Texture node, the U/V-coordinates of a mesh can be processed through a mathematical equation to scale, rotate, translate the texture on the objects surface.
Render Mode
In high resolution Multimachine Setups you could reach the point where you have to presplitt your images and textures to decrease the memory and performance load. If you do so the ScreenAligned property needs to be disabled otherwise the content will be streched across the cluster.
The ScreenAligned property only affects the texture in combination with an Overlay Rectangle.
Filtering
When a fragment tries to retrieve the texel for a specific U/V-coordinate, this will in general not be 1:1 mapping. If a 256x256 texture is used on a rectangle that fills 400x500 pixels when rendered to the screen, the graphics card has to "resize" the texture appropriately. There are different strategies to figure out the final texel color for the U/V-coordinate of a fragment:
- Point: Uses the texel whose center is closest to the U/V-coordinate
- Linear: Uses 2x2 texels around the U/V-coordinate to interpolates the result color
- Anisotropic: Compensates for distortion caused by the difference in angle between the texture polygon and the plane of the screen.
For Anisotropic filtering to have any effect, the MaxAnisotropic value needs to be larger than 1.
The filtering strategy can be set individually for three cases:
- Magnification: The texture as rendered to the screen is larger than the texture resolution, therefore each texel has to be magnified
- Minification: The texture as rendered to the screen is smaller than the texture resolution, therefore multiple texels have to be combined to one color value.
- Mipmapping: When the difference between texture resolution and screen size gets too large, standard magnification/minification can lead to artifacts. The Texture Loader and the Image To Texture node can generate multiple versions of a texture in different resolutions so that the mismatch in size is reduced. This technique is called mipmapping and the respective filter specifies how texels from different mipmap levels are combined.
For more information on filtering, see Wikipedia: Texture Filtering.
Stages and Shading
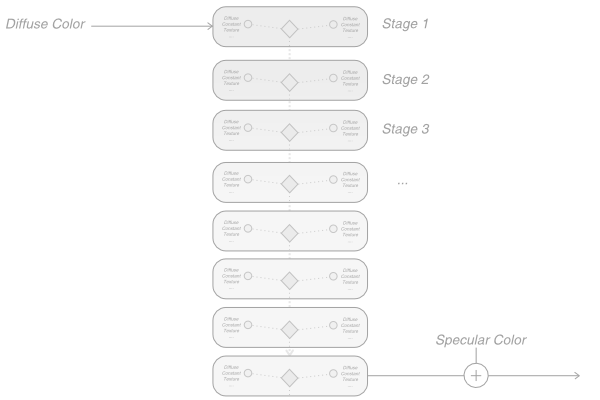
A texture has to be assigned to one of the 8 texture stages via the Stage property. The stages represent the active textures in the render engine. When a fragment is shaded, Ventuz computes the diffuse shading, applies all active textures and then adds the specular information. In increasing order, each texture stage performs one out of multiple possible texture blending functions and then passes the result to the next stage.
Additional there are two dedicated stages Vertex 1 and Vertex 2 . If the texture is set to one of these it can be used inside the Vertex Shader of a HLSL Shader. For further information see Vertex Textures inside HLSL Shaders.
Ventuz defines a number of standard shading functions:
- Disabled: The stage performs no operation and all stages with a higher stage number will be skipped.
- Default: Multiplies the color and alpha received from the previous stage with the texture color and alpha.
- AlphaBlend: Uses the alpha channel of the texture to interpolate between the texture color and the color received from the previous stage. The alpha channel will not be modified.
- AlphaMap: Copies the color channel of the color received from the previous stage but multiplies the alpha channel with the alpha channel of the texture.
- BumpMap: Performs bump mapping, using the texture in the stage as an environment map. The alpha channel is multiplied with the alpha of the texture.
- Add: Computes the sum of the color value from the previous stage and the texture. The textures alpha channel will be copied to the stage output.
- Add Smooth: Same as Add but substracts the product of the texture color and the color received from the previous stage.
- ShowAlpha: The color received from the previous stage is scaled by the alpha value of the texture.
- NoAlpha: Same as Default but ignores the textures alpha channel completely.
To create a custom operation, either select the Texture Node and open the Texture Shading Editor from the main menu bar or choose Custom from the list of available shading types. For more information, see Texture Shading Editor.
The Stage property is by default set to Next which makes the Texture node use the texture stage with the lowest number that is not already in use. The other options are to assign a specific stage or to overwrite the stage with the highest number that is active. As stated before, a Texture Node makes its texture inactive after all child nodes in the Hierarchy have been rendered.
For more information, see MSDN: Texture Blending.
Bump Mapping
Bump Mapping is a normal mapping technique that calculates shading by manipulating normals based on information stored in a texture. This technique is often used to give objects the appearance of roughness of a specific material without increasing the number of polygons. For more information, see Image To Bumpmap Node.
The bump properties are based on the DirectX Bump Mapping Support. Bump00 to Bump11 describe a 2x2 matrix that can be used to manipulate the normal offsets retrieved from the bump map.
Another more sophisticated way of creating BumpMaps is the use of the BumpMap Shader.
Advanced Properties
- DMapOffset: Used as offset in displacement maps.
- GammaCorrection: Used for gamma correction, zero indicates no gamma correction.
- MaxAnisotropy: The degree of anisotropic filtering. If 1 or less, anisotropic filtering will degenerate to linear/mipmap filtering.
- MaxMipLevel: The maximum mipmap level that the graphics card is allowed to use from the levels available for this texture. Zero indicates the finest level can be used. By increasing this value, the graphics card is forced to use lower resolution levels.
- MipMapLODBias: During rendering, the graphics card calculates a mipmap level that is suitable for the current size of a textured triangle. Using the bias, this calculation can be influenced. Each unit of this value changes the decision by one mipmap level. A negative value results in a sharper but more aliased image, a positive in a more blurred image.
- TextureSet: If a texture contains multiple texture elements, this can be used to specify which set should be used.
- ConstantAlpha: Constant that will be passed to the Texture Blending stage and can be used as one of the arguments for the blending operation.
- ConstantColor: Constant that will be passed to the Texture Blending stage and can be used as one of the arguments for the blending operation.