How To Create a Simple Movie Template
Table of Contents
In this tutorial you will be taught how to create a Template for the Ventuz Director that simply shows a movie in the background and scrolls a text in the foreground.
Introduction
In some cases it is very helpful to know a fast way to create a simple Template for the Director by turning down Keyframe Animations. The goal of this How-To is to build a simple template that only shows a Movie Clip in the background and has some additional features, for example a scrolling text in the foreground.
Building the Scene
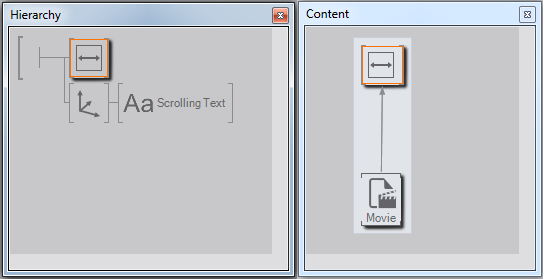
The first step is to build the scene itself, that will represent the template for the Director. For this template we only need a Viewport node with a Movie Clip Loader as a texture and a 2D Text node with a Scroll Text node as text provider. Instead of the Scroll Text you may use any kind of content - for example an RSS Ticker may be interesting.
Bind Properties to Scene Data
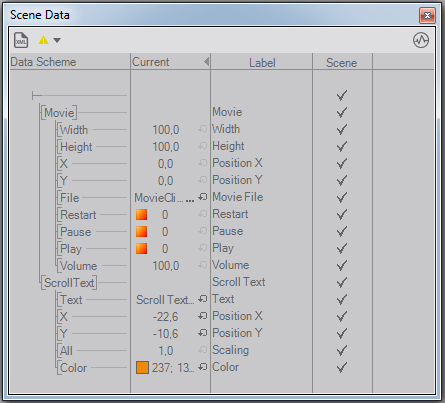
Now that you have the actual appearance of the Template ready to use, you must provide some modifiable Data to the operator of the Director. To do so you have to drag and drop  the wanted properties into the Scene Data Editor (you may open it by clicking on "View" -> "Scene Data Editor" in the main menu bar).
Drop every property that you want to be modifiable into any of the columns but the leftmost one. Consider the Size and Position properties of both the background and the text. Also you may add a Color node to the text and bind its Color property.
Improve Usability of the Template
You will now have a list of unsorted properties often with meaningless names. To sort them you may click long  on the root symbol
  and then choose "Create Sub Folder". Then drag the Data behind that new Sub Folder. If necessary you can create a folder inside another folder as well.
Next you may want to label the Data in a way, that the operator later recognizes the properties. Double click on the Label property in the Scene Data Editor to rename a Label.
It is now more comfortable for the operator to set the values of the bound properties. He has to set all of the values to create a nice looking result, though. So check the Default Values of the Scene Data in the Property Editor and set them to values that make the result look good by default.
The last thing to do now is creating a Thumbnail to let the operator recognize the template more easily. Click inside the Hierarchy Editor. Two buttons appear on the bottom of the Poperties Editor, click on "Create Thumbnail" to make a screenshot and use it as Thumbnail in the Director. You may also rename the template in the Properties Editor (change "Display Name").
Conclusion
Now you know an easy and efficient way to create a simple Template that shows a Movie and a Scrolling Text. To read about a more general Template created this way see the How-To: Create Templates Without Keyframe Animations. You can also create further elements for this Template or read more about the Template Engine of Ventuz, like how to use Project Data or adding Subtemplates.