Render To Disk
Table of Contents
Ventuz supports two ways to create image sequences or video files from any Ventuz scene. The first is a GUI-based Render-To-Disk functionality available in Ventuz Designer. Second way is a dedicated Remoting API.
Restrictions
If a custom Render Setup is used, Ventuz always renders in the resolution of the current Render Setup in the active mode (Machine or Cluster Preview or Production Preview). The result is scaled down to the actual output resolution. This may result in scaling artifacts!
Since rendering to disk is usually faster than real-time, any live video source appears with a corrupted timing
In Internal Software Key mode the Live Video background is not part of the Render To Disk result.
For both cases, the Render-To-Disk process is divided into two main steps:
- Recording of user interaction or remote commands (only in interactive mode)
- Playout or rendering of the loaded scene with the previously recorded data.
In this second step, the actual creation of the output files takes place.
GUI-based Render To Disk
Overview
To start the GUI-based Render-To-Disk functionality, select Render To Disk in the Renderer menu of your Ventuz Designer.
![]() This will bring up a dialog which initially looks as follows:
This will bring up a dialog which initially looks as follows:
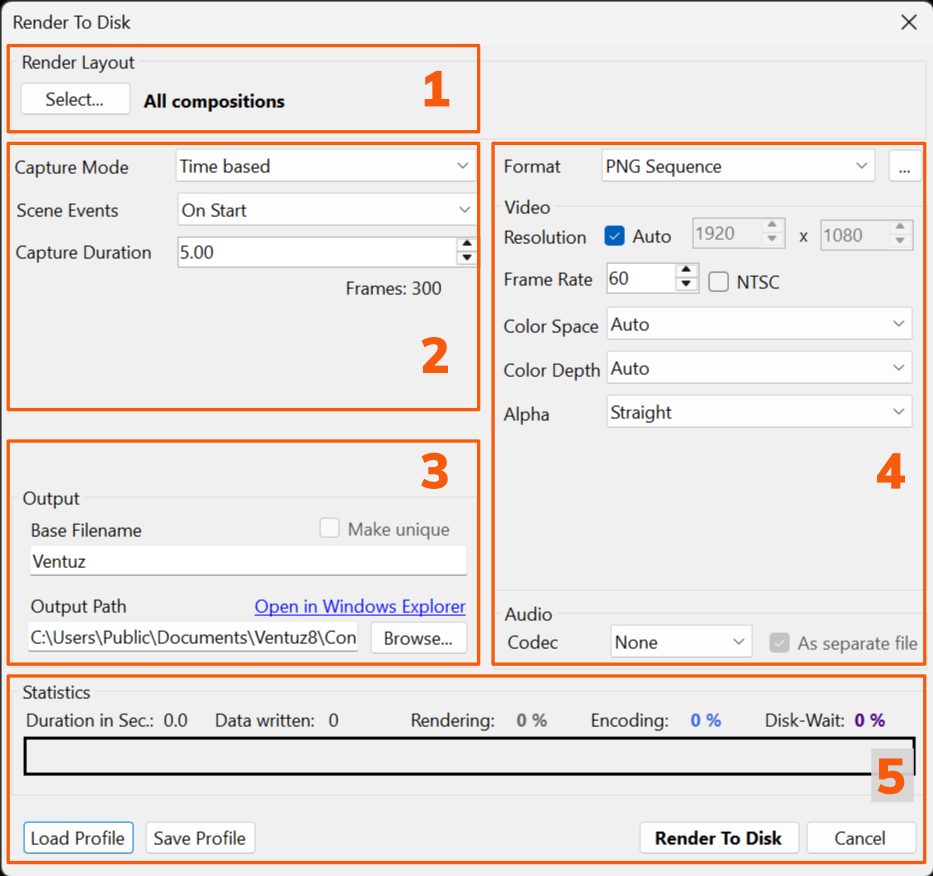 1: Render Layout: Define here which output should be used for the capture. With Select... the Screens, the Design Preview, Compositions, Machine Output - all as defined by the local setup or Render Setup - or the local GPU output can be specified. When all <All Screens> or multiple outputs are selected, the rendering of each output will be saved in an additional file.
2: Control Section provides some scene initialization options and the main controls for the recording and playout steps. The Scene Events option specifies if the active scene should receive a Scene Activate event when the playout starts. If this option is either set to On Prepare or On Start, the scene will act as if it just has been loaded. The option On Prepare is only available in Interactive capture mode. In this case, the event gets fired before the initialization phase of the recorded interaction. Nodes like Scene Event, Movie Clip as well as state based Keyframe Animations react on Scene activation.
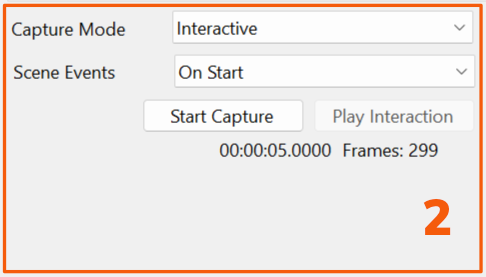
The Capture Mode specifies if interaction with the scene via mouse, keyboard, touch devices or TUIO devices should be captured during the recording step (Interactive mode). In Time-Based mode, only a capture duration can be specified and scene interaction is only possible via the Scene Activate event.

In Interactive mode, Start Capture starts the recording of the user interaction. The interaction recording is divided into two phases: in the first phase (preparation) the user can record, reset and initialize inputs; in the second phase, the inputs for the actual playout are recorded. If user interaction has been recorded, it can be played back by triggering the Play Interaction button. The actual playout to disk is started by pressing the Render To Disk button. The interaction capture of phase 1 is played back first and then afterwards the recording starts with phase 2 interactions.
3: Output
The Base Filename defines the naming for the image files written to disk. For image sequences, a five-digit number is automatically appended to the base name so that the resulting image names look as follows:
<baseFilename>_xxxxx.<containerFormat>
With Make unique Ventuz automatically appends a unique number to the basename for video files, to not overwrite prior renderings.
The Output Path specifies the destination folder for the image sequence. Click on the Open in Windows Explorer link and a new Windows Explorer window with the specified path will be opened if the path is valid.
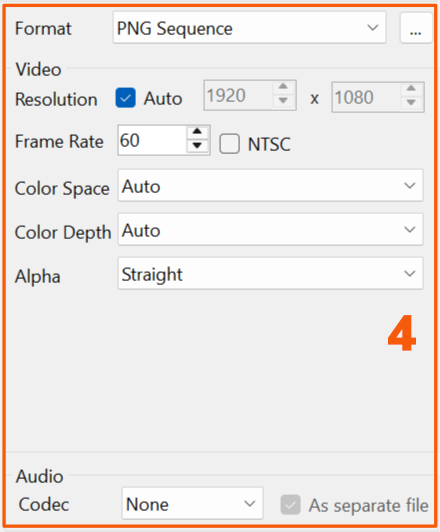
4: Video Format section provides options to specify the image or clip format of captured frames like resolution and frame rate as well as color and audio options. Four Image File Formats are currently available, all of them supporting an alpha channel: BMP, PNG, TGA, TIFF, EXR. Following movie formats are available: the QT Animation format writes a Quicktime Animation (loss-less RLE compression) in a MOV container; the HuffYuv writes a movie with the according codec to an AVI container; the XDCAM format creates movies in XDCAM 442 format to MXF container. Note that the XDCAM format only supports the standard 720p, 1080p and 1080i broadcast formats; DNxHD / DNxHR format creates movies in DNxHD - 440x/440/290/90 for 1080p, DNxHD - 220x/220/145 for 1080i/720p, DNxHR supports 444/HQX/HQ/SQ/LB formats with optional VBR (variable bitrate). Hap/ Hap Alpha and Hap Q wirte HAP movies to a mov container. H.264 (AVC), HEVC (H.265) and AV1 are using the mp4 container, due to compatibility reasons with other tools.
All video format settings of this section can be written and loaded to Render to Disk presets (.vr2dprest), by clicking on the top right corner (...) button.
Movie File Formats
| Codec | Container | Audio |
|---|---|---|
| QT Animation | mov | 48kHz 16/24bit PCM stereo; separate wav file |
| HuffYuv | avi | 48kHz 16/24bit PCM stereo; embedded |
| XDCAM HD 422 | mxf | 48kHz 16/24bit PCM stereo; embedded |
| DNxHD | mov | 48kHz 16/24bit PCM stereo; embedded |
| DNxHR | mov | 48kHz 16/24bit PCM stereo; embedded |
| Hap / Hap Alpha | mov | 48kHz 16/24bit PCM stereo; embedded |
| HapQ | mov | 48kHz 16/24bit PCM stereo; embedded |
| ProRes | mov | 48kHz 16/24bit PCM stereo; embedded |
| H.264(AVC) | mp4 | 48kHz 16bit PCM / 320 kbit/s MP3 / Opus, stereo; embedded |
| HEVC (H.265) | mp4 | 48kHz 16bit PCM / 320 kbit/s MP3 / Opus, stereo; embedded |
| AV1 | mp4 | 48kHz 16bit PCM / 320 kbit/s MP3 / Opus, stereo; embedded |
DNxHR Specifications
| Preset | Quality / Resulting Bit |
|---|---|
| DNxHR 444 | Finishing Quality - 12-bit 4:4:4 |
| DNxHR HQX | High Quality - 12-bit 4:2:2 UHD/4K Broadcast-Quality |
| DNxHR HQ | High Quality - 8-bit 4:2:2 |
| DNxHR SQ | Standard Quality - 8-bit 4:2:2 |
| DNxHR LB | Low Bandwidth - 8-bit 4:2:2 |
DNxHD/DNxHR are written into a MOV container.
Apple ProRes Specifications
| Preset | Quality / Resulting Bit |
|---|---|
| Apple ProRes 4444 XQ | Highest-quality version of ProRes for 4:4:4:4 image sources (including alpha channels) |
| Apple ProRes 4444 | Extremely high-quality version of ProRes for 4:4:4:4 image sources (including alpha channels) |
| Apple ProRes 422 HQ | Higher-data-rate version of ProRes 422 that preserves visual quality at same high level as 4444 but for 4:2:2 image sources |
| Apple ProRes 422 | High-quality compressed codec offering nearly all benefits of ProRes 422 HQ, but at 66 percent of the data rate |
| Apple ProRes 422 LT | More highly compressed codec than ProRes 422, with roughly 70 percent of the data rate |
| Apple ProRes 422 Proxy | An even more highly compressed codec than ProRes 422 LT |
For detailed specifications refer to Apple ProRes Specs
For Render-To-Disk in XDCAM, DNxHD/DNxHR and Apple ProRes formats an additional encoding License Option is required! Please contact Ventuz Sales for license questions.
The Interlaced Mode option specifies if the captured frames are saved in a progressive mode (Off) or two consecutive frames are saved in an interlaced format (On).
The Color Space option is only available if the project is set to HDR color space in the Project Properties. Choosing a suitable color space allows to render out HDR content. The available color spaces depend on the selected output format.
The Alpha Output option specifies if the alpha channel of a captured frame should be preserved or dismissed and how the alpha is calculated.
| Option | Description |
| No alpha | Don’t include alpha channel in output |
| Straight | Output “normal”, unpremultiplied alpha |
| Premultiplied with lifted Alpha | Output premultiplied alpha, adjust alpha if there is additive content (works everywhere but desaturates additive highlights) |
| Premultiplied with additive Headroom | Output premultiplied alpha, keep additive content (preserves image but might not work with some other products) |
The Audio Format specifies if audio should be written; either as separate file or embedded. This depends on the video codes: image sequences can only have a separate audio file. This file is always two channel, 48000Hz PCM, 16 or 24 bit (XDCam can only have embedded 24 bit audio) that contains the audio passed to the first stereo pair of the Ventuz audio output device. The formats with mp4 container support also MP3 and Opus as embedded format. See also Audio Devices
If speed is an important factor, PNG is not a good choice. It is the slowest format to encode, although generating the smallest files...
The Frame Rate value defines the frame rate of the image sequence. A value of e.g. 30 will generate 30 images for every second of rendering. If 1001 Timing is enabled, the resulting frame rate is calculated by FPS * 1000 / 1001. This provides the possibility to capture with frame-rates like 59.94 and 29.97. There is an important difference regarding timing between the Interactive and Time-based mode: In Interactive mode, the rendering timing during the input recording and playout phase is based on the FPS settings in the active Ventuz Project. This is necessary because the input is recorded during normal rendering with the Project frame-rate. To provide a correct animation timing of dynamic elements like Damper or the Interaction nodes, the rendering during a playout is done with the same frame-rate. This means that in the Interactive mode capturing with e.g. 30 FPS will capture every second frame if the rendering/timing FPS is 60. In Time-Based mode timing and capture FPS are equal according to the value set in the FPS box. This makes it possible to create image sequences with e.g. 120 FPS.
In Interactive mode, the Frame Rate value cannot be changed. It is taken from the frame-rate configured in the Ventuz Device Configuration. Thus it is not possible to capture interaction in a scene running at 60 FPS and create a playout with 50 FPS!
The two Size values specify the render and capture frame resolution. The default value is set according to the Direct3D Project Properties. On graphics cards with sufficient memory, this value can be set up to 16384 x 16384! Note that extreme resolutions will make the playout very slow and in need of a huge disk space!
5: Render and Statistics
A Render-To-Disk profile (.vr2d) with all settings and recorded user interaction can be saved and loaded for re-uses. Such a profile is not scene-dependent and can be used with any other scene.
Render To Disk starts the render and writing process.
Creating an Image Sequence
To create an image sequence from a Ventuz scene in Interactive mode, the scene must be loaded in the Ventuz Designer.
- Configure the Render-To-Disk dialog as required and press the Start Capture button.
- The button changes to Start Recording and a reminder to prepare the scene so that recording can be started is shown. This preparation phase is also recorded but will not be captured during playout.
- After triggering Start Recording, the recording start time will be saved as well as all user interaction with the scene. During recording, a red R will be flashing in the upper right corner of the Renderer output. If all user interaction has been fed in or the required recording duration has been reached, press the Stop Recording button.
- If recording succeeded, the Render to disk and Play Interaction buttons will be enabled. Play Interaction will start a playback of the recorded interaction data. Make sure that the scene is in the same state as when the recording started - otherwise the interaction playback might not match the scene states.
- The concluding playout of the image sequence is triggered by pressing Render to disk. Again make sure that the scene is initialized to the same state as when the recording started if this is not already handled by the recorded preparation phase.
Note that in Interactive mode only the interaction with the Renderer is recorded and not the interaction with the Designer GUI (e.g. Property Editor)!