The Ventuz Video Engine
Table of Contents
Introduction to the Video Engine
It is important to note that the video engine actually includes a number of elements, including audio, live video coming from external sources, streaming video, video clip playback and the entire video output system. All audio processing inside of Ventuz is also handled by the video engine.
The configuration for all of the video and audio subsystems and routing is done in the Device Configuration
Render Pipes
With the Render Pipe configuration in the Device Config multiple pipes can be added to the Runtime. Depending on the Ventuz license, there is no limit anymore to the number of pipes. Only the systems hardware limitation will bring up a performance limit.
A Render Pipe can be seen as another instance of the engine within the Runtime. A second pipe is able to hold and load a scene independent of the first pipe. Furthermore the complete Scene Trees with the Layout scene is independent of each other. Therefore changes on the Scene Data can be made without affecting the other pipe. This is especially used in Ventuz Director to change the data in the Preview Pipe while playing out on the Program Pipe.
It is important to know, that the handling of rendering pipes is independent of the Ventuz Scene itself. There is no need to configure specifically for a pipe. But if needed, with the SystemID Node the information in which pipe a scene is loaded, is given.
With Ventuz 7 onwoards, the output streams and the rendering pipes are not linked anymore and can be configured independently.
For rendering different output streams or resolutions in parallel it is not recommended to use extra pipes. With Ventuz 7 the engine can render the same Composition multiple times. Multi pipe is useful when working with Ventuz Director or if you want to make use of a different input Pipe mapping in the Scenes.
Multi Rendering
With Ventuz 7 it is now possible to render the same scene (or whole Scene Tree) multiple times. With creating a Render Setup and the output mapping the same Composition can be rendered in different resolutions or shapes (e.g. rotation or dpi). Within the engine, rendering will be done multiple times, to fit the desired output. A rendering with a 4k playout for the production and a 1080p playout as preview window can be done from the same machine. If the Allow Scaling property is set, the rendering can be scaled without rendering twice. Also setups with Scene Layers mapped to different outputs are possible.
Stream Modes
Every stream, depending on its hardware or software capabilities, can be configured to run in the following modes:
| Name | Ports | Description |
| Input | Input | Input |
| Output | Output | Output |
| External Keying | Output Key + Fill | Output two separate SDI Streams, one containing the alpha channel (key) and one containing color information (fill) |
| External Chroma Keying Simple | Output Key + Fill | As above, but combines foreground, background and garbage matte from separate layers and 3D scenes into a key+fill stream. |
| External Chroma Keying | Output 2xKey + 2xFill | Outputs 4 signals: foreground fill, foreground key, background fill and garbage matte as key |
| Internal Hardware Keying | Input + Output | Let the video hardware take the Ventuz rendering and key it onto an input signal using the linear hardware keyer of the board. |
| Internal Hardware Keying with Input | Input + Output | Let the video hardware take the Ventuz rendering and key it onto an input signal using the linear hardware keyer of the board. In addition, the input signal can be used as a texture in the Ventuz scene. |
| Internal Hardware Keying with Delayed Input | Input + Output | Let the video hardware take the Ventuz rendering and key it onto an input signal using the linear hardware keyer of the board. In addition, the input signal can be used as a texture in the Ventuz scene. The texture will be synchronized with the input keyed input, allowing seamless transition from the keyers input to 3d rendering. |
| Internal Software Keying | Input + Output | Do the keying with the Ventuz 3D engine instead of the hardware. This allows to paint directly over the input signal, not having to care about generating correct alpha/key information. The input can also be used as a texture. |
| Internal Software Chroma Keying | Input + Output | As above, but the input is run through a chroma key. Also combines foreground, background, garbage matte and chroma keyed input into a single output stream. |
Preview
When rendering to SDI or other off screen devices, a Preview Window is shown. The Preview here refers to quality, not a preview in the sense of previewing the next graphical element that is going to appear on-air. It is only an additional output of the signal sent to the SDI board.
The rendering will be scaled to fit into the window, introducing additional artifacts and defeating multi-sampling.
The Preview window is not synchronized to the actual SDI board. The SDI board has its own timing hardware. Animation or videos may stutter, because they are synchronized to the SDI output - not to the graphics board (and thus the preview window). Also tearing effects may appear.
Interlaced video formats are displayed progressive: a 1080@25i format will be display as it would be a 1080@50p format, because Ventuz always renders progressive frames internally.
Naturally, the rendering will look perfect on the actual SDI output.
Video Inputs
Ventuz will support as many concurrent input devices and streams as the hardware and operating system allows. So while in theory it would certainly be possible to trigger hundreds of video clips and live video streams simultaneously within Ventuz, no hardware currently would be able to handle that. The performance of the engine scales with the hardware it is running on. Regardless of the source of the inputs, whether that be an SDI board, a video clip or a webcam – they all are routed and processed, together with audio, through the video engine.
HDR
Short terminology for the field of HDR:
| Term | Description |
|---|---|
| Dynamic Range | Describes the range of brightness and contrast from the lowest representable pixel value to the highest. |
| Color Gamut / Color Space | The spectrum of colors a color space can represent / or output device can show. Colors outside the color space are not representable |
| Wide Color Space | Color spaces which includes more colors (are wider) than sRGB / Rec. 709. For example DCI-P3, or Rec. 2020. These color spaces can represent colors which Rec.709 can’t. |
| Color space conversion | Conversion from one color space to another. This includes conversion of color values and gamma curve (the representation of the luminance to the pixel value). |
| Tone-Mapping | Process to convert a larger color space in a smaller / different one in terms of brightness or colors. For example from Rec. 2020 to Rec. 709. This is necessary converting from HDR to SDR. There are multiple different conversion possibilities, depending on e.g. preserving color accuracy or lumenoscity gradients |
| Bit-depth | How many bits represent one color value and which datatype they have. Standard for SDR in Ventuz is 8-bit integer per color channel. So all color values from (0...1) are mapped fixed to the integer values from (0...255). It is not possible to exceed these values. With using 16-bit float as datatype, a higher precision (more steps in between the color values) and the representation of values higher than 1 are possible. |
The plan for Ventuz 7.x is to support a full rendering pipeline for HDR and wide color space content. There are two main advantages of HDR: Support of higher dynamic range between the darkest and the brightest pixel and a wide color gamut with specific standards like Rec.2020, both with higher accuracy. This enables to display more colors than the standard Rec.709 color space displays usually use. The results are more realistic colors for the human eye and and higher contrast.
Since the development of Ventuz HDR capabilities is split up in more phases, not all features are included in 7.1 for a full HDR workflow. (See: Limitations)
With Ventuz 7.1 the HDR capabilities of Ventuz were mainly expanded for HDR playout in a selectable color space and HDR capable layer blending. Before, HDR layers always have been tone-mapped to SDR (8-bit integer) while blending and for the output.
In the Project Properties the whole engine can be set to HDR mode and for blending SDR and HDR layers, the white level of the maximum SDR brightness can be set.
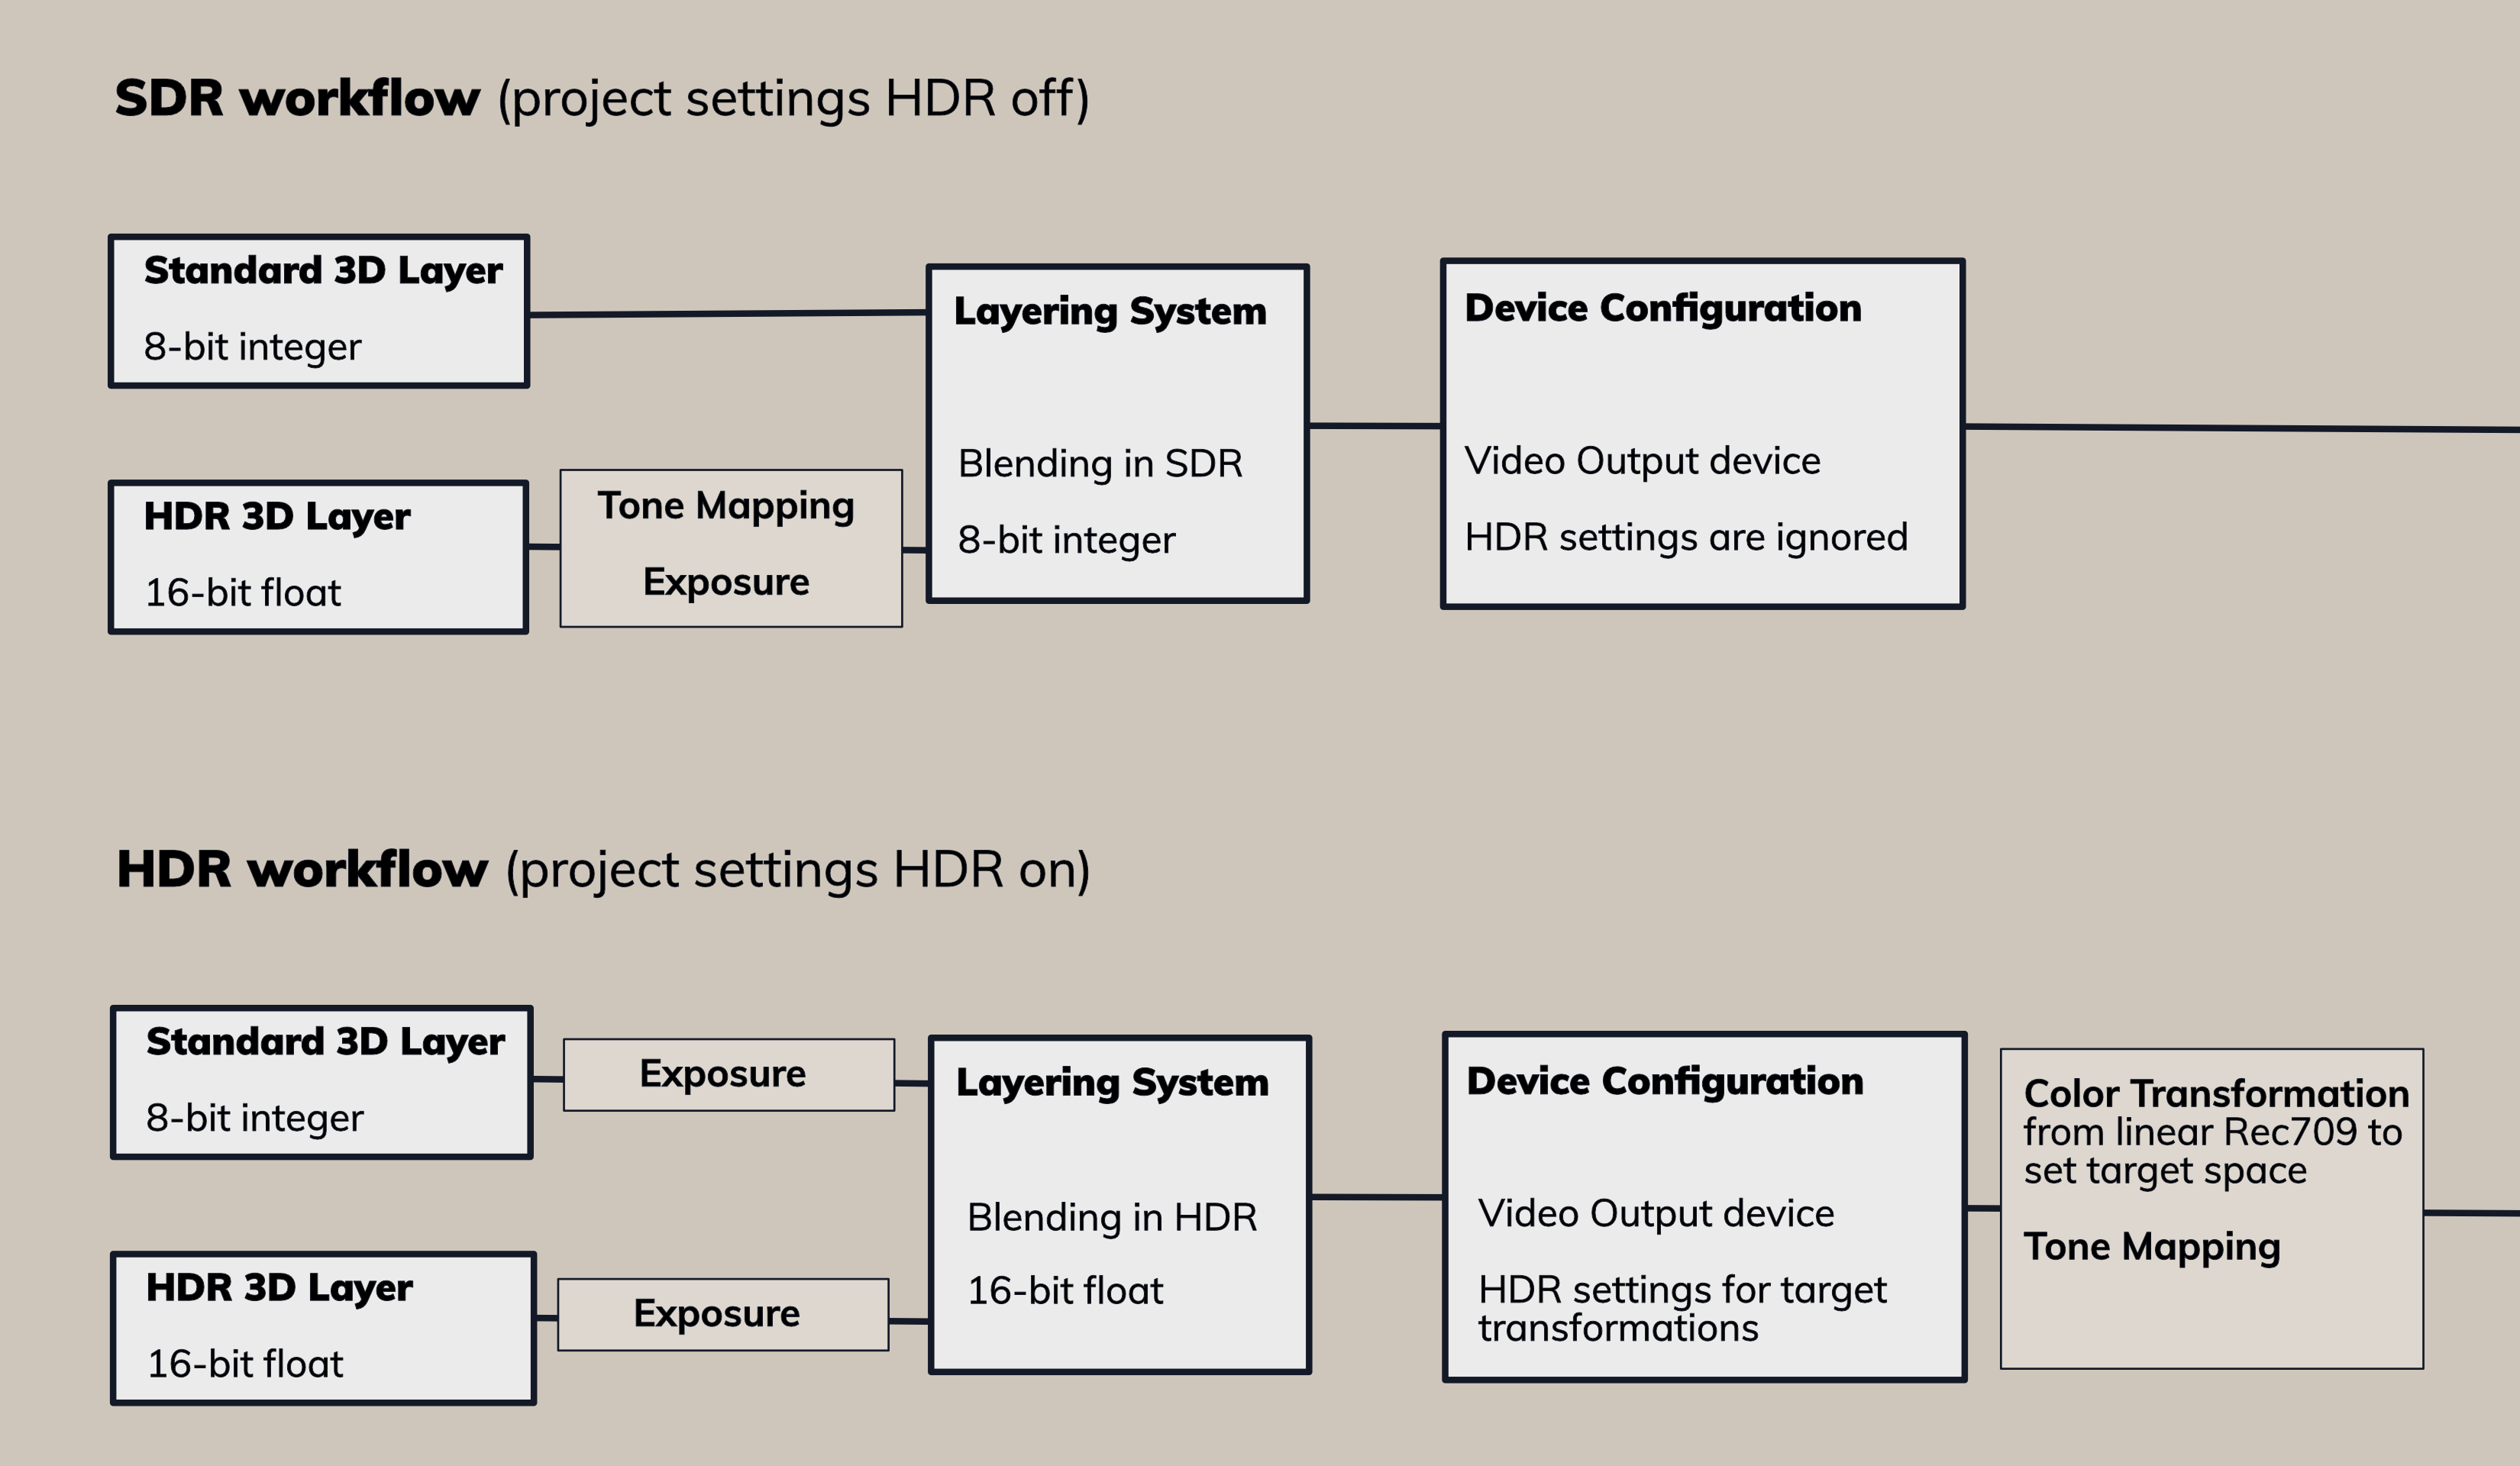
The SDR workflow with HDR turned off, the engine behaves like before. A 3D HDR layer does its calculations in 16-bits/channel HDR color space, then this layer is tone mapped to an 8-bits SDR space where it is composited with the other Standard 3D-Layers. The playout is fixed to Rec.709 color space. The HDR Output settings in the Device Config are ignored.
In the HDR workflow the layering system calculates in 16-bits floating point linear per channel (32 bits are available as an option for color critical work but this is mostly for offline rendering purposes). A 3D HDR layer is not converted down to SDR anymore, but all layers are composited in Rec.709 linear color space with 16-bit float accuracy. This enables the range of brightness calculation to be higher and more precise. With lighting a HDR scene the contrast and especially the bright lights can be more intense without exceeding the limits and losing contrast.
The Standard 3D-Layer will still calculate in SDR 8-bit and is not automatically converted. This ensures older scenes to look exactly the same. The tone-mapping function of the HDR Layer is not relevant anymore in the HDR workflow. At the end of the pipeline, the rendering will be converted to the output color space and tone-mapped, if necessary.
For the device output the color space can be set with the HDR Color Space setting. Ventuz converts the internal Rec.709 colors and the linear gamma curve to the output color space. With HDR Display Transform the rendering is tone-mapped to the device min/max luminance either by clamping or selecting a different function.
Limitations
The internal color space uses Rec.709 (and is not changeable), which is smaller than the wide gamut color spaces. Therefore, it is not possible to render in the wide color ranges the HDR output supports. While rendering it is currently not possible to use all the colors the HDR color space would provide. Also, it is not possible to import any HDR assets, like videos, textures, images and so on. (Except as before: .hdr and .dds files with float data type) These features are planned for the next release(s).
So, the current Ventuz 7.1 HDR implementation is for the brightness range and not for the color range. The output supports a proper HDR signal with the selected color space and accurate conversion.
Bit-depth and controllable quality/performance balance
Ventuz, by default, renders at 8bit per RGBA channel. However, it supports up to 32bit per channel natively. This includes highly accurate and performant algorithms for color space conversion and bit depth conversion. This means that Ventuz is capable of loss-less video processing including handling out-of-gamut colors.
A 10 bit YUV signal gets converted to 16 or 32 bit RGB, processed by Ventuz, and back-converted to 10 bit YUV. With 32 bit RGBA, all pixels will be reconstructed perfectly. At 16 bit, out of gamut colors are clamped to the RGB color space.
Software Watchdog
Input and output queues compensate short processing spikes. The more delay can be afforded, the longer the spikes can be without dropping any frame. (see Extra Buffers)
Ventuz can be configured to disable video processing automatically when the queues threaten to over- or under-run. In disabled mode, the video signal is passed without video processing, but still with the same delay, so seamless switching from full processing to disabled mode is possible. (internal keying modes)
Similarly, when switching scenes or projects, Ventuz might drop a few frames as new resources are loaded. A smooth transition can be guaranteed by manually disabling video processing before such operation and re-enabling afterwards.
This is useful for the various keying modes with Disabled Content set to Transparent. When the software watchdog detects that frames are about to be dropped, it provides transparent frames to the keyer, or in case of internal software keying the input frames are sent to the output unmodified. The fill will disappear but the background will not drop.
When using the Internal hardware keying with input and delay, the software watchdog must be enabled.
Hardware watchdogs control physical bypass relays which serve as last line of defense against power failure and forced reboots. In such cases, the video is simply passed through on the board.
Software Keying
Traditional keying requires a key and fill signal, which is then keyed either externally or on the video board to a video stream.
With software keying, Ventuz can render directly on to the input video, relieving the often tedious and arduous requirement of generating the correct alpha channel or key.
A seamless transition from zooming, stretching and 3-dimensional transformation, to just passing through the unmodified signal is easy. Thus Ventuz can be used as an extremely capable and flexible DVE video processor.
Multiple Sources from Multiple Vendors
The Ventuz Video Engine can mix different boards from different vendors, including Deltacast, Blackmagic and DVS (see Vendors). Video signals can be synchronized to the rendering or asynchronous. For instance, one can use a high quality broadcast board for in- and output of the main video stream and add additional input signals with cheaper hardware.
Similarly, other sources, such as streaming video, usb-cameras, clips or HDMI capture boards can be added, mixed and matched.
SDI
With the grow of Video performance and resolution different SMPTE standards and formats were introduced. Generally, Ventuz supports the SDI formats of the used hardware. For a detailed overview please refer to Supported Hardware Vendors
To transmit a 1080p60 signal with SDI you need more than the 1.5 GBit/s a SDI-HD cable can handle. To do so, you can use two SDI-HD cables (dual link) or a single SDI-3G cable.
The SMPTE ST 425-1 standard about SDI-3G specifies Level A and Level B, which are incompatible to each other. Level A is a "proper" SDI stream while Level B emulates dual link by using two multiplexed streams over the same cable. When creating a stream, you must specify the level.
With quad-link streams 4 HD or SG links at 1920x1080 or 2048x1028 are bundeled to one 4k stream. HD is used for refresh rates up to 30 fps, 3G is used for refresh rates above 30 and up to 60 fps.
Each link carries a quadrant of the image. There is nothing special about the individual links, if you swap two links the quadrants are swapped, as there is no marker to put things together correctly. The individual links are compatible to normal SDI equipment, for instance one can use 4 HD/3G hardware keyers to key a 4k stream.
Since a quad-link 4k signal is indistinguishable from 4 separate HS/3G signals, see Auto-Detect 4k Modes in the Device Options section about telling Ventuz how to decide when such signals are detected.
Chroma Keying
There are the following chroma keying modes:
- External Chroma Keying
- External Chroma Keying Simple
- Internal Software Chroma Keying
When one of these modes is active, The Ventuz scene is rendered in 3 ranks:
- Default (Background)
- Foreground
- Garbage Matte
Each layer can be assigned to one of the 3 ranks. Also inside a 3d layer, parts of the hierarchy can be filtered to be in one of the 3 ranks. The ranks are rendered independently.
 | 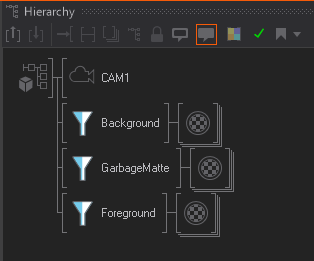
|
| Setting rank in a layer | Setting rank with filters in a 3D hierarchy |
In Internal Software Chroma Keying, Ventuz adds a chroma keyer to the video input. Then the garbage matte is used to cut away parts of the input that might not be covered by greenscreen. In a trackless environment a masking image will suffice, in a tracked studio a 3d scene containing simple virtual boxes around where the physical greenscreen is can be used to mask out the borders of the greenscreen while the camera moves.
The four signals, input, garbage matte, background and foreground are composited properly to form the final image.
The External Chroma Keying Simple mode is intended to provide one fill and one key signal to a simple external chroma keyer. Again the three ranks (background (fill), foreground (key+fill), garbage matte(key)) are rendered. These images are composited to a key+fill stream, the key containing the foreground key and garbage matte key, the fill containing foreground fill and background fill. This can use used in an external chroma keyer. It will create some problems with transparencies in the foreground, but usually it suffices.
The External Chroma Keying outputs the three ranks as four individual signals. The foreground fill, foreground key, background fill and garbage matte as key. These four signals can then be composited in an external chroma keyer.
Comprehensive Audio Mixing
Virtual audio cables can be routed from any video input or Windows audio input device to any other video output or audio output device. Each cable comes with delay, volume and balance control.
Each stereo pair is handled individually, so routing from input 1 channel 5/6 to output 2 channel 1/2, or routing a 5.1 signal by using 3 stereo pairs is simple.
Ventuz can add sound clips or sound from video clips to the mix, or analyze sound from input sources. Similarly, audio can be delayed or compensated in order to match video or other delays.
The delay is for more than just adjusting for video input processing times. For some video formats, the number of samples changes from frame to frame, and input and outputs may be in a different position in the cycle of changing sample counts. For asynchronous streams, additional buffering is required. The delay will calculate a small but safe amount of buffering dependent on various attributes of the streams.
The virtual audio cables operate in stereo pairs. Each input or output has its certain number of stereo pairs (e.g. SDI has 8 pairs), and via the routing in the AV Configuration editor, the delays can be mixed and matched from input to output extremely flexibly.
An audio routing can handle multiple cables per input and output, with smoothing to prevent clicks or popping when changing volume or panning.
All audio processing in Ventuz is done at a sample level at 48kHz, and conversion to other sample rates is handled within the ffmpeg engine. Because Ventuz works with stereo pairs, 5.1 or devices with more outputs are simply divided into stereo pairs. Similarly, mono devices are converted into a stereo pair.