Navigation

Ventuz Introduction

  • Introduction
  • Getting Started
  • Ventuz Editions
  • Ventuz Products
  • Realtime Rendering
  • Frequently Asked Questions
  • Common Mistakes
  • Deploying a Ventuz Presentation
  • Scene Performance and Tweaks

Quick Guides

  • Quick Guide Index
  • Business Logic
  • 3D Art
  • 2D Art
  • Programming
  • System Engineer

General

  • Index
  • What's New
  • Ventuz System Requirements
  • Configuration Editor
  • Device Configuration
  • Machine Configuration
  • Render Setup Editor
  • Introduction to Compositions, Screens and Outputs
  • Explanation of Compositions, Screens and Outputs
  • Live Runtime Control
  • Project and Show Management
  • Web Configuration Editor
  • Communication Protocol Overview
  • GPI Configuration for Runtime or Director
  • Introduction to the Ventuz Video Engine
  • Supported Formats
  • Supported Hardware
  • Color Management and HDR Workflow
  • Multisampling / Anti-Aliasing
  • Input Subsystem
  • Ventuz Proprietary Files
  • Migrating Configs & Content to Ventuz 8
  • Migrating Content to Ventuz 7
  • Migrating Content to Ventuz 6
  • Migrating Content to Ventuz 5
  • Summary Shortcuts
  • Terminology
  • Manual Index

Ventuz Designer

  • Designer Indices
Introduction
  • Designer Introduction Index
  • Designer Overview
  • Realtime Rendering
  • Project Browser
  • Designer Interface
  • Designer Options
  • Working with Nodes
  • Hierarchy and Content Editors
  • 2D Workflow
  • 3D Workflow
  • PBR Workflow
  • Animation Workflow
  • Best Practices
  • Reading Data in Ventuz
  • Display Images and Movies
  • Scene Performance and Tweaks
  • Deploying a Ventuz Presentation
  • Render to Disk
  • Multi Screen and Output Setup
  • Explanation of Compositions, Screens and Outputs
  • Workflow of using Multi Screens
  • Multi GPU
  • Previs
User Interface
  • Designer User Interface Index
  • Designer Interface
  • Renderer Window
  • Layer Editor
  • Property Editor
  • Property Groups
  • Hierarchy Editor
  • Content Editor
  • Find and Replace
  • Toolbox
  • Animation Editor
  • Shader Editor
  • Text Editor
  • Message View
  • Scene Tree
  • Stage Editor
  • Container Outline
  • Watches Editor
  • Scene Control Window
  • Performance Statistics
2D Workflow
  • 2D Workflow Index
  • 2D Workflow
  • Layer Editor
  • Common Layer Properties
  • IPP Effects
  • Color Correction FX
  • Distortion FX
  • Filter FX
  • Hierarchy and Content Editors
  • Display Images and Movies
3D Workflow
  • 3D Workflow Index
  • 3D Workflow
  • Hierarchy and Content Editors
  • Renderer Window
  • Camera Navigation
  • Manipulate Objects with Gizmos
  • In-Scene Editing
  • Layer Editor
  • Property Editor
  • Hierarchy Editor
  • Working with Nodes
  • Isolated Objects
  • Containers
  • Text Rendering
  • Character Sets
  • Geometry Import
  • Color Management and HDR Workflow
  • Display Images and Movies
  • Particle System
  • Creating Realistic Reflections
  • Unreal Integration
  • Notch Integration
  • E2E Node Overview
Logic Workflow
  • Logic Workflow Index
  • Hierarchy and Content Editors
  • Content Editor
  • Hierarchy Editor
  • Working with Nodes
  • Property Editor
  • Containers
  • Project and Scene Data
  • Reading Data in Ventuz
  • Display Images and Movies
  • Input Subsystem
  • Multitouch
  • TUIO Protocol
  • Open Sound Control
  • Unreal Integration
  • Notch Integration
  • E2E Node Overview
Animation Workflow
  • Animation Workflow Index
  • Animation Workflow
  • Animation Editor
  • Content Editor
  • Hierarchy Editor
  • Property Editor
  • Animation and State Engine
  • Templates
  • Template Engine
  • Scene Transitions
  • Unreal Integration
  • Notch Integration
Project Structure
  • Project Structure Index
  • Annotations
  • Project Documentation
  • Projects and Scenes
  • Project Properties
  • Project Maintenance
  • Project and Scene Data
  • Scene Management
  • Scene Statistics
  • Scene Tree
  • Performance Statistics
How Tos
  • Designer How to Index
  • How to Run Ventuz
  • How to Work with Designer
  • Ventuz Designer Drag&Drop Workflow
  • How to work with Shadows
  • How to Build Content for Multiple Screens
  • How to Use Emoijs
  • How to Build a Template
  • How To Build a Custom Scene Transition
  • How to Use the Color Difference Keyer
  • How To Enable HDR Video Output
  • How To Work with the HDR Layer
  • How Create Lens Flares and Bloom
  • How to Create Visuals Loader Node
  • How to Remote Control with a Phone
  • How to use Head Mounted Displays
  • How to work with 3D Reference Layers
  • How to create a Firework Particle System
  • How to use DDS with new Block Compression modes
  • How To use Stream Out
  • How to use the Substance Integration
  • How To Integrate Unreal
  • How To Integrate Notch
  • How To use the Vertex Integration
  • How To Control and Customize Ventuz
  • How to use the Companion with Director
  • How to build Previs scenes with Designer
  • How to migrate from Ventuz 6 to Ventuz 7
Reference
  • Available Nodes
  • Animation Nodes
  • Material&Color Nodes
  • Data Nodes
  • E2E Nodes
  • Geometry Nodes
  • Interaction Nodes
  • IO Nodes
  • Layers
  • Light Nodes
  • Logic Nodes
  • Previs Nodes
  • Render Option Nodes
  • Slides Nodes
  • Sound Nodes
  • Text Nodes
  • Texture Nodes
  • VR Nodes
  • World Nodes
  • Summary Shortcuts
  • Layer Editor Shortcuts
  • Hierarchy Editor Shortcuts
  • Content Editor Shortcuts
  • Animation Editor Shortcuts
  • Director Shortcuts

Ventuz Director

  • Index
  • What's New in Director
  • Introduction
  • Environment
  • Show
  • User Interface
  • Assets
  • Taking Action
  • Property Editor
  • Shot Box
  • Project Data
  • Pages
  • Playlist
  • Transitions
  • Timeline
  • Content References
  • Topology
  • Channels
  • Macros
  • Designing Templates
  • Scene Transitions
  • Plug-Ins
  • Shortcuts
  • Command Line Options
  • Application Settings
  • Glossary
  • GPI Configuration

Ventuz Runtime & Configuration

  • Runtime Index
  • Configuration Editor
  • Machine Configuration
  • Device Configuration
  • Project and Show Management
  • Live Runtime Control
  • Web Configuration Editor
  • Render Setup Editor
  • Warping and Soft-Edging Editor
  • Multi Screen and Output Setup
  • How to migrate from Ventuz 6 to Ventuz 7
  • Machine Clustering
  • Supported Hardware
  • Director Mode
  • How to Configure Audio
  • How to Use Live Options
  • How To Play Out On Multiple Screens
  • How To Render on a Machine Cluster
  • How to Use Head Mounted Displays
  • How to Setup Spout with Ventuz
  • How to Use Newtek NDI
  • How to Use a Mixed Frame Rate Cluster
  • How to Use Tracking

Multi Output & Display Setups

Introduction
  • Introduction to Compositions, Screens and Outputs
  • Explanation of Compositions, Screens and Outputs
  • Machine Clustering
  • Support for multiple GPU's
Editors
  • Configuration Editor
  • Device Configuration
  • Render Setup Editor
  • Warping and Soft-Edging Editor
  • Designer Stage Editor
Workflows
  • How to Build Content for Multiple Screens
  • How To Play Out On Multiple Outputs
  • How To Render on a Machine Cluster
  • How to build Previs scenes with Designer

How To

Designer
  • Designer How to Index
  • How to Run Ventuz
  • How to Work with Designer
  • Ventuz Designer Drag&Drop Workflow
  • How to work with Shadows
  • How to Build Content for Multiple Screens
  • How to Use Emoijs
  • How to Build a Template
  • How To Build a Custom Scene Transition
  • How to Use the Color Difference Keyer
  • How To Work with the HDR Layer
  • How To Enable HDR video output
  • How Create Lens Flares and Bloom
  • How to Create Visuals Loader Node
  • How to Remote Control with a Phone
  • How to use Head Mounted Displays
  • How to work with 3D Reference Layers
  • How to create a Firework Particle System
  • How to use DDS with new Block Compression modes
  • How to use the Substance Integration
  • How To Integrate Unreal
  • How To Integrate Notch
  • How To build and playback Ventuz Content in Vertex
Runtime & Configuration
  • Runtime How Tos Index
  • How to Configure Audio
  • How to Use Live Options
  • How To Play Out On Multiple Screens
  • How To Render on a Machine Cluster
  • How to use Head Mounted Displays
  • How to setup Spout with Ventuz
  • How to use Newtek NDI
  • How to use a Mixed Frame Rate Cluster
  • How to use Tracking
  • How To Integrate Unreal
  • How To Integrate Notch
  • How To build and playback Ventuz Content in Vertex
  • Multi Screen and Output Setup
  • How To Enable HDR video output
Director
  • How To Control Multiple Graphics Independently From Each Other
  • How to use the Companion with Director

Ventuz Node Reference

Available Nodes Overview
  • All Designer Nodes
ANIMATION
  • Mover
  • Alternator
  • Simple Control
  • Timeline Control
  • Anmation Rig
  • Keyframe Animation
  • Animation Group
COLOR/MATERIAL
  • Alpha
  • Fog
  • Ground Fog
  • Sky Box
  • Color to RGBA
  • HSLA to Color
  • RGBA to Color
  • Color Transformer
  • HLSL Shader
  • Color
  • Material
  • Color Picker
  • Substance Material
DATA
  • Database
  • Excel
  • JSON
  • RSS Feed
  • Resource Linker
  • Text File
  • XML
E2E
  • E2E Axis
  • E2E Data
  • E2E Control
  • E2E Layer
  • E2E Provider
  • E2E Node Overview
GEOMETRY
  • Rectangle
  • Rounded Rectangle
  • Gradient Rectangle
  • Overlay Rectangle
  • Cube
  • Circle
  • Sphere
  • Cylinder
  • Cone
  • Torus
  • Chart
  • Random Points
  • Mesh Loader
  • Geometry Import (Live)
  • Volume
  • Get Bounding Box
  • Arrow
  • Particle System
  • Path Renderer
  • Geometry Renderer
INTERACTION
  • Interaction Rect
  • Touch Button
  • Touch Excluder
  • Touch Marker
  • Touch Paint
  • Touch Pattern
  • Touch Proxy
  • Touch Ripples
  • Touch Transformations
  • Web Browser
  • Touch Teleport
  • Touch Simulator
INPUT/OUTPUT (I/O)
  • GPI
  • Joystick
  • Keyboard
  • MIDI
  • Mouse
  • Network
  • Open Sound Control
  • Serial
  • Timecode
  • DMX
  • HTTP
  • RamDiskWriter
LAYER
  • 3D Layers
  • 3D Layer Reference
  • Composition Layer
  • 2D Layers
  • PSD Import Layer
  • E2E Layer
  • Mixer Layer
  • Others
LIGHT
  • Light Sources
LOGIC
  • Array Processing
  • Convert To Text
  • Cluster Synchronization
  • Counter
  • Data Portals
  • Date Time
  • Directory
  • Dispatcher
  • Enumeration
  • Expressions
  • Invert
  • Log
  • Loop Breaker
  • Math Effects
  • Matrix Operations
  • Scene Event
  • Script
  • String Operations
  • System ID
  • Render Setup Relation
  • Text Splitter
  • Timer
  • Toggle
  • Transition Info
  • URL
  • Value Switch
  • Value Buffer
  • Variables
  • Visual Indexer
PREVISUALIZATION
  • Introduction to Previs
  • Previs Screen
  • Previs Canvas
  • Compositon List
  • Rendersetup Objects
  • Composition Projector
  • Previs Screen Render Options
RENDER OPTIONS
  • Alpha Blending
  • Color Write
  • Alpha Testing
  • Clip Plane
  • Filter
  • Mask
  • Mirror
  • Effect
  • Render Cube Map
  • Draw Modes
  • Stencil
  • ZTesting
SOUND
  • Audio Clip
  • Sound
  • Volume Control
  • Audio Analysis
SLIDES
  • Slide Manager
  • Slide
  • Slide Port
  • Pivot
TEXT
  • Text Effects
  • Text Layouts
  • Text Rendering
TEXTURE
  • Background
  • Hatch
  • Image
  • Texture
  • SVG Loader
  • Gradient Texture
  • Live Video
  • Movie Stream
  • Movie Frame
  • Movie Clip
  • Texture Loader
  • Snapshot
  • Snapshot Framebuffer
  • Texture Saver
  • Video Source Selector
  • VIO Input
  • Spout Receiver
  • NDI Receiver
  • Substance Loader
  • QR Code
VR/AR
  • Tracked Devices
  • Draw Tracked Devices
WORLD
  • Axis
  • Billboard
  • GetWorld
  • SetWorld
  • Arrange
  • Ticker
  • Layout
  • Group
  • World Z Sort
  • YesNo
  • Switch
  • Spread
  • Filter Pass
  • Set Pass
  • Hierarchy Container
  • Scene Port
  • Content Container
  • Template Port
  • Container Info
  • Camera
  • Paths
  • Cloner

Advanced and Development

  • Advanced and Development Index
  • Command Line Options
  • Ventuz IP Ports
  • Ventuz Machine Service
  • TUIO
  • .NET Scripting
  • HLSL Shader Programming
  • Ventuz API and SDK
  • Ventuz Extension API
  • Ventuz VIO API
  • Ventuz File Format (VFF)
  • Ventuz Stream Out API
  • Lens Calibration File for FreeD
  • E2E Node Overview
  • Unreal Integration
  • Notch Integration
Remoting
  • Remoting Index
  • Remoting Overview
  • How To Control and Customize Ventuz
  • Remoting 4
  • Remoting 4 via Websockets
  • Remoting 4 via HTTP
  • Director Remoting
  • Deprecated Remoting

Misc

  • Presets
« Previous:
» Index «
Next: »

Reading Data in Ventuz

Table of Contents

  1. Introduction
  2. Text File
  3. Excel File
  4. XML File
  5. JSONs
  6. Database
  7. RSS and RDF Feeds
  8. Conclusion

This page provides an overview of the different types of data that Ventuz can handle out of the box. We will discuss the advantages, disadvantages and use cases of each of them. Still, you should note that these are the types of input data that Ventuz can handle just using the integrated Nodes. You are still able to produce integrations of different types of data by Scripting.

Introduction

Data Integrations are usually used to provide your Ventuz Presentation with any kind of persistent information. The data usually is provided inside the Content Editor so that you can prepare and process the data to finally pass it to any Hierarchy Node. All the discussed nodes can be found in the Data category of the Toolbox and can be placed in the Content Editor from there.

Ventuz is aimed at reading and displaying real-time data interactively - writing to files is not supported out of the box. That being said, you can easily write Scripts that handle this use-case.

Generally the Ventuz nodes use the same concept throughout each type of integrable data:

  1. A Data Loader node provides access to the data source - located in a file on the Hard Disk Drive, in a Database, in the Web or Network etc. As an output they just provide an object representing the data collection or a reference to it (e.g. in the case of a database) - this is usually not yet interpretable as text, numbers or the like.
  2. Data Reader nodes access a specified location of the provided data collection object and return its contents as usable numbers, texts etc.

A good practice to work with these nodes is to have exactly one data loader for each data source (for instance per file). This makes changing the data source a lot easier - you only have to change one node instead of multiple ones. In many cases it is very useful to use Interfacing Containers in conjunction with Container Info Nodes.

Using several data loaders with the same source does not effect performance, as Ventuz' internal resource management caches each file and only loads it once, even if referenced from several nodes. This is true as long as the input properties of the resource loaders are the same and even if you load files from the network or e.g. via HTTP.

In the following paragraphs you find a list of all different types of data sources, the related nodes and their usage:

  • The easiest way to load and use external data is to use a Text File. Unlike the other data nodes, the Text File Node outputs a string directly. This is best used to read simple strings from a file.
  • Excel Files provide a similarly easy way to read data. This should be used if you do not want to care about a UI to create the data, since you can use most office applications for this.
  • XML Files are a more advanced and more flexible way to provide data. The tree structure allows a more generic access to the data using XPath Nodes or you can transform the data using XSL Transformation.
  • JSONs are loaded using the Text File and can then be parsed with the JSON Parser node. Since the JSON Parser accepts a simple string as input, the JSON does not have to be loaded from file but can be from any source, e.g. from a Script Node or from Scene Data.
  • A Data Base can be accessed with the respective nodes. Ventuz supports the most common database types.
  • RSS and RDF Feeds are used to poll any kind of feeds, mainly on the web. Can be used to easily integrate e.g. news feeds.

This page can only describe how the data is integrated in Ventuz but rarely gives details about the corresponding standard or format. In order to fully understand this document you should make sure to read up on these before continuing with the respective paragraph. See the list at the end of the document for some starting points to find reading material.
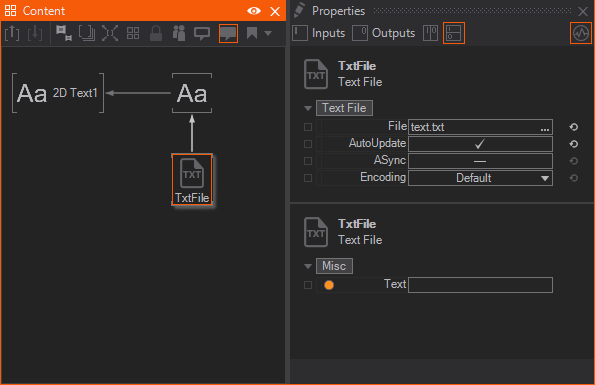
Text File

Using a Text File node is the easiest way to read out any text from either your HDD, your Network or from the Web. It provides the scene with a String that can be bound to any node. Normally you use that to display text from a file or you pass the loaded text on to JSON Parser or XML Text node to parse the text accordingly.

In order to work with the Text File node you need to drag it from the Toolbox into the Content Editor. Select the file you want to load by pressing the three dots ... in the File property and bind the Text output to any node that needs the loaded text.

You can use the Text File node to get the response of an HTTP request as well - just type in the according URL in the File property. Make sure to enable the Async flag in this case to not stall the renderer while the request is pending.

More details are listed on the Reference Page of the Text File Node.

Excel File

When displaying a simple text is not enough or you just have to organize a greater set of texts you can switch to using Excel Files. They offer a tabular structure for your data and your users are easily able to edit them through any office program - namely ​Microsoft Office.

In order to use the Excel workflow you need to first place an Excel Workbook Node in the Content Editor. Using the three dots ...} in the File property you can open your Workbook File. The output is a reference to that workbook. You can bind it to any other Excel Node to query the workbook file. The easiest way is to use an Excel Cell (Row, Column) Node. Bind its Workbook input to the output of the Excel Workbook Node and define the Sheet, Row and Column of the cell you want to read.

Note that Excel indexes its cells one based while most other features in Ventuz use a zero based numbering - which is a lot more common in programming of any kind. So you might need to add or subtract 1 from your indices when working with Excel - this is best done with Int Expressions Nodes.

Finally you can use any of the outputs of the Excel Cell node and bind them to any node that needs them.

There are other Excel Nodes to query an Excel Workbook - have a look at their Reference Page to start working with them.
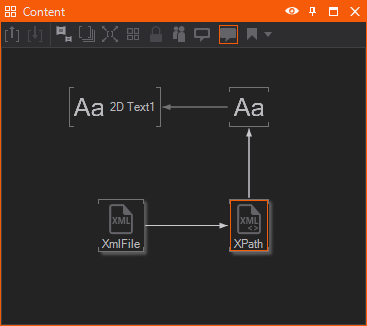
XML File

An XML File can be used to structure any data in a tree. Like JSON you can use XMLs to store configurations of any kind or to pass real-time data to Ventuz.

To read from your file system you can use the XML File node - this node reads the string representation from the file and directly parses it to a queryable XML document. If you get the parsable XML string from another source you can use the XML Text node to parse any output string from another node to an XML document - this is mainly useful if you are getting your XML through a Script.

In order to query the XML you can use an XPath Expression Node. Correctly using XPath Expression is a whole topic for itself, but the basics are pretty simple: you create a URL-like string that describes the Path to the nodes or attributes that you want to read out. The result can either be a subtree of the document in the Node output or a single Node or Attribute. If applicable you get the respective result in the corresponding output of the XPath node. Those can then be used in your nodes as you need them.

If you need to dynamically access different parts of the XML you can build the Path property using a Convert To Text Node. That node can easily put together several inputs and format them to your needs.

More information about the XML Nodes can be found on their reference page.
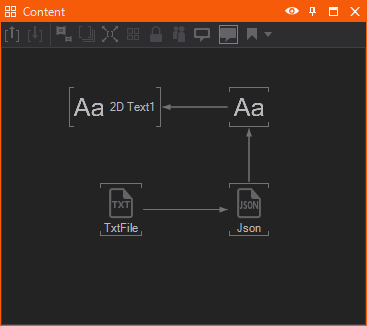
JSONs

Similarly to the XML Documents you can use JSON Objects to either store static information like configurations or to communicate with other applications. In order to get a JSON Object from a file in your file system, you need to use a Text File Node. The output of the Text File can be bound to the Json input property of a JSON Parser Node. If the JSON is an array of JSON objects you need to adjust the Index property as well to define which element to read out.

The JSON Parser node is able to generate several output properties of different types. To read out specific fields in the JSON you can add outputs to the node with the help of its Custom Model. Just  click the edit button in the Properties Editor while the JSON Parser node is selected. Next you select the expected type of the field and name the property after the field you want to read out. It then tries to parse the field in the JSON to the output type you defined.

If you expect an array of JSON objects you will need to select the Object type, like you would do if you expect a single JSON object in that field..

All this might become very tedious very quickly. By clicking the Update button in the Properties Editor you can let the parser node read out the provided JSON and generate all needed Outputs automatically.

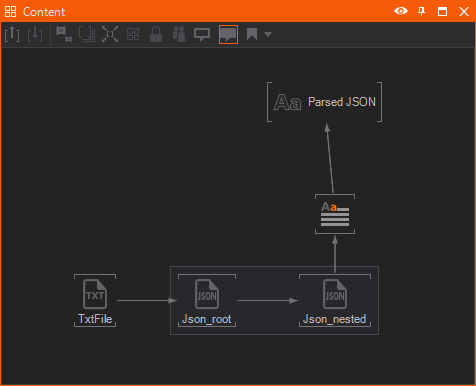
In order to get the field of a nested JSON object you will need to pass each child JSON object to another JSON Parser Node and let that one output its child JSON object(s). This way you create a chain of JSON Parser nodes.

More information can be found on the JSON Parser reference page.
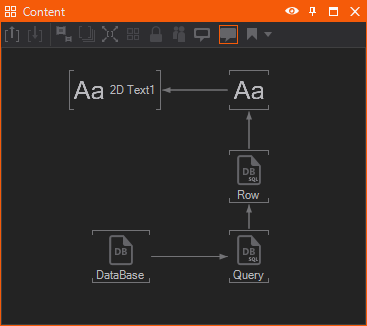
Database

Data Bases are used to persistently and securely store data, most of the times in a similar way like an Excel Workbook - in a tabular, or relational, structure.

To access a Database you need a Database Node that establishes a connection to your database. In order to make this work you need the respective Connection String and select which Type of database to assume when communicating. As a result you get a Database object as an output that you can bind to any Query Node to access its contents. To ultimately access the current values of a row you can for instance use a Row Node. Similar to the JSON Parser Node you need to define the output properties according to the data you want to retrieve: Edit the Custom Model of the node by  clicking the edit button in the Properties Editor while the node is selected. Next you select the expected type of the value and name the property after the column you want to read out.

More details on the Databse Nodes can be found on their reference page.
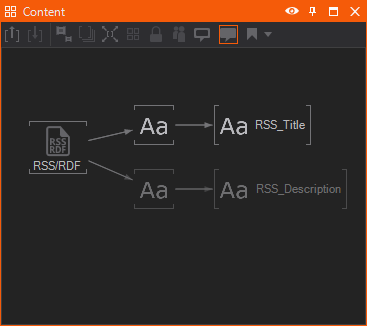
RSS and RDF Feeds

RSS and RDF Feeds can be used to listen to an external data provider that updates the feed from time to time. You need to provide it with the need Feed URLs and can then use the Next method to skip through the resulting elements of the feed.

The feed's items are output through the Item Description and Item Title properties and can directly be bound to to any node.

Have a look at the reference page of the RSS Feed Nodes to get more details.

Conclusion

This concludes the overview data integration in Ventuz. You have learned the different ways of loading and parsing data in Ventuz and have seen the advantages and disadvantages of each one. However, this was just the very first glimpse and it cannot cover all the in-depth details of these topics. You now should start to build presentations with these types of integration to learn how to incorporate that into the rest of your presentation. Also you should have a look at the different Help Scenes of the discussed nodes as they offer a lot more details and tips on how to use them. Lastly go through the reference pages of the nodes to really learn about all their different uses and small details that were not discussed on this page.

See also:
  • Data Nodes
  • Text File Node
  • Excel Nodes
  • XML Nodes
  • JSON Parser Node
  • Database Nodes
  • RSS and RDF Feed Nodes
  • ​Wikipedia: Microsoft Excel
  • ​Wikipedia: XML
  • ​Wikipedia: JSON
  • ​Wikipedia: Database
  • ​Wikipedia: RSS

« Previous:
» Index «
Next: »
Copyright 2025 Ventuz Technology