Navigation

Ventuz Introduction

  • Introduction
  • Getting Started
  • Ventuz Editions
  • Ventuz Products
  • Realtime Rendering
  • Frequently Asked Questions
  • Common Mistakes
  • Deploying a Ventuz Presentation
  • Scene Performance and Tweaks

Quick Guides

  • Quick Guide Index
  • Business Logic
  • 3D Art
  • 2D Art
  • Programming
  • System Engineer

General

  • Index
  • What's New
  • Ventuz System Requirements
  • Configuration Editor
  • Device Configuration
  • Machine Configuration
  • Render Setup Editor
  • Introduction to Compositions, Screens and Outputs
  • Explanation of Compositions, Screens and Outputs
  • Live Runtime Control
  • Project and Show Management
  • Web Configuration Editor
  • Communication Protocol Overview
  • GPI Configuration for Runtime or Director
  • Introduction to the Ventuz Video Engine
  • Supported Formats
  • Supported Hardware
  • Color Management and HDR Workflow
  • Multisampling / Anti-Aliasing
  • Input Subsystem
  • Ventuz Proprietary Files
  • Migrating Configs & Content to Ventuz 8
  • Migrating Content to Ventuz 7
  • Migrating Content to Ventuz 6
  • Migrating Content to Ventuz 5
  • Summary Shortcuts
  • Terminology
  • Manual Index

Ventuz Designer

  • Designer Indices
Introduction
  • Designer Introduction Index
  • Designer Overview
  • Realtime Rendering
  • Project Browser
  • Designer Interface
  • Designer Options
  • Working with Nodes
  • Hierarchy and Content Editors
  • 2D Workflow
  • 3D Workflow
  • PBR Workflow
  • Animation Workflow
  • Best Practices
  • Reading Data in Ventuz
  • Display Images and Movies
  • Scene Performance and Tweaks
  • Deploying a Ventuz Presentation
  • Render to Disk
  • Multi Screen and Output Setup
  • Explanation of Compositions, Screens and Outputs
  • Workflow of using Multi Screens
  • Multi GPU
  • Previs
User Interface
  • Designer User Interface Index
  • Designer Interface
  • Renderer Window
  • Layer Editor
  • Property Editor
  • Property Groups
  • Hierarchy Editor
  • Content Editor
  • Find and Replace
  • Toolbox
  • Animation Editor
  • Shader Editor
  • Text Editor
  • Message View
  • Scene Tree
  • Stage Editor
  • Container Outline
  • Watches Editor
  • Scene Control Window
  • Performance Statistics
2D Workflow
  • 2D Workflow Index
  • 2D Workflow
  • Layer Editor
  • Common Layer Properties
  • IPP Effects
  • Color Correction FX
  • Distortion FX
  • Filter FX
  • Hierarchy and Content Editors
  • Display Images and Movies
3D Workflow
  • 3D Workflow Index
  • 3D Workflow
  • Hierarchy and Content Editors
  • Renderer Window
  • Camera Navigation
  • Manipulate Objects with Gizmos
  • In-Scene Editing
  • Layer Editor
  • Property Editor
  • Hierarchy Editor
  • Working with Nodes
  • Isolated Objects
  • Containers
  • Text Rendering
  • Character Sets
  • Geometry Import
  • Color Management and HDR Workflow
  • Display Images and Movies
  • Particle System
  • Creating Realistic Reflections
  • Unreal Integration
  • Notch Integration
  • E2E Node Overview
Logic Workflow
  • Logic Workflow Index
  • Hierarchy and Content Editors
  • Content Editor
  • Hierarchy Editor
  • Working with Nodes
  • Property Editor
  • Containers
  • Project and Scene Data
  • Reading Data in Ventuz
  • Display Images and Movies
  • Input Subsystem
  • Multitouch
  • TUIO Protocol
  • Open Sound Control
  • Unreal Integration
  • Notch Integration
  • E2E Node Overview
Animation Workflow
  • Animation Workflow Index
  • Animation Workflow
  • Animation Editor
  • Content Editor
  • Hierarchy Editor
  • Property Editor
  • Animation and State Engine
  • Templates
  • Template Engine
  • Scene Transitions
  • Unreal Integration
  • Notch Integration
Project Structure
  • Project Structure Index
  • Annotations
  • Project Documentation
  • Projects and Scenes
  • Project Properties
  • Project Maintenance
  • Project and Scene Data
  • Scene Management
  • Scene Statistics
  • Scene Tree
  • Performance Statistics
How Tos
  • Designer How to Index
  • How to Run Ventuz
  • How to Work with Designer
  • Ventuz Designer Drag&Drop Workflow
  • How to work with Shadows
  • How to Build Content for Multiple Screens
  • How to Use Emoijs
  • How to Build a Template
  • How To Build a Custom Scene Transition
  • How to Use the Color Difference Keyer
  • How To Enable HDR Video Output
  • How To Work with the HDR Layer
  • How Create Lens Flares and Bloom
  • How to Create Visuals Loader Node
  • How to Remote Control with a Phone
  • How to use Head Mounted Displays
  • How to work with 3D Reference Layers
  • How to create a Firework Particle System
  • How to use DDS with new Block Compression modes
  • How To use Stream Out
  • How to use the Substance Integration
  • How To Integrate Unreal
  • How To Integrate Notch
  • How To use the Vertex Integration
  • How To Control and Customize Ventuz
  • How to use the Companion with Director
  • How to build Previs scenes with Designer
  • How to migrate from Ventuz 6 to Ventuz 7
Reference
  • Available Nodes
  • Animation Nodes
  • Material&Color Nodes
  • Data Nodes
  • E2E Nodes
  • Geometry Nodes
  • Interaction Nodes
  • IO Nodes
  • Layers
  • Light Nodes
  • Logic Nodes
  • Previs Nodes
  • Render Option Nodes
  • Slides Nodes
  • Sound Nodes
  • Text Nodes
  • Texture Nodes
  • VR Nodes
  • World Nodes
  • Summary Shortcuts
  • Layer Editor Shortcuts
  • Hierarchy Editor Shortcuts
  • Content Editor Shortcuts
  • Animation Editor Shortcuts
  • Director Shortcuts

Ventuz Director

  • Index
  • What's New in Director
  • Introduction
  • Environment
  • Show
  • User Interface
  • Assets
  • Taking Action
  • Property Editor
  • Shot Box
  • Project Data
  • Pages
  • Playlist
  • Transitions
  • Timeline
  • Content References
  • Topology
  • Channels
  • Macros
  • Designing Templates
  • Scene Transitions
  • Plug-Ins
  • Shortcuts
  • Command Line Options
  • Application Settings
  • Glossary
  • GPI Configuration

Ventuz Runtime & Configuration

  • Runtime Index
  • Configuration Editor
  • Machine Configuration
  • Device Configuration
  • Project and Show Management
  • Live Runtime Control
  • Web Configuration Editor
  • Render Setup Editor
  • Warping and Soft-Edging Editor
  • Multi Screen and Output Setup
  • How to migrate from Ventuz 6 to Ventuz 7
  • Machine Clustering
  • Supported Hardware
  • Director Mode
  • How to Configure Audio
  • How to Use Live Options
  • How To Play Out On Multiple Screens
  • How To Render on a Machine Cluster
  • How to Use Head Mounted Displays
  • How to Setup Spout with Ventuz
  • How to Use Newtek NDI
  • How to Use a Mixed Frame Rate Cluster
  • How to Use Tracking

Multi Output & Display Setups

Introduction
  • Introduction to Compositions, Screens and Outputs
  • Explanation of Compositions, Screens and Outputs
  • Machine Clustering
  • Support for multiple GPU's
Editors
  • Configuration Editor
  • Device Configuration
  • Render Setup Editor
  • Warping and Soft-Edging Editor
  • Designer Stage Editor
Workflows
  • How to Build Content for Multiple Screens
  • How To Play Out On Multiple Outputs
  • How To Render on a Machine Cluster
  • How to build Previs scenes with Designer

How To

Designer
  • Designer How to Index
  • How to Run Ventuz
  • How to Work with Designer
  • Ventuz Designer Drag&Drop Workflow
  • How to work with Shadows
  • How to Build Content for Multiple Screens
  • How to Use Emoijs
  • How to Build a Template
  • How To Build a Custom Scene Transition
  • How to Use the Color Difference Keyer
  • How To Work with the HDR Layer
  • How To Enable HDR video output
  • How Create Lens Flares and Bloom
  • How to Create Visuals Loader Node
  • How to Remote Control with a Phone
  • How to use Head Mounted Displays
  • How to work with 3D Reference Layers
  • How to create a Firework Particle System
  • How to use DDS with new Block Compression modes
  • How to use the Substance Integration
  • How To Integrate Unreal
  • How To Integrate Notch
  • How To build and playback Ventuz Content in Vertex
Runtime & Configuration
  • Runtime How Tos Index
  • How to Configure Audio
  • How to Use Live Options
  • How To Play Out On Multiple Screens
  • How To Render on a Machine Cluster
  • How to use Head Mounted Displays
  • How to setup Spout with Ventuz
  • How to use Newtek NDI
  • How to use a Mixed Frame Rate Cluster
  • How to use Tracking
  • How To Integrate Unreal
  • How To Integrate Notch
  • How To build and playback Ventuz Content in Vertex
  • Multi Screen and Output Setup
  • How To Enable HDR video output
Director
  • How To Control Multiple Graphics Independently From Each Other
  • How to use the Companion with Director

Ventuz Node Reference

Available Nodes Overview
  • All Designer Nodes
ANIMATION
  • Mover
  • Alternator
  • Simple Control
  • Timeline Control
  • Anmation Rig
  • Keyframe Animation
  • Animation Group
COLOR/MATERIAL
  • Alpha
  • Fog
  • Ground Fog
  • Sky Box
  • Color to RGBA
  • HSLA to Color
  • RGBA to Color
  • Color Transformer
  • HLSL Shader
  • Color
  • Material
  • Color Picker
  • Substance Material
DATA
  • Database
  • Excel
  • JSON
  • RSS Feed
  • Resource Linker
  • Text File
  • XML
E2E
  • E2E Axis
  • E2E Data
  • E2E Control
  • E2E Layer
  • E2E Provider
  • E2E Node Overview
GEOMETRY
  • Rectangle
  • Rounded Rectangle
  • Gradient Rectangle
  • Overlay Rectangle
  • Cube
  • Circle
  • Sphere
  • Cylinder
  • Cone
  • Torus
  • Chart
  • Random Points
  • Mesh Loader
  • Geometry Import (Live)
  • Volume
  • Get Bounding Box
  • Arrow
  • Particle System
  • Path Renderer
  • Geometry Renderer
INTERACTION
  • Interaction Rect
  • Touch Button
  • Touch Excluder
  • Touch Marker
  • Touch Paint
  • Touch Pattern
  • Touch Proxy
  • Touch Ripples
  • Touch Transformations
  • Web Browser
  • Touch Teleport
  • Touch Simulator
INPUT/OUTPUT (I/O)
  • GPI
  • Joystick
  • Keyboard
  • MIDI
  • Mouse
  • Network
  • Open Sound Control
  • Serial
  • Timecode
  • DMX
  • HTTP
  • RamDiskWriter
LAYER
  • 3D Layers
  • 3D Layer Reference
  • Composition Layer
  • 2D Layers
  • PSD Import Layer
  • E2E Layer
  • Mixer Layer
  • Others
LIGHT
  • Light Sources
LOGIC
  • Array Processing
  • Convert To Text
  • Cluster Synchronization
  • Counter
  • Data Portals
  • Date Time
  • Directory
  • Dispatcher
  • Enumeration
  • Expressions
  • Invert
  • Log
  • Loop Breaker
  • Math Effects
  • Matrix Operations
  • Scene Event
  • Script
  • String Operations
  • System ID
  • Render Setup Relation
  • Text Splitter
  • Timer
  • Toggle
  • Transition Info
  • URL
  • Value Switch
  • Value Buffer
  • Variables
  • Visual Indexer
PREVISUALIZATION
  • Introduction to Previs
  • Previs Screen
  • Previs Canvas
  • Compositon List
  • Rendersetup Objects
  • Composition Projector
  • Previs Screen Render Options
RENDER OPTIONS
  • Alpha Blending
  • Color Write
  • Alpha Testing
  • Clip Plane
  • Filter
  • Mask
  • Mirror
  • Effect
  • Render Cube Map
  • Draw Modes
  • Stencil
  • ZTesting
SOUND
  • Audio Clip
  • Sound
  • Volume Control
  • Audio Analysis
SLIDES
  • Slide Manager
  • Slide
  • Slide Port
  • Pivot
TEXT
  • Text Effects
  • Text Layouts
  • Text Rendering
TEXTURE
  • Background
  • Hatch
  • Image
  • Texture
  • SVG Loader
  • Gradient Texture
  • Live Video
  • Movie Stream
  • Movie Frame
  • Movie Clip
  • Texture Loader
  • Snapshot
  • Snapshot Framebuffer
  • Texture Saver
  • Video Source Selector
  • VIO Input
  • Spout Receiver
  • NDI Receiver
  • Substance Loader
  • QR Code
VR/AR
  • Tracked Devices
  • Draw Tracked Devices
WORLD
  • Axis
  • Billboard
  • GetWorld
  • SetWorld
  • Arrange
  • Ticker
  • Layout
  • Group
  • World Z Sort
  • YesNo
  • Switch
  • Spread
  • Filter Pass
  • Set Pass
  • Hierarchy Container
  • Scene Port
  • Content Container
  • Template Port
  • Container Info
  • Camera
  • Paths
  • Cloner

Advanced and Development

  • Advanced and Development Index
  • Command Line Options
  • Ventuz IP Ports
  • Ventuz Machine Service
  • TUIO
  • .NET Scripting
  • HLSL Shader Programming
  • Ventuz API and SDK
  • Ventuz Extension API
  • Ventuz VIO API
  • Ventuz File Format (VFF)
  • Ventuz Stream Out API
  • Lens Calibration File for FreeD
  • E2E Node Overview
  • Unreal Integration
  • Notch Integration
Remoting
  • Remoting Index
  • Remoting Overview
  • How To Control and Customize Ventuz
  • Remoting 4
  • Remoting 4 via Websockets
  • Remoting 4 via HTTP
  • Director Remoting
  • Deprecated Remoting

Misc

  • Presets
« Previous:
» Index «
Next: »

Color Management and HDR Workflow

Table of Contents

  1. Introduction
  2. Overview
    1. What is different in linear Color Spaces?
  3. Technical Setup
  4. Working with Color Spaces in Ventuz
    1. Standard Rendering
    2. Linear Color Spaces
      1. Choosing a Color Space
    3. Output and SDR level
    4. Working with Color in Designer
      1. Color Values: Integer vs. Float
    5. Movie Clips, Live Video, Textures
  5. Troubleshooting and Limitations

Introduction

Ventuz 8 introduces a full color management workflow with HDR capapbility and different wide color spaces, from the incoming video file to individual output streams. Especially with the usage of modern LED-panels technology, the production can be elevated with the full range of dynamics and a sophisticated color management.

Overview

What is different in linear Color Spaces?

The main change for the engine is to calculate color values with 16-bit float values, instead of 8-bit integer. Even though this seems like a background technical change, this enables Ventuz to work with a non-fixed dynamic range while still achieving high precision. Processes like PBR material and light rendering greatly benefit from this unbound dynamic range. This is also the foundation for the color processing of input and output video.

It is very recommended to read the background information about Color Spaces to work properly with HDR and color spaces.

With color processing for the whole rendering pipe, Ventuz ensures that an incoming video in a specific color space renders color-accurately on the output, where the rendering color space is independent of the output device's color space.

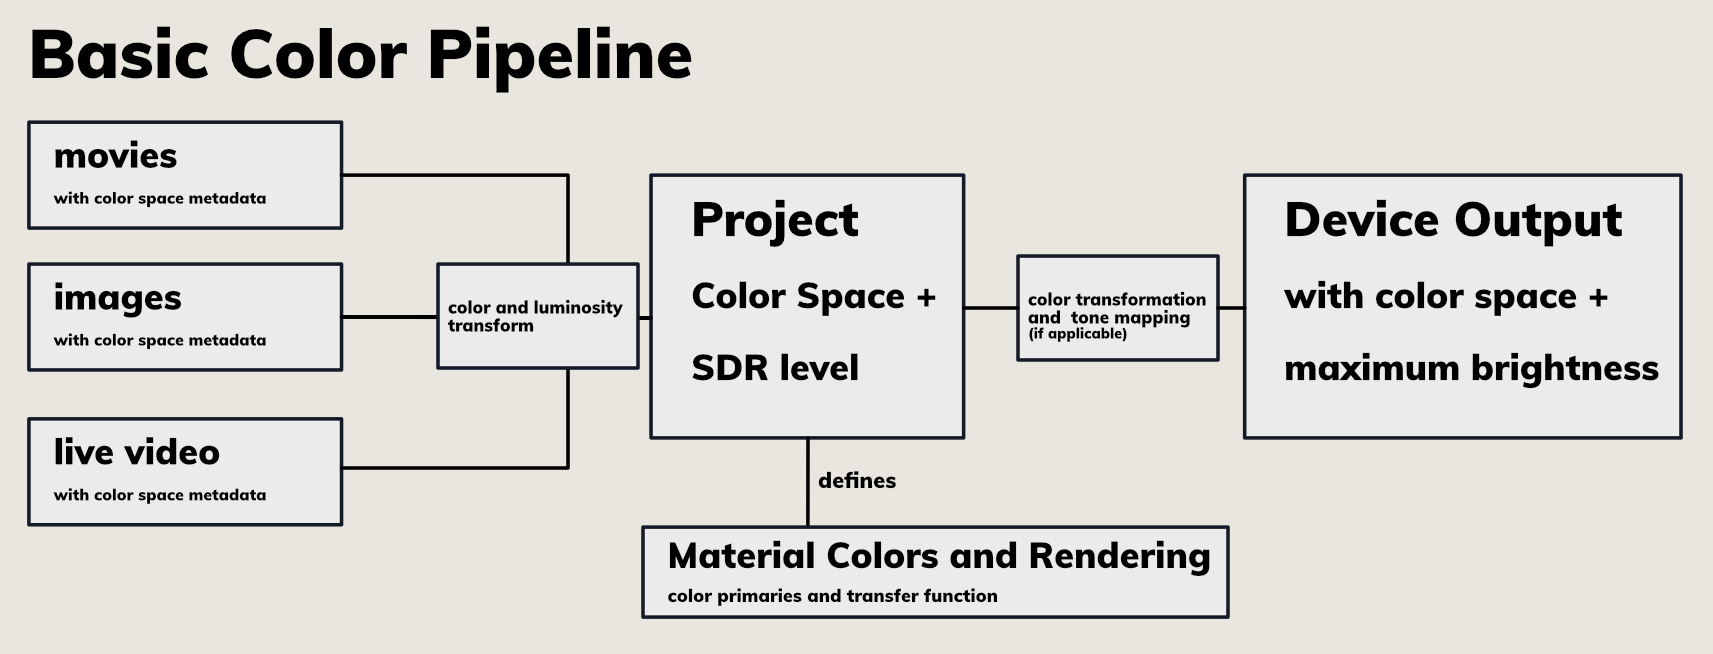
Ventuz auto-detects the color space and other meta-data for all incoming and outgoing video streams and applies the correct color transforms in real-time, to ensure a workflow with minimal additional configuration. In general, all incoming video will be converted to the Project's Color Space. On the device output, the video stream is color transformed again to match the output device independently per Output. For specific use-cases, all of these transforms can be manually adjusted.

Technical Setup

To enable rendering for HDR in linear color spaces, please follow this How To Enable Linear Color Spaces and HDR Video Output

A short checklist for HDR:

☐ HDR capable output device.

☐ Activate HDR in Windows settings.

  • Soth of these settings are necessary to view and playout via the GPU in HDR.

☐ Set Project Color Space to a linear color space.

  • Sets the engine to 16-bit float calculation.

Working with Color Spaces in Ventuz

Standard Rendering

When the Project's Color Space set to the default Rec.709/sRGB, the engine behaves exactly like pre Ventuz 8. Existing Projects will look the same. If there is no need for HDR capabilities or specific color management in your existing project, it is recommended to leave the Project Color Space set to its default Rec.709/sRGB. Across this documentation we call this the SDR Workflow. An advantage of the standard workflow is a sligthly better rendering performance, with its 8-bit calculation.

Linear Color Spaces

There are some considerations that should be taken into account when deciding to work in a linear HDR capable color space. First, the capability of rendering in High Dynamic Range is linked to the non-fixed maximum brightness value which comes with the 16-bit float values, compared to the fixed maximum of 255 in 8-bit integers. So all linear color spaces have the same advantages of HDR capabilities and advanced light calculation. The main difference between the linear color spaces are the primaries for red, green and blue. Check the Video Engine page for a detailed description.

The wider the color space, the more colors that can be represented. Where narrow color spaces, like Rec.709 are not capable of representing the same very reddish-red as an HDR color space can. The color is out-of-gamut in the SDR space. The primary values red, green and blue [(1:0:0), (0:1:0), (0:0:1)] define the look of the specific color and therefore all their mixtures. The (1:0:0) red of Rec.2020 looks much more intense compared to the (1:0:0) red of Rec.709. In fact the Rec.709 red is (0.62 : 0.06 : 0.01) in Rec.2020.

With this in mind, switching between Project Color Spaces will change the appearance of all 3D rendering colors! This is the main limitation when working with different color spaces. In general, best practice is to set it once and avoid changing it. But how do you decide?

Choosing a Color Space

For a production with known output devices, it is best to stick to the output device's color space. This ensures that Ventuz will not produce out-of-gamut colors in any of its internal rendering. However, incoming assets might be clamped if they are produced in Rec.2020. A different strategy is to choose Rec.2020 as a very wide color space, to ensure incoming assets can be processed correctly. Caution must be used when choosing colors within the 3D Rendering, to not choose colors that are outside of the output's target space. (More on this later). For mixed outputs, choosing Rec.2020 can be good strategy as well. If you are not sure and you want to render in a linear color space or stick to the more performant fixed sRGB rendering, choosing linear Rec.709 is a good option. Switching to SDR workflow, won't change the primaries and only has slightly different lighting calculation. If you decided to change later, the result would be very similar. This is also sufficient if you switch from SDR to a HDR workflow and the best option if you want to change an existing project to be HDR capable.

Output and SDR level

In general, Ventuz uses the device's output information from the EDID (for GPU outs). Because of the way the engine works, Ventuz calculates colors by referring to what's in the scene. However, the GPU's output is display referred and encodes the color values to a specific brightness in nits read from the screen. As a result, Ventuz needs a reference brightness level. The SDR-Level in the Project Properties sets the brightness of the white-point (1:1:1). If the rendering exceeds the brightness of the output device, higher values are clamped. Alternatively, you can apply tone-mapping on the Device Output to squeeze it to the range. This will usually produce better results than allowing the colors to be clamped.

Working with Color in Designer

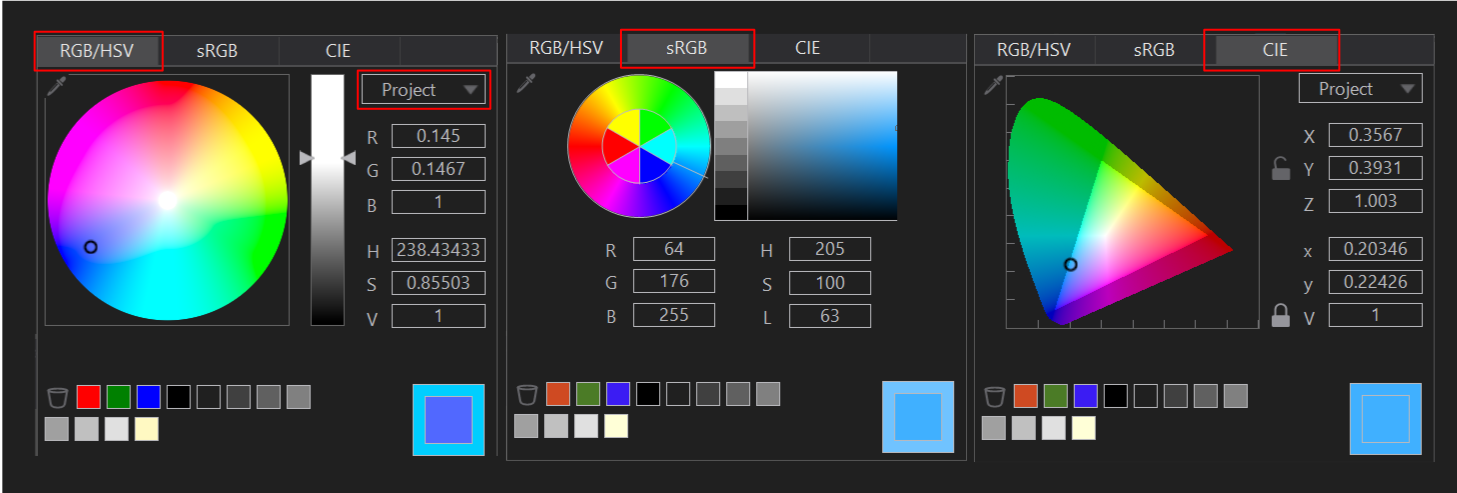
With linear color space, the Color Selector in Ventuz with different tabs and settings. The main tabs are RGB/HSV, sRGB and CIE. RGB/HSV uses a Hue and Saturation circle in combination with a Value (brightness) slider. The color shade is separated from the brightness level. The values can be set via RGB or HSV float numbers directly. This is the default tab to work in linear spaces. With the dropdown selector the color space of the Color Selector can be changed. This is a very useful feature when working in a wide space, like Rec.2020, while not exceeding the gamut of a more confined color space. E.g. if you plan to play out on a Display that supports a P3 color space, you can select this space and stay within these boundaries. The selected color value will be transformed to the Project Color Space value internally. So the RGB or HSV float values on this tab will automatically refer to the dropdown menu's selected color space. Internally all of the values will be processed in the engine's color space and also displayed in these values on a color property.

The sRGB tab functions as legacy color selector, which only uses sRGB values. Use this one to enter known sRGB int values or select a color on the picker as before. If the currently selected color value from another tab exceeds the sRGB gamut, a warning will be shown in the color picker window.

The CIE tab displays the CIE 1931 xyV/XYZ color space and value boxes. It also displays the currently selected color space gamut within CIE as highlighted rectangle. If the selected color is outside the selected color space, a warning is displayed. It is very useful, to check wether a specific color is inside a gamut and also for a better understanding of the color spaces. The xyY or XYZ values are also converted to the Project Color Space values.

Color Values: Integer vs. Float

The linear float color values are represented as (1.00 : 1.00 : 1.00) values, with a : as separator, to distinguish to the classic integer values: (255, 255, 255). Even though all color values switch to float values, the Color Converter nodes still work with integer values. Next to these, there is a float version of all these nodes to work with linear values. In general, all comma separated integer colors are in sRGB, where the float values are in the Project Color Space. All Color properties in the Property Editor have a linear category and a sRGB category with integer values. These also can be used to convert from sRGB logic to linear Project Color Space. (But only within the gamut and range of sRGB!) To enter a known sRGB int value directly you can do it via this dropdown section or simply insert the comma separated numbers or HEX values like before. To fill a color value from a string, it is still possible to bind the string with the color values to the color node. This works for linear and int values, independently of the Layer type (Standard or HDR).

Movie Clips, Live Video, Textures

On all incoming video streams, whether it is as movie clip, live video, or a single texture, Ventuz performs Input Color Processing to convert the stream to the Project's Color Space values. In general this is done automatically and Ventuz reads out the metadata of the file/stream to perform the correct transformations. With the ColorSpace property the color space, primaries and transfer function can be set manually as well as disabling the raw values. The transforms are done in real-time via a shader on the GPU. If the input color space is wider than the Project Color Space, out-of-gamut colors are clamped. Except with possible clamping, the transforms are always accurate for the whole pipe from input, via blending, to the output! With a LUT on a layer, color transformations from wider to narrow color spaces are possible.

Troubleshooting and Limitations

  • The rendering on my screen looks pale, after enabling HDR:
    • This might be related to the screen's limitation. Some HDR monitors can to desaturate with higher values.
  • The general brightness level is too dark on my output:
    • Try to increase the SDR-Level for your project to set the brightness of the standard white-point (1.00 : 1.00 : 1.00) higher and increase general luminosity
  • My movie clip or texture doesn't look as I expected:
    • Try checking the Color Space of the file in the Performance Statistics, to see if the video file meta-data is wrong. When in doubt, set it manually in the movie clip node.
  • I can't activate HDR in Windows:
    • The output screen doesn't report to Windows that it is an HDR capable display.
    • Check with the manufacturer's specifications to ensure that it supports HDR.
    • Check the cables and connections.
  • I changed the Project Color Space and my rendering looks different now:
    • With different color spaces, the primaries are different and also the color values represented. Therefore the rendered colors change. The least change between SDR and linear color space is between SDR rec.709 and linear rec.709.
  • Animation channels and Remoting is fixed to integer values:
    • The Scene Model is currently not expanded to work with linear color values this is also valid for the Animation node. It is possible to use Color nodes and Color Converter nodes to workaround.

See also:
  • Video Engine Color Spaces background information
  • How To Enable Linear Color Spaces and HDR Video Output
  • Device Output settings

« Previous:
» Index «
Next: »
Copyright 2025 Ventuz Technology