Navigation

Ventuz Introduction

  • Introduction
  • Getting Started
  • Ventuz Editions
  • Ventuz Products
  • Realtime Rendering
  • Frequently Asked Questions
  • Common Mistakes
  • Deploying a Ventuz Presentation
  • Scene Performance and Tweaks

Quick Guides

  • Quick Guide Index
  • Business Logic
  • 3D Art
  • 2D Art
  • Programming
  • System Engineer

General

  • Index
  • What's New
  • Ventuz System Requirements
  • Configuration Editor
  • Device Configuration
  • Machine Configuration
  • Render Setup Editor
  • Introduction to Compositions, Screens and Outputs
  • Explanation of Compositions, Screens and Outputs
  • Live Runtime Control
  • Project and Show Management
  • Web Configuration Editor
  • Communication Protocol Overview
  • GPI Configuration for Runtime or Director
  • Introduction to the Ventuz Video Engine
  • Supported Formats
  • Supported Hardware
  • Color Management and HDR Workflow
  • Multisampling / Anti-Aliasing
  • Input Subsystem
  • Ventuz Proprietary Files
  • Migrating Configs & Content to Ventuz 8
  • Migrating Content to Ventuz 7
  • Migrating Content to Ventuz 6
  • Migrating Content to Ventuz 5
  • Summary Shortcuts
  • Terminology
  • Manual Index

Ventuz Designer

  • Designer Indices
Introduction
  • Designer Introduction Index
  • Designer Overview
  • Realtime Rendering
  • Project Browser
  • Designer Interface
  • Designer Options
  • Working with Nodes
  • Hierarchy and Content Editors
  • 2D Workflow
  • 3D Workflow
  • PBR Workflow
  • Animation Workflow
  • Best Practices
  • Reading Data in Ventuz
  • Display Images and Movies
  • Scene Performance and Tweaks
  • Deploying a Ventuz Presentation
  • Render to Disk
  • Multi Screen and Output Setup
  • Explanation of Compositions, Screens and Outputs
  • Workflow of using Multi Screens
  • Multi GPU
  • Previs
User Interface
  • Designer User Interface Index
  • Designer Interface
  • Renderer Window
  • Layer Editor
  • Property Editor
  • Property Groups
  • Hierarchy Editor
  • Content Editor
  • Find and Replace
  • Toolbox
  • Animation Editor
  • Shader Editor
  • Text Editor
  • Message View
  • Scene Tree
  • Stage Editor
  • Container Outline
  • Watches Editor
  • Scene Control Window
  • Performance Statistics
2D Workflow
  • 2D Workflow Index
  • 2D Workflow
  • Layer Editor
  • Common Layer Properties
  • IPP Effects
  • Color Correction FX
  • Distortion FX
  • Filter FX
  • Hierarchy and Content Editors
  • Display Images and Movies
3D Workflow
  • 3D Workflow Index
  • 3D Workflow
  • Hierarchy and Content Editors
  • Renderer Window
  • Camera Navigation
  • Manipulate Objects with Gizmos
  • In-Scene Editing
  • Layer Editor
  • Property Editor
  • Hierarchy Editor
  • Working with Nodes
  • Isolated Objects
  • Containers
  • Text Rendering
  • Character Sets
  • Geometry Import
  • Color Management and HDR Workflow
  • Display Images and Movies
  • Particle System
  • Creating Realistic Reflections
  • Unreal Integration
  • Notch Integration
  • E2E Node Overview
Logic Workflow
  • Logic Workflow Index
  • Hierarchy and Content Editors
  • Content Editor
  • Hierarchy Editor
  • Working with Nodes
  • Property Editor
  • Containers
  • Project and Scene Data
  • Reading Data in Ventuz
  • Display Images and Movies
  • Input Subsystem
  • Multitouch
  • TUIO Protocol
  • Open Sound Control
  • Unreal Integration
  • Notch Integration
  • E2E Node Overview
Animation Workflow
  • Animation Workflow Index
  • Animation Workflow
  • Animation Editor
  • Content Editor
  • Hierarchy Editor
  • Property Editor
  • Animation and State Engine
  • Templates
  • Template Engine
  • Scene Transitions
  • Unreal Integration
  • Notch Integration
Project Structure
  • Project Structure Index
  • Annotations
  • Project Documentation
  • Projects and Scenes
  • Project Properties
  • Project Maintenance
  • Project and Scene Data
  • Scene Management
  • Scene Statistics
  • Scene Tree
  • Performance Statistics
How Tos
  • Designer How to Index
  • How to Run Ventuz
  • How to Work with Designer
  • Ventuz Designer Drag&Drop Workflow
  • How to work with Shadows
  • How to Build Content for Multiple Screens
  • How to Use Emoijs
  • How to Build a Template
  • How To Build a Custom Scene Transition
  • How to Use the Color Difference Keyer
  • How To Enable HDR Video Output
  • How To Work with the HDR Layer
  • How Create Lens Flares and Bloom
  • How to Create Visuals Loader Node
  • How to Remote Control with a Phone
  • How to use Head Mounted Displays
  • How to work with 3D Reference Layers
  • How to create a Firework Particle System
  • How to use DDS with new Block Compression modes
  • How To use Stream Out
  • How to use the Substance Integration
  • How To Integrate Unreal
  • How To Integrate Notch
  • How To use the Vertex Integration
  • How To Control and Customize Ventuz
  • How to use the Companion with Director
  • How to build Previs scenes with Designer
  • How to migrate from Ventuz 6 to Ventuz 7
Reference
  • Available Nodes
  • Animation Nodes
  • Material&Color Nodes
  • Data Nodes
  • E2E Nodes
  • Geometry Nodes
  • Interaction Nodes
  • IO Nodes
  • Layers
  • Light Nodes
  • Logic Nodes
  • Previs Nodes
  • Render Option Nodes
  • Slides Nodes
  • Sound Nodes
  • Text Nodes
  • Texture Nodes
  • VR Nodes
  • World Nodes
  • Summary Shortcuts
  • Layer Editor Shortcuts
  • Hierarchy Editor Shortcuts
  • Content Editor Shortcuts
  • Animation Editor Shortcuts
  • Director Shortcuts

Ventuz Director

  • Index
  • What's New in Director
  • Introduction
  • Environment
  • Show
  • User Interface
  • Assets
  • Taking Action
  • Property Editor
  • Shot Box
  • Project Data
  • Pages
  • Playlist
  • Transitions
  • Timeline
  • Content References
  • Topology
  • Channels
  • Macros
  • Designing Templates
  • Scene Transitions
  • Plug-Ins
  • Shortcuts
  • Command Line Options
  • Application Settings
  • Glossary
  • GPI Configuration

Ventuz Runtime & Configuration

  • Runtime Index
  • Configuration Editor
  • Machine Configuration
  • Device Configuration
  • Project and Show Management
  • Live Runtime Control
  • Web Configuration Editor
  • Render Setup Editor
  • Warping and Soft-Edging Editor
  • Multi Screen and Output Setup
  • How to migrate from Ventuz 6 to Ventuz 7
  • Machine Clustering
  • Supported Hardware
  • Director Mode
  • How to Configure Audio
  • How to Use Live Options
  • How To Play Out On Multiple Screens
  • How To Render on a Machine Cluster
  • How to Use Head Mounted Displays
  • How to Setup Spout with Ventuz
  • How to Use Newtek NDI
  • How to Use a Mixed Frame Rate Cluster
  • How to Use Tracking

Multi Output & Display Setups

Introduction
  • Introduction to Compositions, Screens and Outputs
  • Explanation of Compositions, Screens and Outputs
  • Machine Clustering
  • Support for multiple GPU's
Editors
  • Configuration Editor
  • Device Configuration
  • Render Setup Editor
  • Warping and Soft-Edging Editor
  • Designer Stage Editor
Workflows
  • How to Build Content for Multiple Screens
  • How To Play Out On Multiple Outputs
  • How To Render on a Machine Cluster
  • How to build Previs scenes with Designer

How To

Designer
  • Designer How to Index
  • How to Run Ventuz
  • How to Work with Designer
  • Ventuz Designer Drag&Drop Workflow
  • How to work with Shadows
  • How to Build Content for Multiple Screens
  • How to Use Emoijs
  • How to Build a Template
  • How To Build a Custom Scene Transition
  • How to Use the Color Difference Keyer
  • How To Work with the HDR Layer
  • How To Enable HDR video output
  • How Create Lens Flares and Bloom
  • How to Create Visuals Loader Node
  • How to Remote Control with a Phone
  • How to use Head Mounted Displays
  • How to work with 3D Reference Layers
  • How to create a Firework Particle System
  • How to use DDS with new Block Compression modes
  • How to use the Substance Integration
  • How To Integrate Unreal
  • How To Integrate Notch
  • How To build and playback Ventuz Content in Vertex
Runtime & Configuration
  • Runtime How Tos Index
  • How to Configure Audio
  • How to Use Live Options
  • How To Play Out On Multiple Screens
  • How To Render on a Machine Cluster
  • How to use Head Mounted Displays
  • How to setup Spout with Ventuz
  • How to use Newtek NDI
  • How to use a Mixed Frame Rate Cluster
  • How to use Tracking
  • How To Integrate Unreal
  • How To Integrate Notch
  • How To build and playback Ventuz Content in Vertex
  • Multi Screen and Output Setup
  • How To Enable HDR video output
Director
  • How To Control Multiple Graphics Independently From Each Other
  • How to use the Companion with Director

Ventuz Node Reference

Available Nodes Overview
  • All Designer Nodes
ANIMATION
  • Mover
  • Alternator
  • Simple Control
  • Timeline Control
  • Anmation Rig
  • Keyframe Animation
  • Animation Group
COLOR/MATERIAL
  • Alpha
  • Fog
  • Ground Fog
  • Sky Box
  • Color to RGBA
  • HSLA to Color
  • RGBA to Color
  • Color Transformer
  • HLSL Shader
  • Color
  • Material
  • Color Picker
  • Substance Material
DATA
  • Database
  • Excel
  • JSON
  • RSS Feed
  • Resource Linker
  • Text File
  • XML
E2E
  • E2E Axis
  • E2E Data
  • E2E Control
  • E2E Layer
  • E2E Provider
  • E2E Node Overview
GEOMETRY
  • Rectangle
  • Rounded Rectangle
  • Gradient Rectangle
  • Overlay Rectangle
  • Cube
  • Circle
  • Sphere
  • Cylinder
  • Cone
  • Torus
  • Chart
  • Random Points
  • Mesh Loader
  • Geometry Import (Live)
  • Volume
  • Get Bounding Box
  • Arrow
  • Particle System
  • Path Renderer
  • Geometry Renderer
INTERACTION
  • Interaction Rect
  • Touch Button
  • Touch Excluder
  • Touch Marker
  • Touch Paint
  • Touch Pattern
  • Touch Proxy
  • Touch Ripples
  • Touch Transformations
  • Web Browser
  • Touch Teleport
  • Touch Simulator
INPUT/OUTPUT (I/O)
  • GPI
  • Joystick
  • Keyboard
  • MIDI
  • Mouse
  • Network
  • Open Sound Control
  • Serial
  • Timecode
  • DMX
  • HTTP
  • RamDiskWriter
LAYER
  • 3D Layers
  • 3D Layer Reference
  • Composition Layer
  • 2D Layers
  • PSD Import Layer
  • E2E Layer
  • Mixer Layer
  • Others
LIGHT
  • Light Sources
LOGIC
  • Array Processing
  • Convert To Text
  • Cluster Synchronization
  • Counter
  • Data Portals
  • Date Time
  • Directory
  • Dispatcher
  • Enumeration
  • Expressions
  • Invert
  • Log
  • Loop Breaker
  • Math Effects
  • Matrix Operations
  • Scene Event
  • Script
  • String Operations
  • System ID
  • Render Setup Relation
  • Text Splitter
  • Timer
  • Toggle
  • Transition Info
  • URL
  • Value Switch
  • Value Buffer
  • Variables
  • Visual Indexer
PREVISUALIZATION
  • Introduction to Previs
  • Previs Screen
  • Previs Canvas
  • Compositon List
  • Rendersetup Objects
  • Composition Projector
  • Previs Screen Render Options
RENDER OPTIONS
  • Alpha Blending
  • Color Write
  • Alpha Testing
  • Clip Plane
  • Filter
  • Mask
  • Mirror
  • Effect
  • Render Cube Map
  • Draw Modes
  • Stencil
  • ZTesting
SOUND
  • Audio Clip
  • Sound
  • Volume Control
  • Audio Analysis
SLIDES
  • Slide Manager
  • Slide
  • Slide Port
  • Pivot
TEXT
  • Text Effects
  • Text Layouts
  • Text Rendering
TEXTURE
  • Background
  • Hatch
  • Image
  • Texture
  • SVG Loader
  • Gradient Texture
  • Live Video
  • Movie Stream
  • Movie Frame
  • Movie Clip
  • Texture Loader
  • Snapshot
  • Snapshot Framebuffer
  • Texture Saver
  • Video Source Selector
  • VIO Input
  • Spout Receiver
  • NDI Receiver
  • Substance Loader
  • QR Code
VR/AR
  • Tracked Devices
  • Draw Tracked Devices
WORLD
  • Axis
  • Billboard
  • GetWorld
  • SetWorld
  • Arrange
  • Ticker
  • Layout
  • Group
  • World Z Sort
  • YesNo
  • Switch
  • Spread
  • Filter Pass
  • Set Pass
  • Hierarchy Container
  • Scene Port
  • Content Container
  • Template Port
  • Container Info
  • Camera
  • Paths
  • Cloner

Advanced and Development

  • Advanced and Development Index
  • Command Line Options
  • Ventuz IP Ports
  • Ventuz Machine Service
  • TUIO
  • .NET Scripting
  • HLSL Shader Programming
  • Ventuz API and SDK
  • Ventuz Extension API
  • Ventuz VIO API
  • Ventuz File Format (VFF)
  • Ventuz Stream Out API
  • Lens Calibration File for FreeD
  • E2E Node Overview
  • Unreal Integration
  • Notch Integration
Remoting
  • Remoting Index
  • Remoting Overview
  • How To Control and Customize Ventuz
  • Remoting 4
  • Remoting 4 via Websockets
  • Remoting 4 via HTTP
  • Director Remoting
  • Deprecated Remoting

Misc

  • Presets
« Previous:
» Index «
Next: »

Live Control

Table of Contents

  1. Ventuz Configuration
    1. Overview - Ventuz Configuration Editor
    2. Web Browser Configuration Editor
    3. Machine Selection
    4. Messages
  2. Status
    1. General
    2. Cluster Status
    3. Logs Quick access
  3. License
    1. License Manager
  4. General Configuration
    1. Overview
    2. Group Selection
  5. Machine Configuration
    1. General
    2. Remoting
    3. DMX
    4. Extended
  6. Device Configuration
    1. General
    2. Video
    3. Touch
    4. Tracking
    5. Audio
    6. Pipe Mapping
    7. Preview Window
  7. Project and Show Management
    1. Project Management
  8. Live Control
    1. General
    2. Scene Control
    3. Project Data
    4. Live Options
    5. Diagnostics

General

With starting and running Ventuz Runtime or while working with Designer or Director and runtime in the background the Live Control section of the Configuration Editor is accessible. In this section all changes and the overview and debugging possibilities of the runtime can be made.

Presets

For the set Live Options and the set Scene and Project Data Presets can be saved and loaded. This is very useful when you adjusted your production settings in preparation and want to make sure they can be loaded the same for the show.

To create a Preset click the Save Preset button. This will popup a window to select the data which should be written to the preset. If there are some settings which shouldnt be applied by activating the preset, deselect them in the dialog box. Therefore it is possible to create different presets for different data fields.

You have two options to save: Save on the local machine (yellow button) will save the preset on the harddrive or to save it in the app with the blue button. These represents the different colored presets. Note: To save changes on a existing Preset, press Save and enter the same name as the existing preset. This will overwrite the old one.

With the Pencil Icon the edit mode is toggled, which enables to delete or export and save single presets or to import a preset from your local files. With these tools presets can be shared and uploaded on a different production machine.

Scene Control

With the Scene Control section the currently loaded Scene(s) in the runtime can be overviewed and changed. The Scene Data can be controlled over here for each loaded scene. Also the Layout Scene is displayed.

For a good Ventuz structure and Scene Management, please see: Scene Management and Scene Tree Editor

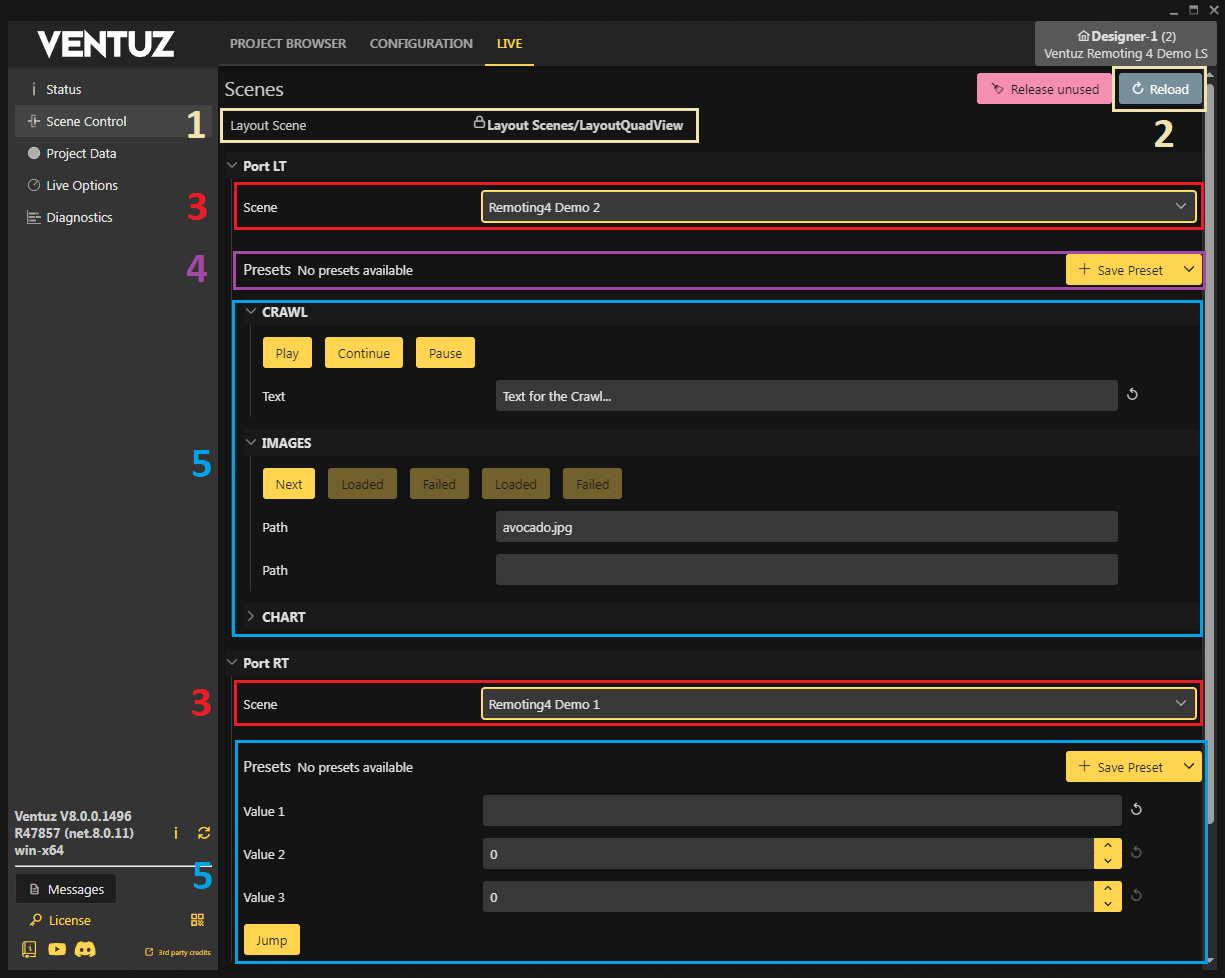
  • 1: The Layout Scene of the loaded project is displayed on top of the page. The Layout Scene can not be changed while the runtime is running.
  • 2: With the Reload Button changes on the Scene Data can be loaded. For example: If you are editing the Scene Data in Designer or adding some properties, these changes will be visible by pressing Reload.
  • 3: Every Layout Scene holds at least one Scene Layer which can load other Scenes. If there is no Layout Scene configured, a default layout with one Scene Layer is set. In the red rectangled section you can select the Scene which should be loaded. The Scene is loaded instantly. The required Scene needs to be part of the current loaded project.
  • 4: With a preset the edited Scene Data can be saved and later used again. Simply press Save Preset. It is possible to export them or importing in .json format. For more information on presets see here: Presets.
  • 5: These boxes hold the Scene Data of the loaded scenes. All items which are part of the Scene Data can be edited here. By collapsing these boxes more items can be displayed in parallel. The changes made are affecting the bound nodes in the scene in realtime.

The Web Configuration Editor uses the ​invariant culture with periods . for floating points and commata , to seperate array items.

Multi Render Pipes

If there are multiple Render Pipes configured, there is a tab on top of the page to change the view to the other Render Pipe(s). Each Render Pipe is able to be configured independently in the same way as described.

Project Data

In this section, the Project Data of the running project can be controlled. The overall handling is the same as the Scene Control section with editing the data and the possibility to save the changes as Preset, but the Project Data holds data which is used project wide and not on a single scene. All scenes in a project can refer to this data.

Live Options

General

With the Live Options section of the Configuration Editor, settings of the active Runtime can be adjusted and also saved to the Device Configuration. Therefore changes can be done in a running production environment according to the adjustments which might be necessary. Also many output device settings are changeable with the AV Options. Especially when working with SDI, with these changes fine tuning to the other video hardware is possible. With the Show Statistics toggle enabled, one can debug and monitor the performance with the Performance Statistics and Diagnostics.

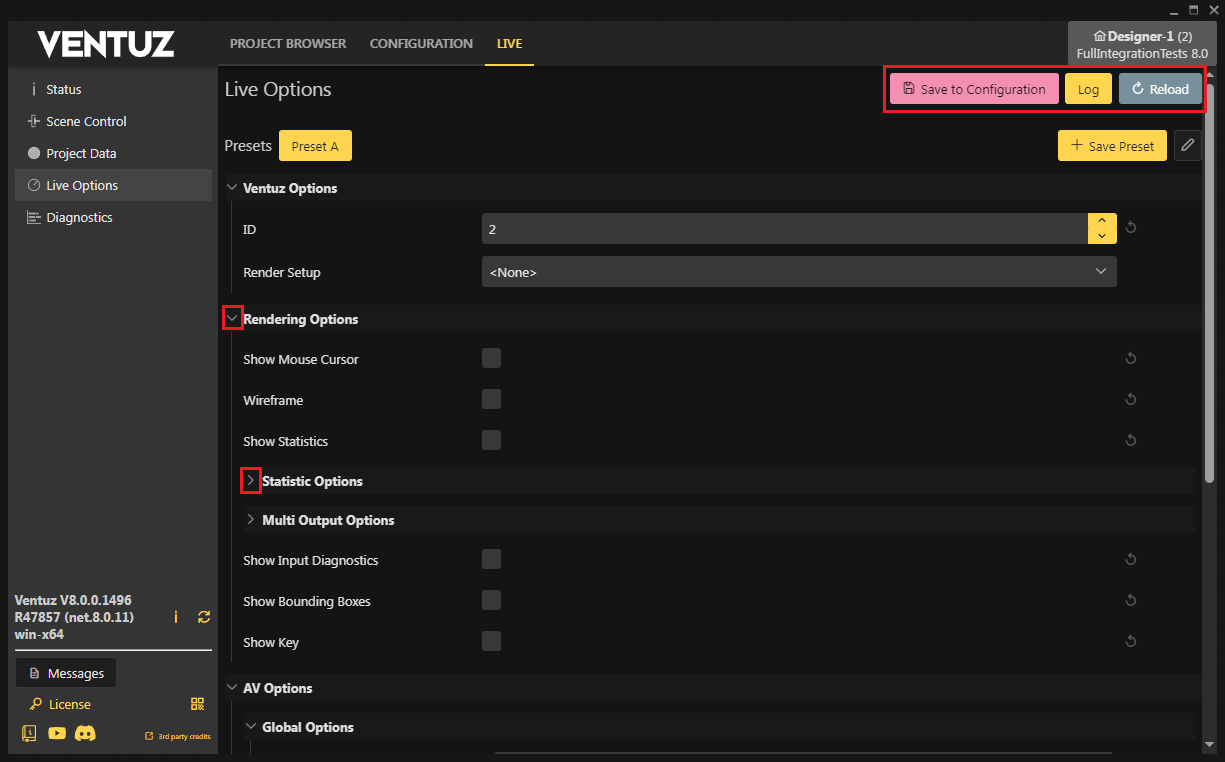
Some of the Live Options are applied immediately. Settings which refer to the Device Configuration, needs to be saved by pressing the Save to Configuration button. This will write the config settings to the Device Configuration. With starting the Runtime again, these changes stay in use.

The Log button writes the set Live Options and Device Configuration to the Messages Dialog.

With Reload the Live Options are updated. If the Device Configuration or other settings have changed (e.g. with the options in Designer), Reload will load the new Live Options.

The Live Options can be (un)collapsed by pressing the - Icon or + Icon at each section for a better overview.

All settings can be saved to a Preset with the Editor. This is especially useful for all settings which are not saved to the Configuration. For example: You need to monitor and debug your rendering and output, to not need to activate the desired Statistic Options and the Show Statistic toggle, simply create a Preset with all the activated options.

Please note that Live Options can only be saved if the corresponding configuration is not set to (None). The actual values of the settings are injected into the currently loaded file and it will be saved to disk.

Ventuz Options Description
ID Overwrites the Machine ID in the Configuration. In a Machine Cluster the ID changes the Master / Client behaviour and the rendering of the correct Render Setup part.
Render Setup Changes the Render Setup for the machine. Note: To use a Render Setup in the Live Options it needs to be included in the Ventuz Presentation or part of the project, which is currently running.
Rendering Options
Wireframe Toggle to only render the wireframe of the geometries
Show Statistics Turn on the Performance Statistics and Diagnostics in the renderer
Show Mouse Cursor The mouse cursor will be visible on the rendered output
Show Input Diagnostics Toggle to show the Input Diagnostics of the incoming touch devices
Show Bounding Boxes Turn on to show the Bounding boxes of the selected Node in Designer.
Show Key Toggle to show the key output in the Preview Window, while an external keying output mode is active.
Statistic Options With these Live Options, the specific Performance Statistics are toggled. For a detailed description see the Performance Statistics page.
Multi Output Options
Enable Physical Outputs Toggle if the physical outputs will play out the rendering. With deselecting, the outputs are not active.
Lower Resolution for Previs This will lower the resolution inside a Previsualization Scene. Previs scenes can have very huge resolutions, to ensure good performance while working on a bigger scene it is advised to use this option.
Preview Without Scaling This forces the Renderer to render the current Designer Preview in its configured resolution coming from the Render Setup, it will also crop the image if the renderer window is to small. This only affects the Designer, the runtime will always use the configured output resolution!
Multi Bezel Color Use this to change the color of bezels inside the Designer Rendering Window.
Per Output Stats Defines the displayed Performance Statistics referring to the output. All: Shows all statistics on all outputs. Preview: Shows the information only in Designer Preview Window or Runtime Preview Window. Per Output: Shows the information referring to the specific output playing out.
Enable Software Watchdog Enables the Software Watchdog, alco can be set in the Video Options.
AV Options With these settings the Input and Output device streams of the Device Configuration can be adjusted and saved to the config. The settings vary depending on the configured devices and streams. Especially the Video Output setting in general and the Advanced Video Options are adjustable. Please refer to these pages for the information of the specified settings.

Diagnostics

The Diagnostics section mirrors the Performance Statistics of the active runtime on the selected machine. In general it shows the same information as you can see in the Performance Statistics. The big advantage is to be able to monitor a runtime remotely from a different device and without disturbing the output rendering. Also in many output scenarios, the rendering is splitted across multiple display devices.

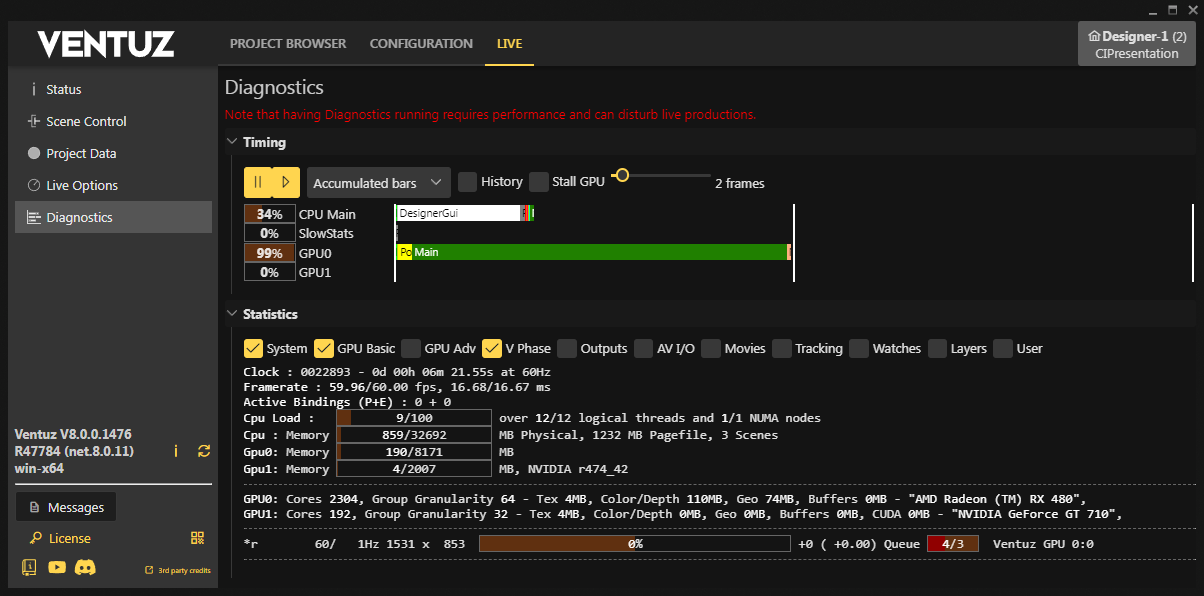
Having the Diagnostics running requires performance and can disturb live productions!

In the Timing section the performance demand of the GPU and CPU is shown for an overview of the systems used resources. For the SlowStats bar are certain Performance Statistics which can be enabled in the Live Options and may slow down the rendering. To stay aware of this we integrated this timing bar.

With the Pause and Play button, the timing bars can be paused or keep running. When investigating for a system overload it is useful to pause the timing to be able to check in detail which engine tasks needs a lot of performance and eventually optimize the Scene.

The type of the performance bars can be changed with the dropdown menu. Please refer to Accumulated Bars vs. Detailed Timeline for more information an the impact of the selection. With the History toggle, the diagnostics of the last frames are shown as well. This is useful, if you have a performance lag, with a specific task (e.g. loading/playing back a movie). You can trigger this task and pause to see in detail which aspect is taking all your resources and may change the format of the video to solve the problem. The Stall GPU: The slider for adjusting the number of frames will change the scope of the timing bars to a different number of frames.

The Statistics section displays the Performance Statistics in the UI. The displayed selection of statistics can be made with the selection boxes at the top. They are very similar to the ones in the Live Options and are described on the page of the Performance Statistics.

See also:
  • Performance Statistics
  • Introduction to the Video Engine
  • Scene Management
  • Project and Scene Data
  • Machine Cluster

« Previous:
» Index «
Next: »
Copyright 2025 Ventuz Technology