Multi TouchMGPU: , Cluster:
Table of Contents
This document is an overview of the Multi Touch input handling and gesture recognition inside of Ventuz. It describes the technical aspects of what happens internally from a touch interaction being registered to the Interaction node reacting to that touch interaction. Although much of the complexity in implementing Multi Touch has successfully been hidden from the user, a deeper understanding of what really goes on can seriously improve the way a user designs a Multi Touch scene.
General Concept
Due to the complexity of implementing proper Multi Touch handling, the usual Ventuz philosophy of providing raw input information for example, the Mouse Node and the way process them it is presented to the user does not follow the Multi Touch implementation. Instead, ease of use was the primary concern.
Ventuz supports four forms of touch interaction:
- Mouse - translated into a virtual touch when the left mouse button is pressed.
- Windows Touch - standard touch screens
- TUIO 1.1
- VR Controller - e.g. from HTC Vive
When a new touch is registered, Ventuz calculates which geometry has been touched and relays that information to all interaction nodes that are associated with this geometry - all interaction nodes that lie on the path from the geometry to the scene root. The interaction nodes perform some calculations to translate the 2D touch position to meaningful values such as the angle of rotation that is implied by the users movement in case of a Touch Rotation node. These values are both provided as output properties as well as used by the nodes themselves. For example, a Touch Translation node contains an axis inside and automatically performs the appropriate motion for the touch movement. A Touch Paint node works like an Overlay Rectangle and automatically displays the texture that is painted by the touch movement.
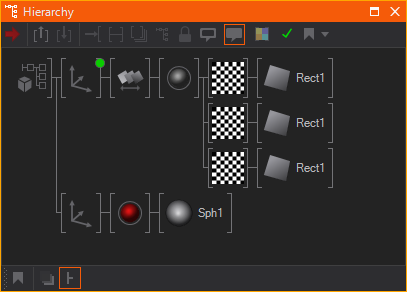
In the example shown here, touching any of the three rectangles and moving the touch will cause the Touch Translation to update its internal axis and thus move all nodes in its subtree of nodes. The sphere however is neither affected by this nor does it itself react to touch input.
No bindings are required. Inserting the interaction node will automatically associate that node with all geometries underneath it.
Intersection
When a new touch is detected, Ventuz will cast a ray to estimate which geometry (or Volume) the user has hit when the touch began; This also applies for touches that are hovering. Ray-intersection is a performance intensive operation due to the scene flexibility of Ventuz. For example, there is no bounding volume hierarchy which can be used for acceleration determining a ray's origin and direction through the scene. It can only be calculated when the mesh is reached as camera/view nodes can be on any level of the hierarchy. Therefore intersection is only calculated for meshes beneath interaction nodes and by default only against an objects bounding volume. This behavior can be changed to mesh intersection for each interaction node. The result of this intersection is the mesh that has the smallest z-value with respect to the viewer is the mesh that will interact with the touch; this is regardless of z-function rendering options or alpha value specified in the scene. Starting at the mesh hit, Ventuz traverses the scene hierarchy towards the scene root and notifies interaction nodes on its way.
It is often advisable to use simplified intersection proxies under a gesture and bind the output values to a separate axis that performs the motion. The most simple way to achieve this is to use an alpha node with an alpha of zero and the auto-block property deactivated, then add the appropriate primitive(s) underneath.
There are three different types of interaction nodes: Those that are based on an object in the scene, based on the screen space or a specific marker object. The type of node will both imply how the touch coordinates are mapped and how interaction nodes are activated. In general, screen-space nodes, such as Touch Painting), are only activated if the touch does not activate any object-based interaction node (i.e. a translation).
Once a touch is accepted and bound to an interaction node a touch hits the control surface and is no longer hovering, it will trigger no more intersection tests. Instead, changes in position are directly transmitted to that node. As a result, an object can be moved underneath another interaction area and the touch will not be re-assigned to the interaction node in front of it.
Mapping
When an interaction node receives touch information, it performs some calculations of its own to map the 2D touch position to meaningful values. For example, the Touch Translation first computes the intersection point of the viewing ray with the X/Y-plane of the world coordinate system as it is for the translation node. So any Axis above the interaction node will affect how the touch movement is mapped. If the axis contains a rotation of 45 degrees in the Y-Axis, the translation will map and move along the rotated X-Axis.
![]()
The translation node will output the amount of units that the internal axis would have to be shifted in the X- and Y-axes such that the object stays fixed with respect to the touch. Other nodes have similar properties that provide the interpreted values.
Except for the initial intersection point, no part of the mapping process uses the geometry that was hit. It is therefore important what position/orientation the interaction node has versus what the geometry has.
The Touch Transformation nodes have Limit properties that can artificially restrict the interval into which the touch information is mapped. For example, a Touch Translation can be restricted to always have a Y-value of zero or a Touch Rotation can be restricted to only rotate between plus and minus 45 degrees. These values also are based on the world coordinate system at the interaction node level.
To re-iterate, the way that touch movement is mapped, and thus translated to numeric values, does not depend on the shape/size/position of the object but the position/scaling of the interaction node itself. Whether inserting a translating/rotating/scaling axis as a parent or child of an interaction node produces two different results!
Stacked Gestures
Things get more complicated when an interaction node is used as a child of another interaction node. Starting from the intersected mesh, all object-based interaction nodes will be bound to the touch but not create any changes in output. Instead, each interaction node continuously maps the touch’s movement into its own mapping system and estimates the amount of effective movement. For example, if an interaction node is limited to a minimum X translation value, any movement in that direction will at best go up to this limit. All interaction nodes bound to this touch will do this calculation until a nodes estimated effective movement lies above the movement threshold specified in the Project Properties. Once the threshold is reached, the node claims exclusiveness for all its bound touches and starts processing, i.e. generating output values. The motion threshold should be as small as possible to minimize the movement it takes before a node reacts, but on the other hand it must be large enough that the motion can be positively associated to one of the nodes.
Example: Two translation nodes are stacked on top of each other in the scene hierarchy. Both have activated limits but one has a min/max value of zero in X direction and the other in Y direction. The motion threshold shall be 5 pixels. When the user touches a mesh beneath those interaction nodes, nothing happens until he moves at least 5 pixels along the free mapping axis of one of those nodes. Once this happens, the appropriate node will start updating its values and thus move the mesh.
Touch Groups
Every interaction node can be configured to react on specificied TouchGroups. This is done with the TouchGroupFilter property. In the Touch section of the [MachineConfigurationAV#Touch Device Config] every touch device is assigned to TouchGroups (Default, A, B, C, D). This means, for example, TUIO can generate touch entries on TouchGroup A&B. Interaction nodes 'listening' on one of these TouchGroups will process such touch entries; all other nodes will ignore these touches. For VR Controller the TouchGroups can be directly set on the nodes!
To apply the Touch Groups through bindings you can use a bitmask-like encoding. This means that each touch group has a power of 2 assigned. To select several groups you need to add up the number of each of them and bind the result to the Touch Group enumeration.
| Number | Group |
| 0 | None |
| 1 | Default |
| 2 | A |
| 4 | B |
| 8 | C |
| 16 | D |
For example if you want to enable the Touch Groups Default, B and C on an Interaction Node you would need to use the number 13. To only use Touch Group D use the number 16.
Hardware Setup
There are two main scenarios supported by the Ventuz Multi Touch system:
- Standalone machine with one touch input device (i.e. a touch panel) and a single display, often integrated into the same device (e.g. a Microsoft Surface-type device).
- A single touch input device (i.e. a radar touch) connected to a master control machine which serves multiple rendering client. See Input Subsystem.
The Project Properties contain a number of settings to influence touch processing. Most notably, they contain the parameters that handle smoothing of the raw input and duration settings for single tap as well as tap-and-hold events. The Touch Device Configuration contains the hardware-dependent settings like which input device types are to be used for touch handling.
Windows Mouse
The mouse position and left mouse button state are used to create an artificial touch. Through this mechanism, all interaction nodes respond to mouse input in the same way as with a single touch coming from a Multi Touch device.
TUIO 1.1
The TUIO network protocol is an OSC-based protocol to transmit multi touch information from hardware input devices to software applications. Except for simple touch LCD displays which utilizes native Windows Touch support. For more information, see TUIO.
TUIO 2.0 is currently not implemented and tests with TUIO 1.0 not have been performed.
Most TUIO devices do not deliver more than 20-30 position updates per second. this is lower than the rendering update rate, moving objects may not be smooth. Use the input processing capabilities provided in the Project Properties and the input diagnostics visualization to improve results on such devices.
Windows Touch
The Windows Touch API was introduced by Microsoft to create a uniform way in which touch displays can be supported by the Windows Operating System. Because Windows is a mouse-based operating system, Windows Touch has certain limitations, when it comes to mouse focus for example.
Windows Touch by design is directly tied to the standard mouse. By default, a Windows Touch device will emit legacy windows mouse messages in addition to touch messages. The Ventuz Input Handling automatically blocks those events so that a clear separation between touch and mouse device exist. But the windows mouse cursors position is still affected. Especially moving the mouse will unfortunately affect the touch and cause a "touch up" window message. It is advised to remove/disable the windows mouse device when running presentations based on Windows Touch or ensure sure the mouse is not moved and does not produce micro movement due to jitter even if it is sitting still).
A number of settings are available in the Windows Control Panel that are important for correct operation. Make sure Windows Touch is active and mapped to the correct display:
- Sometimes the touch position is mapped by Windows to a secondary display. To fix this, go to the Windows control panel > Hardware & Sound > Tablet PC Settings > Display. Press "Setup..." and Windows will show a text instructing you to either touch the display or press enter, depending on if the text is shown on the touch display or not.
VR/3D Controller
In contrast to the former input types a VR Controller provides full 3D transformation (translation and rotation on all three axes). We implemented two interaction modes for such controllers: Pointer and Volume mode. In Pointer mode a ray is pointing from controller center in direction of its Z-Axis. To 'touch' an object point on it and press the configured 'trigger' button on the controller. All Interaction nodes work in this pointer mode except the Touch Pattern node. In Volume mode the controller has to enter the object that should be touched. In this mode the controller currently has only a 1D extent. That's why the Paint and Touch Pattern do not work in this mode.
For more details on the according controller see Tracked Device Nodes.
Input Diagnostics
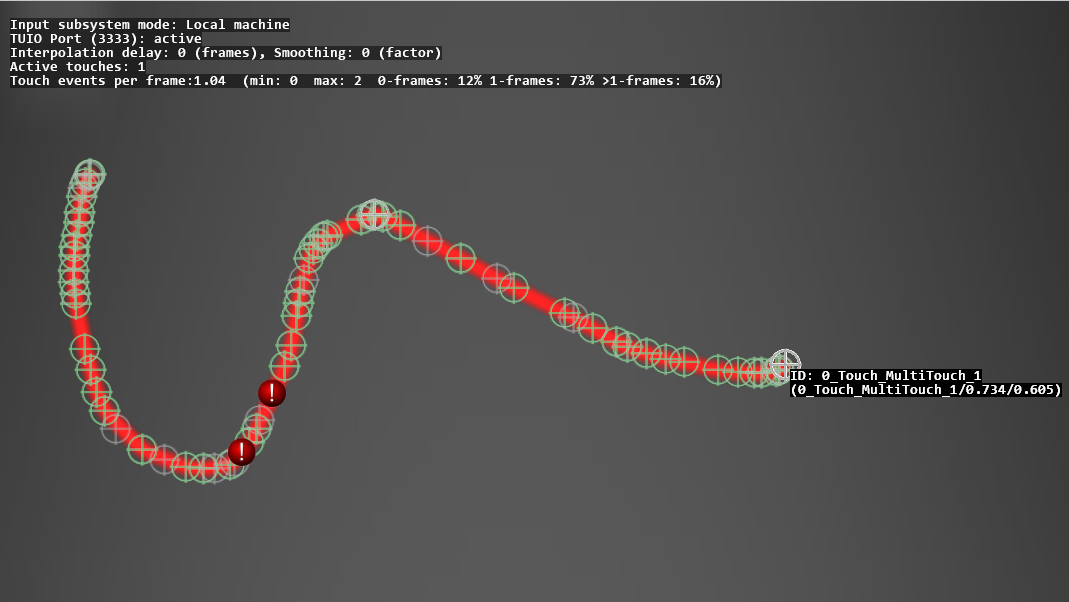
The Performance Statistics overlay displays several properties such as average number of updates per frame, and input sub-system mode. While a minimum of one touch is inside the render window, markers are drawn to visualize the raw touch input:
- Green markers show position updates that were used.
- Gray markers show updates that where dropped when there were more than one update in a single frame
- Red markers show a frame where there has been no updates from the device although the touch was moving above a certain internal threshold.
- Yellow circles show the processed position used by Ventuz when smoothing or interpolation is activated.
Input Diagnostic is currently not supported for 3D/VR controller, Previs Portal Touch and inside the Design Preview!
Input Processing, Smoothing & Interpolation
To improve behavior for hardware devices that deliver fewer updates than the render loop, two options exist improve the smoothness of objects. Both can be set in the Project Properties. The Smoothing Weight specifies with what amount positions from previous frames are weighted into the final position. The Interpolation Delay specifies the number of frames between the render loop and the point in time where input positions are evaluated. The larger this value, the higher the chance to be able to interpolate values when the hardware device was not able to deliver any updates. Both result in some form of delay but create much smoother moving gestures.
Limitations
Windows Touch is not fully functional in a Cluster Configuration!