Introduction to the Particle System
Table of Contents
Introduction
A particle system in general is a framework to create and control visual effects in your application. It "is a technique in game physics, motion graphics and computer graphics that uses many minute sprites, 3D models, or other graphic objects to simulate certain kinds of fuzzy phenomena, which are otherwise very hard to reproduce with conventional rendering techniques - usually highly chaotic systems, natural phenomena, or processes caused by chemical reactions" (cited from Wikipedia's Particle System entry). Particle effects can be 3D or 2D, can be purely aesthetic or visualize a dataset, and can be randomized or react to several inputs like user interaction.
In Ventuz there are several use cases for a particle system, some of which are:
- Creating visually appealing high resolution backgrounds. It might be a lot faster to render a background in real-time than to render it to a movie and play that back - especially at high resolutions. Also, the background can react to real-time inputs like touch, and thus make your application appear a lot more responsive to the user.
- Creating visually appealing representations of big data sets. There are Emitters and Modifiers that directly pass a set of data to your particles. Furthermore, particles can react to touch input using the Touch module.
- Creating small visual effects like rain, fireworks, smoke or flames.
See the Particle Presets demo project in the Project Browser for a lot more examples.
This document will cover a basic introduction to the Particle System, its limits, differences between the Functional- and Simulated Particle System, module order and sorting, and lastly the explanation of the Fretboard. For an in-depth overview of each individual module, please refer to the particle system's modules list.
Create a Particle System
There are two different presets to create a Particle system. You will find the Particle System node and the Particle System (Source + Sprite) node available to select from.
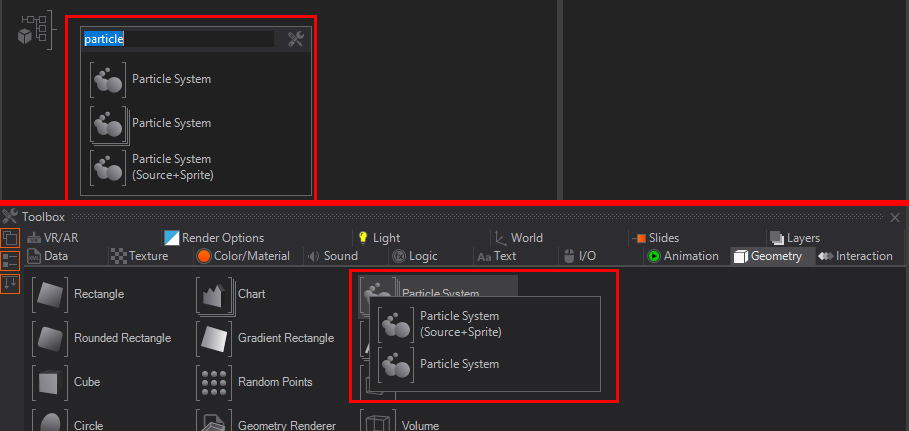
The Particle System creates an empty particle node that has no inline stream or any kind of module or modifier. You need to create the inline stream and the corresponding modules on your own. The Particle System (Source + Sprite) starts with a basic system, which consists of an emitter (Source) and a renderer, enough to create a simple fountain without gravity. The latter provides a rough starting point and is good for "tryouts". The inline stream mentioned above is where a particle system starts. The stream goes from module to module and thereby changes the behavior of a particle - the modules read from and write to its attributes. The most compact stream would be the Particle System (Source + Sprite); as mentioned above, it consists of just a source emitter and a renderer. The stream would therefore look like this: a particle is born - "emitted" - then receives basic values like lifetime, size and direction and is "rendered"; once the particle's lifetime is over, it dies. For another way to understand the inline stream, or the stream itself, the section on the fretboard is good further reading.
Differences Functional-/ Simulated System
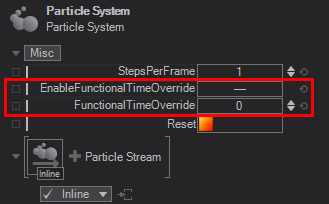
From a designer's perspective, the simple difference between a functional and a simulated particle system is that in a functional system you are able to scrub the particle time. This makes it possible to pause, forward and even play the particle system backwards. This way you can have explicit timing - you have full control over it. You enable the timing control with the EnableFunctionalTimeOverride boolean and then use the FunctionalTimeOverride value to scrub or animate the time.
A simulated particle system can be created by simply adding the corresponding module - Simulation. As soon as you use the Simulation module, the Functional Override and the Functional System no longer work. Time Override and Scrubbing are ignored and have no effect. With a simulated system you can now use the Collision- and Curl Nodes, as well as some more which need a simulated system. The reason is the difference in the particle system's internal calculation. A Simulated Particle System needs to calculate the next frame for the single particle based on the attributes from the last simulation step (or frame). A collision or a bounce from a collision plane is therefore only possible if we can change velocity, speed and direction based on the actual frame. This information is stored on a per frame basis. It can then be used for the next frame to estimate the new position and behavior for the particle. This calculation is then called a Simulation loop.
You might be confused why it is possible to still have Modules or Modifiers behind the simulation loop. Keep in mind that the attributes are written only up to the point where the stream reaches the Simulation module. Therefore it is still possible to modify the attributes for a particle, but they will not be written. That way you can decide what attributes should get written and kept for the next simulation loop.
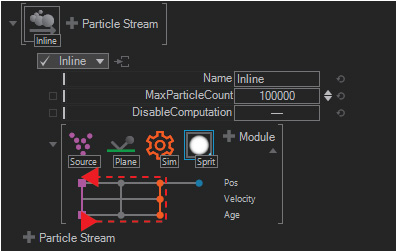
At this point the way you sort/order the modules becomes important. This is covered in the modules subsection and for the Modifiers you can find relevant information in the modifiers subsection of this page.
The Fretboard
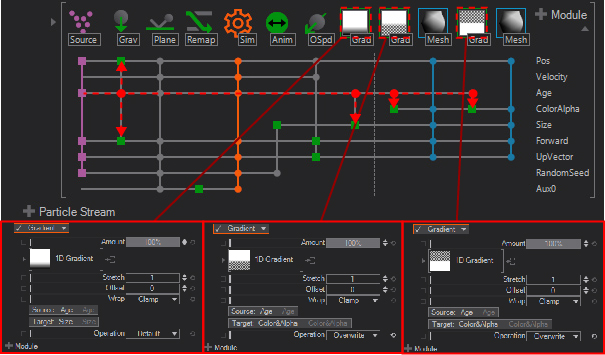
The above image shows a typical Fretboard from an example Particle System. The Fretboard is made to help you understand what's happening inside the Particle System and shows you which module uses and modifies a certain channel, such as the Position, Velocity, Age, Color, Alpha, Size and so on. The Fretboard can be read and understood as follows: On the very left side you mostly see an emitter - or even a secondary emitter, which depends on an already existing stream. On the very right side you see the used and available channels, for example Age:
The Source particle starts with an Age; the Age is used by several modifiers, like the Gravity, and three times by the Gradients. In the case of the Gradients you can see that the Source is the Age and the Target for each Gradient is Size and two times the ColorAlpha. That means that the color or alpha (ColorAlpha) of the particles will change over time (Age). So by analyzing the Fretboard you can see what the individual channels control and where they are used - at which point a value gets grabbed and modifies something else.
Modules
Our Particle System is made of Modules. These Modules are grouped into categories like Emitters, Renderers, Specials and Modifiers. Also take note that you always start with an Emitter to generate particles and need at least one Renderer to render the generated particles.
Emitter
The Emitter is the base for each and every particle system. The most commonly used are Source, Secondary, Grid, Mesh and Path; the others are mostly used in certain conditions, like for example the DataEmitter, which is used for data visualisation from external data. An Emitter is always needed since this will create or generate the particles. A full list of all the available Emitter modules can be found here.
Modifier sorting and order
The right hand list (indicated by green icons) contains the Modifiers - these really modify the attributes for a particle stream. A Modifier therefore writes into the particle attributes at the position it is placed. So the order of several modifiers may affect the appearance of a particle. There are certain Modifiers that have to be used inside the Simulation loop. Such a Modifier is the Curl Modifier. You would get a red error message indicating that the modifier needs to be sorted inside the loop. To do so, you can simply drag&drop the Modifier Module into another place (preferably inside the simulation loop) or select the module and press CTRL + ← / →.
You will notice there seems to be no way to use a Gradient Modifier module inside a simulation loop - the reason is simple: If you use a specific color inside the loop, it will use the modifier's default operation, which is Add. This would cause the color to add up on the old color value with each simulation loop it passes, and would therefore result in black very quickly. This can be prevented by using the Operation: Overwrite - this will overwrite the color value with the selected one in each simulation loop.
Path - Follow and Emitter
The Path Emitter can use any 2D SVG, imported 3D path or vpath to generate particles from. There is an option to use multiple paths. The difference is whether the particle system takes, for example, a text as a single path or as each individual letter. If you shorten the Extend value to 0.5 and animate the Mid value of the Path Emitter, you can see the particles emitting as a flow from letter to letter:

If you check the MultiplePaths property, you can see that each individual letter emits particles at once:
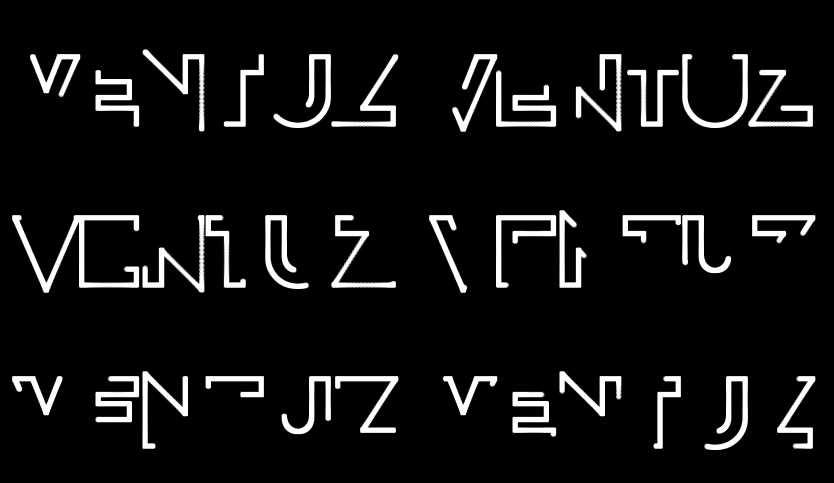
Mesh Emitter
The Mesh Emitter will generate particles from each available vertex. You can choose to use animated geometries as well.
Secondary Emitter
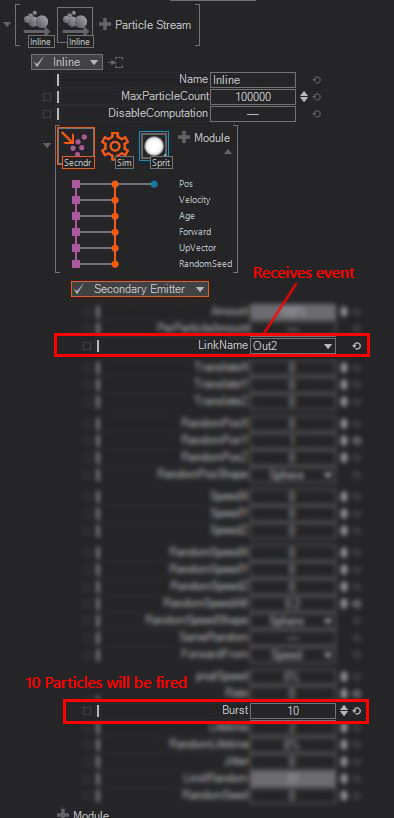
The Secondary Emitter makes it possible to hook another stream onto an existing particle by using the LinkName. This way it is possible to create trailing particles that follow a single particle which has been emitted by another emitter. If you combine the Secondary emitter with events from another module, you can trigger the burst of the secondary emitter to emit particles as well. A good example of this is a raindrop creating a splash when it hits the ground or a firework rocket. Please refer to the Buffers and Events section in this document.
A Secondary emitter doesn't work without a Simulation module!
Interaction
Touch interaction
With the Touch interaction module it is possible to fire an event if you touch a particle, get the position, or have a specific feedback. For example, to get the !ParticleID you would set the FeedbackSelect : ObjectID. This way you can link anything to the output of the Particle System and receive a FeedbackValue (Float) which reads the touched Particle/ObjectID.
Basic interaction / transformation
You can use the Transform property to change for example the position of a particle system. One of the best use cases is to have the Particle System follow your mouse position. To do so you can bind the X/Y/Z values of the particle system transformation to your actual mouse cursor position. Another useful option is to use the Anchor and the Anchor node instead of a manual transform.
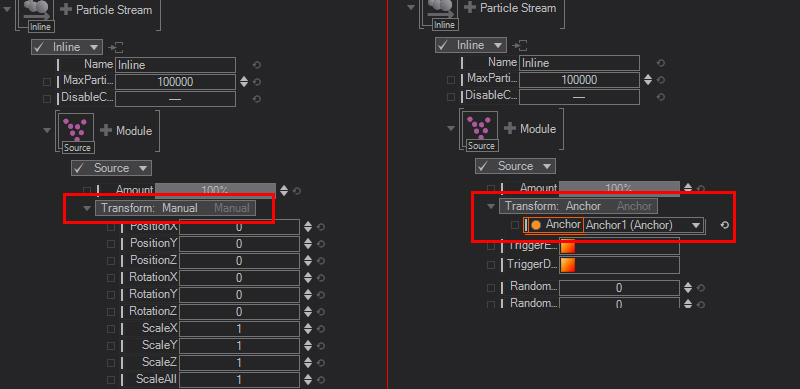
The best result for a moving particle system would be a simulated particle system, since only the particle source will follow your mouse, and the already emitted particles will stay in place.

Buffers and Events
Buffer
With a Buffer you can write the particle's attributes to access them from the same stream at another point or from a completely different inline stream. Modules that can create and write into a buffer are the Simulation and LinkOut. For these modules you have the option to set a LinkName. This creates a named buffer and the attributes can then be accessed by using a corresponding module which relies on the same name, for example the secondary emitter or the Link in module.
Event
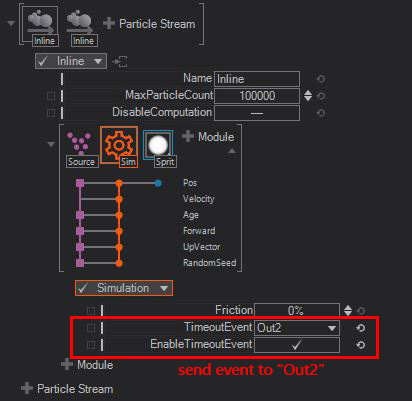
The particle system has an internal event system which you can use for several use cases such as firing the burst for another inline stream. Events can be fired from a Collision-, Simulation- and Touch module.
You need to enable the sending of the events by setting the appropriate boolean and set a unique name for the buffer to write the event into (Out2).
A receiver for such events could be a Secondary stream, which would fire the burst for this stream - in this case whenever the event named Out2 has been fired.
Events can be sent when a particle hits the collision surface, when it bounces off the surface, when it dies after exceeding its lifetime, or manually via the Touch module.
Conclusion
This is just a very basic overview of the Particle System. See the Particle System Reference Page for a more in-depth look at exactly how it works. Also make sure to learn about Real Time Rendering to find out not only about its advantages but also about the problems that might arise while working with real-time graphics. Particle Systems can get performance hungry very quickly - so keep a close look at the Performance Statistics as well.