Navigation

Ventuz 5 Quick Guide

  • Introduction
  • Getting Started
  • Ventuz Editions
  • Designer Overview
  • Ventuz System Requirements
  • Configuration
  • Video/Audio Configuration
  • Machine Configuration
  • GPI Configuration for Runtime or Director
  • Optimize Rendering Performance
  • Supported Formats
  • Supported Hardware
  • Multisampling / Anti-Aliasing
  • Input Subsystem
  • Ventuz Proprietary Files
  • What's new
  • FAQ
  • Common Mistakes
  • Deployment
  • Migration Guide
  • Summary Shortcuts

Ventuz 5 Designer

  • Index
  • Getting Started
  • Designer Options
  • Designer Overview
Projects & Scenes
  • Projects and Scenes
  • Project Browser
  • Project Properties
  • Project Maintenance
  • Project and Scene Data
  • Scene Tree
  • Scene Management
  • Scene Statistics
  • Deployment
Interface
  • Designer Interface
  • Renderer Window
  • Realtime Rendering
  • Optimize Scene Performance
  • Performance Statistics
  • Transformation Gizmo
  • Render to Disk
  • Camera Navigation
  • Isolated Objects
  • Manipulate Objects with Gizmos
  • Layer Editor
  • Common Layer Properties
  • IPP Effects
  • Color Correction FX
  • Distortion FX
  • Filter FX
  • Layer Editor Shortcuts
  • Hierarchy Editor
  • Working with Nodes
  • Containers
  • Find and Replace
  • Shortcuts Hierarchy Editor
  • Content Editor
  • Working with Nodes
  • Containers
  • Content Editor Shortcuts
  • Toolbox
  • Available Nodes
  • Property Editor
  • Project Data and Scene Data
  • Shader Editor
  • Text Editor
  • Scene Tree
  • Message View
  • Stage Editor
  • Animation Nodes
  • Animation Editor
  • Animation and State Engine
  • Templates
  • Template Engine
  • Shortcuts Animation Editor
  • Text Nodes
  • Text Rendering
  • Text Editor
  • Character Sets
  • Geometry Import
  • World Nodes
  • Geometry Nodes
  • Texture Nodes
  • Material&Color Nodes
  • Render Option Nodes
  • Interaction Nodes
  • Input Subsystem
  • Multitouch
  • TUIO Protocol
  • Open Sound Control
  • VR Nodes
  • How to work with Head Mounted Displays
  • Cluster
  • Multi Display Setups and Shaping
  • Warping, Soft Edging and Masking

Ventuz 5 Node Reference

ANIMATION
  • Mover
  • Alternator
  • Simple Control
  • Timeline Control
  • Keyframe Animation
  • Animation Group
GEOMETRY
  • Rectangle
  • Rounded Rectangle
  • Gradient Rectangle
  • Overlay Rectangle
  • Cube
  • Circle
  • Sphere
  • Cylinder
  • Cone
  • Torus
  • Chart
  • Random Points
  • Mesh Loader
  • Geometry Import (Live)
  • Volume
DATA
  • Database
  • Excel
  • JSON
  • RSS Feed
  • Resource Linker
  • Text File
  • XML
INTERACTION
  • Touch Button
  • Touch Excluder
  • Touch Marker
  • Touch Paint
  • Touch Pattern
  • Touch Proxy
  • Touch Ripples
  • Touch Transformations
  • Web Browser
  • Touch Teleport
  • Touch Simulator
INPUT/OUTPUT (I/O)
  • GPI
  • Joystick
  • Keyboard
  • MIDI
  • Mouse
  • Network
  • Open Sound Control
  • Serial
  • Timecode
LOGIC
  • Array Processing
  • Convert To Text
  • Cluster Synchronization
  • Counter
  • Date Time
  • Directory
  • Dispatcher
  • Enumeration
  • Expressions
  • Invert
  • Log
  • Loop Breaker
  • Math Effects
  • Matrix Operations
  • Scene Event
  • Script
  • String Operations
  • System ID
  • Text Splitter
  • Timer
  • Toggle
  • URL
  • Value Switch
  • Value Buffer
  • Variables
  • Visual Indexer
COLOR/MATERIAL
  • Alpha
  • Fog
  • Ground Fog
  • Sky Box
  • Color to RGBA
  • HSLA to Color
  • RGBA to Color
  • Color Transformer
  • HLSL Shader
  • Color
  • Material
LAYER
  • 3D Layers
  • 3D Layer Reference
  • 2D Layers
  • PSD Import Layer
  • Others
RENDER OPTIONS
  • Alpha Blending
  • Alpha Testing
  • Clip Plane
  • Filter
  • Mask
  • Mirror
  • Effect
  • Point Options
  • Render Cube Map
  • Render Options
  • Stencil
  • ZTesting
LIGHT
  • Light Sources
TEXT
  • Text Effects
  • Text Layouts
  • Text Rendering
VR/AR
  • Tracked Devices
  • Draw Tracked Devices
WORLD
  • Axis
  • Billboard
  • GetWorld
  • SetWorld
  • Arrange
  • Ticker
  • Layout
  • Group
  • World Z Sort
  • YesNo
  • Switch
  • Spread
  • Filter Pass
  • Set Pass
  • Hierarchy Container
  • Scene Port
  • Content Container
  • Template Port
  • Container Info
  • Camera
TEXTURE
  • Background
  • Hatch
  • Image
  • Texture
  • SVG Loader
  • Live Video
  • Movie Stream
  • Movie Frame
  • Movie Clip
  • Texture Loader
  • Snapshot
  • Gradient Texture
  • Texture Saver
  • Video Source Selector
  • VIO Input
SOUND
  • Audio Clip
  • Sound
  • Volume Control
  • FFT Audio Analysis
SLIDES
  • Slide Manager
  • Slide
  • Slide Port
  • Pivot

Ventuz 5 Director

  • Application Settings
  • Assets
  • Channels
  • Command Line Options
  • Content References
  • Designing Templates
  • Environment
  • Glossary
  • Index
  • Introduction
  • Pages
  • Playlist
  • Plug-Ins
  • Project Data
  • Property Editor
  • Shortcuts
  • GPI Configuration
  • Shot Box
  • Show
  • Taking Action
  • Timeline
  • Topology
  • User Interface
  • Director Mode

How To

  • How to Run Ventuz
  • How to Work with Designer
  • Ventuz Designer Drag&Drop workflow
  • How to use Head Mounted Displays
  • How to work with Shadows
  • How to use Emoijs
  • How to Build a Template
  • How to use Newtek NDI
  • How to Create Visuals Loader Node
  • How to Remote Control with a Phone
  • How to Setup a Cluster Render
  • How to use a Mixed Frame Rate Cluster
  • How to use Tracking
  • How to work with 3D Reference Layers

Keyboard Shortcuts

  • Summary Shortcuts
  • Layer Editor Shortcuts
  • Hierarchy Editor Shortcuts
  • Content Editor Shortcuts
  • Animation Editor Shortcuts
  • Director Shortcuts

Advanced and Development

  • Command Line Options
  • Remoting Overview
  • Remoting 4
  • Deprecated Remoting
  • Ventuz IP Ports
  • Ventuz Machine Service
  • Remoting Machine Signature
  • TUIO
  • .NET Scripting
  • HLSL Shader Programming
  • Ventuz API and SDK
  • Ventuz VIO API

General Reference

  • Terminology
  • Manual Index

Miscellaneous

  • Presets
  • PropertyGroups
« Previous Article
» Index «
Next Article »

Ventuz Configuration

Table of Contents

  1. Ventuz Configuration
    1. Machine Selection
    2. Live Options
      1. Ventuz Options
    3. Rendering Options
    4. AV Options
    5. Ventuz Config
    6. Project Management
  2. Machine Configuration
    1. Interaction
      1. General
      2. Windows Touch
      3. TUIO
      4. Cluster Networking
      5. Output Scaling
    2. Remoting
      1. Remoting 2 (.Net)
      2. Remoting 4
      3. Miranda
      4. CLI Remoting
      5. OSC Remoting
    3. Extended
      1. Culture Settings
      2. WebBrowser Settings(Ad Blocker, Audio etc.)
      3. Process Settings
      4. Tracking System
      5. Timecode Settings
      6. Progress Visualization Settings
      7. Logging Settings
      8. System Monitoring Settings
  3. Introduction to the Video Engine
    1. Render Pipes
      1. Stream Modes
      2. Preview
    2. Video Inputs
    3. Bit-depth and controllable quality/performance balance
    4. Software Watchdog
    5. Software Keying
    6. Multiple Sources from Multiple Vendors
      1. SDI 3G
      2. 4k
    7. Chroma Keying
    8. Comprehensive Audio Mixing
    9. Video Setup independent from Ventuz Scene
  4. AV Configuration
    1. Video Outputs
      1. Enable 10bit (DirectX-Mode)
    2. Video Inputs
    3. Video Options
      1. Standard Options
      2. Advanced Options
    4. Video Device Information and Options
    5. Global Options
    6. Live Status
    7. Audio Devices
    8. Cross Points
      1. Crosspoints Example: Adding Ventuz to SDI
    9. Device Mapping
  5. Render Setup Editor
    1. User Interface
    2. Automatic Render Setup from VMS
    3. Coordinate Space
    4. Logical vs. Visual Resolution
    5. Manipulating a Render Setup
      1. Selection
      2. Move Elements
      3. Bezel and Overlap
      4. Split and Combine
        1. Combine Machines & Transfer to new Machine
      5. Machine ID
    6. Design View and Production View
    7. Touch Area
      1. Examples and Scenarios
    8. Keyboard Shortcuts
  6. Warping and Soft-Edging
    1. The Ventuz Shaping Engine
      1. Performance Considerations
      2. Shaping with the Ventuz Designer
    2. The User Interface
      1. Navigation
      2. Global Toolbar
        1. Test Patterns
    3. Editing the Grid
      1. Selection
        1. Mirror Modes
      2. Editing
        1. Smart Mode
        2. UV Editor
      3. Summary
        1. Keyboard
        2. The Side-Toolbar
        3. Cursor Shape
      4. Zooming and Panning
      5. Handle Modes
      6. Insert Rows and Columns
    4. Manipulating Layers and Groups
      1. Subdivision
      2. Multiple Warp Groups
    5. Soft-Edges
      1. The gamma values
      2. Automatic Mode
      3. Manual Mode
    6. Per Output Settings
      1. Color Correction
      2. Quality Settings
      3. Enable / Disable Projector User Interface
    7. Per Group Settings
      1. Enable Warp Group / Alpha Blending
      2. UV Boundaries
      3. 3D projection

The Ventuz Configuration Editor enables the configuration of a Ventuz system for production. The editor also allows for the administration of multiple configurations and easy switching between them. The Ventuz Configuration Editor can be found in the Windows Start menu, or in the Tools menu of Ventuz Designer.

The editor is capable of configuring and controlling remote systems utilizing the Ventuz Machine Service. In fact, the local system is actually also technically configured by remote access (via localhost)! An installed, started and accessible VMS is mandatory for all systems being configured.

The Ventuz Configuration is project independent and handles and configures all settings related to the Ventuz system. Most of the settings are hardware related but it also contains rendering, network and identification settings. This configuration affects settings of the Ventuz installation and likely needs to be changed whenever the system is used for another project.

Changing the Ventuz Configuration requires a restart of Ventuz is most cases! (except for changing Live Options. See below).

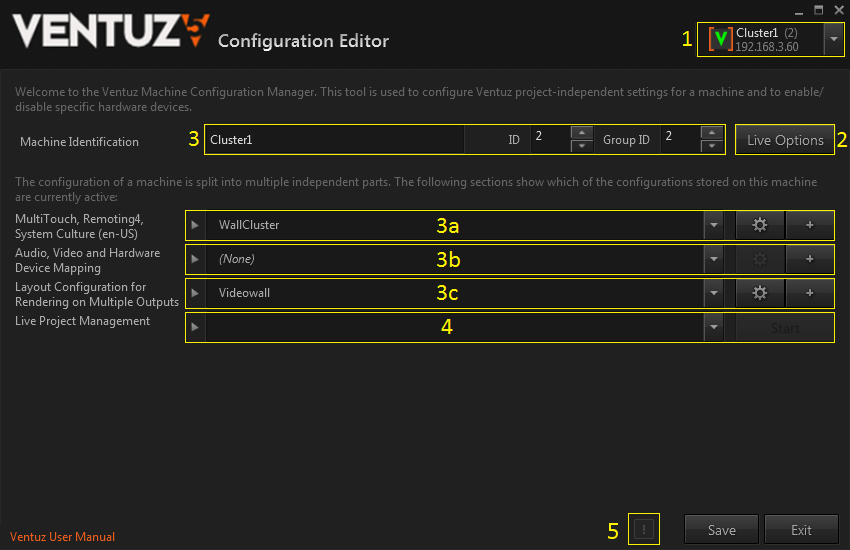
The Ventuz Configuration Editor consists of several sections which are described here:

  1. Selection of a single Ventuz machine or selection of a group of Ventuz machines (Cluster)
  2. Editing of Live-Options (only in single machine mode)
  3. Configuration of the Ventuz Config (Name, ID, GroupID and selection of sub-configurations)
    1. Edit and administrate Machine Configuration (only in single machine mode)
    2. Edit and administrate AV Configuration (only in single machine mode)
    3. Edit and administrate Render Setup (in single and group machine mode)
  4. Live Project Management (Upload Ventuz project, Start and Stop Ventuz Runtime)
  5. Log Messages: When  clicked, shows the message log window.

All Ventuz configuration files are stored in the system's public documents folder in the Ventuz5\Configuration directory. On most systems this path is:

C:\Users\Public\Documents\Ventuz5\Configuration\

In the Ventuz config folder multiple files and folders are stored. All Ventuz configuration files use the XML format and therefore are human readable and easy to handle.

VentuzConfig.vcfg Ventuz Configuration
MachineConfig\*.vmc Machine Configuration Files
AVConfig\*.avc AV Configuration Files
RendersSetup\*.vmc Render Setup Files
Director\*.* Director Configuration Files (not part of the Ventuz Config Editor)

Machine Selection

The Machine Selector shows all machines discovered within the network. The Ventuz Machine Service broadcasts its VMS signature periodically. The Machine Selector receives these messages and add the entries to the selector. Machines without VMS running can't be discovered and configured!

The entry with the green bar on the left marks the local machine. The local machine is the default selection when the Ventuz Configuration Editor is started.

The selector automatically groups all machines with the same GroupID. To select a group click on the group label (here Group 2). Only Render Setups and Project Management are available when a group is selected.

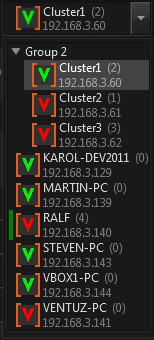
Each entry has a colored Ventuz icon. The color indicates the current state of the running Ventuz process on that particular machine:

OK Ventuz is connected and running
INIT Ventuz is connected and running, though no project is loaded yet
OFFLINE Ventuz is not connected
TIMEOUT No VMS discovery message received

Live Options

Some settings from all configuration areas as well as many settings for the renderer can be adjusted on-the-fly by entering the Live Options on a machine with a running and connected Ventuz Runtime process (green or yellow state). Currently there are three areas that have live options available:

Please note that Live Options can only be saved if the corresponding configuration is not set to (None). The actual values of the settings are injected into the currently loaded file and it will be saved to disk. If there is no configuration file Ventuz can't save it...

Ventuz Options

The ID and the currently used Render Setup can be changed live. Changing these values doesn't affect the saved Ventuz Configuration as long the Live Options have not been saved.
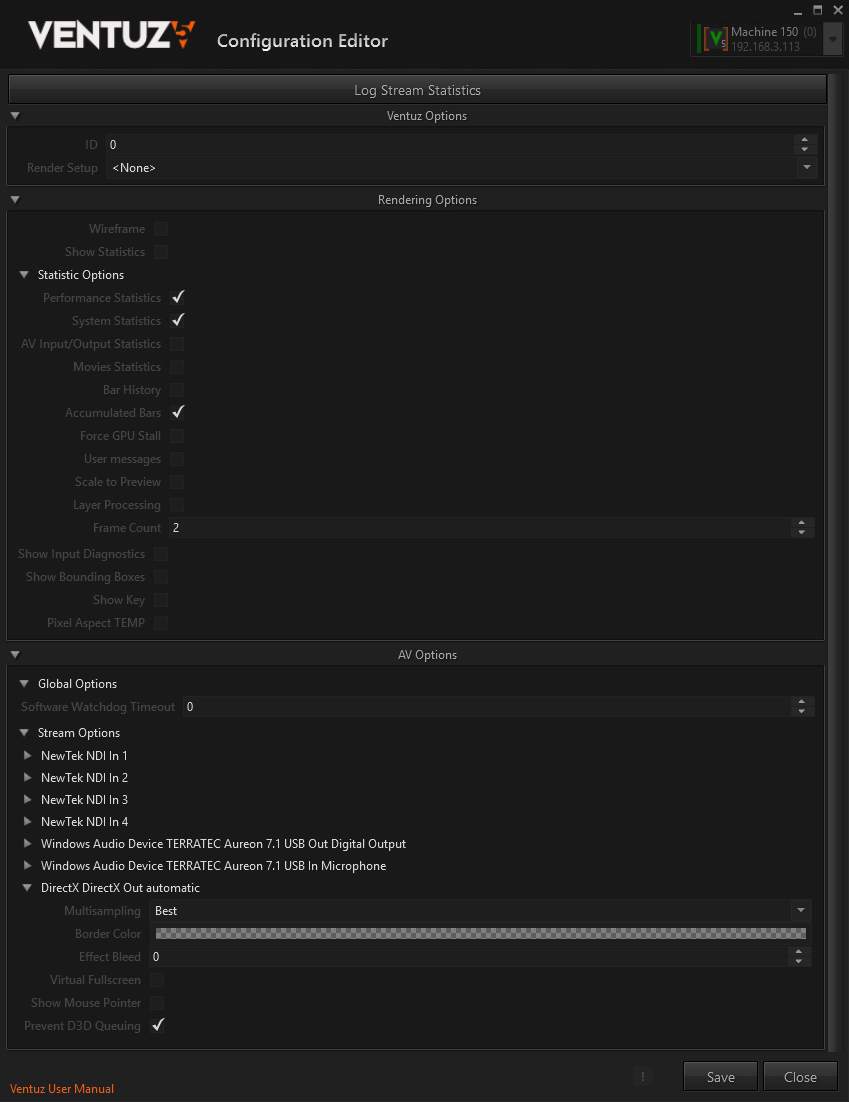
Rendering Options

These options change some renderer-specific settings. The same options are also available in the Renderer Windows in Ventuz Designer.

Please note that the Rendering Options cannot be saved! After a restart of Ventuz all options fall back to their default values.

AV Options

Some board and audio and video stream have settings that only can reasonably adjusted while Ventuz is running (Genlock delay, audio gains and delays, etc). The live AV options make all settings available that are changeable on-the-fly. Saving the AV part of the Live Options will overwrite the current AV Configuration File. If no configuration has been set (None) the live edited values cannot be saved!

Ventuz Config

The Ventuz Configuration contains general information about the Ventuz Machine. If defines the Name of the machine as well its numeric ID and GroupID. The ID is used to select the correct part to be rendered in the multi-machine Render Setup. The GroupID must be set to a value greater than zero if a machine is part of a Cluster (group). Only machines with a GroupID can interchange their timing (cluster clock) to synchronize Remoting, animation and movie playback. For proper synchronization a valid Cluster Option is required. The Name of a machine is technically not important. A proper name helps the user to identify a machine within a Ventuz network.

The Ventuz Configuration also defines which sub-configuration should be used for the three sub-sections: Machine Configuration, AV Configuration and Render Setup. The corresponding selection boxes (3a, 3b and 3c) allows the user to switch between the existing configurations. Changing a value here requires the Ventuz Configuration to be saved. This can be done by pressing the Save button.

Each of the three sub-configuration has an Administration Area. This is shown if the expander left of the selection box is clicked.

The Administration Area shows a list of all available configurations where the checked entry marks the currently active file.

Several action can be performed on the selected entries:

Edit selected entry Create new entry
Duplicates selected entry Renames selected entry
Deletes selected entry
Imports a file Exports selected entry

The Edit and New buttons are also available in the compact view of each sub-configuration section though the shown entry is the check and selected one at the same time. (always the active configuration is edited)

Editing an entry switches to the corresponding sub-configuration editor. Each sub-editor has its own Save and Cancel buttons. These buttons affect only the current sub-configuration being edited. The Save button on the Ventuz Configuration page only affects the settings of the Ventuz Configuration which references the sub-configurations by name.

Importing and Exporting is just a simple way to copy the actual configuration files from/to the configuration folder. If a remote system or group of machines is configured this feature becomes very helpful!

Project Management

The Live Project Management allows a project found on the target system to be selected and Ventuz Runtime to be started with the selection. The simple view can also be expanded to show more options:

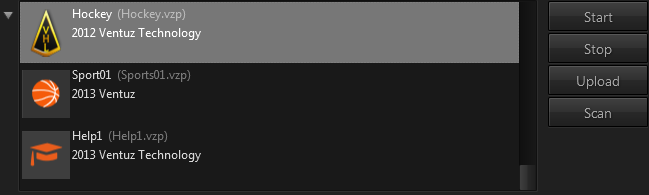
The displayed list shows all projects found by VMS on the target system. If the user hovers the mouse over one entry a tooltip popup shows more details about the project. The project files must be stored in the project folder configured in VMS. The default folder is

C:\Users\Public\Documents\Ventuz5\Projects

Please note that only unique projects are displayed in that list. If a project with the same ID appears multiple times on a system or - in multi machine mode - a project ID doesn't exist on one or more system it won't be displayed!

In expanded mode the Live Project Management can perform several actions:

Start the selected project. Any previously running Ventuz Runtime will be closed before!
Stop (kill) any currently running Ventuz Runtime.
Upload a Ventuz Project (VPA or VPR) to all selected machines and initiate a re-scan on VMS.
Initiate a project scan on all selected target machines.

Before starting or stopping and Ventuz Runtime processes make absolutely sure that you're connected to the correct machines! To disallow closing processes accidentally you can set security settings on the VMS.

See also:
  • Ventuz Machine Service
  • Input Handling inside Ventuz
  • ​Open Sound Control
  • ​Deltacast
  • ​Miranda: Vertigo Suite and ​Miranda: X-3D / X-Ventuz
  • ​TrackMen 3D Tracking Solutions Example: ​TabulaTrack with Ventuz

« Previous Article
» Index «
Next Article »
Copyright 2004-2017 Ventuz Technology Group