How to Build Content for Multiple Screens
Table of Contents
This How To will teach you how to properly build content for multiple screen setups. Before you start it may make sense to read this guide How to configure a Multi Screen Setup, to correctly configure Ventuz. While in Ventuz Designer you can create projects without knowing how to set these up, you might want to have insights into it to understand the workflow of your content much better.
Introduction
Working with a multi screen setup since Ventuz 7 is significantly different than in versions before; the new workflow needs a quick introduction to the Render Setup, Stage Editor and the new Composition Layer. Understanding these concepts, will help use Ventuz to its full potential.
These are the topics we are going through:
- What are Compositions
- The different ways of using Compositions
- The different modes of the Renderer Window and the Stage Editor.
- Useful information for building your content
- Creating pixel perfect content
- Moving things across multiple screens
- Presenting your project
What are Compositions
Composition Layers are used to define rendering areas and function multi-directionally by either coming from the Render Setup, a Previsualization Scene or the composition layer itself. Composition Layers can also be imported into the Render setup. A Composition Layer defines the rendering area and can either be coming from the Render Setup or by the Layer itself and then imported to the Render Setup. You can also "connect" those layers with the Render Setup without the import function. As long as the names match they will function correctly.
A Composition, inside of Ventuz, is where all of the magic happens. A composition is where the Layer assets are rendered; it defines the area to pass to the graphics card(s) or to Previsualization Screen(s).
Each composition in Ventuz can be a unique area that can 'hold' one or more Layers. One or more Compositions can be used in each scene.
A Composition can be virtually any size, regardless of what the output sizes are, or are expected to be. Compositions allow Ventuz Scenes to be dynamic and allow them to be used for many different setups using the same Project File. By resizing a Composition, different Layers are able to utilize more or less pixel space without losing resolution.
Because Ventuz elements are rasterized and rendered inside of Ventuz in real-time, the size of the Composition does not matter, with the exception of videos or images that are created outside of Ventuz and imported into the Project.
The different ways of using Compositions
There are three main ways to use and work with Compositions inside of Ventuz:
- 1: By using the Render Setup Editor
- 2: By importing Composition layer into the Render Setup Editor
- 3: By using a Previsualization scene
1: By using the Render Setup Editor. Defining Compositions there and connecting them with Composition layer inside the Designer.
Example:
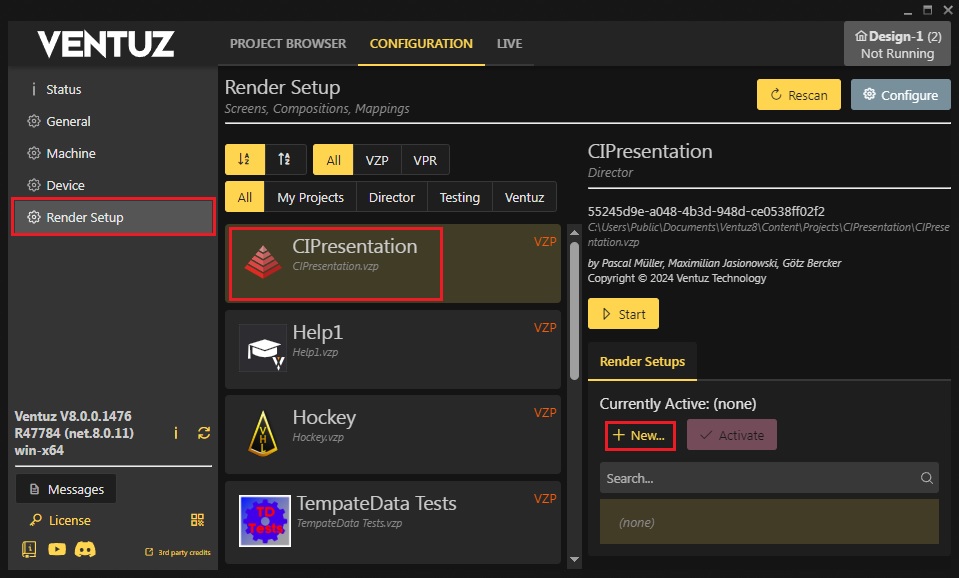
Create a Render Setup by opening the Configuration Editor and clicking on the Project Management tab. Now choose your project and hit New on the right. To learn how to create Render Setups take a look into this page : Render Setup Editor
2: It is Possible to build the Scene in Ventuz Designer using multiple Compositions before configuring the Render Setup. These Compositions can be imported into the Render Setup editor.
Example inside of Ventuz Designer:
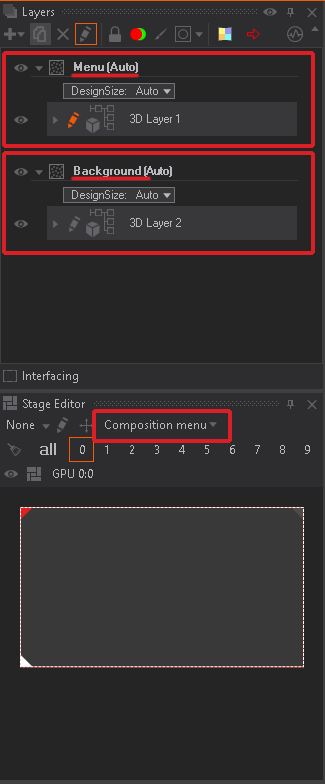
Start by inserting Composition Layer inside the Designer found in the + the button in the "Layer" window of Designer. You can also rename Compositions by Double Click on the name property.
The size of the composition can be changed by clicking on the Design Size property and choosing Manual.
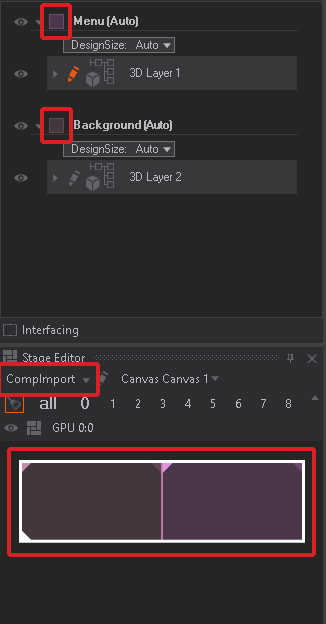
If you can not see any elements in your 3D layer inside the of the new Composition Layer, make sure you are in the correct Preview mode. You can find it inside the Stage Editor or on the Top right of the Designer.
Notice the small square on the left beside the Composition name. This noise pattern indicates that these compositions are not connected to any Render Setup. As soon as we import this scene into the Render Setup Editor this small square will show the assigned color when loading the scene again with this new Render Setup activated.
To do this, create a new Render Setup for your project and click on the Import Compositions button in the lower left corner.
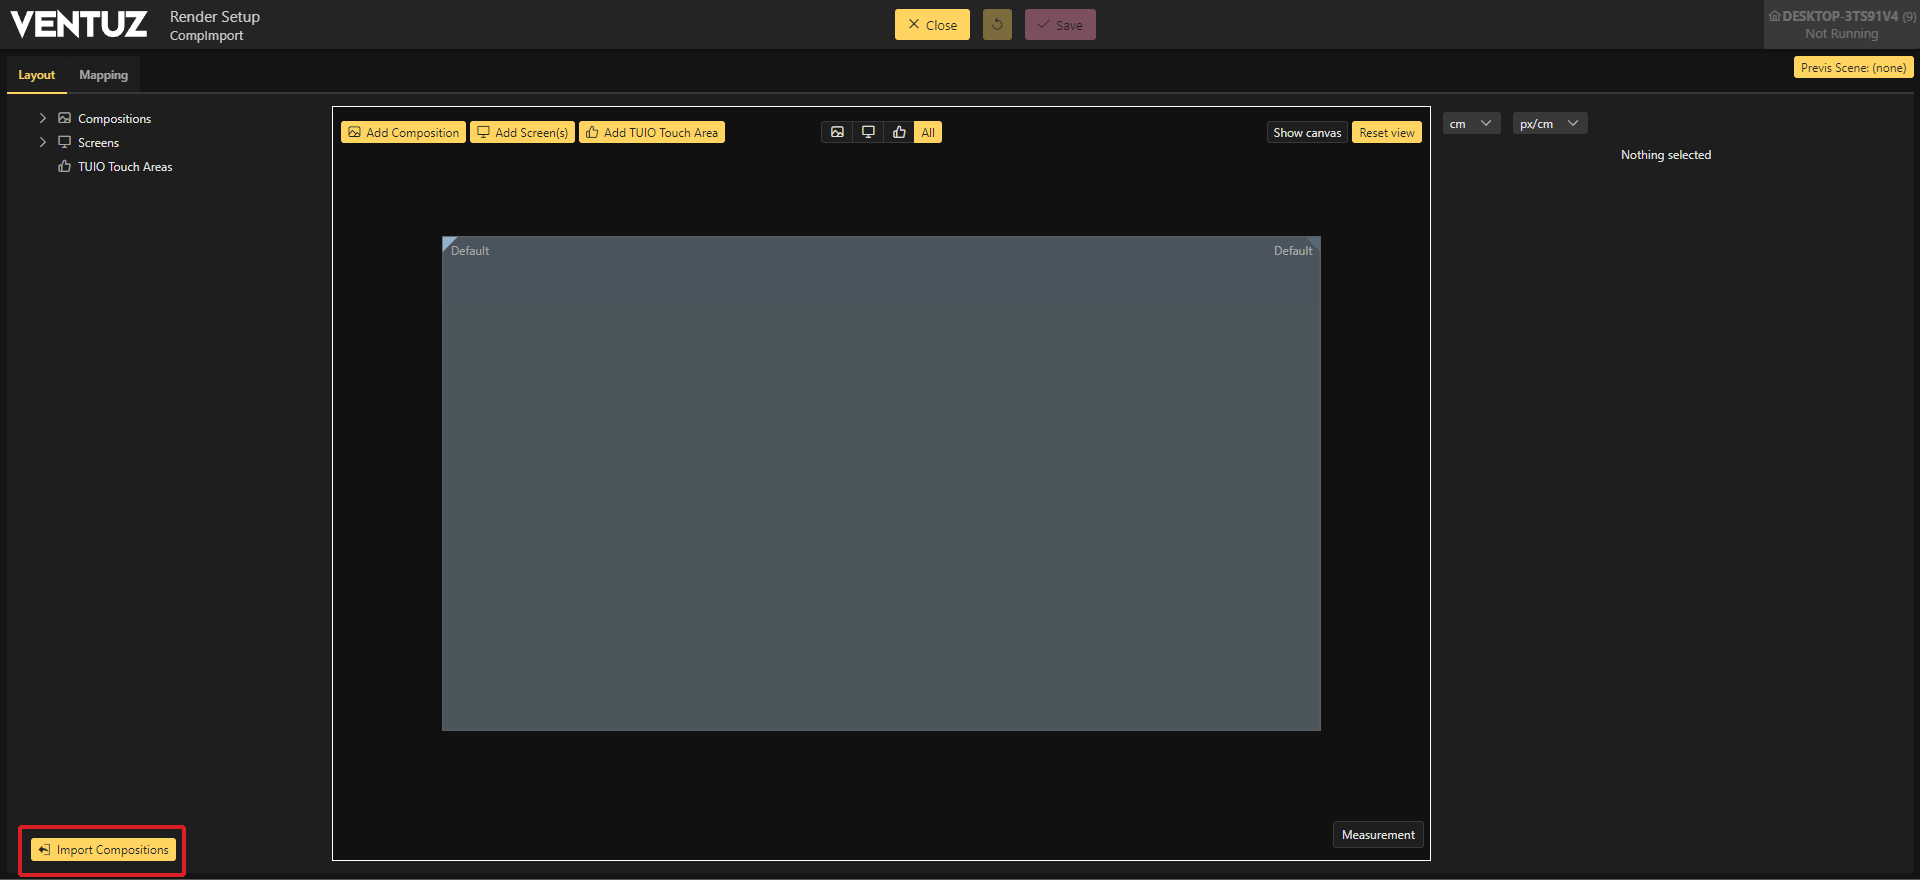
Choose the scene you want to import and click Import.
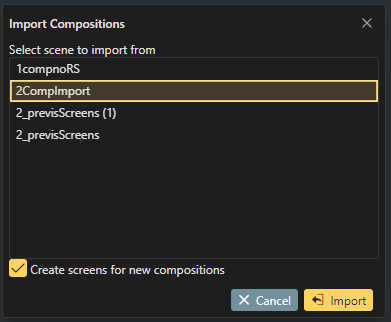

If creating the Compositions manually inside of the Render Configuration Setup window, ensure that the composition names exactly match the Composition Name inside of the Designer. These names are automatically set when using the "Import" option.
Now we have our created compositions from the Designer inside the Render Setup. For best practice, the Compositions and Screens that are not being used should be deleted.
The Default Composition and Default Screen are not used in this setup and can be deleted.
With this done we can switch over to the Mapping Mode, the "Mapping" tab found at the top of the window, and quickly finish our output mapping, so everything is correctly connected to your Device Configuration.
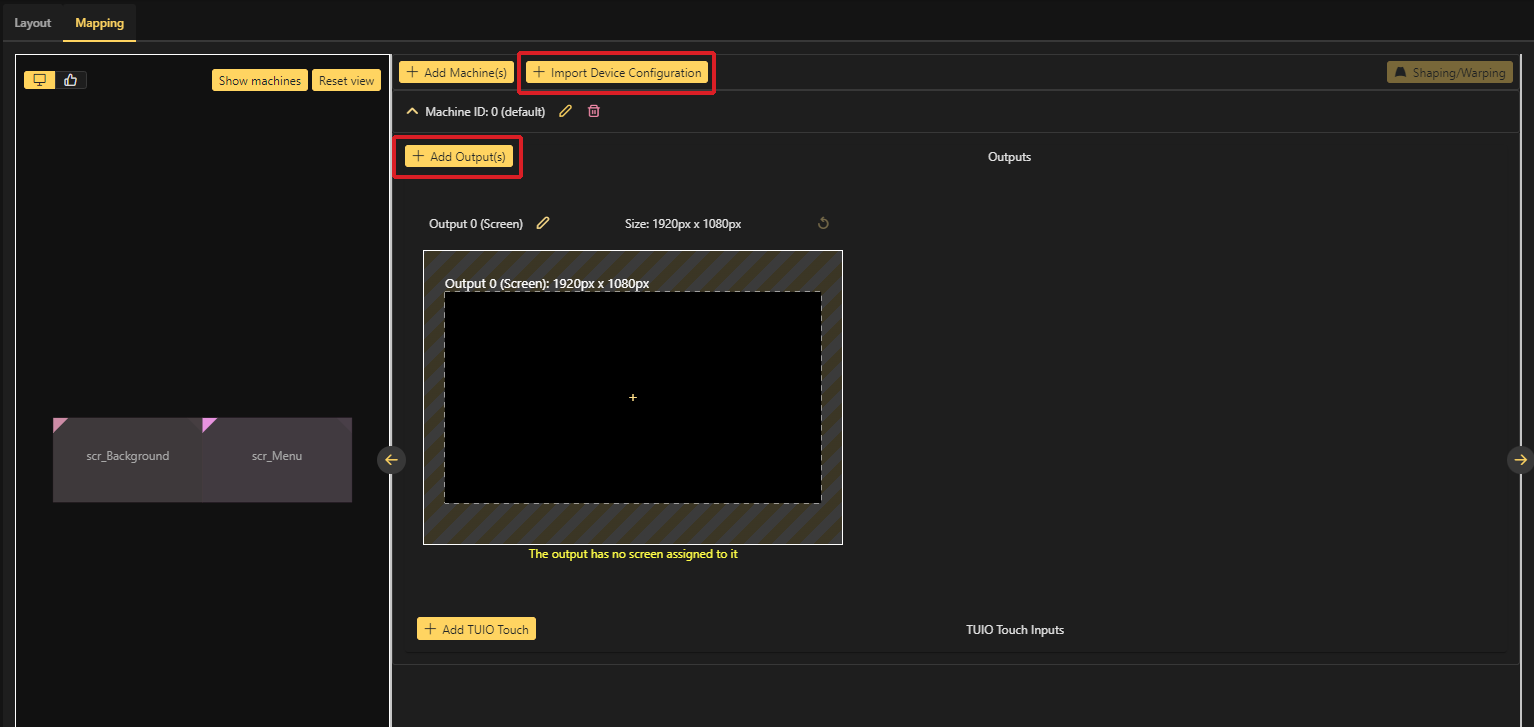
Here you can either directly import your Device Configuration or add single outputs by hand.
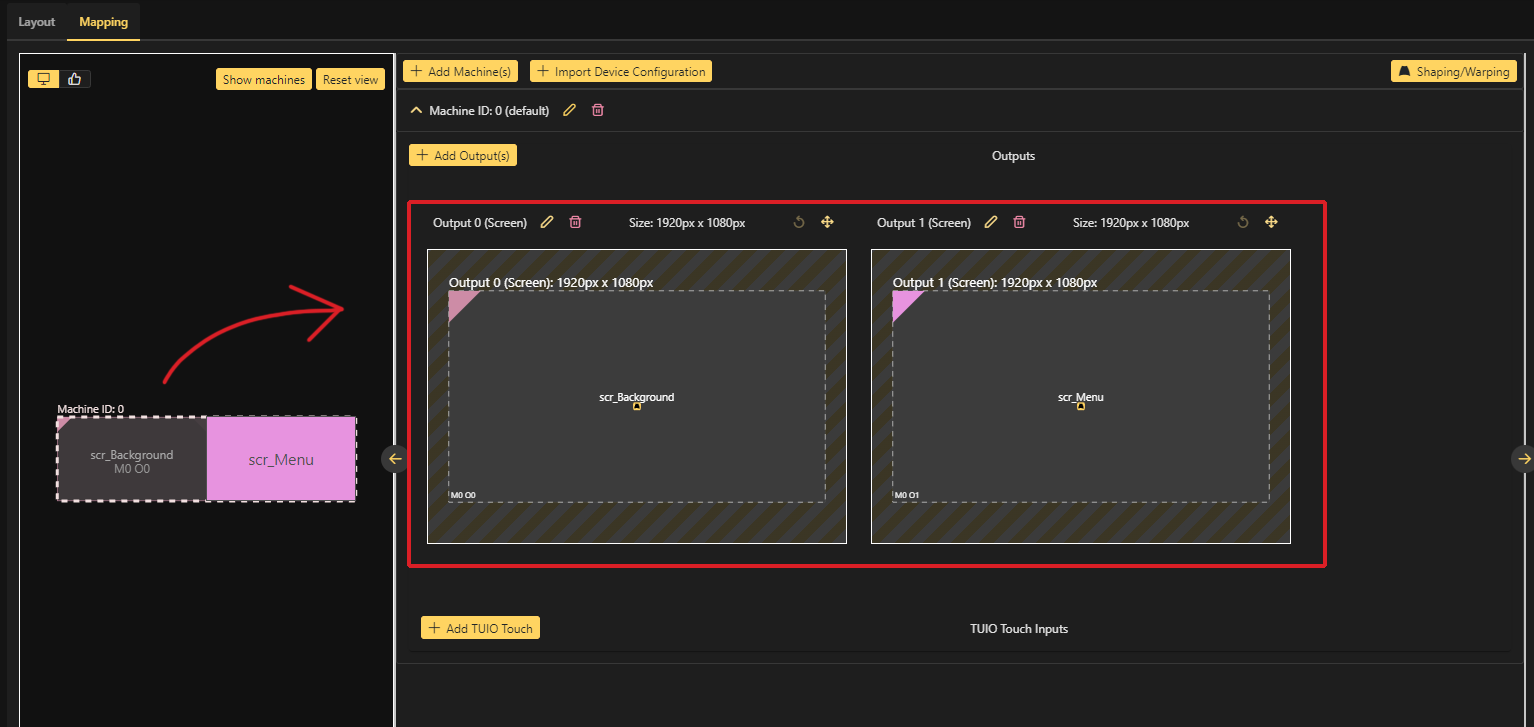
To fill the outputs with your screens, simply drag and drop them on the desired output. If you havent imported your Device Configuration as shown in the example, it may be difficult to know which screen should be applied to which output. Ventuz will start from the left in the output mapping and assign these screens to the first output configured in the Device Configuration (top). You can also rename those outputs by clicking on the small pencil beside the output.
Now, the Render Properties are set up to use the desired Outputs with your Compositions. Save and close the Render Setup window.
It is important to ensure that the correct Render Setup is activated inside of Ventuz Designer and Runtime. To do this before navigating back to Designer, select the desired Render Setup Configuration in the Project Management and click Activate;
The Render Setup can also be activated directly in the Designer using the Stage Editor.
The small squares mentioned above will now be colored according to the Composition colors set in the Render Setup Configurator.
3: With the power of the Previsualization Scenes it is also possible to build a whole Render Setup, using Compositions and screens, inside the Designer and then importing it into the Render Setup Editor. Where only the mapping has to be done.
For this we have a detailed How to on this page
Renderer window and the Stage Editor
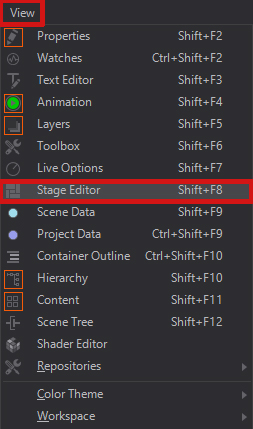
There are different modes for the Renderer window. These can be found in the Stage Editor. If it isnt open currently, just go to View -> Stage Editor in the top menu bar of Ventuz Designer.
Stage Editor
Introduction
The Stage Editor enables previewing of different Screens, Previs Screens and Compositions as well as outputs and other machines inside a Cluster. Furthermore you are able to switch, edit and create Render Setups quickly.
The Stage Editor has two tabs: The Preview view, with selections of different Screens and Compositions and the Render Setups view to create and manage the Render Setups.
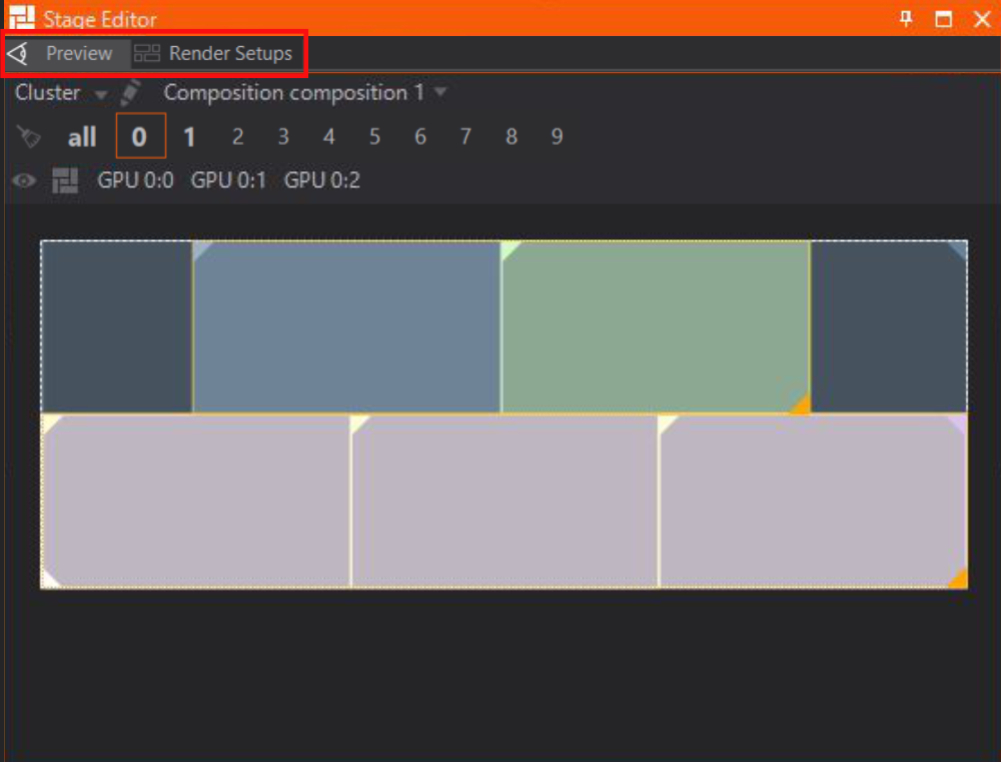
Preview view
Render Setup Selection and Editing
Also in the Preview view it is possible to quickly select your Render Setups from the drop down menu. Use the  to get inside the Render Setup Editor and edit the currently selected Render Setup.
A restart of the Designer is not needed. Hit Save after changing the Render Setup and the changes will be instantly applied; Alternatively, click Live at the top of the Editor to see your changes update in real time!
For creating a new Render Setup, switch to the Render Setups view as explain later downwards.
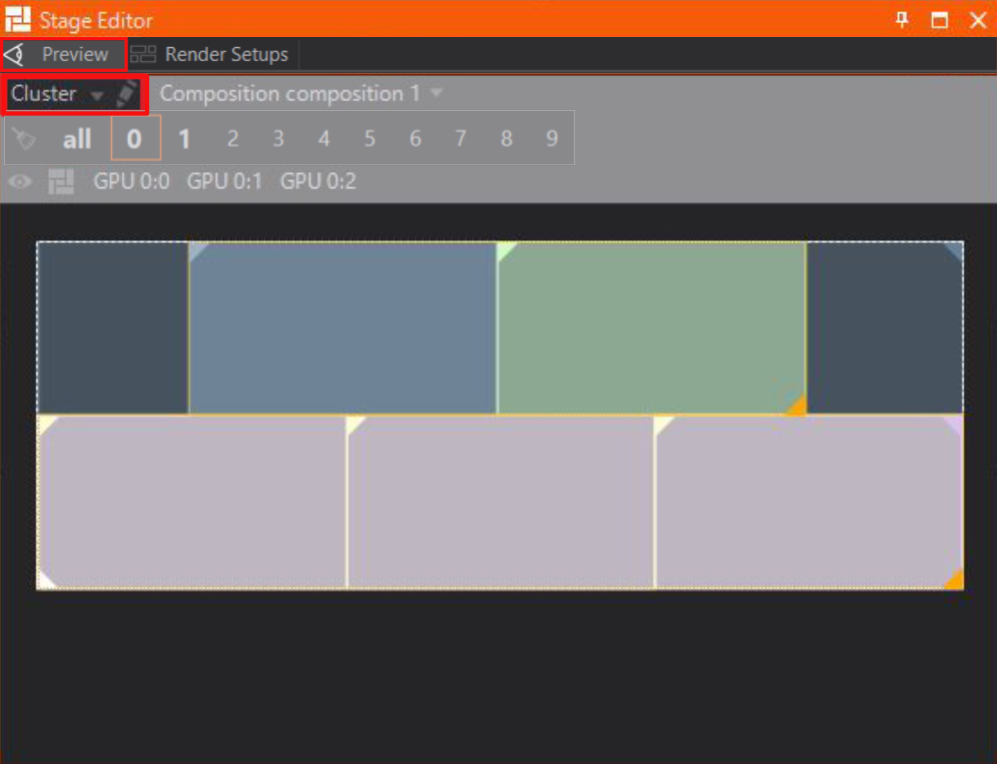
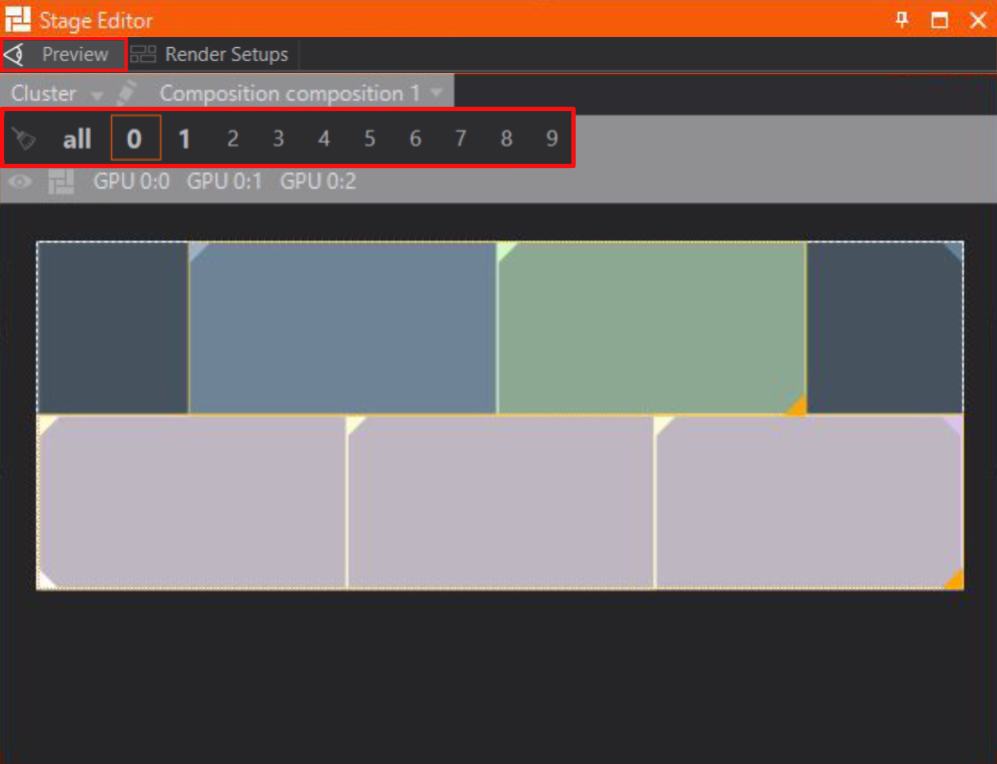
Preview Selection Menu
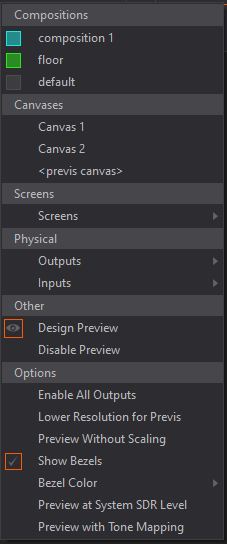
With the Preview Selection Menu it is possible to switch between different Compositions, Previs Screens, Screens and Canvases which are defined inside the Render Setup. These will be then previewed inside the Renderer Window.
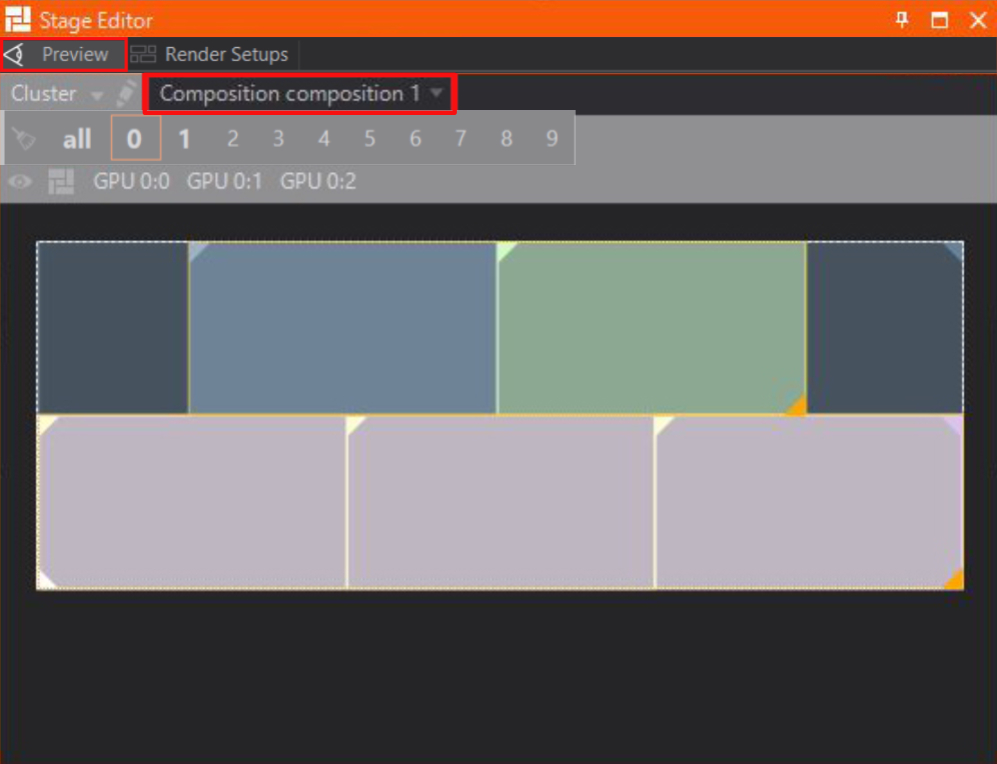
When working with a previs scene the Composition preview may show content with a strange aspect ratio; this is not a bug but rather a technical limitation. This is due to the Render Order, at the point of previewing the Composition the engine doesn't know the design size set by the canvas. It will fall back to the Aspect Ratio set in the Project Properties window.
Physical
This previews the physical device output. Depending on the setting Enable All Outputs, it behaves differently.
| Enable All Outputs | Behavior |
|---|---|
| On | Previews the output of the device as configured in the Device Configuration. |
| Off | Previews DUMMY Outputs as configured in the Render Setup output mapping tab. |
Inputs can be previewed if configured inside your Device Configuration.
Design Preview
The Design Preview will show all configured Previs Screens, Screens, Compositions, Canvases and other machines defined in the Render Setup combined as one preview. This should give you a good estimate of what your scene will look like.
Using the Design Preview in conjunction with the option to Preview Without Scaling can have a heavy performance impact on bigger scenes with high resolution!
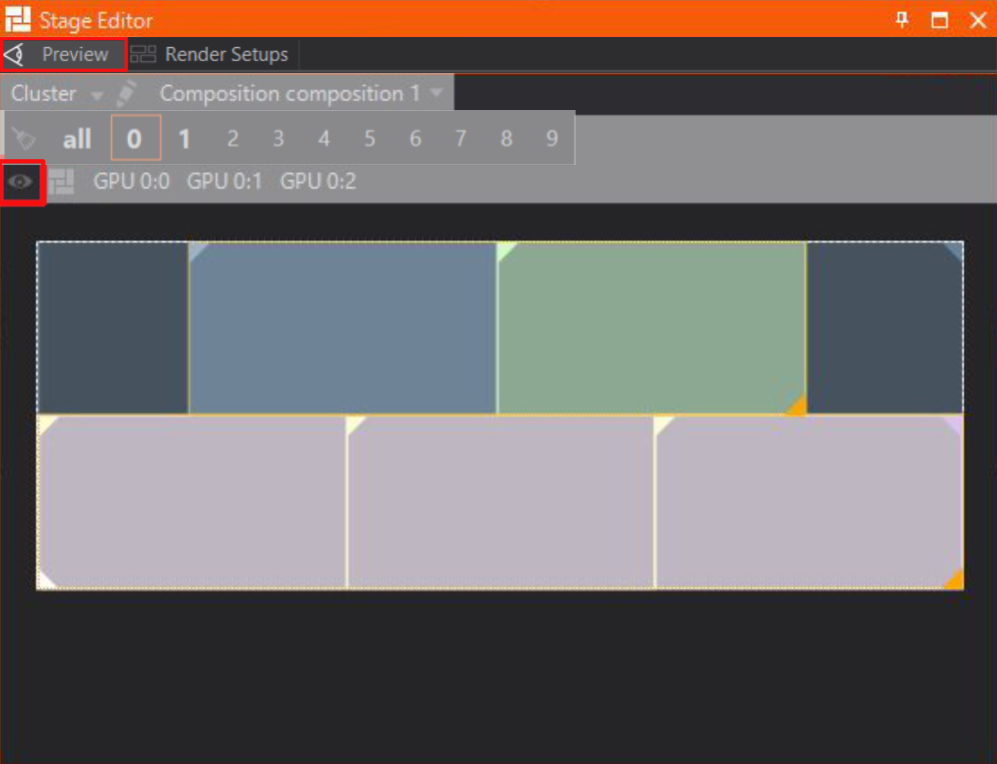
Disable Preview
Disables the preview Renderer window.
This doesn't completely block Ventuz from rendering your scene. See it more like the "inactive" flag on a node. To completely disable the rendering use the option inside the Device Configuration for Disabling the Preview Window.
Options
Enable All Outputs: Will use all physical screens currently configured as outputs inside your Device Configuration and render your scene on it, except the screen with Designer open. When disabled, the Preview Renderer will render the Physical Outputs as configured in the active Render Setup, instead of the Device Configuration.
Lower Resolution for Previs: This will divide the Resolution inside a Previs by 4. Some Previs scenes can have very large resolutions; to ensure good performance while working on it we introduced this option.
Preview without scaling: This forces the Renderer to render the current preview in its configured resolution coming from the Render Setup, it will also crop the image if the renderer window is to small.
Show Bezel: Use this to show currently configured bezels coming from the Render Setup inside the Rendering Window.
Bezel Color: Change the rendered bezel color as well as the transparency by using the alpha values below the color wheel.
Preview at System SDR Level: Whith HDR mode on: Sets the SDR white-level of the preview renderer to the Windows SDR level of the Windows Display Settings.
Preview with Tone Mapping: Whith HDR mode on: Performs a bt2390 rgb display transform to tone map linear HDR to SDR.
Machine ID Selection
Use the broom icon to display what is used with your current machine ID, which is configured on the general tab inside the configuration tab inside the Configuration editor. Or Preview other machines outputs from your network with the corresponding ID. With all all machines can be previewed in Design preview or with the All Outputs preview.
Changing the previewed machine ID will only render on Enabled Physical Outputs; make sure to enable this option inside the Preview Selection Menu!
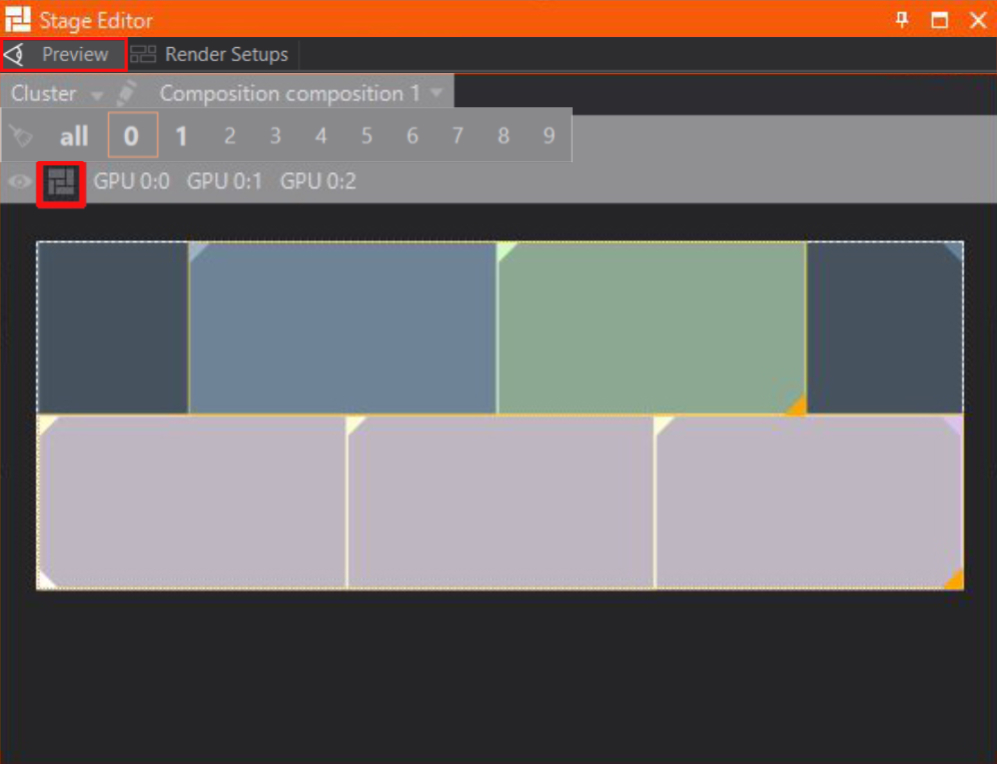
Design Preview
The Design Preview will show all configured Screens, Compositions, Canvases and other machines defined in the Render Setup combined as one preview. This is especially helpful when working on bigger scenes using multiple Canvases.
All Outputs
Activates all configured Outputs and previews them, if enough physical outputs are connected. Otherwise use the connector selection to preview single outputs.
Configuration of both Inputs and Outputs can be done inside the Device Configuration. When all is selected in machine selection, All Outputs previews all outputs from all machines in the cluster. Be aware of perfomance demand. Lower Resolution for Previs can reduce the preview resolution for the All Outputs preview.
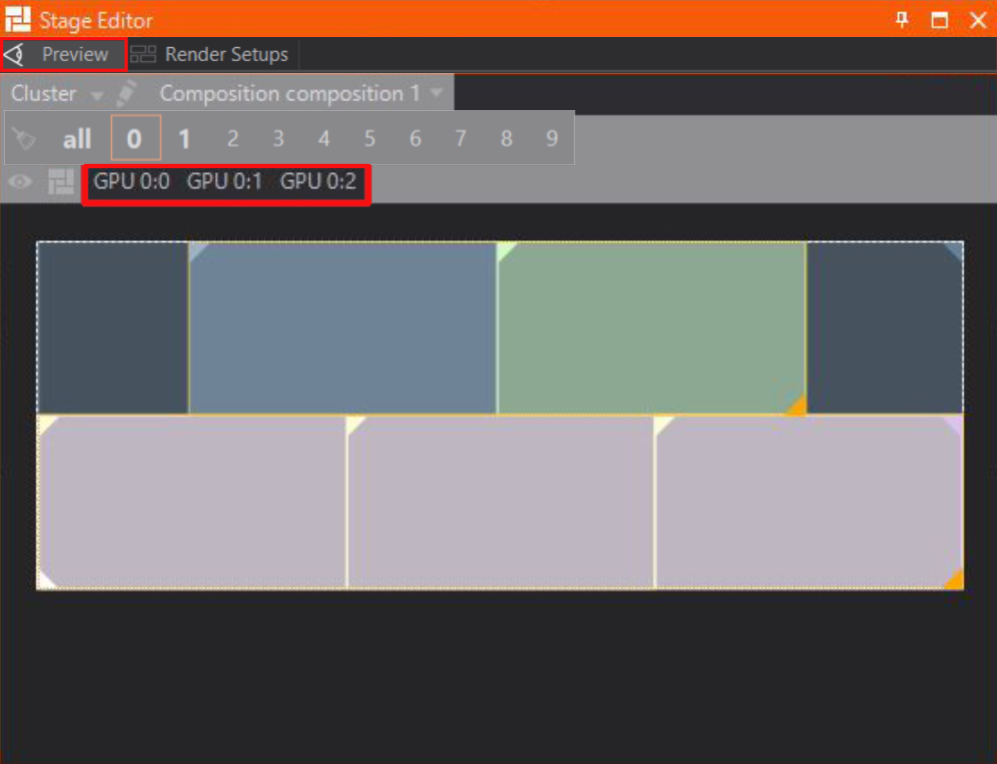
Connector Selection
Preview single outputs which are currently configured in the Device Configuration.
Render Setups view
To create, edit and mange the Render Setups switch to the Render Setups view of the Stage Editor.

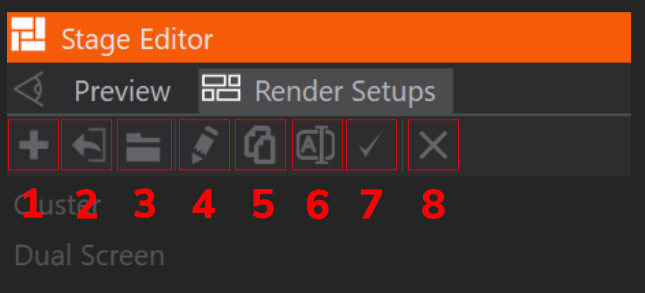
The active Render Setup is highlighted in orange and when selected the tick is selected. To activate a different one, select it and activate the tick (7). To edit a Render Setup, double click 2x the name of a Render Setup or press the pencil icon (4). To add a new one, the plus icon (1). Rename a selected Render Setup with a on the name or with button (6). Button (2) imports a Render Setup from a file from disk. Button (3) opens the Render Setups directory. Button (5) duplicates a selected Render Setup. And button (8) deletes the selected one.
Useful information
Now that you know how to work with the Stage Editor, lets tie this into the Renderer window and see what we can do with it.
When starting the project with a multi-screen setup, the Stage Editor and the Render Window appears the same as before.
By default, the Stage Editor is in the Canvas preview mode. Canvas preview shows the render space for the default canvas that Ventuz uses. In order to see the borders of the screens, content must be applied to the scene.
In this example, three screens are displayed in the Render Window. Three colored rectangles that are touching, show the gap between screens 2 and 3:
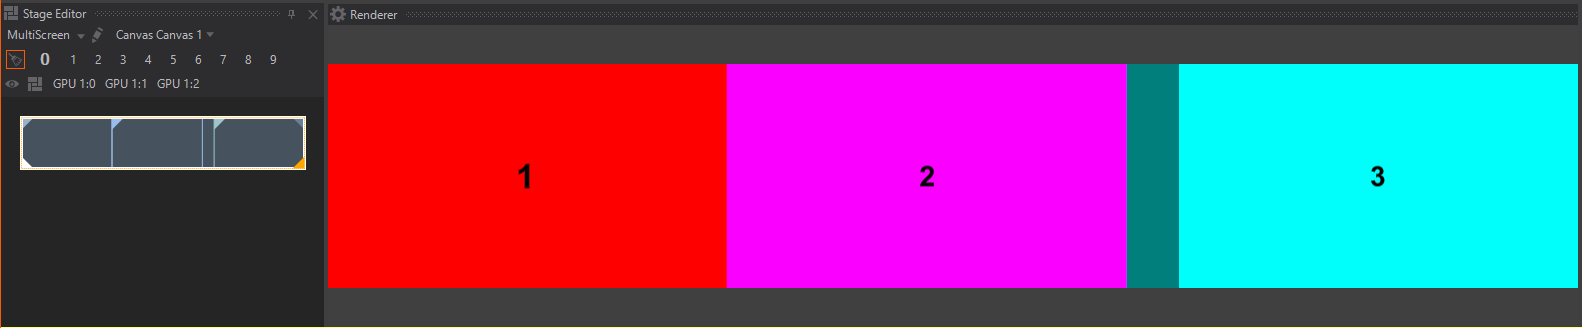
These rectangles represent your screens. The grayed out area will not be visible when presenting the project.
When the Design Preview mode is used, all of the Compositions, including the darkened areas that aren't visible in the in the physical setup.
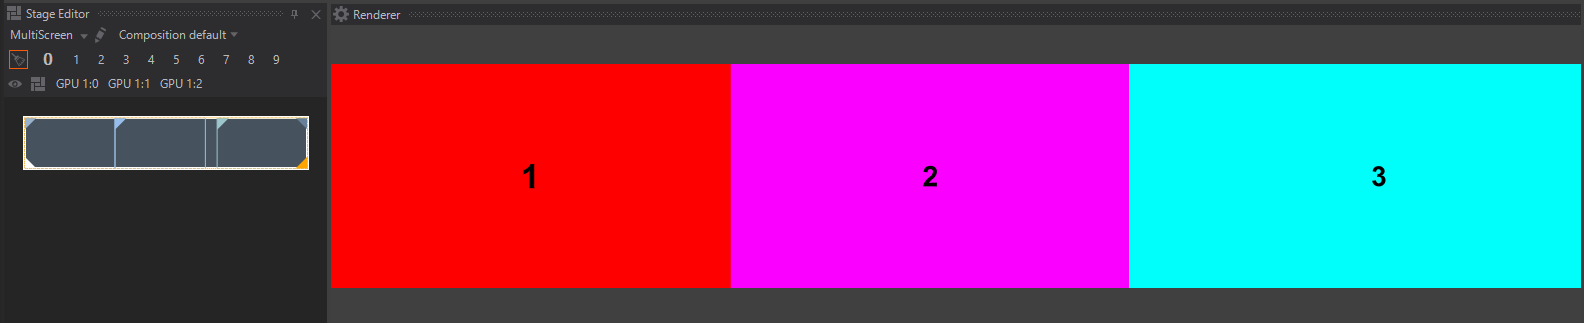
When the Composition mode is used, the entire Composition is displayed and the Render Window and the preview ignores the Screen and Output settings.
This tool is useful to if the screen layout happens to change in the future to ensure the content is rendered as desired.
It is highly recommended to switch to the production mode from time to time to see what it will look like when presenting it. This is very helpful if you have overlapping content, or things moving around.
Placing Pixel Perfect Content
To apply a Movie Clip Layer it will be stretched over the whole render Composition no matter its size or aspect ratio.
There are different methods to resize a layer like the Movie Clip Layer so it will display as the desired size, some are more accurate than others.
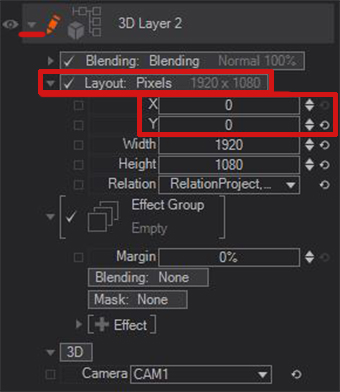
In order to achieve pixel perfect placement, there are properties available in the Movie Clip Layer.
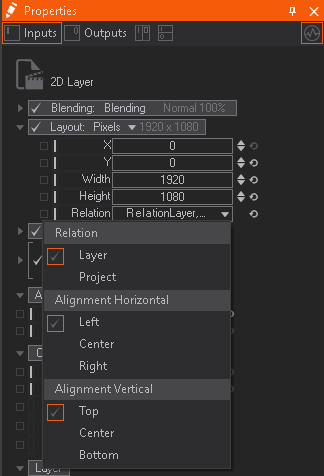
Changing the layout to pixels and the relation to Layer -> Left -> Top will align the clip to the top left corner of the rendering space.
Moving things across multiple screens
Ventuz' synchronization capabilities across GPU outputs and even across multiple machines allow you to show content that spans over several screens. It is possible to have visuals elements travel across several screens to have them appear as one large video surface.
Having content move across multiple screens is fairly simple as you only need to arrange according to your screen setup using the Layout properties as shown above.
Considerations with the Field of View
When having content span across several screens in the horizontal axis the content at the edges might appear distorted or stretched.


This comes from the default camera in the layer root. There are multiple ways to fix this issue.
One method involves ignoring the camera and moving the Layer itself, and therefore its content, inside the Property of the 3D Layer. To see the properties of the Layer, click the small triangle beside the pencil.
By using the X and Y properties, the content will be shifted around without any distortion. But this might be limiting in some cases since you are moving the whole layer at once.
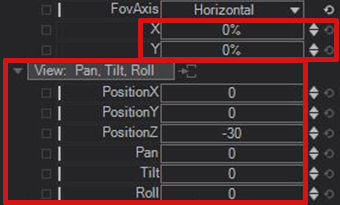
Another method includes using a Camera Node in the Hierarchy Editor. Changing the Field of View Axis to horizontal. If you now move the content around with the axis there will minimal distortion.
It is possible to use the camera X and Y Property either of the FOV axis or the different view modes to move things around. This will give you distortion free results.
Creating a Scene
Using the methods above, a scene can span across multiple physical screens using the same workflow as creating a single screen scene.
If the screens are on different computers, a Clustering Setup must be used.
Presenting your project
Once the scene has been created, it must be exported as a Presentation.

Projects can greatly vary between its simplicity and its complexity; Some projects are more difficult to setup for Deploying Presentation File (.vpr). If you need more help please see Deployment page.