Navigation

Ventuz Introduction

  • Introduction
  • Getting Started
  • Ventuz Editions
  • Ventuz Products
  • Realtime Rendering
  • Frequently Asked Questions
  • Common Mistakes
  • Deploying a Ventuz Presentation
  • Scene Performance and Tweaks

Quick Guides

  • Quick Guide Index
  • Business Logic
  • 3D Art
  • 2D Art
  • Programming
  • System Engineer

General

  • Index
  • What's New
  • Ventuz System Requirements
  • Communication Protocol Overview
  • Configuration Editor
  • Audio / Video Configuration
  • Machine Configuration
  • Web Configuration Editor and License Manager
  • GPI Configuration for Runtime or Director
  • Supported Formats
  • Supported Hardware
  • Multisampling / Anti-Aliasing
  • Input Subsystem
  • Ventuz Proprietary Files
  • Migrating Content to Ventuz 6
  • Migrating Content to Ventuz 5
  • Summary Shortcuts
  • Terminology
  • Manual Index

Ventuz Designer

  • Designer Indices
Introduction
  • Designer Introduction Index
  • Designer Overview
  • Realtime Rendering
  • Project Browser
  • Designer Interface
  • Designer Options
  • Working with Nodes
  • Hierarchy and Content Editors
  • 2D Workflow
  • 3D Workflow
  • Animation Workflow
  • Best Practices
  • Reading Data in Ventuz
  • Display Images and Movies
  • Scene Performance and Tweaks
  • Deploying a Ventuz Presentation
  • Render to Disk
User Interface
  • Designer User Interface Index
  • Designer Interface
  • Renderer Window
  • Layer Editor
  • Property Editor
  • Property Groups
  • Hierarchy Editor
  • Content Editor
  • Find and Replace
  • Toolbox
  • Animation Editor
  • Shader Editor
  • Text Editor
  • Message View
  • Scene Tree
  • Stage Editor
  • Container Outline
  • Watches Editor
  • Performance Statistics
2D Workflow
  • 2D Workflow Index
  • 2D Workflow
  • Layer Editor
  • Common Layer Properties
  • IPP Effects
  • Color Correction FX
  • Distortion FX
  • Filter FX
  • Hierarchy and Content Editors
  • Display Images and Movies
3D Workflow
  • 3D Workflow Index
  • 3D Workflow
  • Hierarchy and Content Editors
  • Renderer Window
  • Camera Navigation
  • Manipulate Objects with Gizmos
  • Layer Editor
  • Property Editor
  • Hierarchy Editor
  • Working with Nodes
  • Isolated Objects
  • Containers
  • Text Rendering
  • Character Sets
  • Geometry Import
  • Display Images and Movies
  • Particle System
  • Creating Realistic Reflections
  • Unreal Integration
  • Notch Integration
  • E2E Node Overview
Logic Workflow
  • Logic Workflow Index
  • Hierarchy and Content Editors
  • Content Editor
  • Hierarchy Editor
  • Working with Nodes
  • Property Editor
  • Containers
  • Project and Scene Data
  • Reading Data in Ventuz
  • Display Images and Movies
  • Input Subsystem
  • Multitouch
  • TUIO Protocol
  • Open Sound Control
  • Unreal Integration
  • Notch Integration
  • E2E Node Overview
Animation Workflow
  • Animation Workflow Index
  • Animation Workflow
  • Animation Editor
  • Content Editor
  • Hierarchy Editor
  • Property Editor
  • Animation and State Engine
  • Templates
  • Template Engine
  • Unreal Integration
  • Notch Integration
Project Structure
  • Project Structure Index
  • Annotations
  • Projects and Scenes
  • Project Properties
  • Project Maintenance
  • Project and Scene Data
  • Scene Management
  • Scene Statistics
  • Scene Tree
  • Performance Statistics
How Tos
  • Designer How to Index
  • How to Run Ventuz
  • How to Work with Designer
  • Ventuz Designer Drag&Drop Workflow
  • How to work with Shadows
  • How to Build Content for Multiple Screens
  • How to Use Emoijs
  • How to Build a Template
  • How to Use the Color Difference Keyer
  • How To Use the HDR Engine
  • How Create Lens Flares and Bloom
  • How to Create Visuals Loader Node
  • How to Remote Control with a Phone
  • How to use Head Mounted Displays
  • How to work with 3D Reference Layers
  • How to create a Firework Particle System
  • How to use DDS with new Block Compression modes
  • How to use the Substance Integration
  • How To Integrate Unreal
  • How To Integrate Notch
  • How To use the Vertex Integration
  • How To Control and Customize Ventuz
Reference
  • Available Nodes
  • Animation Nodes
  • Material&Color Nodes
  • Data Nodes
  • E2E Nodes
  • Geometry Nodes
  • Interaction Nodes
  • IO Nodes
  • Layers
  • Light Nodes
  • Logic Nodes
  • Render Option Nodes
  • Slides Nodes
  • Sound Nodes
  • Text Nodes
  • Texture Nodes
  • VR Nodes
  • World Nodes
  • Summary Shortcuts
  • Layer Editor Shortcuts
  • Hierarchy Editor Shortcuts
  • Content Editor Shortcuts
  • Animation Editor Shortcuts
  • Director Shortcuts

Ventuz Director

  • Index
  • Introduction
  • Environment
  • Show
  • User Interface
  • Assets
  • Taking Action
  • Property Editor
  • Shot Box
  • Project Data
  • Pages
  • Playlist
  • Timeline
  • Content References
  • Topology
  • Channels
  • Macros
  • Designing Templates
  • Plug-Ins
  • Shortcuts
  • Command Line Options
  • Application Settings
  • Glossary
  • GPI Configuration

Ventuz Runtime & Configuration

  • Runtime Index
  • Configuration Configuration Editor
  • Machine Configuration
  • Video/Audio Configuration
  • Web Configuration Editor and License Manager
  • Render Setup Editor
  • Warping and Soft-Edging Editor
  • Machine Clustering
  • Supported Hardware
  • Director Mode
  • Runtime How Tos Index
  • How to Configure Audio
  • How to Use Live Options
  • How To Play Out On Multiple Screens
  • How To Render on a Machine Cluster
  • How to Use Head Mounted Displays
  • How to Setup Spout with Ventuz
  • How to Use Newtek NDI
  • How to Use a Mixed Frame Rate Cluster
  • How to Use Tracking

How To

Designer
  • Designer How to Index
  • How to Run Ventuz
  • How to Work with Designer
  • Ventuz Designer Drag&Drop Workflow
  • How to work with Shadows
  • How to Build Content for Multiple Screens
  • How to Use Emoijs
  • How to Build a Template
  • How to Use the Color Difference Keyer
  • How To Use the HDR Engine
  • How Create Lens Flares and Bloom
  • How to Create Visuals Loader Node
  • How to Remote Control with a Phone
  • How to use Head Mounted Displays
  • How to work with 3D Reference Layers
  • How to create a Firework Particle System
  • How to use DDS with new Block Compression modes
  • How to use the Substance Integration
  • How To Integrate Unreal
  • How To Integrate Notch
  • How To build and playback Ventuz Content in Vertex
Runtime & Configuration
  • Runtime How Tos Index
  • How to Configure Audio
  • How to Use Live Options
  • How To Play Out On Multiple Screens
  • How To Render on a Machine Cluster
  • How to use Head Mounted Displays
  • How to setup Spout with Ventuz
  • How to use Newtek NDI
  • How to use a Mixed Frame Rate Cluster
  • How to use Tracking
  • How To Integrate Unreal
  • How To Integrate Notch
  • How To build and playback Ventuz Content in Vertex
Director
  • How To Control Multiple Graphics Independently From Each Other
  • How to use the Companion with Director

Ventuz Node Reference

ANIMATION
  • Mover
  • Alternator
  • Simple Control
  • Timeline Control
  • Anmation Rig
  • Keyframe Animation
  • Animation Group
COLOR/MATERIAL
  • Alpha
  • Fog
  • Ground Fog
  • Sky Box
  • Color to RGBA
  • HSLA to Color
  • RGBA to Color
  • Color Transformer
  • HLSL Shader
  • Color
  • Material
  • Color Picker
  • Substance Material
DATA
  • Database
  • Excel
  • JSON
  • RSS Feed
  • Resource Linker
  • Text File
  • XML
E2E
  • E2E Axis
  • E2E Data
  • E2E Control
  • E2E Layer
  • E2E Provider
  • E2E Node Overview
GEOMETRY
  • Rectangle
  • Rounded Rectangle
  • Gradient Rectangle
  • Overlay Rectangle
  • Cube
  • Circle
  • Sphere
  • Cylinder
  • Cone
  • Torus
  • Chart
  • Random Points
  • Mesh Loader
  • Geometry Import (Live)
  • Volume
  • Get Bounding Box
  • Arrow
  • Particle System
  • Path Renderer
  • Geometry Renderer
INTERACTION
  • Interaction Rect
  • Touch Button
  • Touch Excluder
  • Touch Marker
  • Touch Paint
  • Touch Pattern
  • Touch Proxy
  • Touch Ripples
  • Touch Transformations
  • Web Browser
  • Touch Teleport
  • Touch Simulator
INPUT/OUTPUT (I/O)
  • GPI
  • Joystick
  • Keyboard
  • MIDI
  • Mouse
  • Network
  • Open Sound Control
  • Serial
  • Timecode
  • DMX
  • HTTP
  • RamDiskWriter
LAYER
  • 3D Layers
  • 3D Layer Reference
  • 2D Layers
  • PSD Import Layer
  • E2E Layer
  • Others
LIGHT
  • Light Sources
LOGIC
  • Array Processing
  • Convert To Text
  • Cluster Synchronization
  • Counter
  • Date Time
  • Directory
  • Dispatcher
  • Enumeration
  • Expressions
  • Invert
  • Log
  • Loop Breaker
  • Math Effects
  • Matrix Operations
  • Scene Event
  • Script
  • String Operations
  • System ID
  • Text Splitter
  • Timer
  • Toggle
  • URL
  • Value Switch
  • Value Buffer
  • Variables
  • Visual Indexer
RENDER OPTIONS
  • Alpha Blending
  • Color Write
  • Alpha Testing
  • Clip Plane
  • Filter
  • Mask
  • Mirror
  • Effect
  • Render Cube Map
  • Draw Modes
  • Stencil
  • ZTesting
SOUND
  • Audio Clip
  • Sound
  • Volume Control
  • Audio Analysis
SLIDES
  • Slide Manager
  • Slide
  • Slide Port
  • Pivot
TEXT
  • Text Effects
  • Text Layouts
  • Text Rendering
TEXTURE
  • Background
  • Hatch
  • Image
  • Texture
  • SVG Loader
  • Gradient Texture
  • Live Video
  • Movie Stream
  • Movie Frame
  • Movie Clip
  • Texture Loader
  • Snapshot
  • Snapshot Framebuffer
  • Texture Saver
  • Video Source Selector
  • VIO Input
  • Spout Receiver
  • NDI Receiver
  • Substance Loader
  • QR Code
VR/AR
  • Tracked Devices
  • Draw Tracked Devices
WORLD
  • Axis
  • Billboard
  • GetWorld
  • SetWorld
  • Arrange
  • Ticker
  • Layout
  • Group
  • World Z Sort
  • YesNo
  • Switch
  • Spread
  • Filter Pass
  • Set Pass
  • Hierarchy Container
  • Scene Port
  • Content Container
  • Template Port
  • Container Info
  • Camera
  • Paths

Advanced and Development

  • Advanced and Development Index
  • Command Line Options
  • Ventuz IP Ports
  • Ventuz Machine Service
  • TUIO
  • .NET Scripting
  • HLSL Shader Programming
  • Ventuz API and SDK
  • Ventuz Extension API
  • Ventuz VIO API
  • Ventuz File Format (VFF)
  • Ventuz Stream Out API
  • Lens Calibration File for FreeD
  • E2E Node Overview
  • Unreal Integration
  • Notch Integration
Remoting
  • Remoting Index
  • Remoting Overview
  • How To Control and Customize Ventuz
  • Remoting 4
  • Remoting 4 via Websockets
  • Remoting 4 via HTTP
  • Director Remoting
  • Deprecated Remoting
  • Remoting Machine Signature

Misc

  • Presets
« Previous:
» Index «
Next: »

How To Use the Substance Integration

Table of Contents

  1. Preparations in Substance Designer
  2. Exporting and Importing
    1. Exporting
    2. Importing
  3. The Substance Nodes
    1. Substance Material
      1. Displacement Maps
    2. Substance Loader
    3. Tweaking Exposed Parameters in Ventuz

From Version 6.4 on Ventuz has an easy way to import and tweak your Substance Designer Textures. On this Page we will show you how to import them, setting up custom parameters and how to tweak them inside Ventuz. The general process of importing your substances into Ventuz is a very easy and straight forward task. But there are some things to keep in mind while building and preparing them in Substance Designer. Also we will show you how to use the Substance Loader Node and how you can tweak your substance with set parameters in Ventuz.

Preparations in Substance Designer

After you are done with creating your Substance Graphs you have to decide which input parameters are important to tweak later e.g.: Blending mode, height intensity, X and Y amount etc. If you want to be able to do so in Ventuz you need to Expose them in Substance Designer. To do so  click the desired function on the parameter tab and hit Expose:

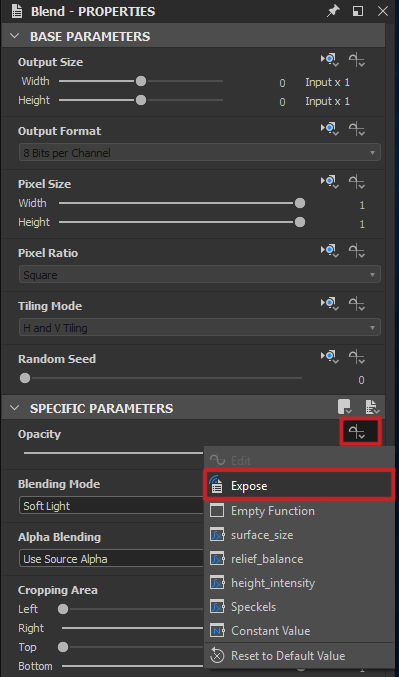
Now you will be able to tweak the exposed parameters once exported. Exposing can be done with nearly every function.

One thing to note here is that after exposing a parameter, it cannot be changed anymore in Substance Designer.

Do not create grayscale textures because Ventuz uses Direct 3D which handles those single channel textures like RGB textures and as a result you will end up with a Red color. So always work in an RGB workflow. There you can use a Gray Color if that is what you need.

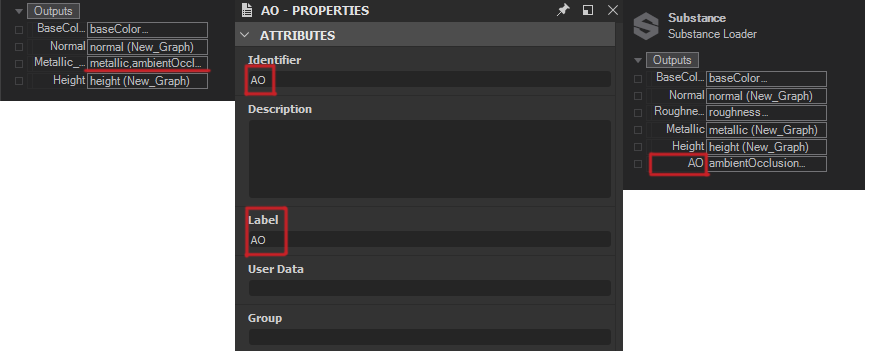
Another thing to note is the semantics of your outputs: The Substance Material node will map the textures to Material Channels based on the Usage property of an output in the Substance Designer. This does not happen in the Substance Loader Node, there all pre-defined Outputs are named like the Outputs you defined in Substance Designer.

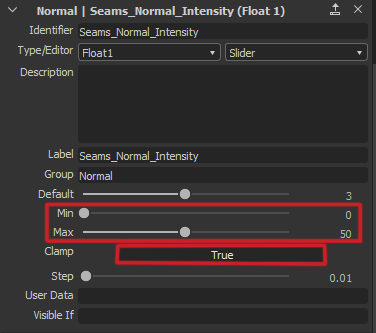
Additionally it´s advised that you set the Min and Max Values and the clamping for those Parameters, because otherwise the Ventuz UI might not be able to adjust the values as expected. To do this  click on the name of your graph on the left side in the explorer. Then just scroll down on the right side in the properties window until you find the input parameters. There you should see the exposed parameters. 
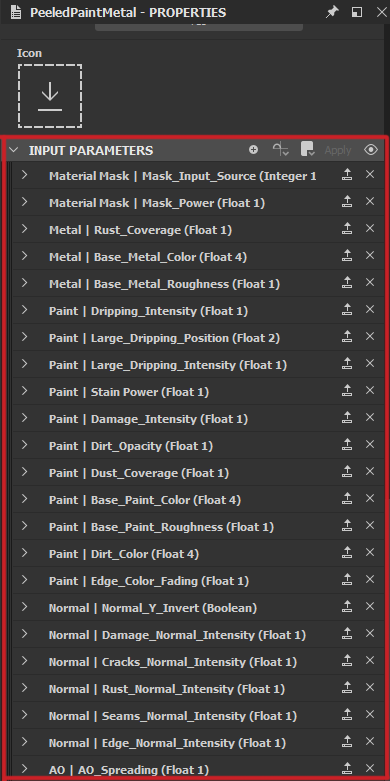
Now expand the parameter you want to edit, set clamping to true and define the Min and Max values for the slider.

Clamp: if set to True, the user won't be able to enter values beyond what has been defined.

Exporting and Importing

Exporting

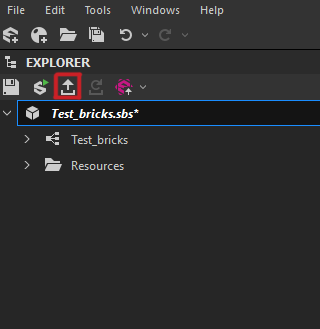
To be able to use it in Ventuz we need a .sbsar file. To create that file you need to  click the Export button inside Substance Designer. This will save your Substance Graph as an .sbsar file. We can then use it inside Ventuz to continue working with it.

Importing

Importing the .sbsar file into Ventuz can be done in two ways:

  • Drag it from your Windows Explorer and drop it into the Hierarchy Window to create Substance Material or Content Window to create a Substance Loader.
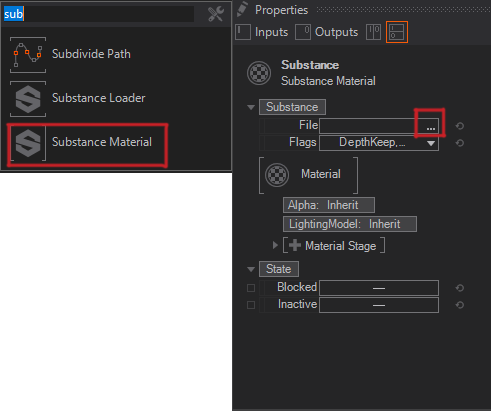
  • Manually create a Substance Material node or Substance Loader node and load the substance by clicking on the three small dots on the File property in the Properties Editor.

The Substance Nodes

Substance Material

The Substance Material node works similar to the Material node, but it will create Material Stages and Lighting Options based on the loaded Substance. Thus you do not need to care much about the exact usage of the different textures. Though, in order to adjust the Substance Material's properties you will need to familiarize yourself with the Material node first.

Displacement Maps

Per default the Displacement material stage is deactivated and you will need to enable the according Material Stage on the Substance Material. This is because you need to have a properly tesselated geometry to get good visual results.

Almost all maps are applied to the lighting of the Material. The Displacement Map is an exception to this. The values will offset the location of each vertex of the materialized geometry. Because of that you will need to prepare the geometry accordingly and give it a high enough tesselation so that the displacement will have enough details to be properly visible.
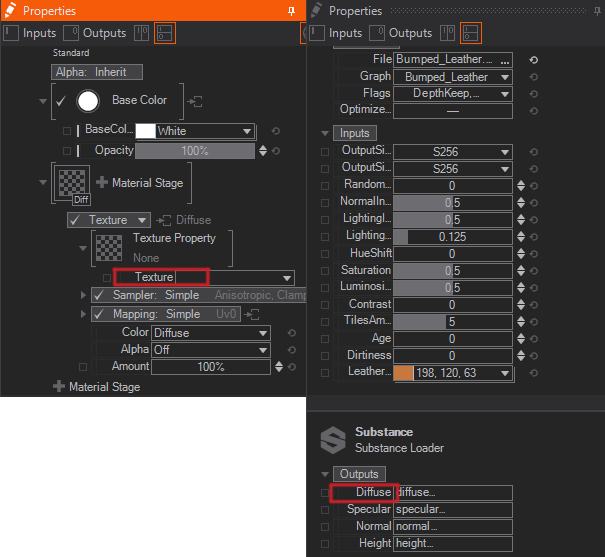
Substance Loader

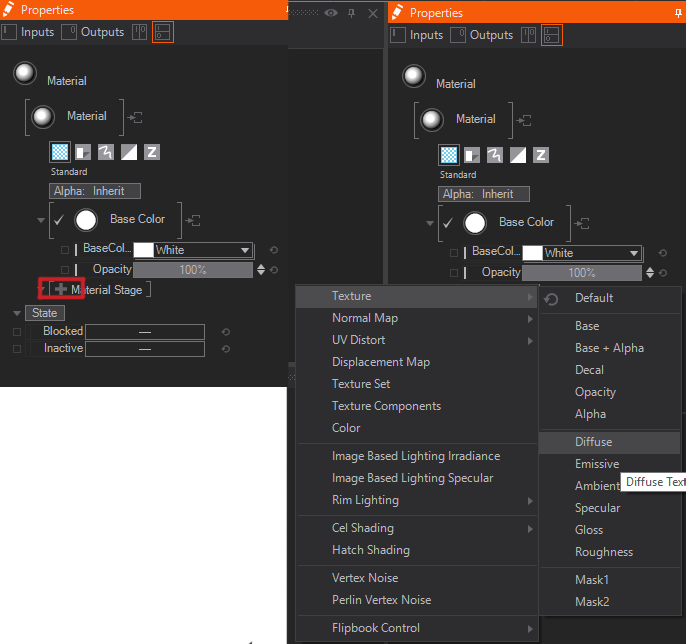
The Substance Loader Node is only usable in the Content Editor window. This node provides you with the feature of using only single textures or channels, for example only the generated Diffuse Map. To do so create a new Material node and load the .sbsar. After that, set a new Material stage, for our example a diffuse channel.

Now  click on Loader and  double click the Texture property's thumbnail.

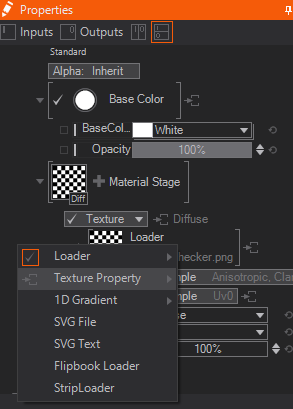
This will allow you to  drag the Texture property to the Substance Loader node, drop it there and bind it to an according texture in the Output section - e.g. a diffuse texture.

Tweaking Exposed Parameters in Ventuz

The parameters you exposed during the Preparations are visible in the input of the Substance nodes. Changing these will cause the texture to be newly generated.

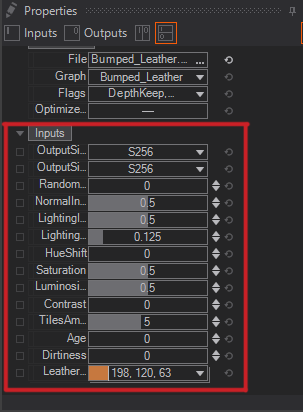
With these exposed Parameters you are able to tweak the texture until you get your desired result.

Tweaking those exposed Parameters will possibly stall the Renderer. So always tweak your textures before the presentation starts. Doing it live will most likely cause heavy stuttering on more complex Substance Graphs!

See also:
  • Substance Material
  • Material
  • Substance Loader Node
  • Properties Editor
  • Content Editor

« Previous:
» Index «
Next: »
Copyright 2022 Ventuz Technology