Navigation

Ventuz Introduction

  • Introduction
  • Getting Started
  • Ventuz Editions
  • Ventuz Products
  • Realtime Rendering
  • Frequently Asked Questions
  • Common Mistakes
  • Deploying a Ventuz Presentation
  • Scene Performance and Tweaks

Quick Guides

  • Quick Guide Index
  • Business Logic
  • 3D Art
  • 2D Art
  • Programming
  • System Engineer

General

  • Index
  • What's New
  • Ventuz System Requirements
  • Communication Protocol Overview
  • Configuration Editor
  • Audio / Video Configuration
  • Machine Configuration
  • Web Configuration Editor and License Manager
  • GPI Configuration for Runtime or Director
  • Supported Formats
  • Supported Hardware
  • Multisampling / Anti-Aliasing
  • Input Subsystem
  • Ventuz Proprietary Files
  • Migrating Content to Ventuz 6
  • Migrating Content to Ventuz 5
  • Summary Shortcuts
  • Terminology
  • Manual Index

Ventuz Designer

  • Designer Indices
Introduction
  • Designer Introduction Index
  • Designer Overview
  • Realtime Rendering
  • Project Browser
  • Designer Interface
  • Designer Options
  • Working with Nodes
  • Hierarchy and Content Editors
  • 2D Workflow
  • 3D Workflow
  • Animation Workflow
  • Best Practices
  • Reading Data in Ventuz
  • Display Images and Movies
  • Scene Performance and Tweaks
  • Deploying a Ventuz Presentation
  • Render to Disk
User Interface
  • Designer User Interface Index
  • Designer Interface
  • Renderer Window
  • Layer Editor
  • Property Editor
  • Property Groups
  • Hierarchy Editor
  • Content Editor
  • Find and Replace
  • Toolbox
  • Animation Editor
  • Shader Editor
  • Text Editor
  • Message View
  • Scene Tree
  • Stage Editor
  • Container Outline
  • Watches Editor
  • Performance Statistics
2D Workflow
  • 2D Workflow Index
  • 2D Workflow
  • Layer Editor
  • Common Layer Properties
  • IPP Effects
  • Color Correction FX
  • Distortion FX
  • Filter FX
  • Hierarchy and Content Editors
  • Display Images and Movies
3D Workflow
  • 3D Workflow Index
  • 3D Workflow
  • Hierarchy and Content Editors
  • Renderer Window
  • Camera Navigation
  • Manipulate Objects with Gizmos
  • Layer Editor
  • Property Editor
  • Hierarchy Editor
  • Working with Nodes
  • Isolated Objects
  • Containers
  • Text Rendering
  • Character Sets
  • Geometry Import
  • Display Images and Movies
  • Particle System
  • Creating Realistic Reflections
  • Unreal Integration
  • Notch Integration
  • E2E Node Overview
Logic Workflow
  • Logic Workflow Index
  • Hierarchy and Content Editors
  • Content Editor
  • Hierarchy Editor
  • Working with Nodes
  • Property Editor
  • Containers
  • Project and Scene Data
  • Reading Data in Ventuz
  • Display Images and Movies
  • Input Subsystem
  • Multitouch
  • TUIO Protocol
  • Open Sound Control
  • Unreal Integration
  • Notch Integration
  • E2E Node Overview
Animation Workflow
  • Animation Workflow Index
  • Animation Workflow
  • Animation Editor
  • Content Editor
  • Hierarchy Editor
  • Property Editor
  • Animation and State Engine
  • Templates
  • Template Engine
  • Unreal Integration
  • Notch Integration
Project Structure
  • Project Structure Index
  • Annotations
  • Projects and Scenes
  • Project Properties
  • Project Maintenance
  • Project and Scene Data
  • Scene Management
  • Scene Statistics
  • Scene Tree
  • Performance Statistics
How Tos
  • Designer How to Index
  • How to Run Ventuz
  • How to Work with Designer
  • Ventuz Designer Drag&Drop Workflow
  • How to work with Shadows
  • How to Build Content for Multiple Screens
  • How to Use Emoijs
  • How to Build a Template
  • How to Use the Color Difference Keyer
  • How To Use the HDR Engine
  • How Create Lens Flares and Bloom
  • How to Create Visuals Loader Node
  • How to Remote Control with a Phone
  • How to use Head Mounted Displays
  • How to work with 3D Reference Layers
  • How to create a Firework Particle System
  • How to use DDS with new Block Compression modes
  • How to use the Substance Integration
  • How To Integrate Unreal
  • How To Integrate Notch
  • How To use the Vertex Integration
  • How To Control and Customize Ventuz
Reference
  • Available Nodes
  • Animation Nodes
  • Material&Color Nodes
  • Data Nodes
  • E2E Nodes
  • Geometry Nodes
  • Interaction Nodes
  • IO Nodes
  • Layers
  • Light Nodes
  • Logic Nodes
  • Render Option Nodes
  • Slides Nodes
  • Sound Nodes
  • Text Nodes
  • Texture Nodes
  • VR Nodes
  • World Nodes
  • Summary Shortcuts
  • Layer Editor Shortcuts
  • Hierarchy Editor Shortcuts
  • Content Editor Shortcuts
  • Animation Editor Shortcuts
  • Director Shortcuts

Ventuz Director

  • Index
  • Introduction
  • Environment
  • Show
  • User Interface
  • Assets
  • Taking Action
  • Property Editor
  • Shot Box
  • Project Data
  • Pages
  • Playlist
  • Timeline
  • Content References
  • Topology
  • Channels
  • Macros
  • Designing Templates
  • Plug-Ins
  • Shortcuts
  • Command Line Options
  • Application Settings
  • Glossary
  • GPI Configuration

Ventuz Runtime & Configuration

  • Runtime Index
  • Configuration Configuration Editor
  • Machine Configuration
  • Video/Audio Configuration
  • Web Configuration Editor and License Manager
  • Render Setup Editor
  • Warping and Soft-Edging Editor
  • Machine Clustering
  • Supported Hardware
  • Director Mode
  • Runtime How Tos Index
  • How to Configure Audio
  • How to Use Live Options
  • How To Play Out On Multiple Screens
  • How To Render on a Machine Cluster
  • How to Use Head Mounted Displays
  • How to Setup Spout with Ventuz
  • How to Use Newtek NDI
  • How to Use a Mixed Frame Rate Cluster
  • How to Use Tracking

How To

Designer
  • Designer How to Index
  • How to Run Ventuz
  • How to Work with Designer
  • Ventuz Designer Drag&Drop Workflow
  • How to work with Shadows
  • How to Build Content for Multiple Screens
  • How to Use Emoijs
  • How to Build a Template
  • How to Use the Color Difference Keyer
  • How To Use the HDR Engine
  • How Create Lens Flares and Bloom
  • How to Create Visuals Loader Node
  • How to Remote Control with a Phone
  • How to use Head Mounted Displays
  • How to work with 3D Reference Layers
  • How to create a Firework Particle System
  • How to use DDS with new Block Compression modes
  • How to use the Substance Integration
  • How To Integrate Unreal
  • How To Integrate Notch
  • How To build and playback Ventuz Content in Vertex
Runtime & Configuration
  • Runtime How Tos Index
  • How to Configure Audio
  • How to Use Live Options
  • How To Play Out On Multiple Screens
  • How To Render on a Machine Cluster
  • How to use Head Mounted Displays
  • How to setup Spout with Ventuz
  • How to use Newtek NDI
  • How to use a Mixed Frame Rate Cluster
  • How to use Tracking
  • How To Integrate Unreal
  • How To Integrate Notch
  • How To build and playback Ventuz Content in Vertex
Director
  • How To Control Multiple Graphics Independently From Each Other
  • How to use the Companion with Director

Ventuz Node Reference

ANIMATION
  • Mover
  • Alternator
  • Simple Control
  • Timeline Control
  • Anmation Rig
  • Keyframe Animation
  • Animation Group
COLOR/MATERIAL
  • Alpha
  • Fog
  • Ground Fog
  • Sky Box
  • Color to RGBA
  • HSLA to Color
  • RGBA to Color
  • Color Transformer
  • HLSL Shader
  • Color
  • Material
  • Color Picker
  • Substance Material
DATA
  • Database
  • Excel
  • JSON
  • RSS Feed
  • Resource Linker
  • Text File
  • XML
E2E
  • E2E Axis
  • E2E Data
  • E2E Control
  • E2E Layer
  • E2E Provider
  • E2E Node Overview
GEOMETRY
  • Rectangle
  • Rounded Rectangle
  • Gradient Rectangle
  • Overlay Rectangle
  • Cube
  • Circle
  • Sphere
  • Cylinder
  • Cone
  • Torus
  • Chart
  • Random Points
  • Mesh Loader
  • Geometry Import (Live)
  • Volume
  • Get Bounding Box
  • Arrow
  • Particle System
  • Path Renderer
  • Geometry Renderer
INTERACTION
  • Interaction Rect
  • Touch Button
  • Touch Excluder
  • Touch Marker
  • Touch Paint
  • Touch Pattern
  • Touch Proxy
  • Touch Ripples
  • Touch Transformations
  • Web Browser
  • Touch Teleport
  • Touch Simulator
INPUT/OUTPUT (I/O)
  • GPI
  • Joystick
  • Keyboard
  • MIDI
  • Mouse
  • Network
  • Open Sound Control
  • Serial
  • Timecode
  • DMX
  • HTTP
  • RamDiskWriter
LAYER
  • 3D Layers
  • 3D Layer Reference
  • 2D Layers
  • PSD Import Layer
  • E2E Layer
  • Others
LIGHT
  • Light Sources
LOGIC
  • Array Processing
  • Convert To Text
  • Cluster Synchronization
  • Counter
  • Date Time
  • Directory
  • Dispatcher
  • Enumeration
  • Expressions
  • Invert
  • Log
  • Loop Breaker
  • Math Effects
  • Matrix Operations
  • Scene Event
  • Script
  • String Operations
  • System ID
  • Text Splitter
  • Timer
  • Toggle
  • URL
  • Value Switch
  • Value Buffer
  • Variables
  • Visual Indexer
RENDER OPTIONS
  • Alpha Blending
  • Color Write
  • Alpha Testing
  • Clip Plane
  • Filter
  • Mask
  • Mirror
  • Effect
  • Render Cube Map
  • Draw Modes
  • Stencil
  • ZTesting
SOUND
  • Audio Clip
  • Sound
  • Volume Control
  • Audio Analysis
SLIDES
  • Slide Manager
  • Slide
  • Slide Port
  • Pivot
TEXT
  • Text Effects
  • Text Layouts
  • Text Rendering
TEXTURE
  • Background
  • Hatch
  • Image
  • Texture
  • SVG Loader
  • Gradient Texture
  • Live Video
  • Movie Stream
  • Movie Frame
  • Movie Clip
  • Texture Loader
  • Snapshot
  • Snapshot Framebuffer
  • Texture Saver
  • Video Source Selector
  • VIO Input
  • Spout Receiver
  • NDI Receiver
  • Substance Loader
  • QR Code
VR/AR
  • Tracked Devices
  • Draw Tracked Devices
WORLD
  • Axis
  • Billboard
  • GetWorld
  • SetWorld
  • Arrange
  • Ticker
  • Layout
  • Group
  • World Z Sort
  • YesNo
  • Switch
  • Spread
  • Filter Pass
  • Set Pass
  • Hierarchy Container
  • Scene Port
  • Content Container
  • Template Port
  • Container Info
  • Camera
  • Paths

Advanced and Development

  • Advanced and Development Index
  • Command Line Options
  • Ventuz IP Ports
  • Ventuz Machine Service
  • TUIO
  • .NET Scripting
  • HLSL Shader Programming
  • Ventuz API and SDK
  • Ventuz Extension API
  • Ventuz VIO API
  • Ventuz File Format (VFF)
  • Ventuz Stream Out API
  • Lens Calibration File for FreeD
  • E2E Node Overview
  • Unreal Integration
  • Notch Integration
Remoting
  • Remoting Index
  • Remoting Overview
  • How To Control and Customize Ventuz
  • Remoting 4
  • Remoting 4 via Websockets
  • Remoting 4 via HTTP
  • Director Remoting
  • Deprecated Remoting
  • Remoting Machine Signature

Misc

  • Presets
« Previous:
» Index «
Next: »

Creating Realistic Reflections

Table of Contents

  1. Introduction
  2. Simple Mirror
  3. Effect Mirror
    1. Use the Effect Mirror property outputs
  4. Cube Maps
    1. Use the Cube Map texture property output
  5. Conclusion

This page will provide you with an overview of possible ways to create reflections. We will cover the standard Mirrors and Cube Maps as well as manual camera space reflections.

Introduction

Ventuz has several nodes to create reflections, so there is no need to create a reflection setup by adding several nodes to have a reflection on your geometries. We differ between three different ways of creating a reflection: Simple Mirror, Effect Mirror, Camera Space Reflection. While the Simple- and Effect Mirror are based on the same node they still have their differences.

Simple Mirror

Simple Mirrors create a duplication of all 3D objects in the layer mirrored across a defined, boundless plane.

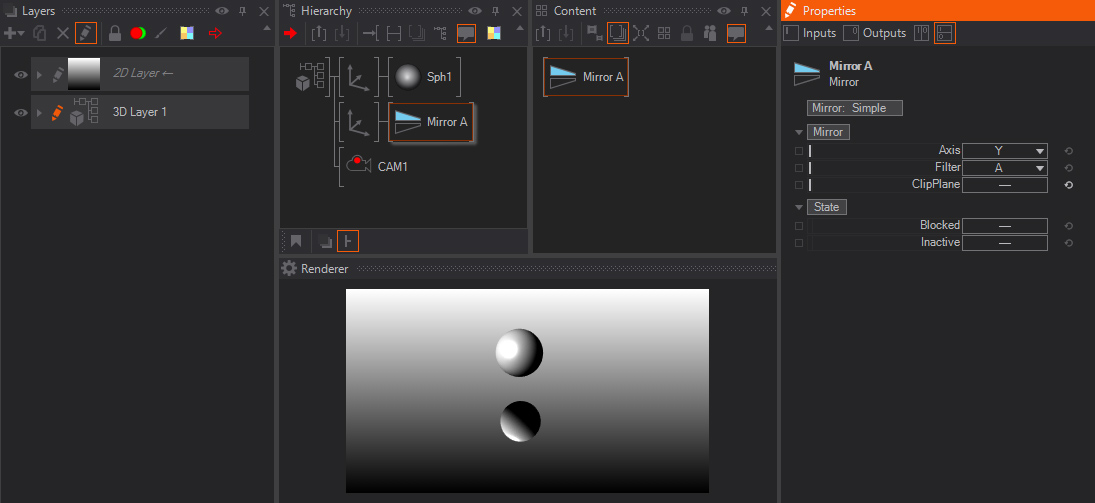
To use this type of mirror, add the Simple Mirror node to the scene and you will have a flat surface which has a simple reflection applied to it. Keep in mind that the Mirror plane is endless and can not be scaled, just rotated. The part of the surface which contains no reflection is fully transparent - therefore the created Mirror Surface can be used against a different Background or even a Layer. You can not change the color or other parameters of the reflection. The following image shows a very basic setup for a Simple Mirror.

Effect Mirror

The effect mirror is a way more advanced version of the Simple Mirror. Not only offers it a Simple Blur and Output Properties, it also has the possibility of adding any IPP Effect which we have available for Ventuz. This allows a huge freedom for your unique designs.

For the Effect Mirror its a must to have a rectangular geometry behind the mirror node. This also makes it possible to have the reflective surface oriented and transformed where you need it. Keep in mind that you can control both transforms independently, the Mirror Origin as well as the Reflective Surface.

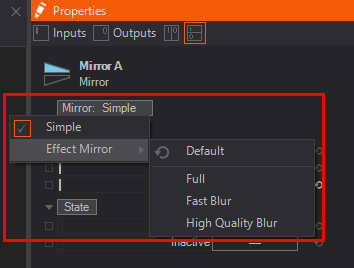
To use the effect mirror you can simply switch the property from Mirror: Simple to Mirror: Effect or drag&drop  the Mirror Effect node from the Toolbox into the Hierarchy Editor - a warning will appear and remind you to place a flat geometry behind it.

A Flat geometry can be a Rectangle or Circle.

You will notice the surface will have the reflection but its own shading color applied as well. You can adjust the appearance by adding a Material Node and adjust the properties there. After you add a material node behind, but before the flat geometry you would need to switch the lighting model from Inherit to Phong to have access to the Base and Specular properties and values.

To have a real mirror change the basecolor to Black / 0,0,0. Per default the Effect Mirror will have a Blur effect applied. You can change the Resolution to save performance (Half/Quarter) or increase the quality (Full) - the Visibility changes the overall visibility of the reflection applied to the geometry. To change the Blur you have to adjust the values in the effect section of the mirror node, here you can add more IPP-Effects as well.

The Effect Mirror will not add an endless rectangle or floor in your scene, its using a dedicated flat geometry which can be transformed freely. On top the Effect Mirror has an Output Property for the texture as well as for the size.

Use the Effect Mirror property outputs

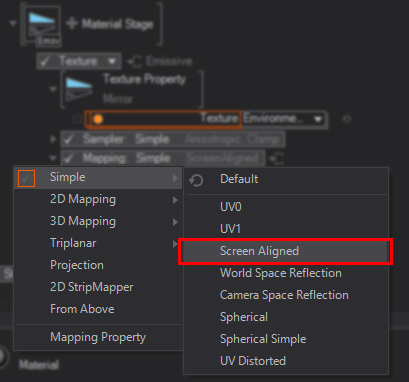
To use the generated mirror texture output you would need to apply the texture by using e.g. a Material node, select an emissive or specular texture input and set the Mapping to Simple - ScreenAligned

This way it is possible to have full control over the generated texture and you can make use of it as a real Material Stage. You can now assign a completely different Target for this stage, use a different blend mode or send it into a mask-channel.

Cube Maps

You can get reflections by using the RenderCubeMap node. A cube map is a six sided generated texture which can be used as a reflection source for any kind of geometry. You can generate this Cube Map each frame or just render it once. Any geometry which you append behind the RenderCubeMap node will have a cube map reflection. You adjust the intensity and appearance not only by the amount on the node itself, you can have way more control by adjusting the properties like BaseColor and Specular with a Material node. Just add the Material node between the RenderCubeMap node and the appending geometry or nodes.

Use the Cube Map texture property output

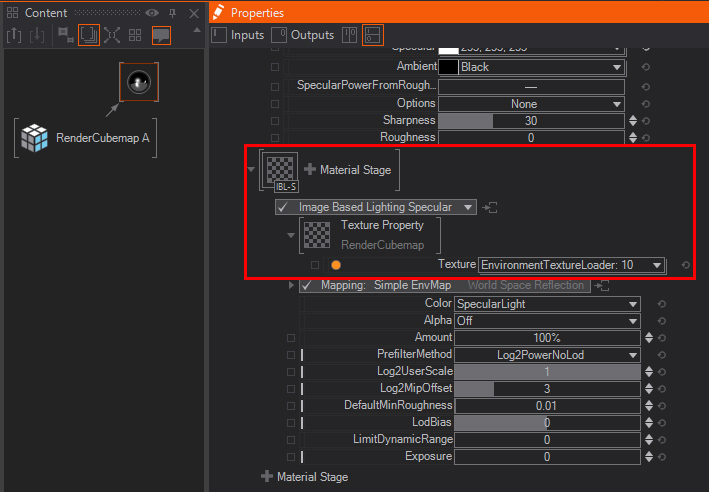
The RenderCubeMap has also an Texture Output available. Since this is a "six sided version" of a "reflection", a cross texture, you can not simply bind it to a screen aligned mapped texture slot - it uses completely different shader code. In this case you would need to add a Material node and add an IBL Specular Reflection material stage.

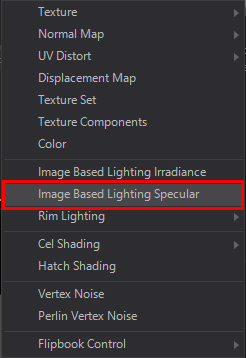
Now you can bind the Texture Property Output from the RenderCubeMap to the Texture Property from the IBL stage.

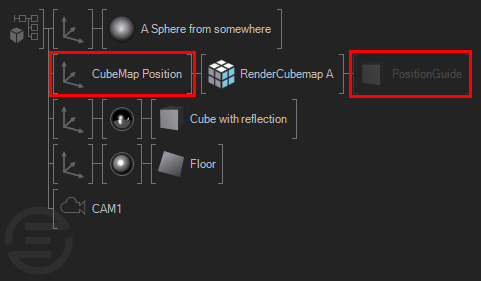
Whenever you plan to use the Cube Map Texture Property Output only, you do not need to have geometry sorted directly behind the Cube Map node. This gives you more freedom to bind the reflection where- and whenever you want. For an easier workflow you can still put a cube behind the RenderCubeMap Node to help you identify where the Cube Map reflection is rendered, i.d. the source/origin position of the reflection. Just add an Axis in front of the RenderCubeMap Node and reposition the "node" or better source position. As soon as you found the desired position you can block the geometry to hide your guide.

Conclusion

There are several ways of generating and using reflections. All have their own purpose, such as a mirror node, which will only be used for merely flat geometries such as rectangles and circles. While Cube Maps are used for generating quick and easy to use reflections on more complex geometries.

Additionally you can use the texture property outputs to modify the appearance of the generated textures. This can come in handy if you would like to alter the way you use the flat mirror.

See also:
  • Mirror Node
  • RenderCubeMap Node
  • Material Node
  • ​Cube mapping Wiki

« Previous:
» Index «
Next: »
Copyright 2022 Ventuz Technology