How To Use VIO with Vertex
Table of Contents
This How To is will demonstrate how to setup VIO (Video in and Out) in Ventuz; and how to use this VIO setup in Vertex as well as sending data to and from Vertex from Ventuz.
Introduction
Ventuz has several options for outputting its rendered display. One of these options is Video in and Out, or VIO. This feature allows Ventuz to interface with other platforms.
Carefully follow these steps to set up Ventuz for rendering Scenes inside of Vertex and how to send data from one platform to the other.
Vertex by IOVersal, among other things, is a powerful and flexible playback platform.
The workflow in Vertex is focused around a timeline including layers and keyframes, much like Premier or other non-linear editing software platforms..
Vertex is a flexible platform that can be used for video, image, and Ventuz playback.
Please note that the current Vertex integration is in beta, changes to available features and this guide may be made in future Vertex or Ventuz updates.
Requirements
VIO works with Ventuz version 7.1 or later. It is recommended to have the latest version of Ventuz installed. This how-to focuses on how to make these features work inside Ventuz 7.0 and higher. While the screenshots may look different, the steps inside of the Configuration Editor, Ventuz Version 7.1 and Version 8 are capable of working with Vertex.
Vertex version 2024 R1 and later currently supports Ventuz playback. It is recommended to have the latest version of Vertex installed.
Preparations
- Download and install Ventuz 7.1 or later. Found here: Ventuz Downloads
- Download and install the latest version of Vertex, a Vertex account is needed. Found here: ioversal Trial Download
- The trial version of Vertex supports the features needed for this integration.
Ventuz Scene
Scene Creation
Open Ventuz Designer. Start a new project and give it a title. In this example VentuzVertex is used as the project name in the Ventuz default save location: C:\Users\Public\Documents\Ventuz6\Content\Projects\. This is very important for later.
Ventuz will load a blank scene.
- Add an Axis Node to the Hierarchy tab.
- Add a Color Node to the Axis Node
- Add a Cube Node to the Color Node
- Change the size of the Cube to 15 x 15 x 15
- Set the BevelRadius to 2.
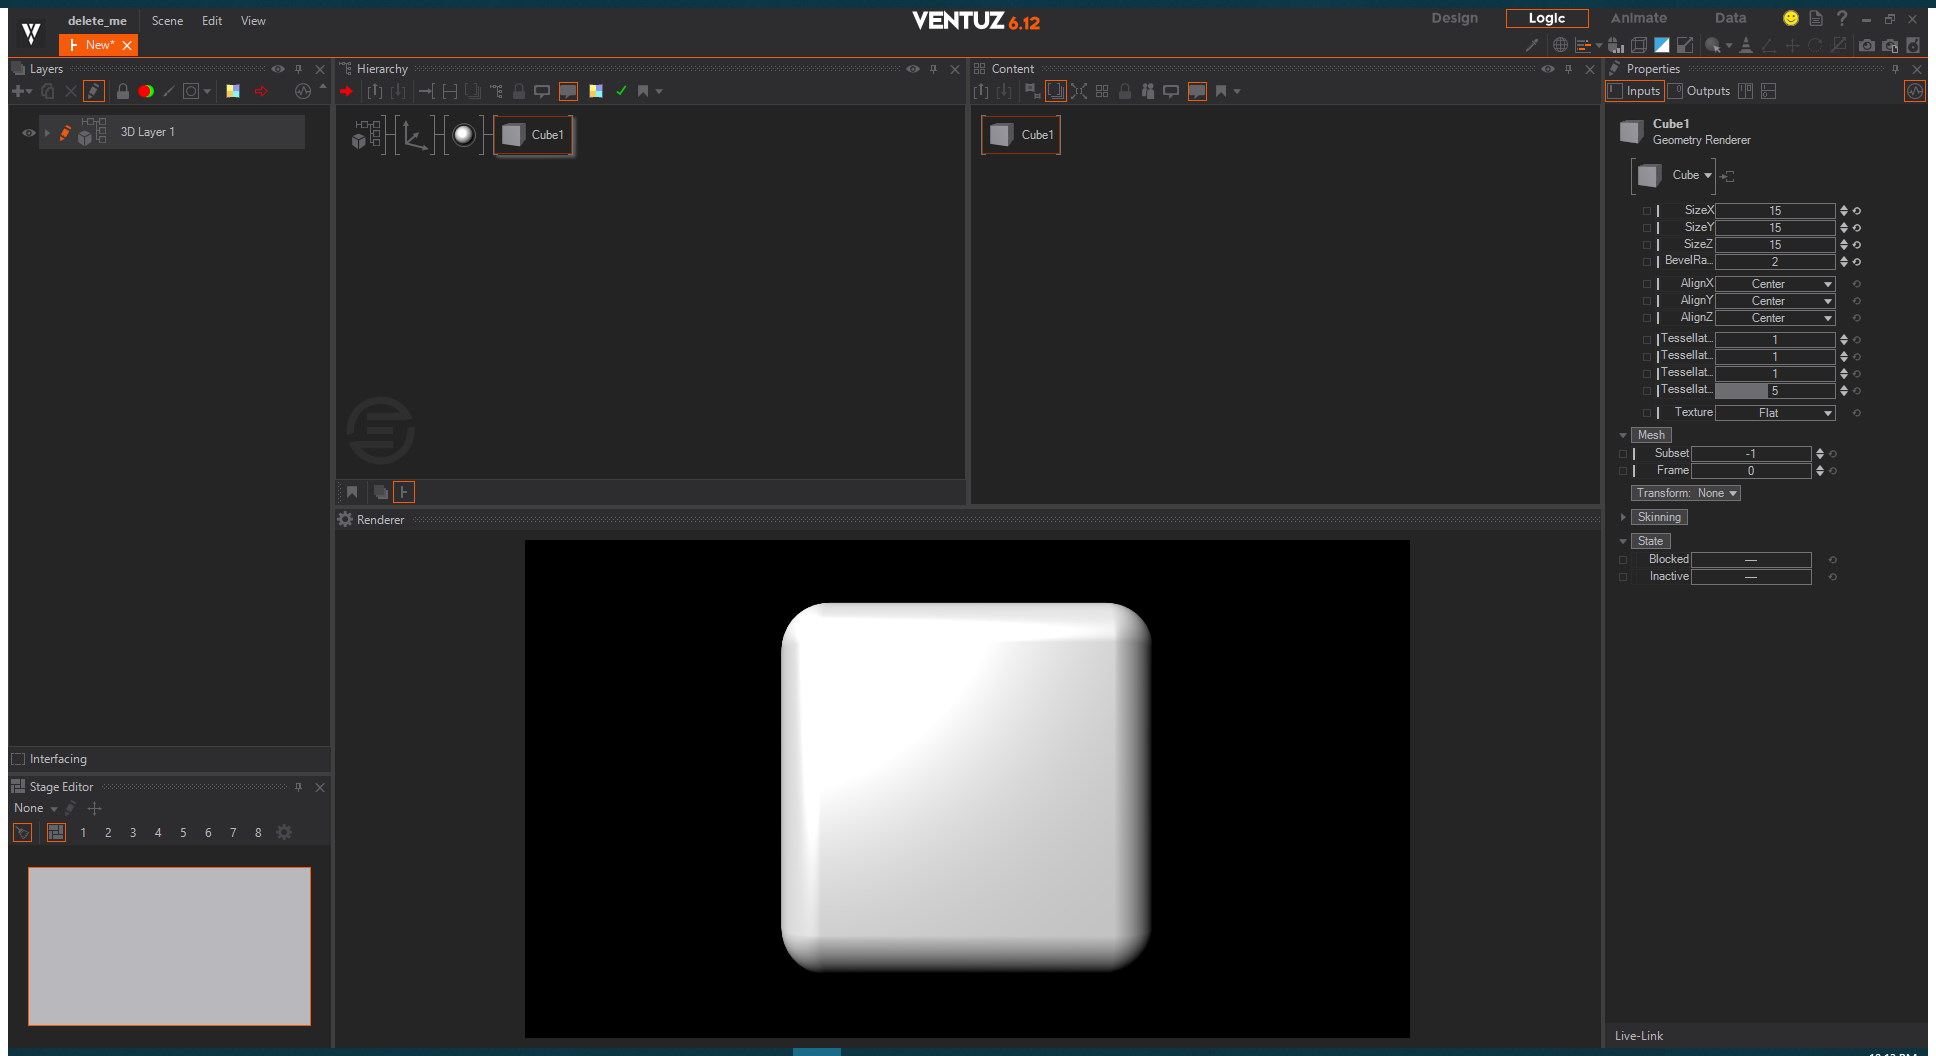
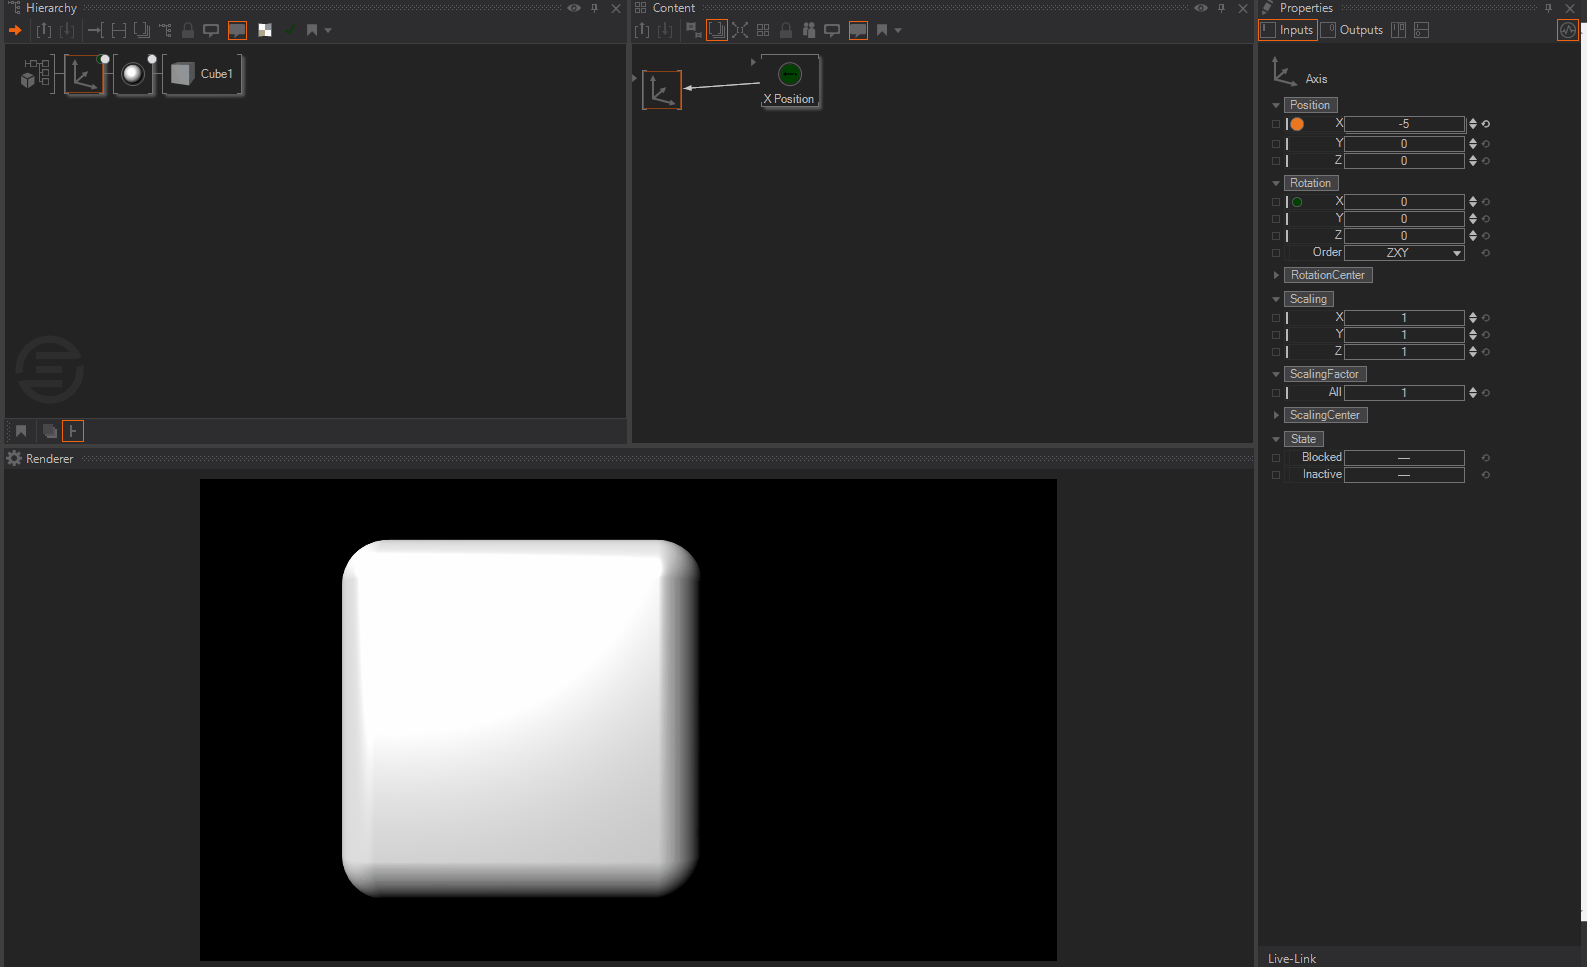
- Click on theAxis Node in the Hierarchy Area.
- In the Content Area, create and connect a Mover Node to the X Position Property.
- Set the Min of the Mover Node to -5 and the Max to 5.
Now there is a moving Cube in the render window.
Adjust Scene for Vertex Timeline Operation
To make a Ventuz scene compatible with the Vertex timeline based workflow, Keyframes must be added to the Ventuz Scene.
The Main Timeline in Ventuz must be used for this integration.
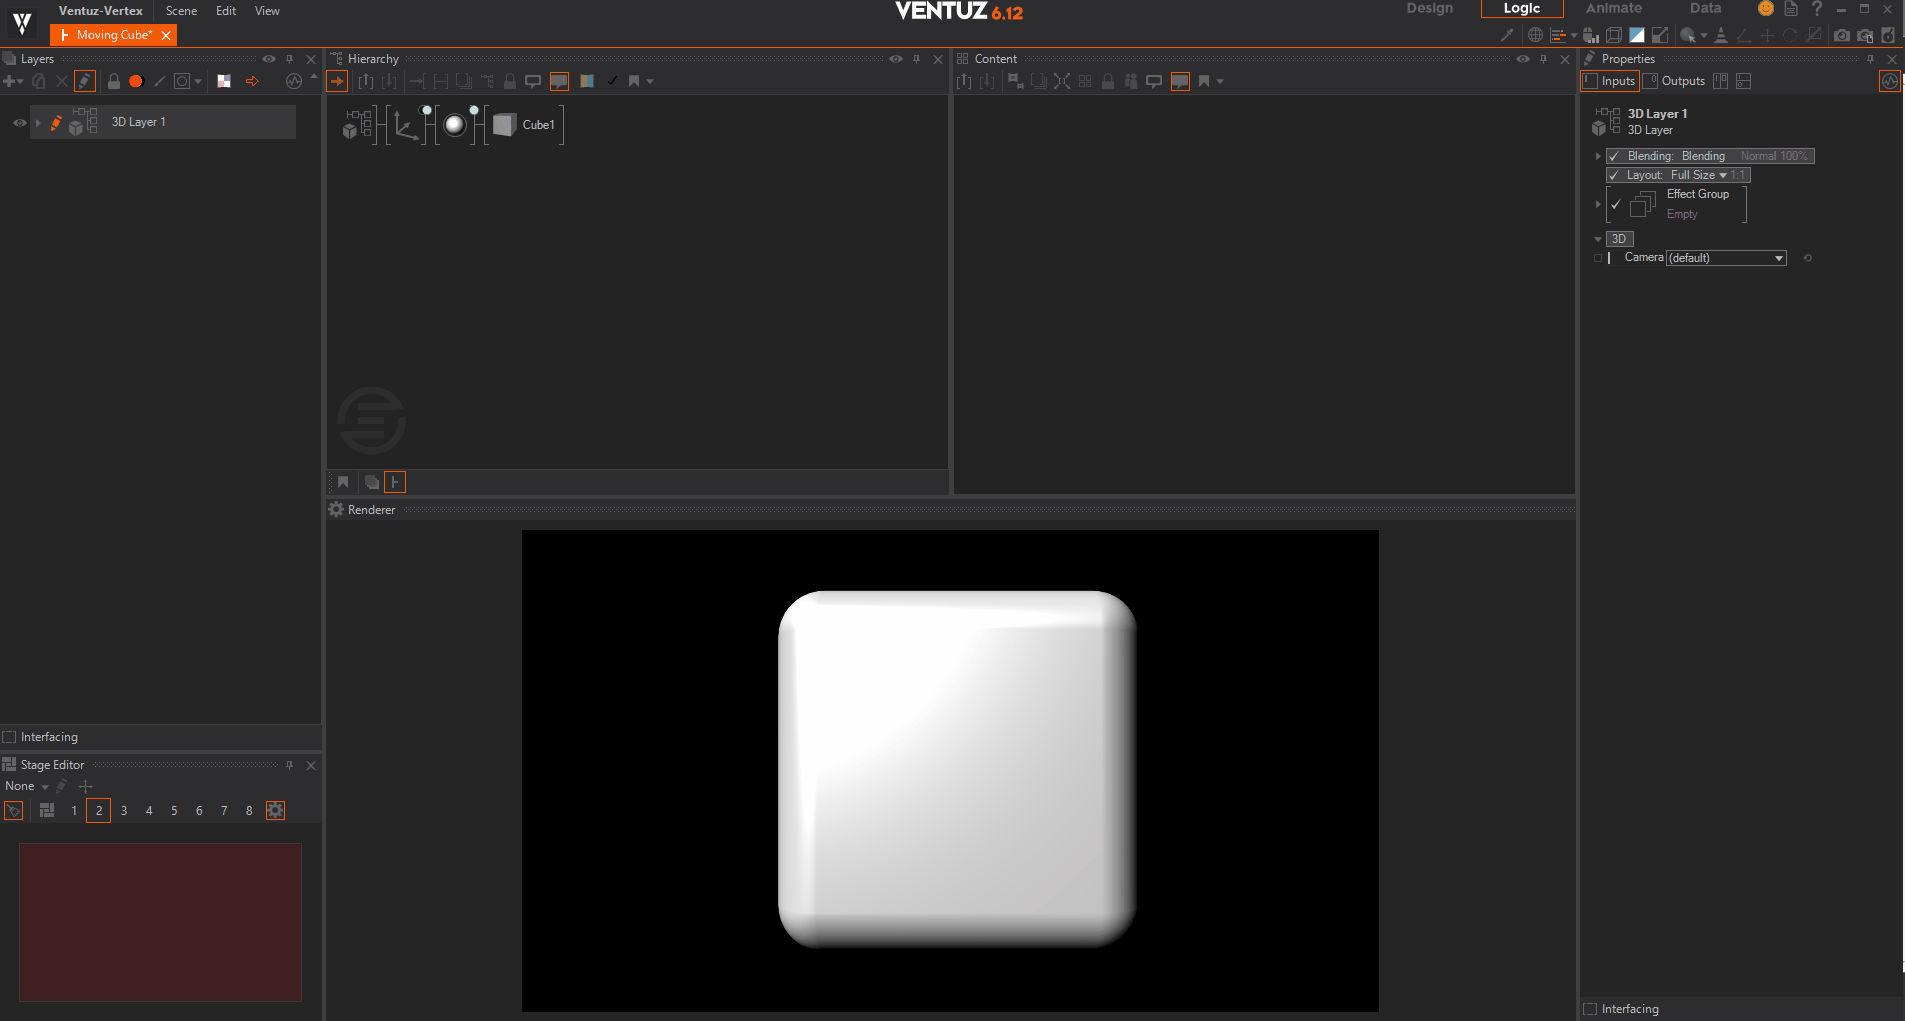
- Click Animate at the top right of Ventuz window. This will change the workspace to a setup better suited for working with the timeline and keyframes.
- With the Axis Node selected, Drag the X Rotation and put it into the timeline area.
- Add a keyframe by Click the Orange + button. Or Insert.
- Move down the timeline and add another keyframe.
- Change the value of the X Rotation parameter to 360.
Note - The length of the container in Vertex is determined by the length of the timeline (or space between keyframes) in Ventuz. A 2 second timeline in Ventuz means a 2 second container in Vertex.
- Save the Scene.
In this example, Moving Cube is the name of the scene used.
Notes:
- Changing the duration container in Vertex will change the duration of the Ventuz Scene - making the container longer will cause the animation in the Scene to move slower.
- Because Ventuz is not creating pre-rendered frames, making the movement slower does not make it 'choppy' or 'stutter' - it will remain smooth.
- A Scene without any keyframes on the Main Animation Timeline will work in Vertex, however Vertex will only load and loop Scene.
- Changing the duration of this kind of Scene's container in Vertex will not change the speed of the Ventuz Scene.
Expose Parameters to Vertex
One of the many benefits of using Ventuz in any situation is Ventuz' ability to use internal or external data. Vertex can leverage this benefit when parameters have been exposed inside of Ventuz.
Ventuz can expose several kinds of data to Vertex including:
- Dropdown menu
- Integers, Doubles, Strings and Booleans
- Textures such as videos and images
- Colors
Cube Color
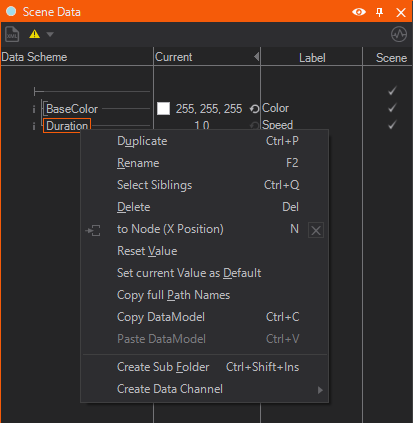
To start, the cube's color Node can be exposed to Vertex:
- In the top right corner of Ventuz, click the Data button. In this view, data sources can be more easily managed.
- click on the Color Node in the Hierarchy Tab.
- drag the Base Color parameter to the Scene Data Tab.
- Double the Base Color under the Label heading and rename it to Color.
The Cube's Color is now exposed in the Scene Data of this Scene and can be accessed from Vertex.
Cube Speed
Following the same workflow in the step above, this will expose a Double (a number variable with a decimal) to Vertex that will control the speed of the Cube's movement.
- Click on the Axis Node in the Hierarchy Tab.
- Click on the Mover Node in the Content Tab
- drag the Duration parameter to the Scene Data Tab and set its label.
Organize Exposed Parameters
Vertex organizes exposed parameters the same way it is laid out in the Scene Data tab.
Folders and parameters can be moved, grouped and renamed. These folders and parameters can be moved much the same way, by LMB drag Nodes are connected in the Hierarchy Tab.
Setting Parameter Default
In order for Vertex to know what values to load when using exposed parameters, defaults to these values must be set in Ventuz.
- In the Scene Data Tab set the values as desired.
- Hover over the name of the value to set the default for and long on this name.
- Select Set current Value as Default
- Repeat for each exposed value.
Setting the default will enable the "Reset Parameter" features to be used in Vertex.
Generating Thumbnail
At the top of the Scene Data View, a yellow triangle can be seen. click brings up the message that there are Thumbnails missing. Creating a Thumbnail for a Ventuz Scene is a nice to have as it is shown in Vertex but is not nessesary. It makes it easier to identify the correct scene.
After clicking on the icon, click on the Create Thumbnail option in the Properties Window. Ventuz will take a snapshot of what is currently shown in the Renderer window.

VIO Setup
VIO is the method that Ventuz and Vertex use to exchange textures and frames.
Each VIO Output that is added will allow for one "stream" of the Ventuz Runtime to run inside of Vertex. A minimum of two VIO Outputs must be added to enable Ventuz inside of Vertex. If two Outputs are added, only two Scenes can play at a time inside of Vertex. If four are added, four can play at the same time and so on until the machine's performance cannot keep up.
To begin setting up VIO:
- Open the Ventuz Configuration Editor.
- In the left navigation pane, Click on Configuration. This will open the Ventuz Configuration screen.
- In the top bar, click Device.
- In the "Create Configuration" window, type in a name such as VertexVentuz or something similar and click + Create.
- The newly created configuration will automatically open.
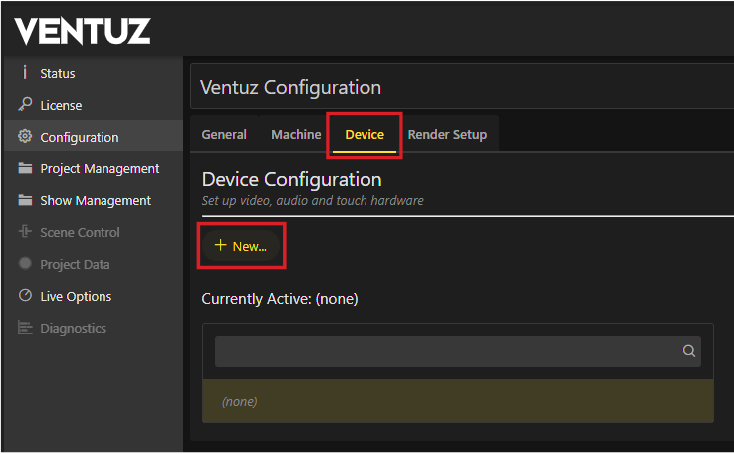
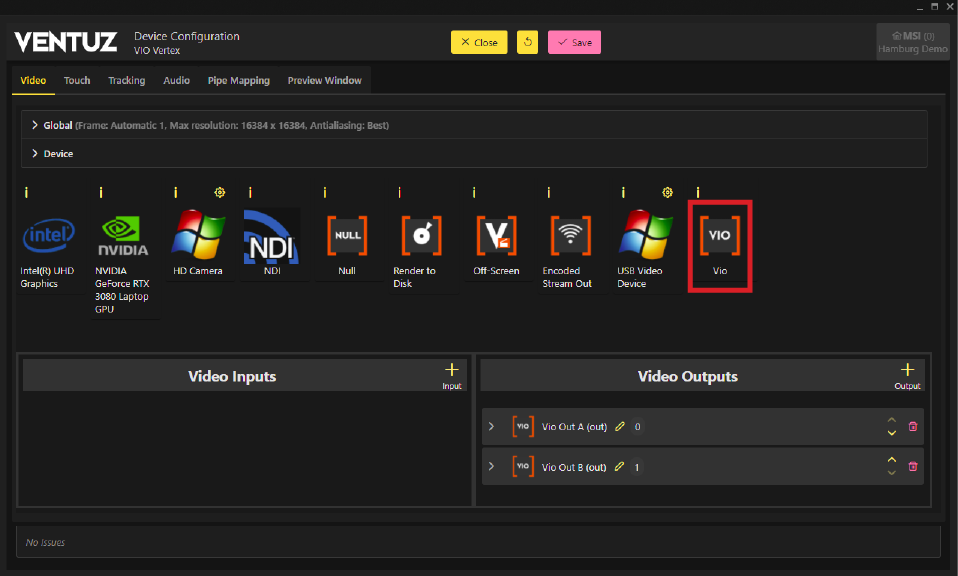
- Drag the VIO option to the Video Outputs area at least two times.
- Do this as many times as needed to have multiple streams as mentioned above.
Next, you will need to add a Pipe. A Render Pipe can be seen as another instance of the engine within the Runtime. Each Pipe can hold one Scene, which is important for both displaying multiple Scenes at the same time, pre-loading Scenes before they need to play, and for enabling smooth transitions between Scenes. Read more about Render Pipes here.
- Click on Pipe Mapping in the top bar.
- Click "Add Pipe" two times to add the minimum number of required Pipes.
- Add additional pipes as needed.
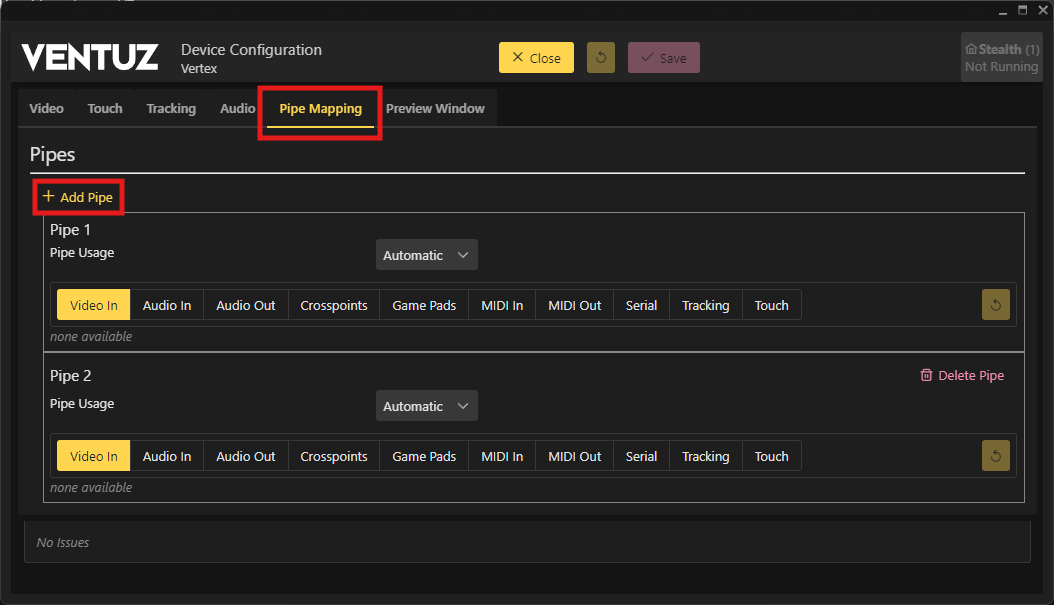
- click Save and Close the Device Configuration Window with the Close button.
- A window will ask if the new configuration should be activated. click Yes, Activate to continue.
Close the Configuration Editor.
Refer to the user manual for more information on the Configuration Editor.
Vertex Setup
Please reference the Vertex User Manual if needed.
Import Ventuz Project Files
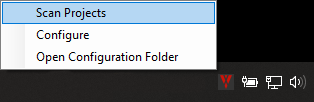
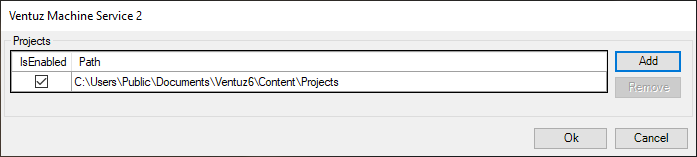
By default, the Ventuz save location is seen and will be scanned by Ventuz Runtime; this is necessary to enable Vertex to load Ventuz Projects and Scenes.
If the project was saved in the default Ventuz folder C:\Users\Public\Documents\Ventuz6\Content\Projects follow these steps:
- In the Windows System Tray, Click on the red Ventuz Logo.
- Click Scan Projects
If the project and scenes were not saved in a the default location:
- In the Windows System Tray, Click on the Ventuz Runtime Logo
- Click Configure
- Click Add
- Navigate to the custom save location.
- Add the parent folder to the project folder, not the project folder itself
- Click Ok to add the folder
- Click Ok to close the configuration window
- In the Windows System Tray, Click on the red Ventuz Logo.
- Click Scan Projects
Updates and additions to Projects that have been scanned do not require another scan. The same is true for adding Scenes to this project.
Open Ventuz Scenes in Vertex
- Open Vertex
- Start a new project.
- The default settings in Vertex are sufficient.
- The project's save location does not matter for this integration.
- VertexVentuz Is used in this example.
- Import the Ventuz Project
- Open the File Import Window, either push CTRL + I. Or in the top menu bar, Click CREATE -> Content -> Add File...
- Navigate to the Ventuz project folder, named VentuzVertex, select and open the project file.
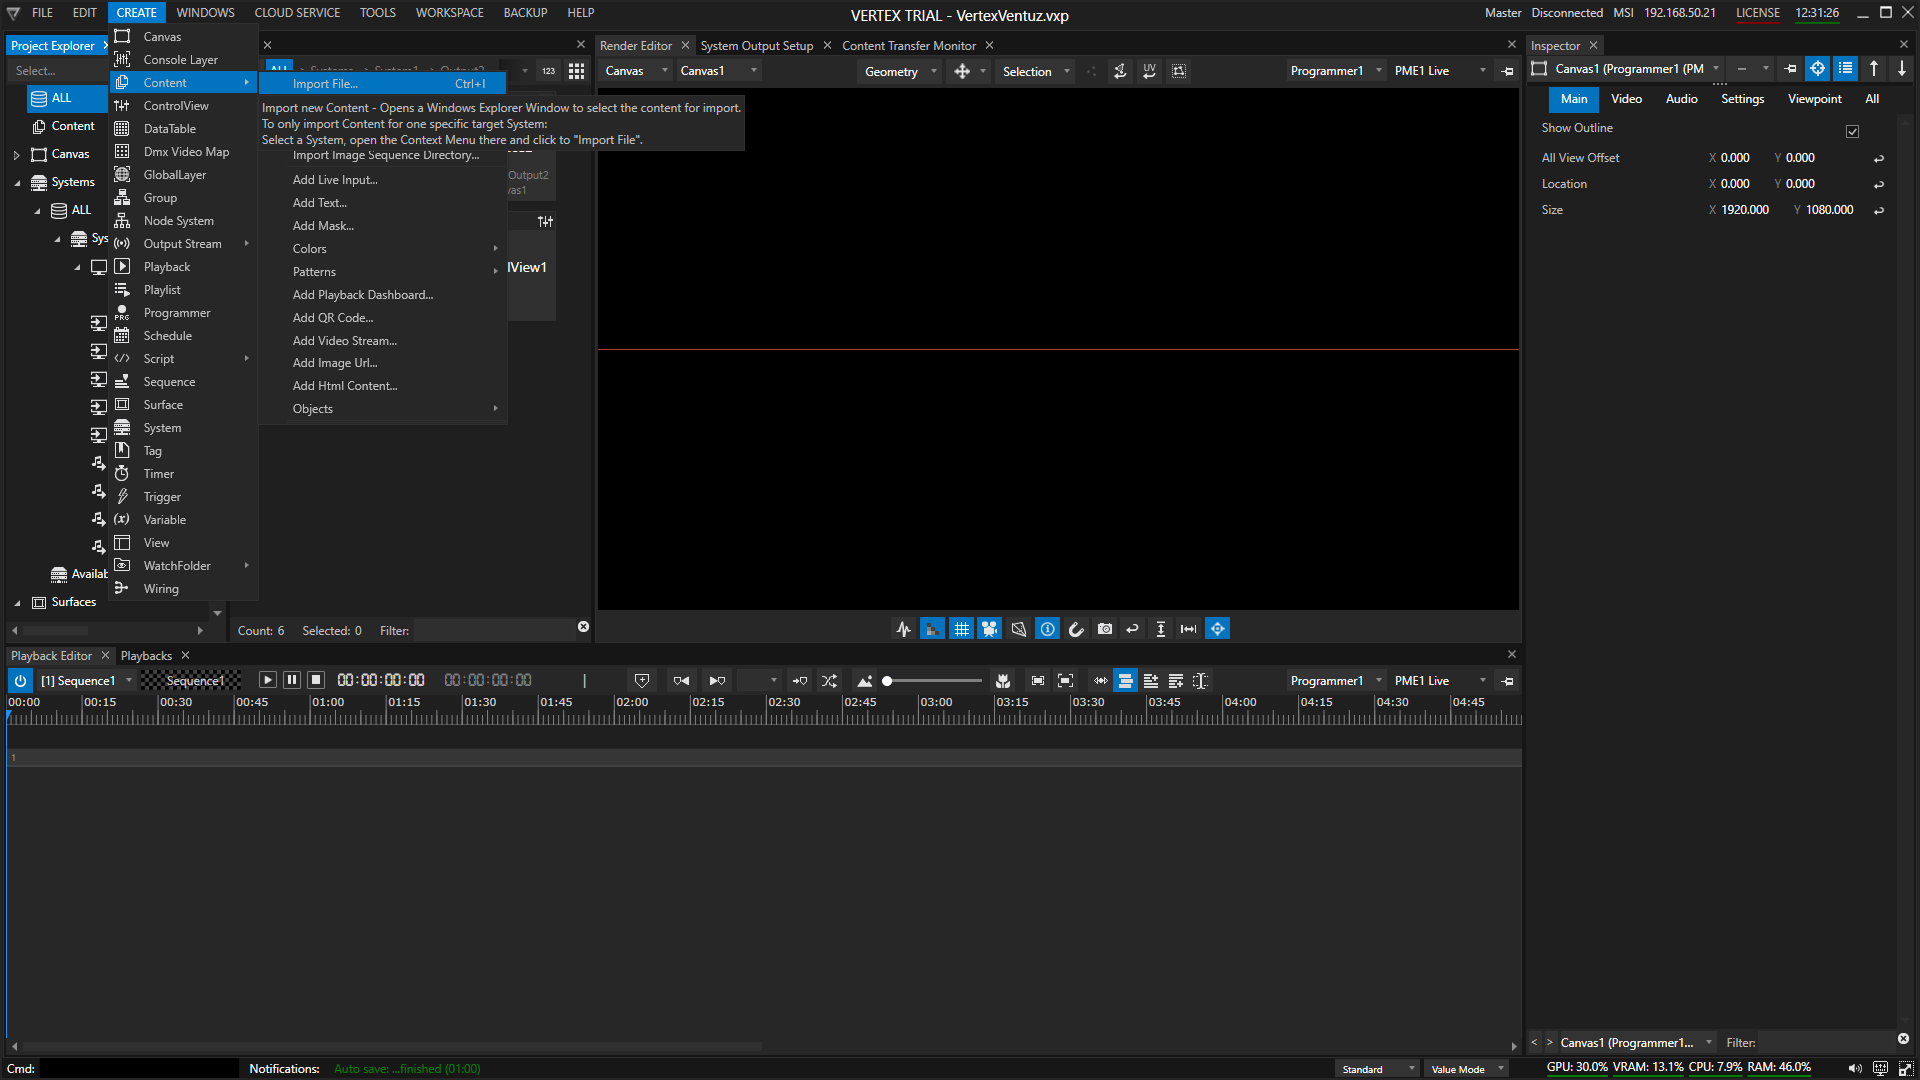
The VentuzVertex Ventuz project is loaded into Vertex inside of the Project Explorer.
Double on the Ventuz Project icon and the Scene(s) in that project will be shown.
Drag the scene to the timeline at the bottom of the Vertex window and move the play-head into this new container by clicking on the top of the timeline.
In the background, Vertex instructs Ventuz to start the Ventuz Runtime and load this project and scene. This may take up to 1 minute. This delay will only happen the first time a scene is loaded. When loading other scenes from this project as Runtime is already loaded, the delay will not take place.
When scrubing, or dragging the playhead, through this new container, the cube will rotate on its X-Axis following the keyframes in Ventuz.
Controlling Parameters in Vertex
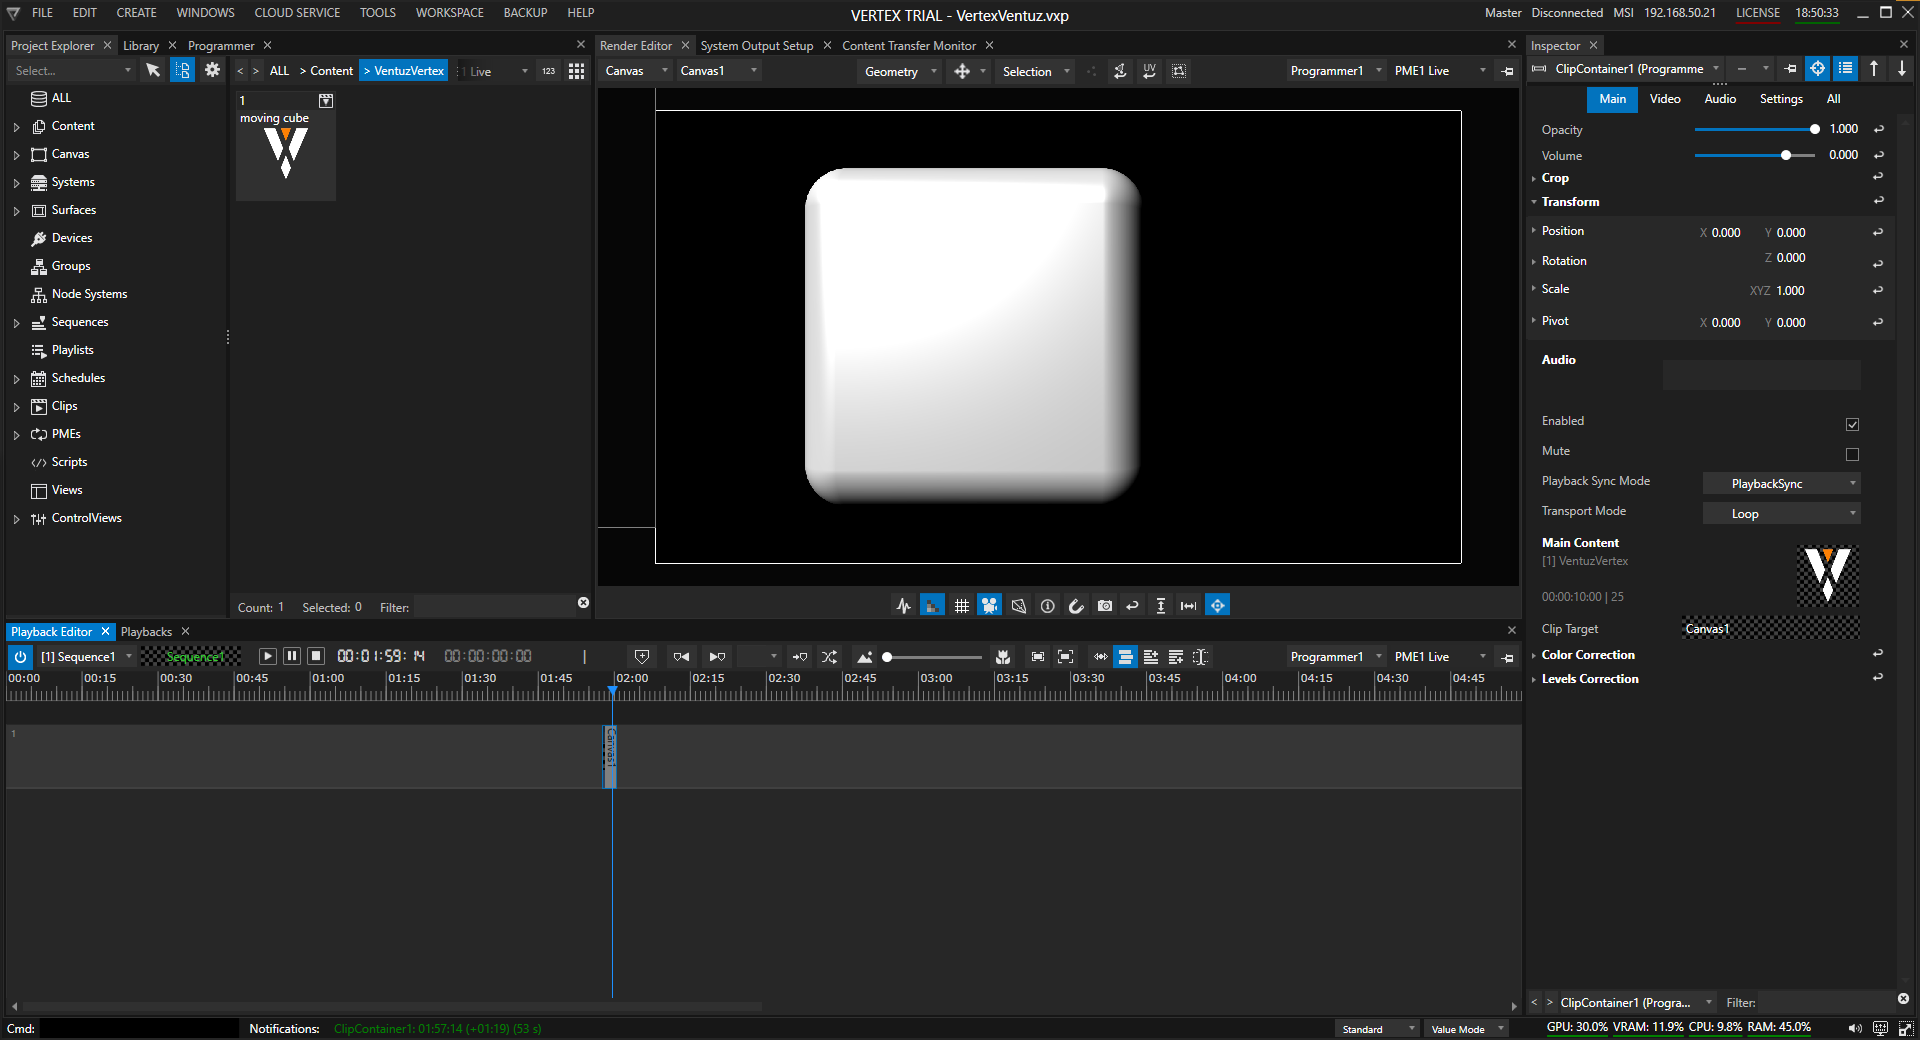
- Add the Scene to the timeline. Use the + button to zoom in.
- Hover over the edge of the container to extend it if needed.
- changing the length of the container will speed up or slow down the time between keyfrmes. Any nodes such as movers or particle movement will not be affected by adjusting the length of the container in Vertex.
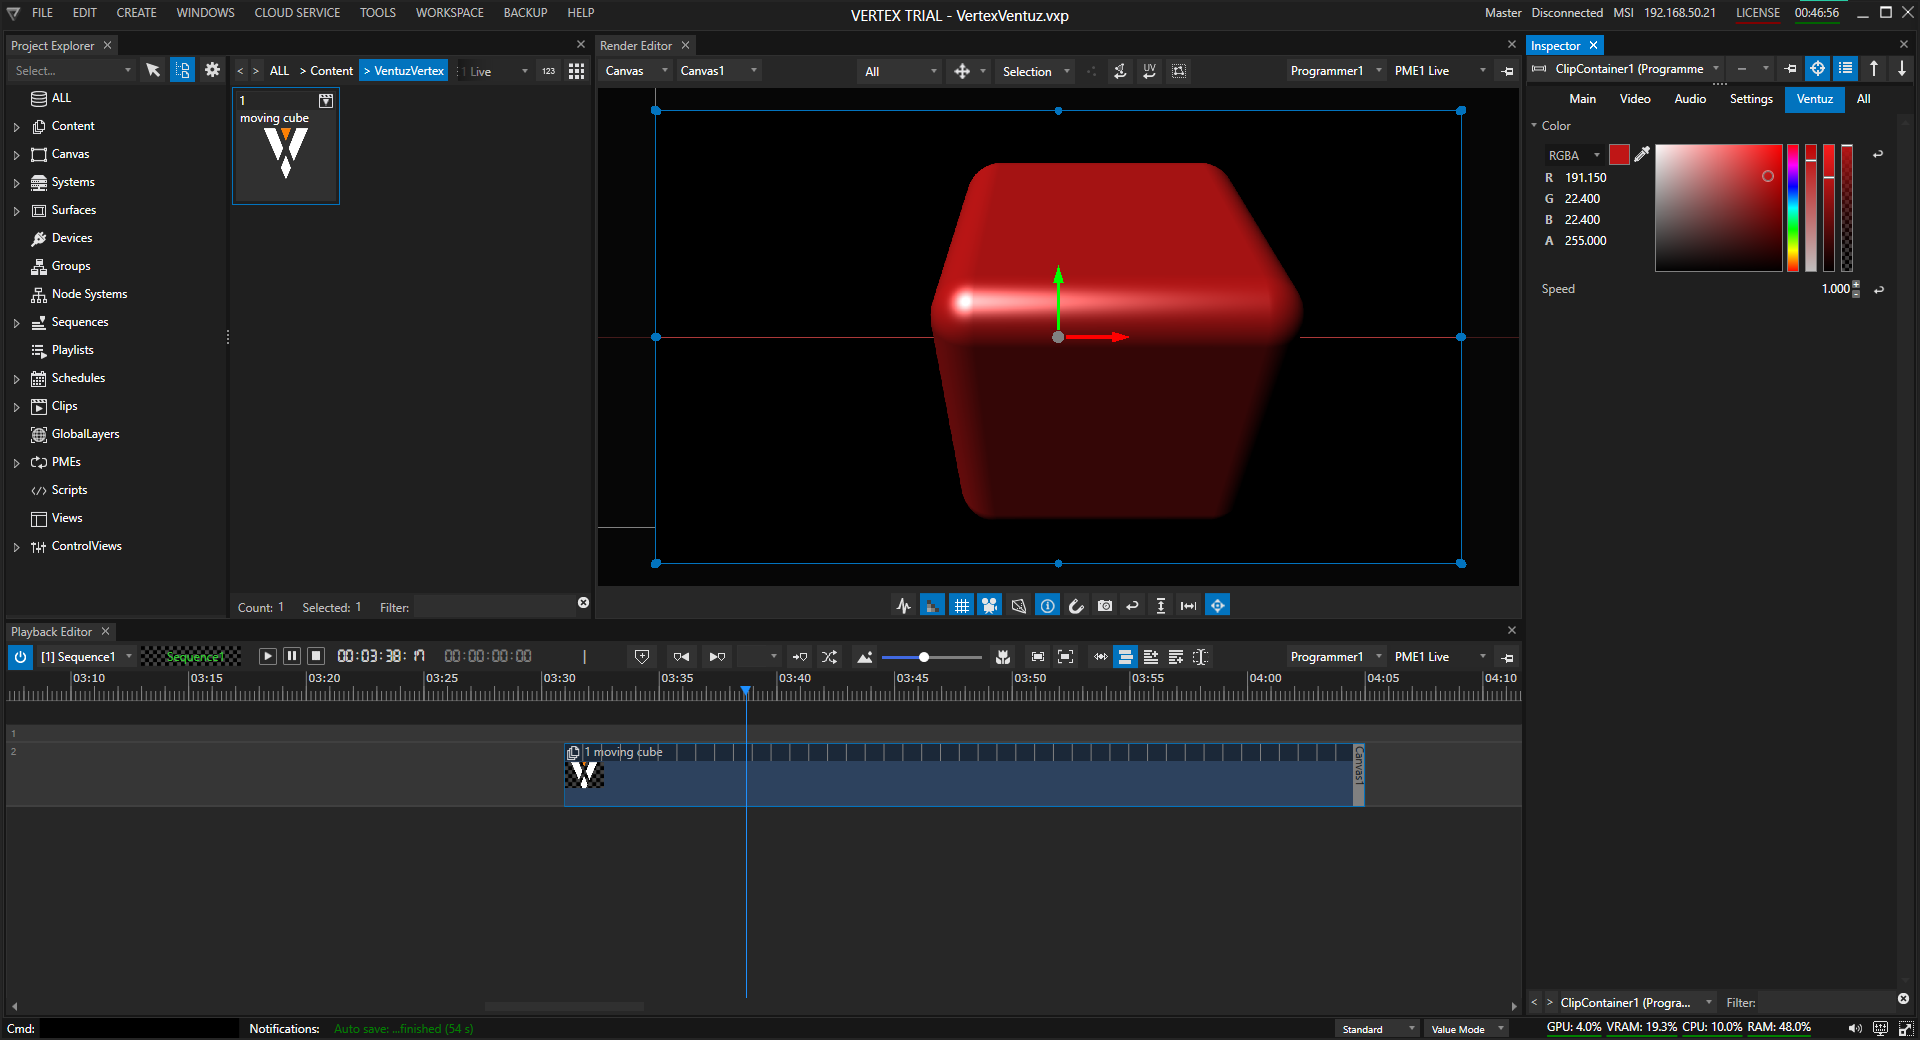
- click on the Moving Cube in the timeline.
- In the Inspector click on Ventuz.
- Here, the Color and Speed values that were exposed in Ventuz can be adjusted.
- These adjustments are being made real-time to the Scene in the Ventuz Runtime Engine; it's the same as changing the values inside of Ventuz manually.
- Refer to the Vertex User Manual to store these values as keyframes on the Vertex timeline.
Modifying a Scene in Ventuz Designer
When Vertex loads the Ventuz Project and all of its contained scenes it creates its own version of the Ventuz Project as a cached file. In order to see changes made to the Scene in Ventuz Designer the Ventuz Project must be removed and re-added in Vertex.
Click on the Ventuz Project in Vertex and select Delete or Click the Ventuz Project and press Delete.
The Ventuz Project can be re-added to Vertex following Step 4 here Open Ventuz Scenes in Vertex.
If the Scene(s) are not modified in Ventuz Designer, this step does not need to be done. Changing exposed parameters in Vertex are updated live and do not need a Project/Scene reload.
When removing and re-adding a Ventuz Project, all containers placed on the timeline will remove the Ventuz Scene from them.
The containers and keyframes remain.
Conclusion
With these steps, many scenes can be created; for example:
- Backgrounds that can be customized using particle systems that will play seamlessly for any amount of time and always be unique (No loop-point!)
- Name and title plates to introduce speakers or award winners
- Take names from an Excel file and don't worry about spelling or having to render unique videos for every plate needed.
- Interactive content - have the audience participate in making the experience unique using sensors, polling, web pages, buttons and more.
- Wipes and transitions between videos or other assets.
The possibilities are virtually endless. Bring the flexibility of Ventuz and power of Vertex together to create a perfect presentation.