How To Configure Audio in Ventuz
Table of Contents
Ventuz has the capability to make use of Audio in flexible ways. On this page you will learn how you can route audio with the use of the Ventuz Configuration Editor .
Introduction
You can use audio inputs and outputs and audio which is generated by Ventuz from movies or sound files. Ventuz virtualizes each hardware device that you connect to your machine. So in order to play things out you need to route the virtual channels to physical hardware. While you have a default routing to your audio devices you can easily define the exact routing more precisely. You can decide what should happen with the inputs - this will be useful for more complex setups, e.g. when Ventuz should visualize its audio output using the Analyze Audio Node.
In Ventuz this audio routing is designed to have an abstraction layer between the design and production of a Ventuz Presentation. A Ventuz artist does not need to know the hardware configuration on a production machine, but instead just selects one of several virtual ordinals. On the production machine these virtual ordinals are then connected to physical hardware devices.
General Audio
To make use of custom audio routing you need to configure your inputs and outputs in the Ventuz Configuration Editor by creating a new configuration inside the Device Configuration.
When you open the audio tab in the Device Configuration you can see that available audio inputs and outputs are not visible because Ventuz is using the default in and outputs, which are the ones configured inside your operating system. It is possible to add specific in and outputs by using the + buttons, but you will need to route them to the virtual Ventuz Ordinals. For this they will be available in the next tab for creating crosspoints.
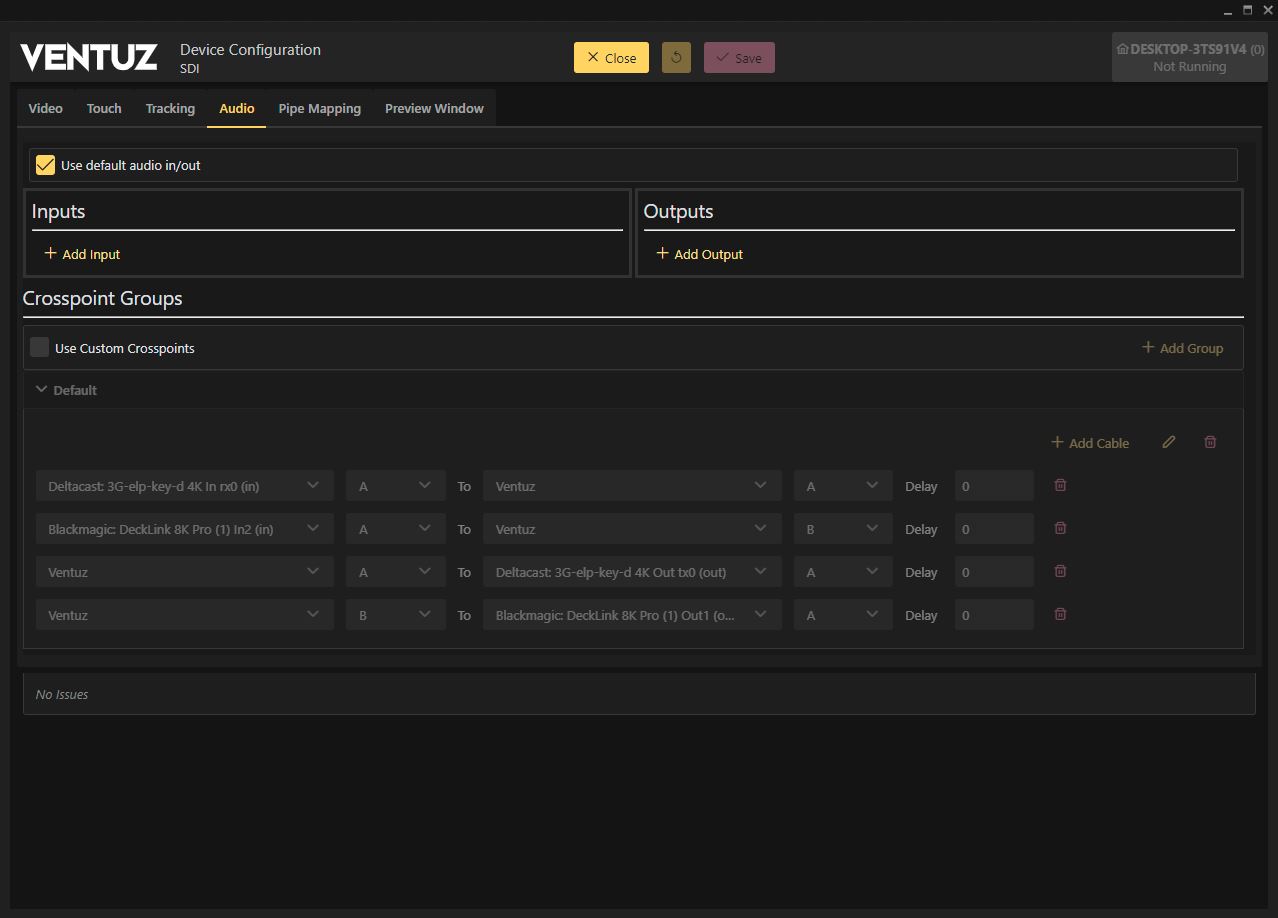
In the Audio tab of the Device Configuration you can define which Ventuz Ordinals should be mapped to which Hardware Channels. You can also map virtual output ordinals back to input ordinals so that Ventuz listens to one of its Audio outputs. Likewise you can directly map a physical audio input to another physical hardware output so that it bypasses Ventuz. Lastly it is also possible to map any physical device or virtual ordinal multiple times - e.g. you can bypass an audio input directly to an output and also map it to a Ventuz input ordinal to visualize its sounds in your presentation.
Visualize the Ventuz Audio Output
For this section we want to examine a special case of routing: We want to visualize the Ventuz Audio Output with the Analyze Audio Node.
If you want to analyze the audio of an Audioclip - e.g. a WAV file - or the audio from a Movieclip file you need to setup the Ventuz Audio Configuration accordingly. In this case you do not need to select an input or output device in the Audio section of the Device Config since no hardware device is involved in this process. This is only needed if you additionally want to output the audio. So you just need to reroute the sound of a Ventuz ordinal back to an input ordinal.
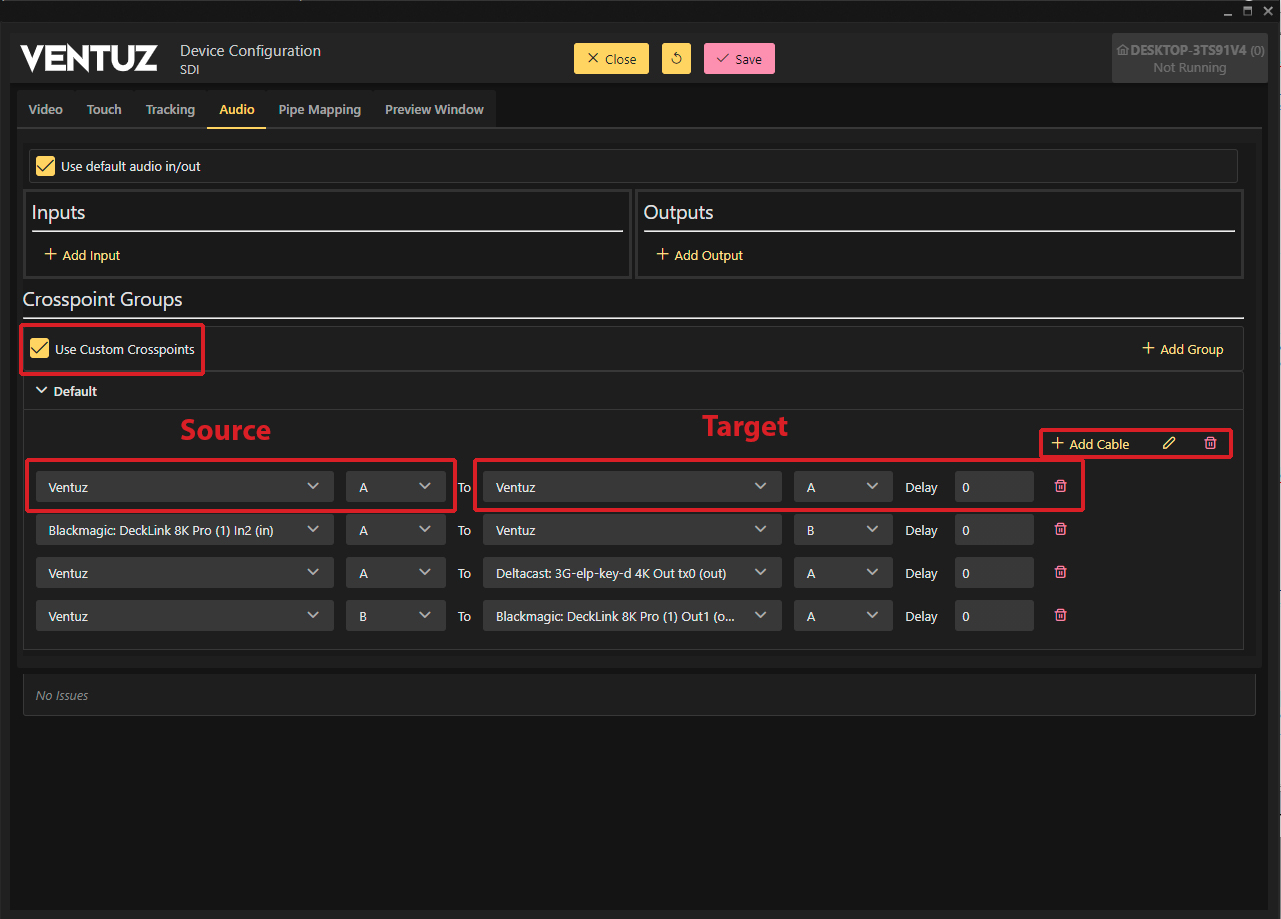
Now use the Cross Points section and enable the Use Custom Crosspoints checkbox to be able to manually adjust them.
Use the dropdown menu to select individual audio devices. For each device, on the left is the device's source and on the right is its destination. On the right hand you can assign where this source should be routed to. Click the drop down menu, select Ventuz and for the Ordinal select A as well. At first sight, this seems to create an infinite loop but since input and output ordinals are distinct items, we only route the Ventuz output from ordinal A to the Ventuz input on ordinal A, but not vice versa.
You have created a Ventuz to Ventuz routing right now. Since Ventuz creates a virtual Ventuz Device it is possible to playback audio from within Ventuz and reuse the audio signal internally then. This is the common way to use the Audio signal to be analyzed from Ventuz itself. If you plan to use the Analyze Audio Node to build up e.g. a VU-Meter or have something react to your audio, you would need to create this Virtual Device configuration. If you use a Movieclip the sound is routed internally and can be analyzed by Ventuz. The output of the Analyze Audio Node can now be used for a Particle System as well. You can have particles react to the Audio - like changing their Size and/or Color, Position, Orientation and so on, just to give you an idea what you could do with this kind of routing of the audio. Use the delay function to sync match when needed the value is in milliseconds.
For more Detailed information about Audio settings see here.
External Audio Routing
Since you can have multiple audio devices attached to your workstation or server, like audiocards, SDI boards, Head Mounted Display like the HTC-VIVE, you can route them as described above as well. This can be done in the Audio tab of the Device Configuration. The first thing is to click the + and add inputs.
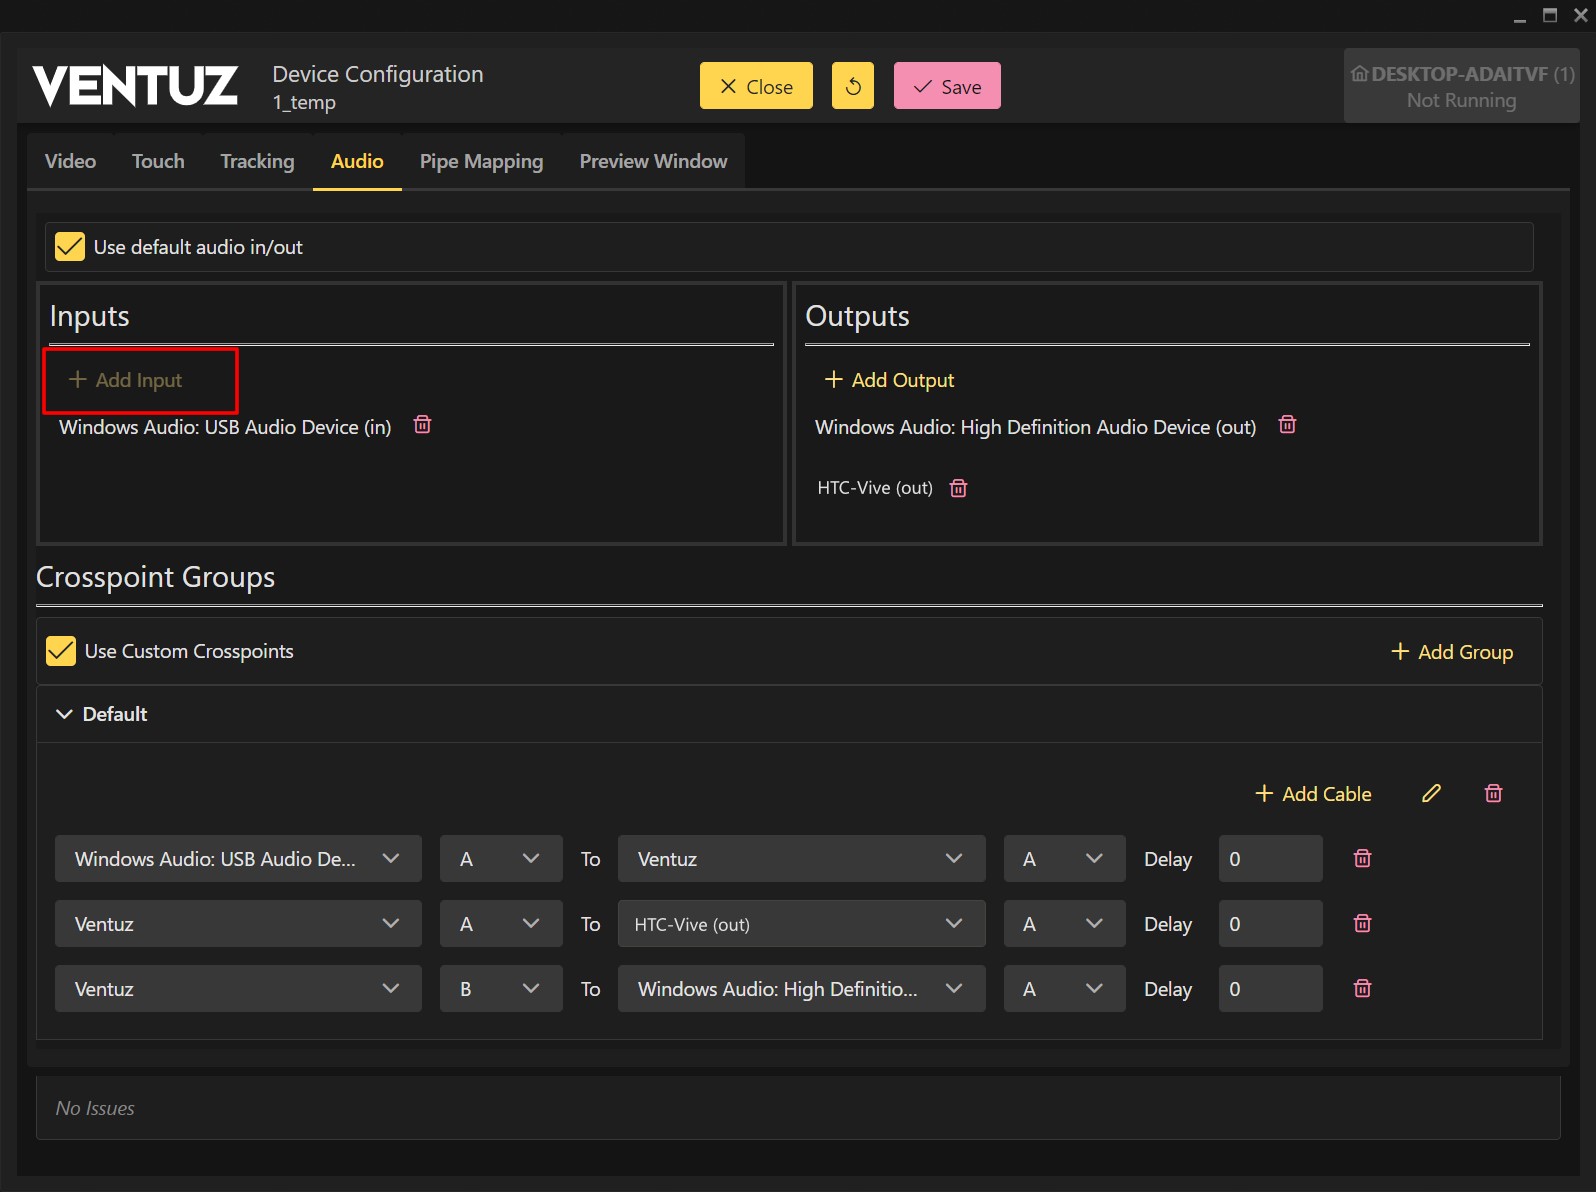
Inside the Crosspoints section enable the Use custom crosspoints flag. Without that Ventuz is using the default routes. These routes are:
| Source | Ordinal | Target | Ordinal | |
| Soundcard Input | A | to | Ventuz | A |
| Ventuz | A | to | Output HTC VIVE | A |
| Ventuz | B | to | Output Soundcard | A |
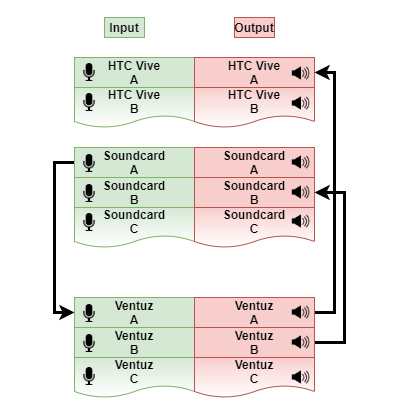
Why do we have different Ordinals like A and B in this case? Ordinals can be seen as Stereo Pairs - like channel 1&2 or R and L. You have Ordinal A-H which makes a total of 8 audio pairs available. Since Ventuz has automatically assigned all inputs and outputs, Ventuz assumed you would like to have all these sources separately. A Ventuz Artist can now decide on which physical output to playback from a Node by selecting either Ordinal A or B in the Ventuz Designer. So in this example above you could select from within the Ventuz Designer to have the Ventuz sounds to be routed EITHER from Ventuz to the Vive by using Ordinal A or from Ventuz to the Soundcard using Ordinal B. Still, the Artist does not need to care about which exact hardware this will play out to, they only care about that these are different physical outputs - thus assigning the different ordinals. To learn more about the Ordinals check the User Manual Crosspoints section.
As you can imagine you can go for a very complex routing in the Cross Points tab and make it possible to have Ventuz use specific routes wich you created with the virtual cables and selected the route by chosing the respective ordinal from within the Ventuz Designer.
Conclusion
Ventuz is very flexible when it comes to the audio device selection and their routing/cabling possibilities. As you have seen the routing works like a connection matrix or a common audio patch bay from audio and recording studios. You can also route different movies or SDI sources to different audio hardware or even channels. This option enables any artist working in the Ventuz Designer to select that sounds are played back on different devices but do not need to care about which hardware will be available on the production machine.