How To Troubleshoot Your Presentations
Table of Contents
This How To will teach you the different ways of using the Live Options to debug your scene while it is running .
Introduction
You will learn what you can do if you encounter problems while running the presentation. Like general performance issues or Audio problems.
This is what we are going to cover in this how to:
- General introduction
- Audio troubleshooting
- Video options
- SDI troubleshooting
- Switching render setups live
While running a show in the Runtime, you can access the Live Options via the Live Options either by the Configuration Editor application or by the Web Browser. The Live Options button will be grayed out if no show or scene is running. When pressing it you will be greeted with many options that can be turned on and off, for a detailed description of these options have a look here.
Another way to access the Live Options is via Remoting and will be covered later in this page.
In the next section we will take a look at some use cases.
Audio troubleshooting
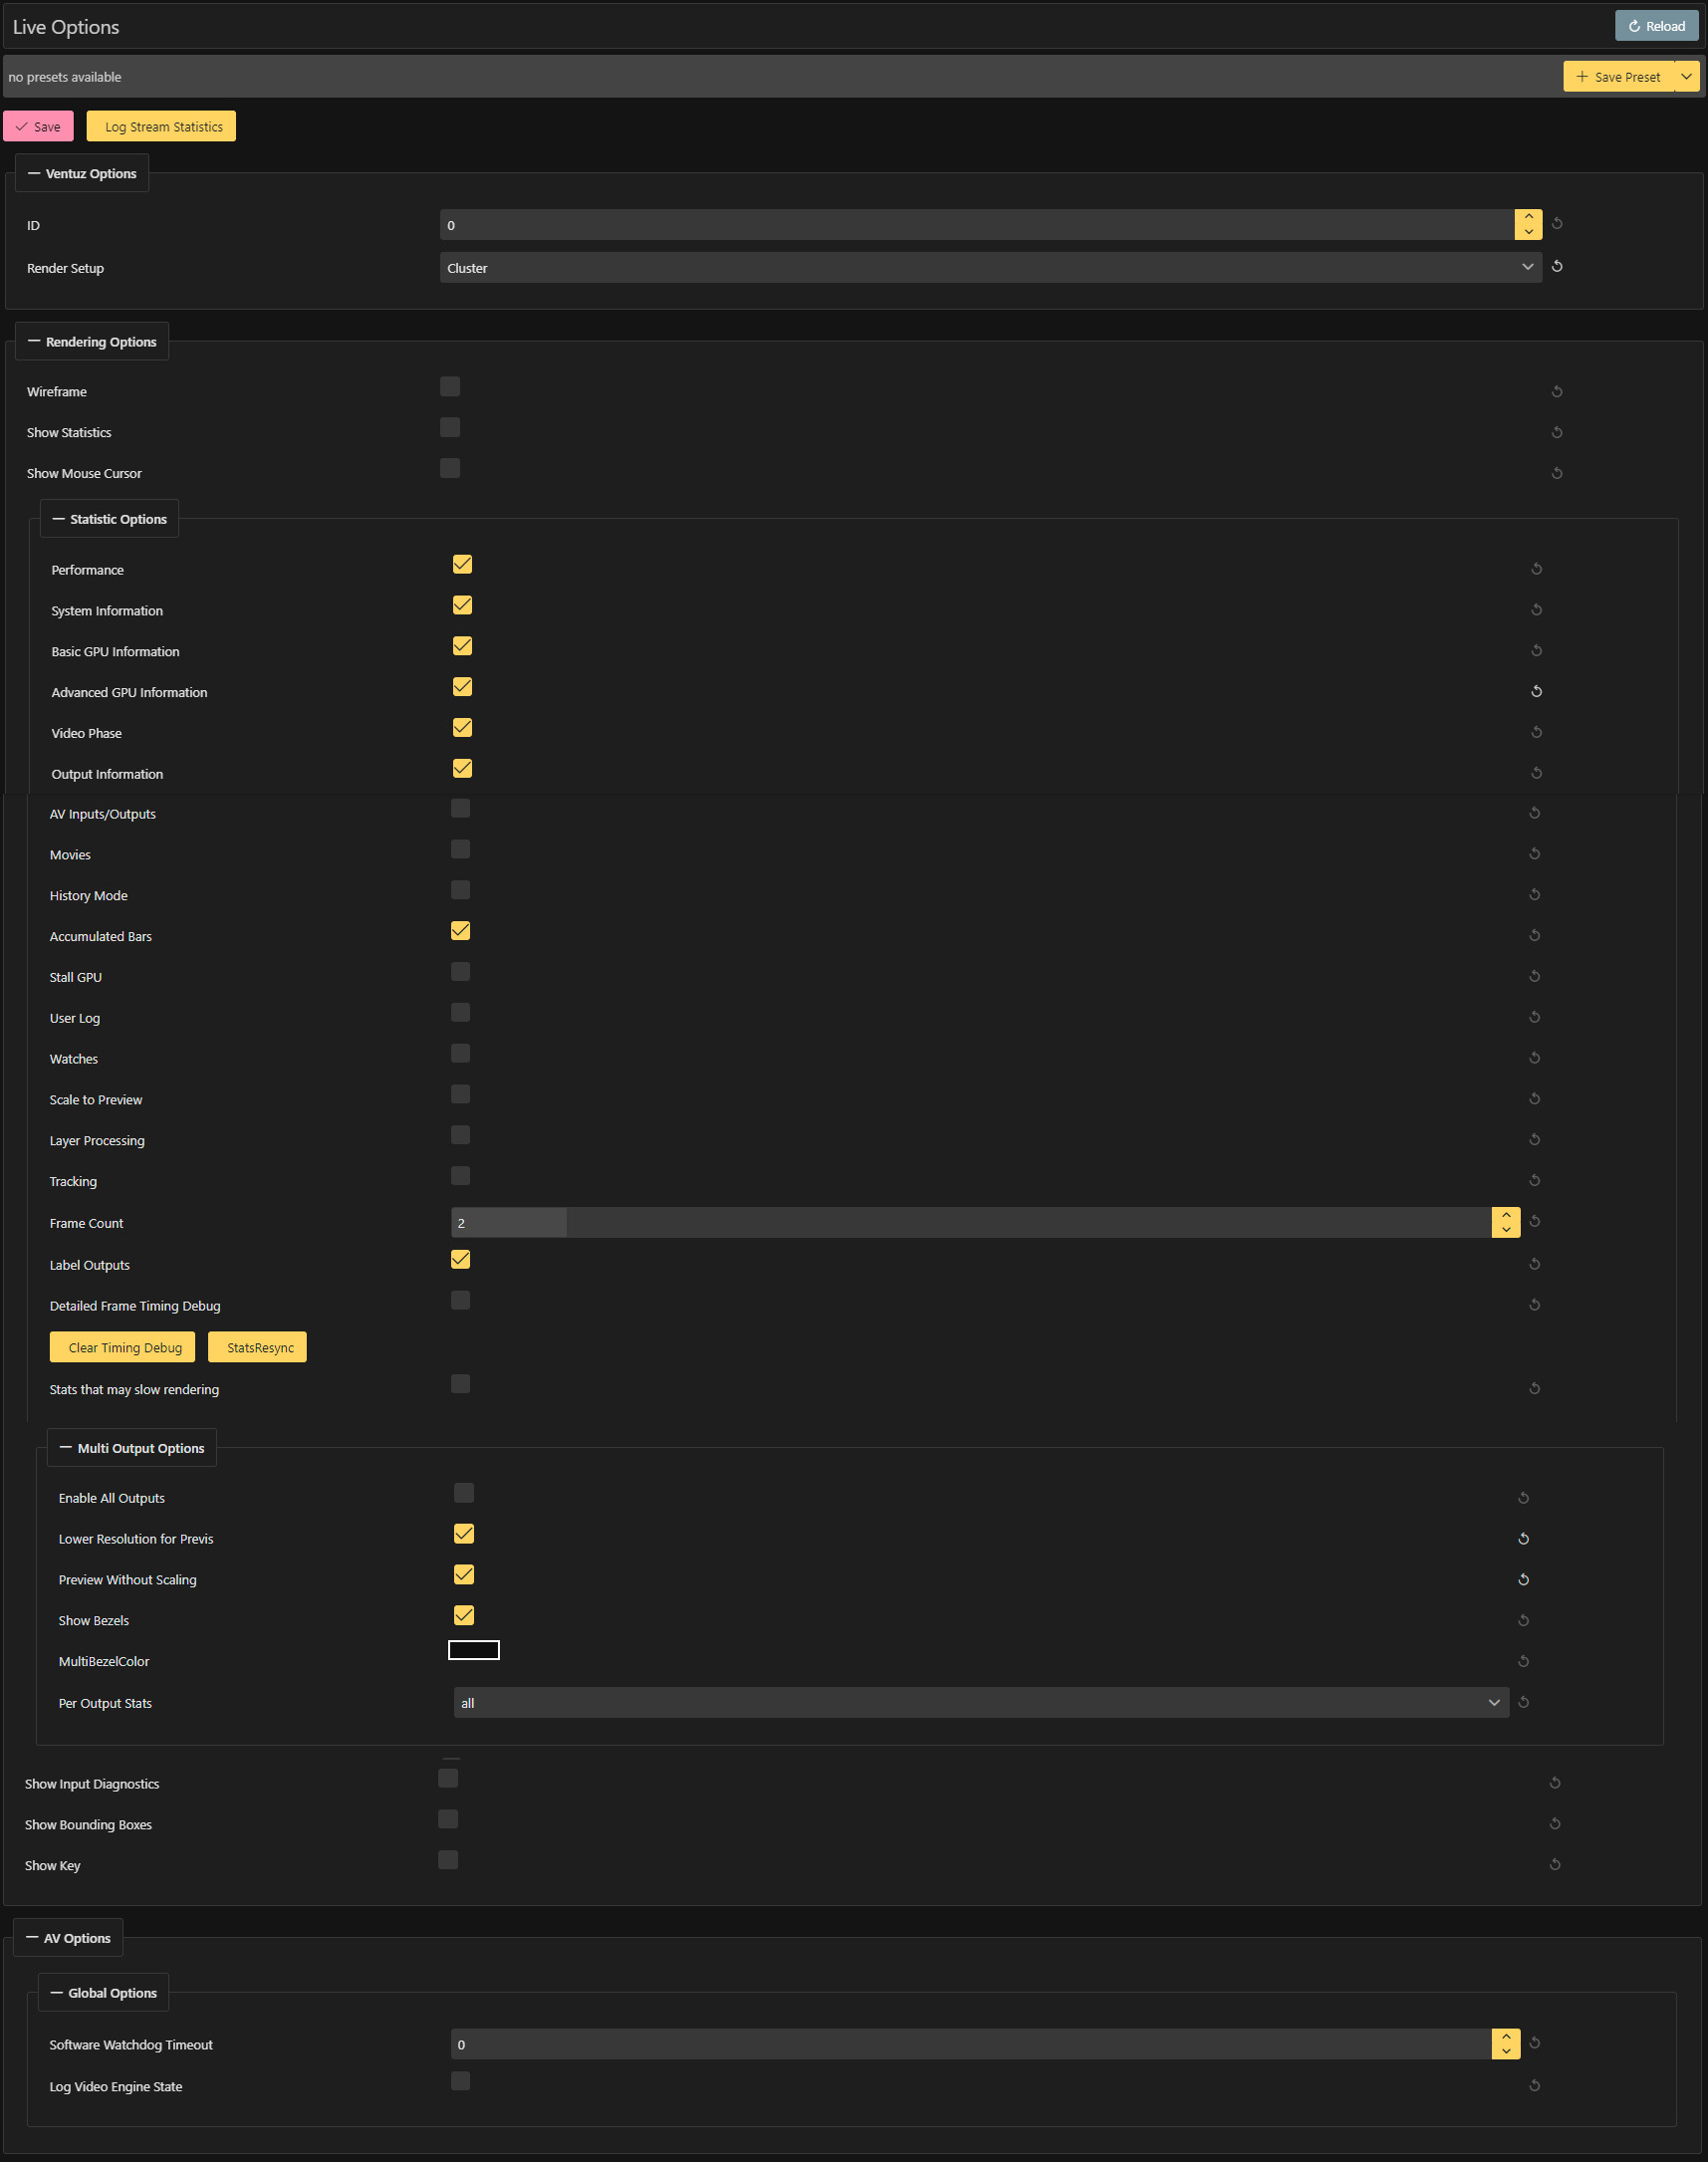
If you scroll down a little bit in the Live Options you will find options for controlling each of your configured audio devices.
Generally speaking, all audio devices needed for a presentation are setup in the Device Configuration before its start. Switching to non-configured devices is possible during a show but can impact the rendering.There are some properties that can be changed on the fly, like the audio gain. Which controls the volume.
To see the Audio gains while working in the Designer, Enable Physical Outputs needs to be activated to be able to see these options!
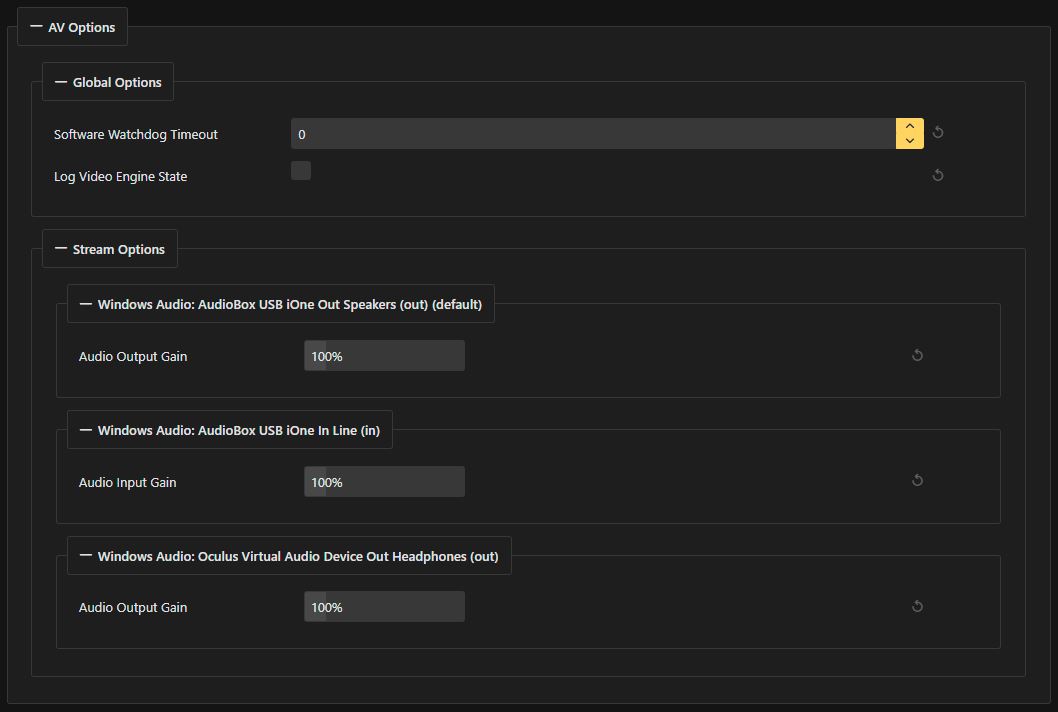
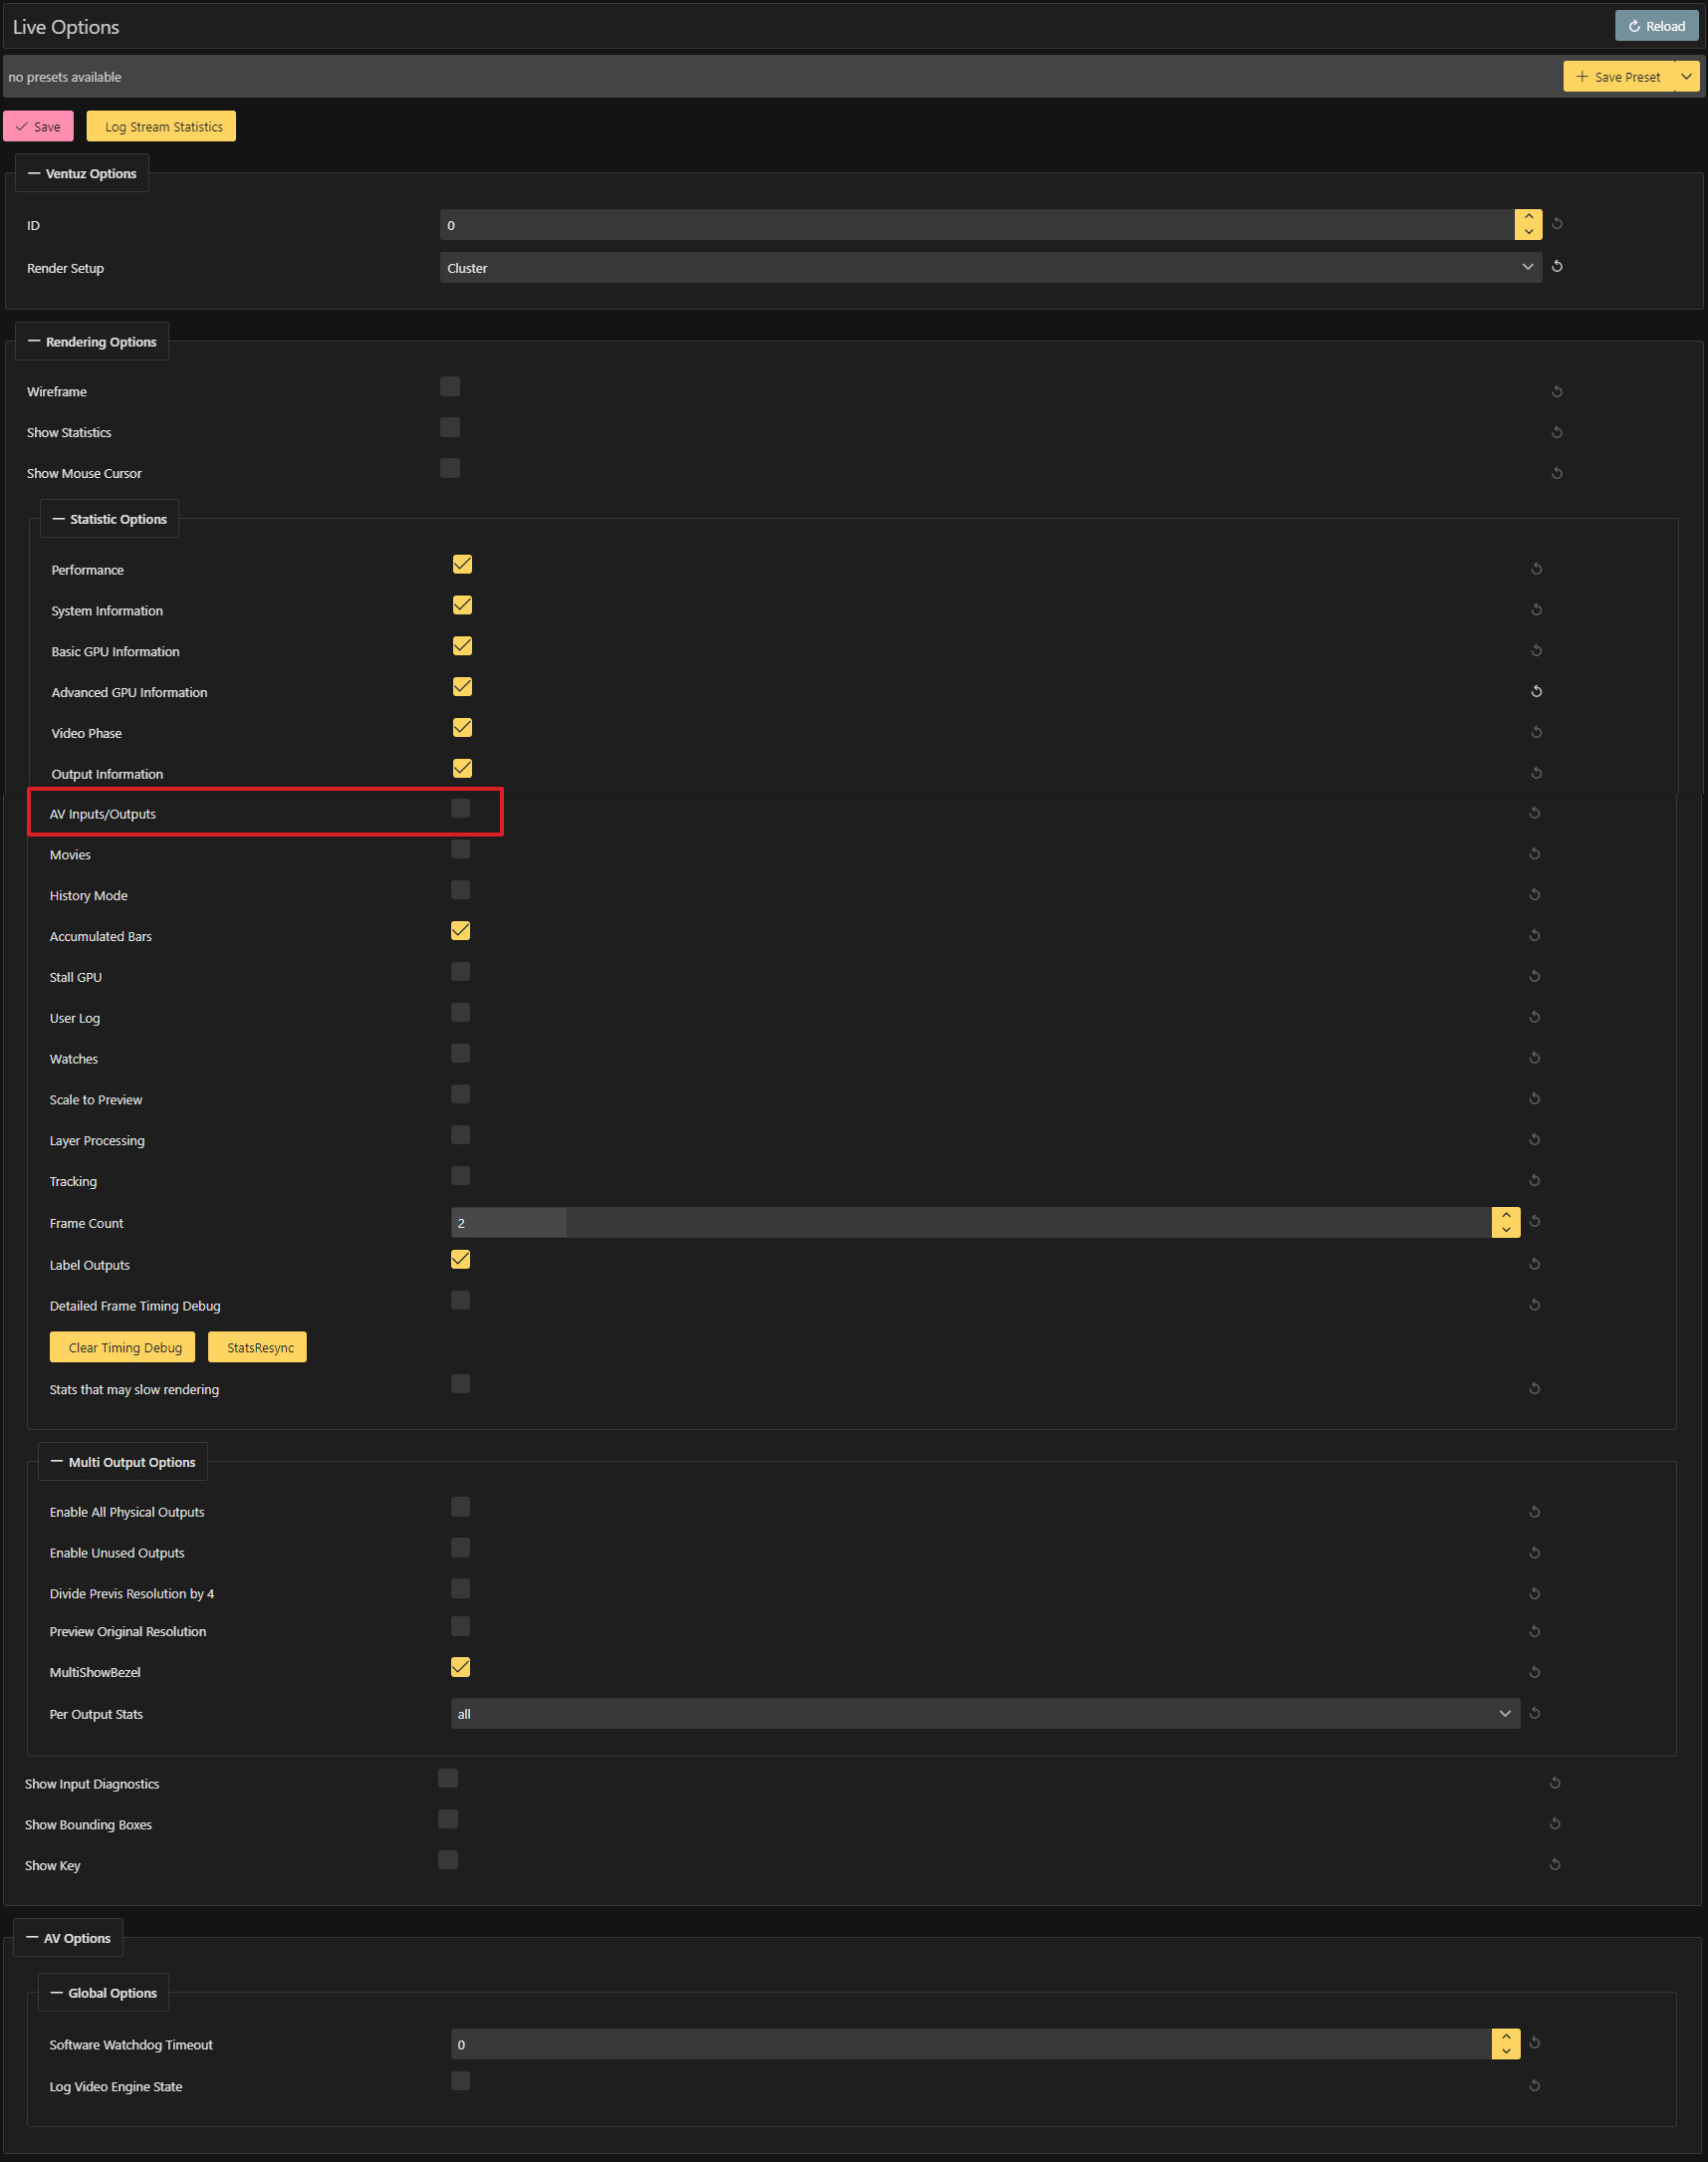
In the Performance Statistics section of the Live Options further up the list, you can find the Show Statistics and AVInput/Output Statistics flags. By activating both you get a overview of the connected devices and its status on the output of your running presentation.
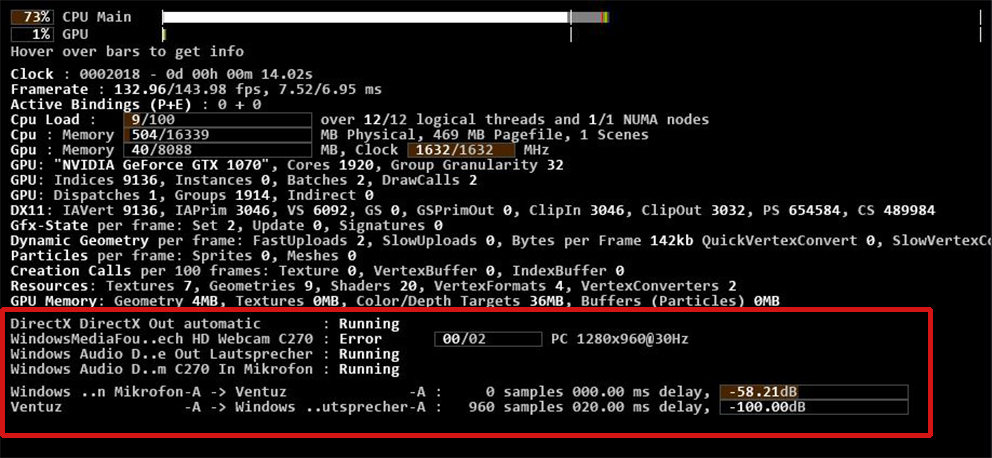
Here you might find indicator on what might be wrong with your Audio - like devices that are not running or a that they are connected to the wrong ordinal. What these different states of the audio mean can be found here.
Video Options
While most options of your stream must be set before starting the Ventuz Runtime, there are some options that can be changed on the fly to make their tweaking a lot easier.
Multisampling:
- Select the desired multisampling quality. Only affects the edges of geometries. It does not affect the quality of textures, texture based text or live video textures. Best (default): Selects the highest available level of multisampling quality depending on the output device. Medium: Selects the mid range (Best/2) of available quality levels. Low: Selects low quality level. None: Disables Antialising
Use the boarder color to see unused render space.
The Effect Bleed option in the makes it easier to adjust Post Processing Effects like the Blur in a Machine Cluster for video walls. Effect Bleed adds an extra margin around the rendered content. The value is the amount of pixels added to all four sides. It will not extend the visible/physical output, but will allow layer effects to create better results close to the machine borders in a Cluster Setup.
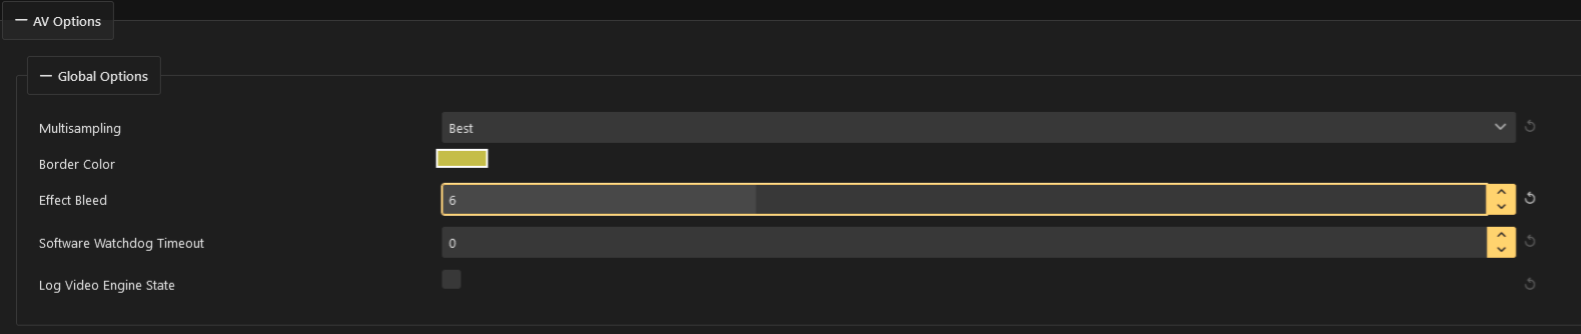
Log Video Engine State:
- Dumps the current status of the rendering engine into the log when the checkbox is set.
It is also possible to change the Render Setup on the fly to better test your presentation. The drop-down menu can be found on the top of the Live Options.

For a more detailed description of the other options take a look here.
SDI Troubleshooting
While working with SDI signals there are some things that can be adjusted while the Runtime is running. After activating the live options with the AV in and output, you will find this in the statistics:

If you are using a Genlock signal, you can determine whether your output is synchronized to it or not. In the Live Options are some more things that you can troubleshoot.
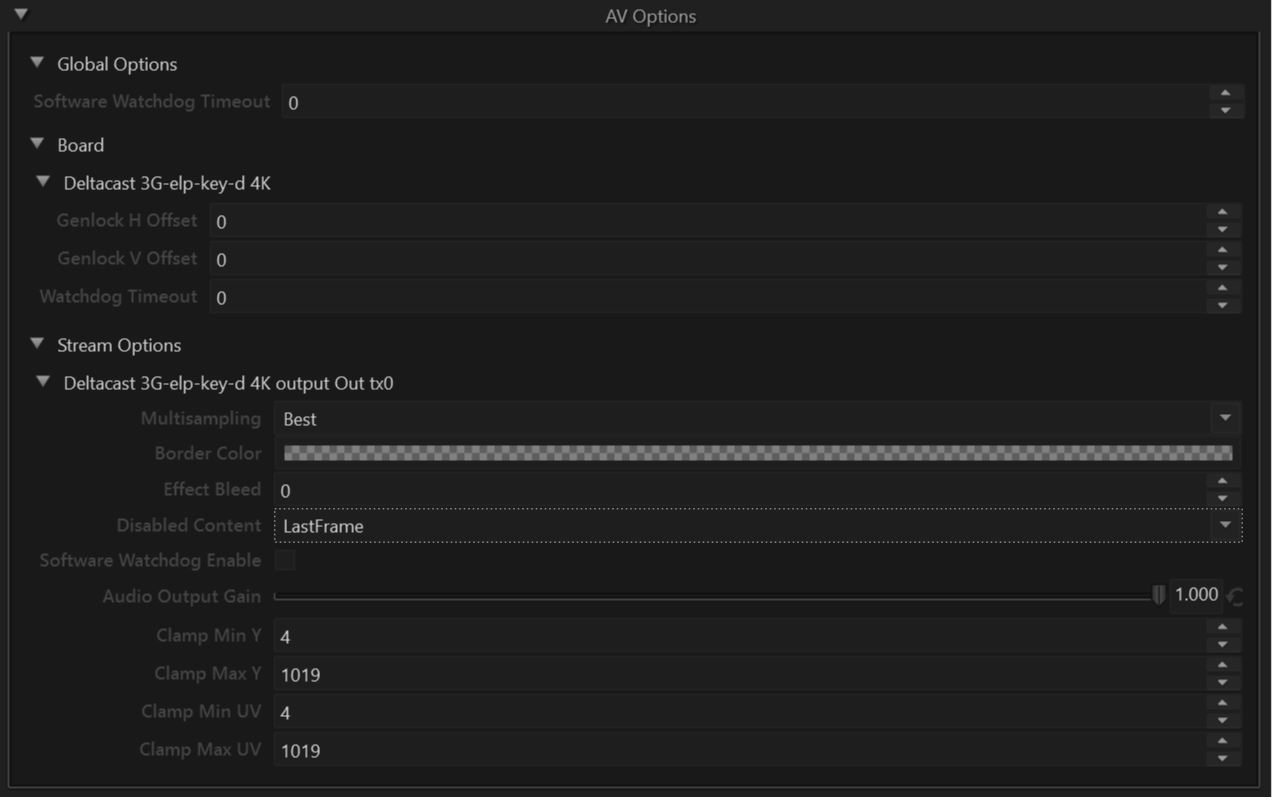
Here you can offset the genlock either horizontally or vertically to match your signal. The timeout for the Hardware Watchdog can also be changed here. Please note this value is given in millisecond and for some boards there might be no hardware watchdog and only a software option.
Further down you will find similar options to the standard GPU options. Like Multisampling, Effect bleed, border color and disabled content. For a more detailed description of these options take a look right here. The Clamp Options can only be found on Video signals using YUV that can be clamped to a certain range. Values are always specified in the 0 to 1023 range of 10 bit. if the stream uses an 8 bit YUV buffer, values are internally converted to 8 bit. If the stream uses an RGB buffer, this option is not available.
Touch Troubleshooting
When having trouble with touch inputs the first good thing to check is the input diagnostics. This way you can check if the input is coming through correctly.
Input Diagnostics
The Performance Statistics overlay displays several properties such as average number of updates per frame, and input sub-system mode. While a minimum of one touch is inside the render window, markers are drawn to visualize the raw touch input:
- Green markers show position updates that were used.
- Gray markers show updates that where dropped when there were more than one update in a single frame
- Red markers show a frame where there has been no updates from the device although the touch was moving above a certain internal threshold.
- Yellow circles show the processed position used by Ventuz when smoothing or interpolation is activated.
Input Diagnostic is currently not supported for 3D/VR controller, Previs Portal Touch and inside the Design Preview!
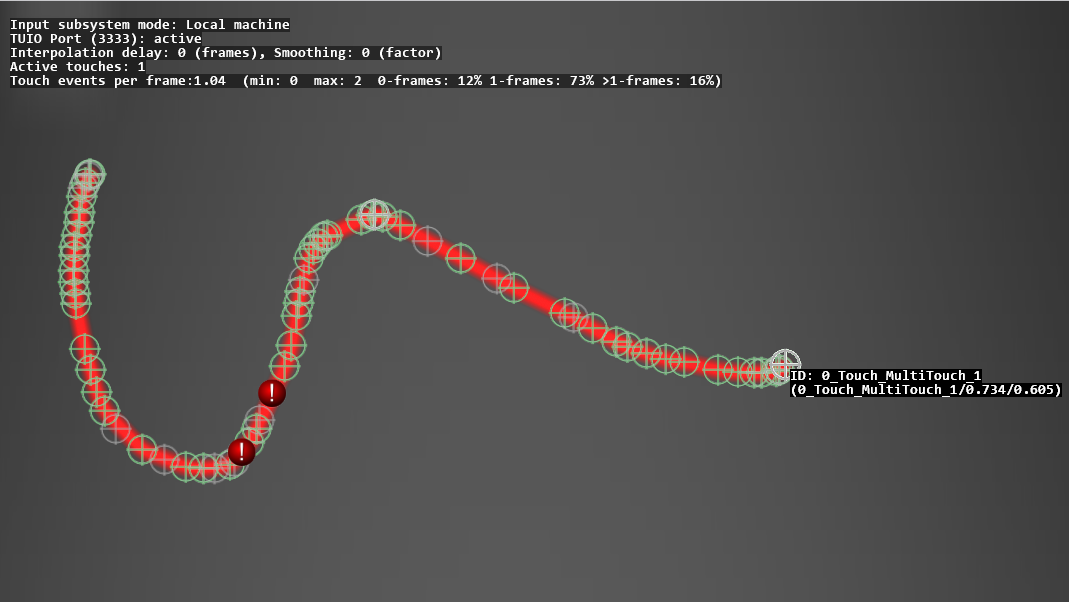
If there is a issue with the Touch input you will most likely spot it in these Diagnostic. These ! marker will most likely appear because there was no data send. If possible try changing the send rate of your input device to make the tracking more accurate.
Remote options
As mentioned in the beginning there is a third option to change properties in the Live Options. Via Remoting4 and a few lines of code you can e.g. change render setups from within your remoting program or your Ventuz Scene. This needs to be prepared beforehand inside the Designer with the C# Script Node. You can copy the following lines of code directly into the Editor. Read the comments or take a look at this page.
using System;
using Ventuz.Kernel;
using Ventuz.Remoting4;

public class Script : ScriptBase, System.IDisposable
{
    // this object is used to communicate to the local machine (or any remote machine) via Remoting 4
	Cluster cluster;

	// this boolean is set when the "SetRenderSetup" method was fired
	// but it could not execute since the cluster object does not have a connection yet
	bool tryToSetLiveOption;

	// this boolean is set as soon as the cluster object has a connection
	bool clusterConnectionOk;

	// in the constructor we create the cluster object and add the local machine to it.
	// you can change the IP Address to set the render setup on any other machine in your network
    public Script()
	{
		cluster = new Cluster { Name = "Local" };
		cluster.AddMachine(new System.Net.IPEndPoint(System.Net.IPAddress.Parse("127.0.0.1"), Cluster.DEFAULT_PORT));
		cluster.Start();

		// the ClusterStateChanged event handler must be bound to the ClusterStateChanged event of the cluster object
		// this is used to track the current state of the connection
		cluster.ClusterStateChanged += ClusterStateChanged;
	}

	// when shut down the cluster's connection terminated
	public virtual void Dispose()
	{
		cluster.Shutdown();
	}

	// in this method first we check if the cluster is connected
	// if it is we set the render setup
	// if not we set the "tryToSetLiveOption" boolean so that once connected we can change the render setup
	private void TrySetRenderSetup()
	{
		if(clusterConnectionOk)
		{
			SetRenderSetup();
			tryToSetLiveOption = false;
		}
		else
		{
			tryToSetLiveOption = true;
			VLog.Info("Cluster not started.");
		}
	}

	// this event handler checks if the cluster is connected and running and sets the "clusterConnectionOk" boolean accordingly
	// if the "TrySetRenderSetup" method was called before without success we can now safely set the render setup
	private void ClusterStateChanged(object sender, EventArgs e)
	{
		if(this.cluster.ClusterState == ClusterState.Ok || (this.cluster.ClusterState & ClusterState.WarningMask) != 0 && this.cluster.ClusterState != ClusterState.WarningNoProject)
		{
			clusterConnectionOk = true;
			if (tryToSetLiveOption)
			{
				SetRenderSetup();
			}
		}
	}

	// this is the important part of this script - here we use the cluster to set the Render Setup option
	// you can use this method to set any other live option as well
	private void SetRenderSetup()
	{
		cluster.Option(".VZ.RenderSetup", RenderSetupName, null);
		VLog.Info("Set Render Setup.");
	}

	// This Method is called if the method SetRenderSetup is invoked by the user or a bound event
	public bool OnSetRenderSetup(int arg)
	{
		TrySetRenderSetup();

		return false;
	}


}
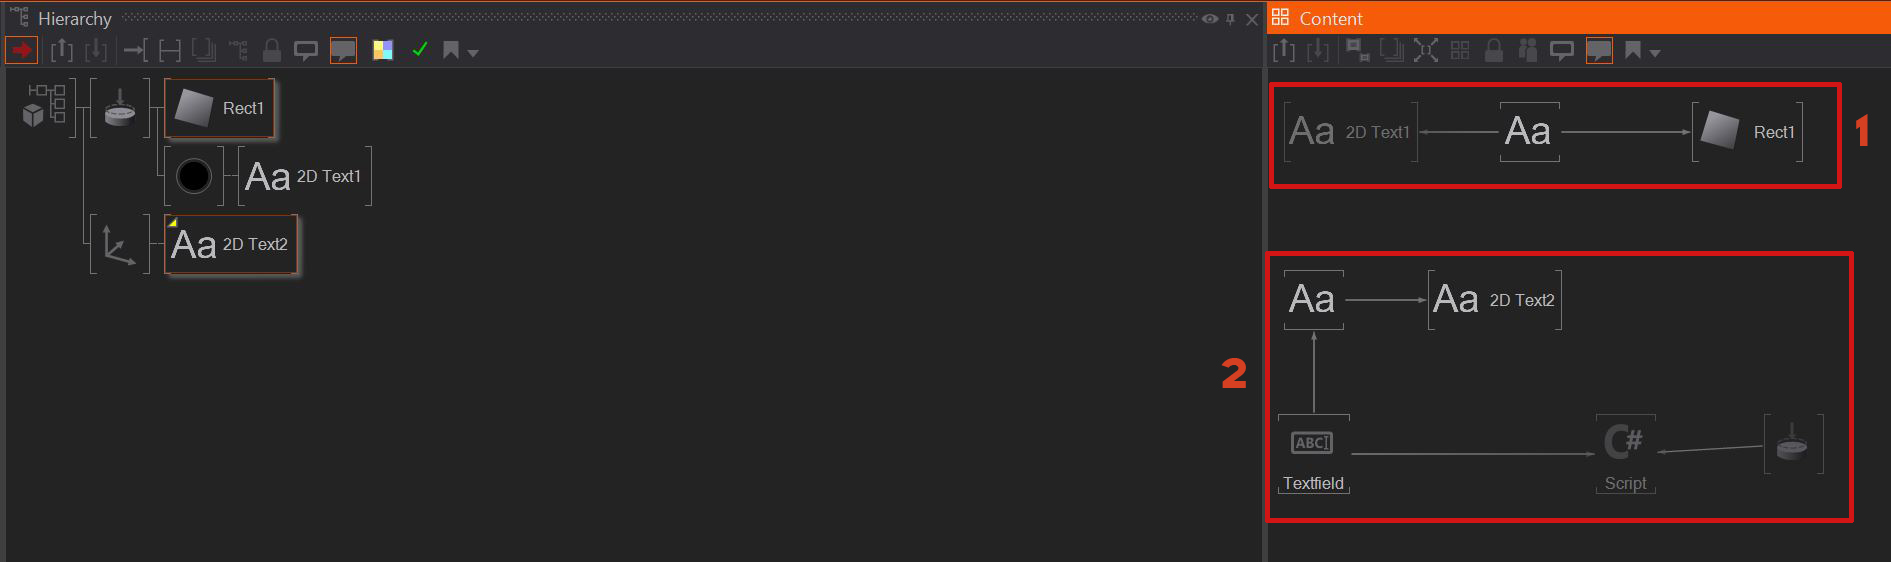
- 1: The Text Provider Node's Bounding Box Property is set to static and the Rectangle's Size X and Size Y value is connected to the Text Provider's Width and Height. This
- 2: The second text node is connected to the IME textfield input, and the C# script node is also connected to the IME node with the "RenderSetupName" property. Also the "SetRenderSetup" property is connected to the single tap event of the touch button.
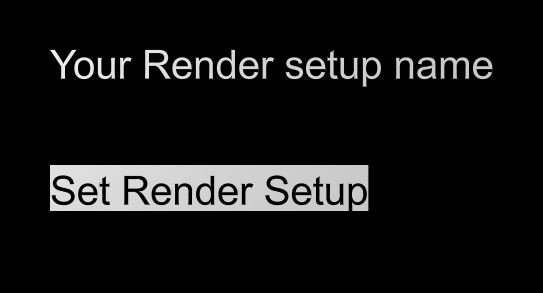
With this setup you can simply type in the name of your render setup that you want to switch to and click on the button. Now you only have to export it as a Ventuz presentation(.vpr) and start it.
TCP
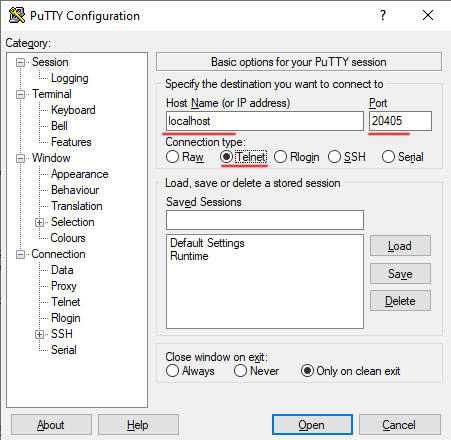
With the help of a Telnet Client like PuTTY you are able to remotely control some functions of Ventuz. In our case we are going to discover which Live Options are remotely controllable. Visit the Wikipedia page, if you need to find a download link for PuTTY. Alternatively, you can also use the Windows Telnet Client. If you are connecting from the same pc, you can simply type in localhost for the IP address. Connecting from another pc in the same network needs the local IP address. Ventuz is using the port 20405.
Here is the PuTTY client window. Make sure you selected Telnet as connection type.
After starting you should see a message that tells you that the VMS service is ready. Assuming the Runtime is running.

Here you can find a list of all available commands. But for now we are concentrating on the OPT command which holds the live options. If you just type in OPT you will see a list of all available command groups and there name. The group we are looking for is called REN which lists all rendering commands. There you will find another group inside which is called Stats.

So in order to show the Performance Statistics, type in OPT .REN.Stats true.
Important: always type the superior group name first and after that which part of the underlying group you want. This argument after the group name needs to start with a . and between two groups or properties this is also the seperator. Setting the .REN.Stats to true will show them on screen. To turn them off again, set them to false instead. Here is another example on how to show the Audio/Video Inputs and Outputs - this requires us to get another step deeper into the option's hierarchy.
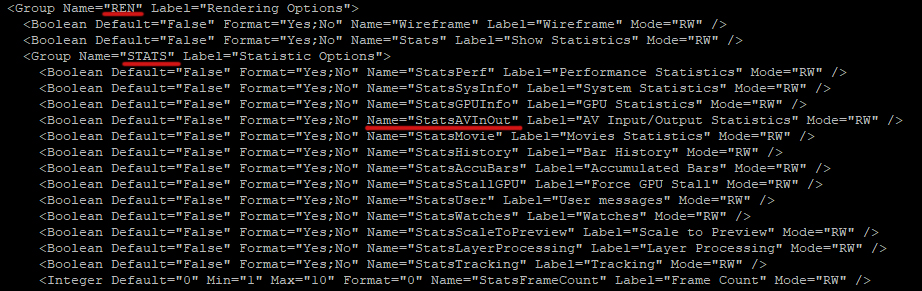
Since we are still in the REN group, and we want to get into the STATS group where we still need to get one level deeper, which is done by adding the .StatsAVInOut. So the command would be: OPT .REN.STATS.StatsAVInOut true.