Sky Box
Table of Contents
 | Sky Box | Simulates an environment and is able to light the scene using an image. |
 | PBR Sky Box | Simulates physically based lighting using a HDRI texture. |
Sky Box
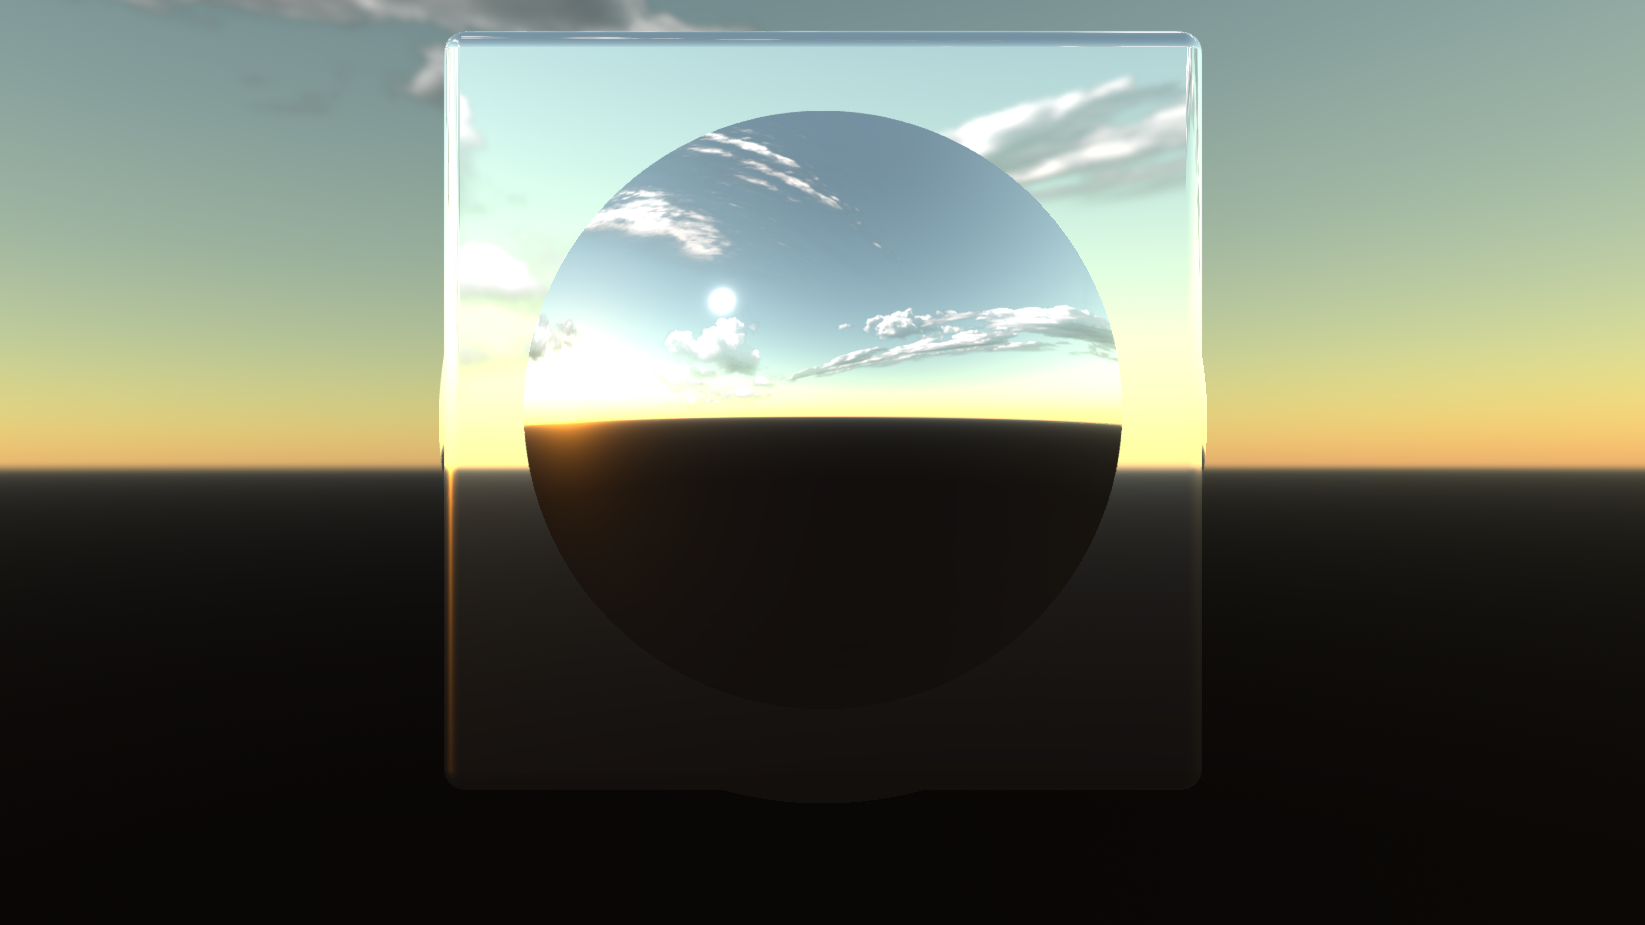
Image-based lighting is a fantastic technique for utilizing High Dynamic Range images to create realistic and complex lighting. Apart from enabling image based lighting and reflections, the Sky Box Node also allows you to render a cubic environment.
Filtered Texture Loader
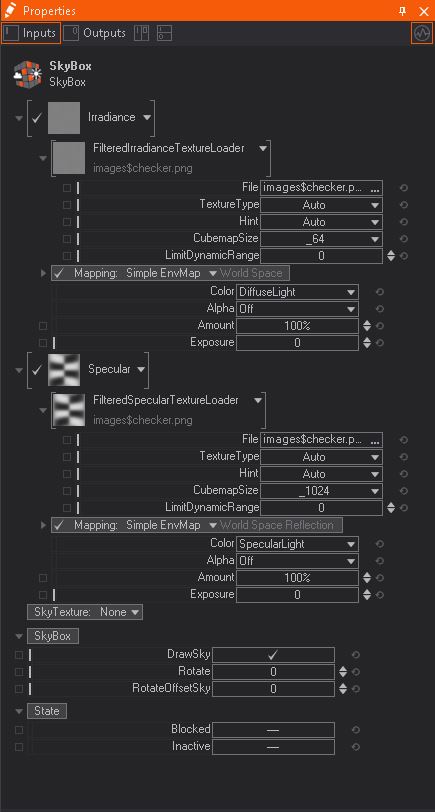
With the Filtered Texture Loader, it easy to use HDRi textures. While the Environment Longitude and Latitude loader gives you more control over single parameters. Use the Texture Type if Ventuz didn't automatically set the texture to cubemap, cross, or lat-long texture types. The Hint property changes the color range for the gamma or alpha.
Change the resolution of the final texture with the Specular Cubemap Size property.
Limit Dynamic Range: Limit bright spots to prevent them from dominating the image. Use 0.0 to disable.
Environment Long/Lat Loader
You can add up to three Textures to the SkyBox Node. Each of them has to be a Cubemap meeting the corresponding requirements of their usage. They usually are created outside of Ventuz using suitable software.
Ventuz is capable of interpreting several Cubemap layouts. Usually it is able to automatically distinguish between them.
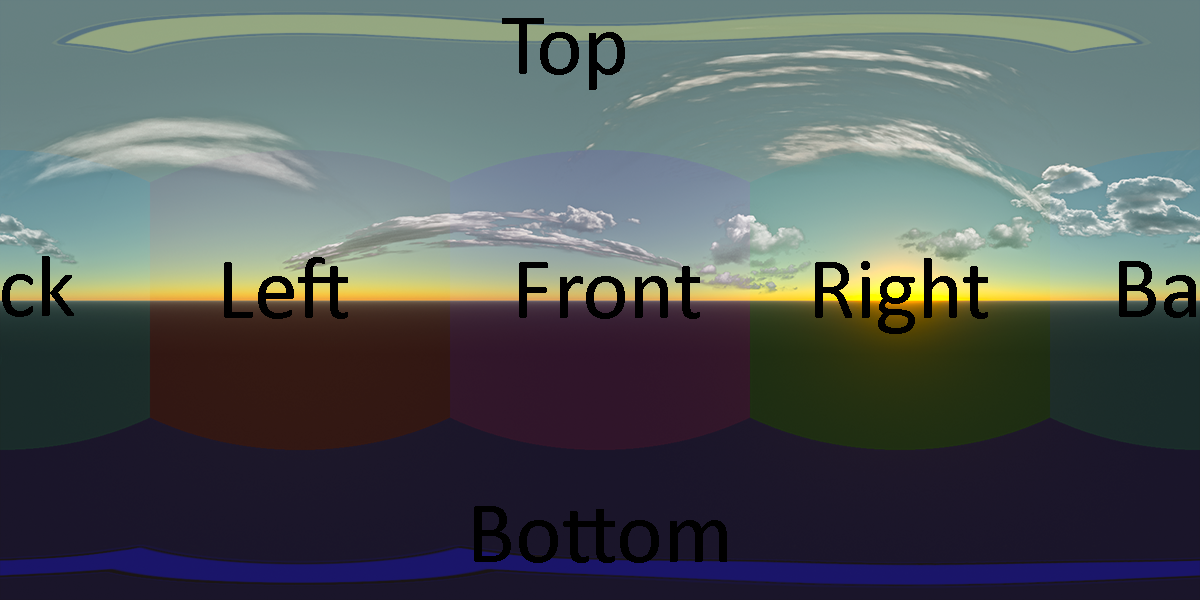
The Longitude-Latitude Cubemap saves the information of your environment based on polar coordinates. This results in a map that has a lot of information on the top and bottom of the mapped sphere and the least information on the equatorial line.
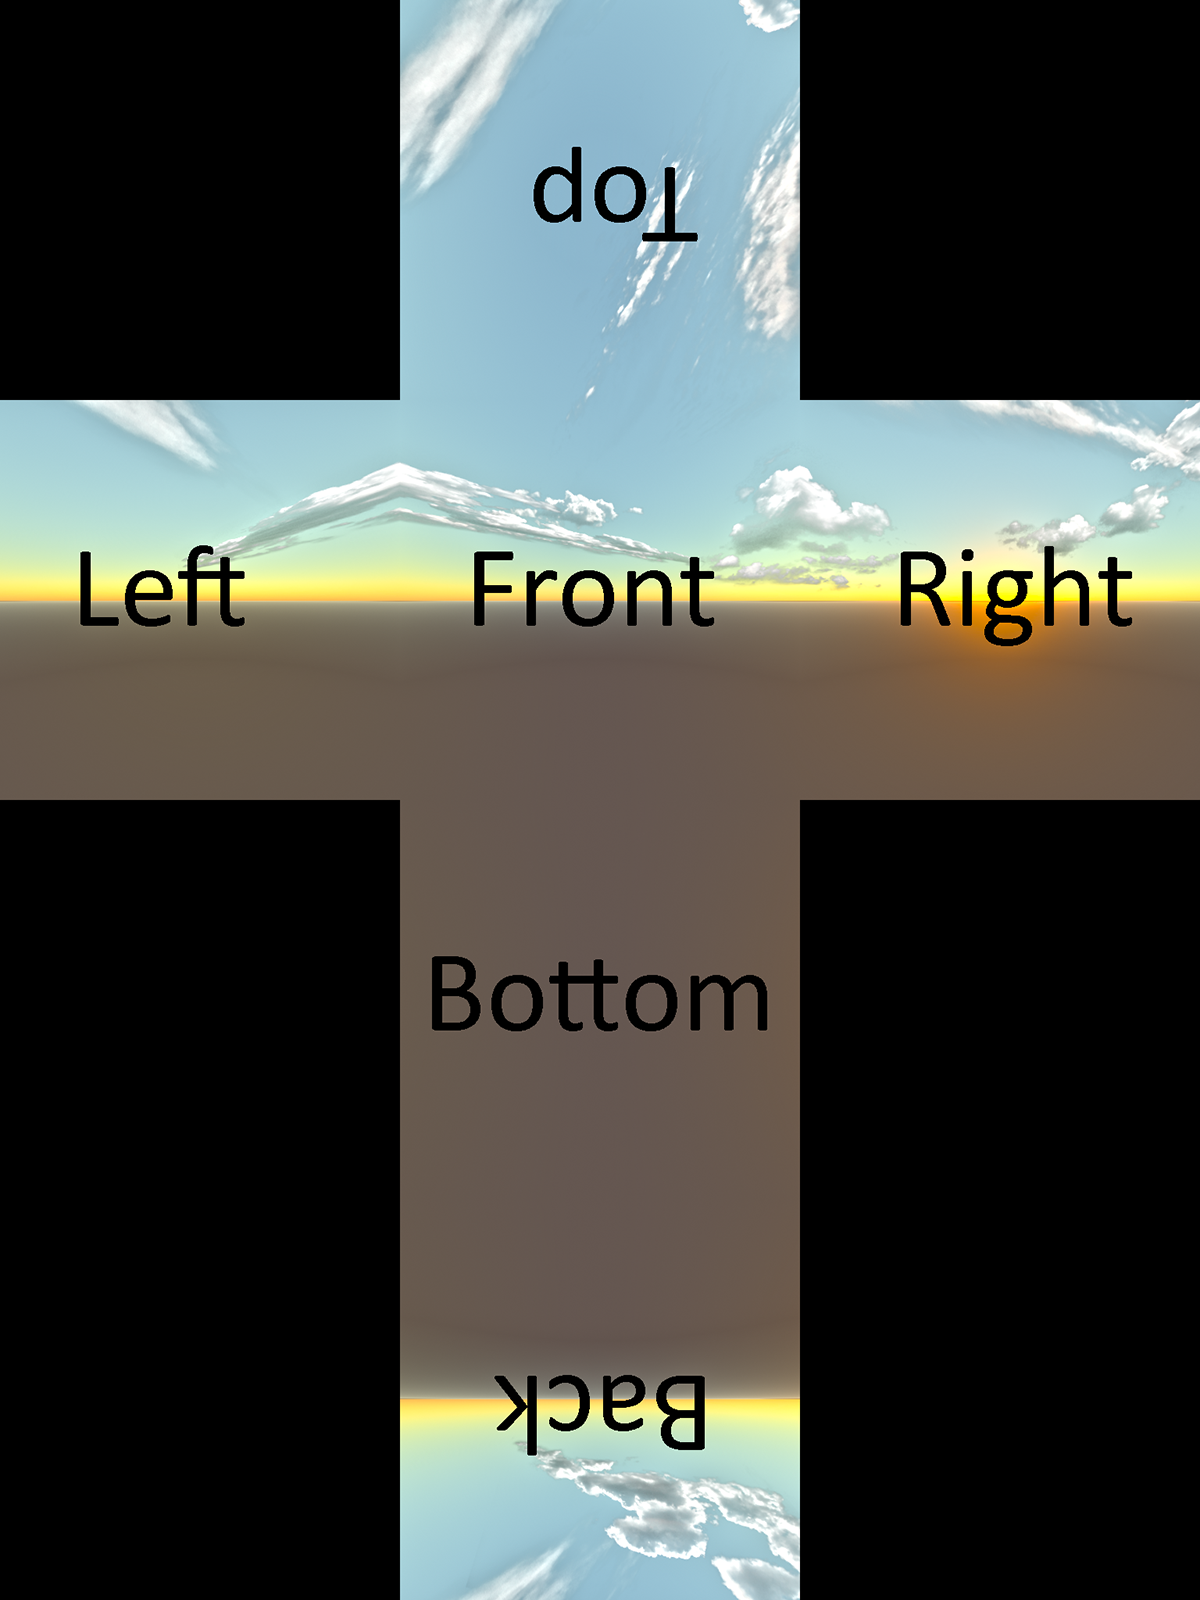
Horizontal and Vertical Crosses save the information of your environment based on an unfolded cube. This layout is the most common because it is very easy to create manually due to its seamlessness. The Vertical Cross layout is used by ATI tools.

Horizontal Strips save the information of your environment into a simple strip. This layout's sections have seams and therefore do not influence each other in MipMap calculation which may lead to noticeable artifacts. Horizontal Crosses are created by nVidia tools, like the nVidia DDS Exporter Plugin for Photoshop.
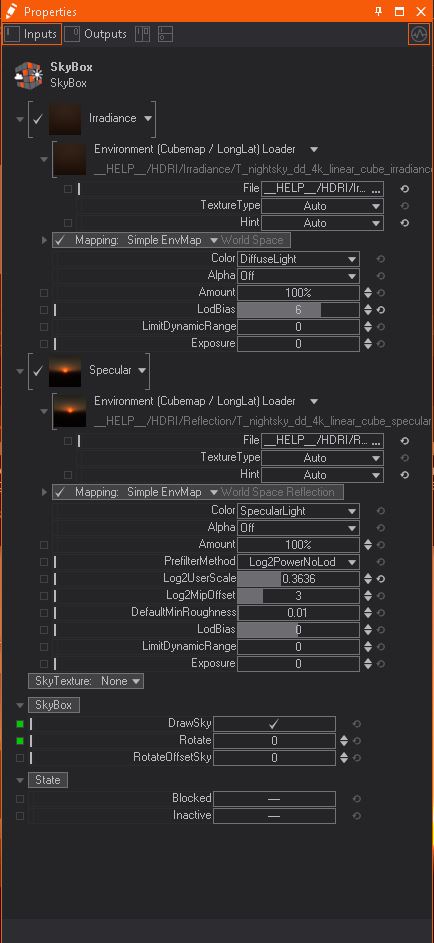
Irradiance Texture
Irradiance simulates how the environment lights the scene. It controls the amount, color and quality of light by mapping the information from the environment into the defined channel in the material of the affected objects. Usually an irradiance texture is not bigger than 128px per section and has no MipMaps.
The Mapping Property Group changes how the texture is mapped in the environment and thus on to the objects it affects.
Simple EnvMap uses the corresponding mapping with the default settings and EnvMap displays all the properties to be adjusted.
Color defines which Channel of the Materials of the affected objects the Color Channel of the Texture should be applied to, which operation to use and whether or not to use a mask. Alpha does the same for the texture's Alpha Channel. Amount defines how much the Texture affects the Material Shading. See the Material Node for more information on this topic.
LodBias adjusts the start MipMap step - you should usually set this value to -16 to disable MipMaps completely since that would only create artifacts.
LimitDynamicRange creates a cap for all channels values. When a Texture Pixel has a higher value it will be capped at this value. 0 means that there is no limit.
Exposure applies the exposure values of the affected objects independently from those of the HDR 3D Layer's Exposure.
Specular Texture
The Specular Texture affects reflections on the target objects, taking their roughness into consideration. The rougher an object is the more vague, or blurred, is the reflection.
Most of the properties work the same as with the Irradiance Texture. PrefilterMethod, Log2UserScale, Log2MipOffset and DefaultMinRoughness should have the same settings as the software the where the Texture was calculated. The PrefilterMethod defines an equation about how to sample between the different Levels of Detail in your Specular Texture. The you have to know which PrefilterMethod was used when the Texture was exported. When using Log2Power you need to know the set User Scale and the Mip Map Offset and set the Log2UserScale and Log2MipOffset properties accordingly. When using the Default method you has to define the set Minimum Roughness.
Roughness is simulated by using higher MipMap steps. LodBias defines at which step to start on a spot with no roughness at all. The rougher the Material gets, the higher the used MipMap. Normally when using Default prefilter method you set this value to a negative value, otherwise you leave it set to 0.
Sky Box Texture
If you want to use a simple Sky Cubemap that does not affect the objects' materials you can use the Sky Box Texture Group. Here you can insert a third texture that is then rendered in the background - on a sphere always aligned to the camera.
The Rotate property in the SkyBox Category rotates the Sky around the world's Y-Axis, affecting all used textures.
RotateOffsetSky is an additional rotation that is only applied to the sky box texture.
DrawSky flag sets whether the background image (i.e. the environment map) is visible in the renderer.
If you want to draw the Specular Texture as a Skybox instead of a dedicated one you can set the DrawSky boolean in the SkyBox Category to true. This will then draw the Specular Texture to the SkyBox.
PBR Sky Box
With the PBR SkyBox it is possible to use a single HDRi texture to light your scene in a realistic way. Ventuz will be prefiltering for the irradiance and specular when loading your texture.
The biggest difference is that the PBR Sky box uses only one texture while the Sky box node still needs two. Both texture loader are by default using a filtered one. For the PBR Sky box node this can not be changed because Ventuz will handle the pre-filtering, while on the Sky box node the Environment Long/Lat Loader is still available.
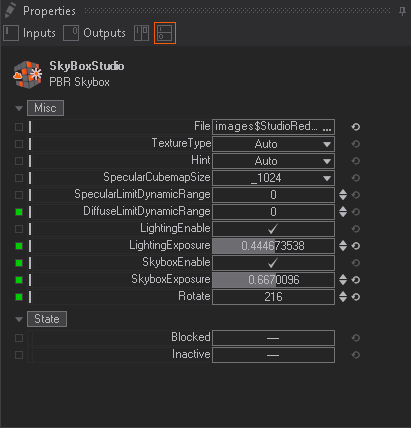
Use the Texture Type if Ventuz doesn't determine the texture should change the setting to cubemap, cross, or latlong texture types.
Hint changes the color range for the gamma or alpha. Change the resolution of the final texture with the Specular Cubemap Size property.
Limit Dynamic Range: Limit bright spots to prevent them from dominating the image. 0.0 to disable.
Changing the Limits of the Dynamic range will impact performance as the texture is calculated anew!
Enable or disable the lighting effect on geometry with Lighting Enable. Or change the exposure by adjusting the Lighting Exposure value. The whole rendering of the Sky Box texture rendering can be disabled by un-checking Sky Box Enable. The general brightness of the Sky Box can be adjusted by using the Sky Box Exposure property. The whole image can also be rotated. Use the Rotate Value for this.