Table of Contents
Geometry Import
 | Geometry Import | Allows importing many 3D content in industry standard formats like glTF, Collada, FBX, 3DS, OBJ, etc.. |
 | Geometry Import Live | Creates a Live Link with Maxon Cinema 4D, every changes made in the Cinema 4D scene are updated live in the Ventuz Scene |
Models in standard industry formats have to be imported and converted to the native Ventuz Mesh Format (.vzm) before they can be used in a scene via a Mesh Loader node. For further information on these formats see the Supported Formats page.
Not all of these formats store information about lights, cameras, animation, textures, materials and so forth, Ventuz then only imports the geometric data.
In order to import geometry from any of the above formats place a Geometry Import Node in your Hierarchy after which the resulting Mesh will be placed.
Once the import is complete, a .vzm version of the model is stored in the Projects Folder Structure and Geometry Renderer nodes with the Mesh Loader property are added to the scene hierarchy.
Mesh Capabilities
A Ventuz mesh has the following limitations and capabilities:
- Per-vertex position, normal, texture, tangential and binormal information.
- Tangents and binormals will be imported if there is no information about them they will be calculated.
- Two sets of texture coordinates containing U/V-values is stored per vertex.
- VZM Files are also able to have 3D Texture Coordinates.
Geometry Import
In contrast to the Mesh Loader Node the Geometry Import Node is able to import Standard Industry Formats. You can specify a file path and then update the node. In this process, Ventuz creates a Ventuz Mesh File based on the defined parameters. Afterward, the Geometry Import Node creates Child Nodes that render the imported mesh. If necessary it will create Axes, Materials, Keyframe Animations and Mesh Loader Nodes in order to accomplish that.
Properties
After placing the Node you need to specify the Asset property to define which Geometry file to import. Afterward, you need to specify all import options.
General
Asset is where you specify the geometry file to import. ApplyCamera will activate the first found Camera inside an imported file - you can disable this property to manually select and activate a camera. CreateNodes should be checked to create at least some nodes. You can uncheck the option to ImportCameras if you want to have just the Geometry imported. Lights will be imported since the ImportLights is checked per default. You can define an own scaling factor by using the Scale and type any factor. With the UpdateNodes option you can enable or disable the updating of the already imported geometry and nodes, but to have newly added geomtries, lights, cameras or animations still added to the scene if they are new to the imported file.
Material
ImportMaterials will allow the Node to read out the Materials in the Imported file and add Material Nodes accordingly. Ventuz will create material reference nodes if your imported mesh is using the same material across the whole imported mesh. You can then easily access and modify properties of the created content material node to apply changes to your materials.
You can invert the Opacity of the Material with the InvertAlpha boolean. NoLighting will set all material nodes to have the NoColor - Shading. This is very useful if you have baked textures which have generally the lighting baked into the textures.
The Legacy Texture switch is used for glTF imports only and does not apply to any other format.
Animation
AnimationSpeed adjusts the scaling of frames in between keyframes when importing an animation. To import Keyframe Animations check the ImportAnimation flag. Sometimes Animations are put into different slices and will not be played back properly, therefore we have set the MergeAnimationSlices as default. If it happens that an animation is overwritten by another animation slice/channel you should turn this off. This happens for some animation tools and can not be foreseen by Ventuz. If SingleAnimationNode is turned on all imported keyframe animations are merged into a single node. Otherwise every created node will have its own Keyframe Animation Node.
BoundingBox
The BoundingBox properties will adjust the pivot points of each imported mesh. If set to None it will use the defined pivot in the geometry file. Otherwise, it will use the right, center or left point in the bounding box of the imported mesh. When PreserveOffsets is turned on Ventuz adjusts the subset's positions so that the resulting mesh will look the same even with different pivot points.
Faces, Normals, UVs
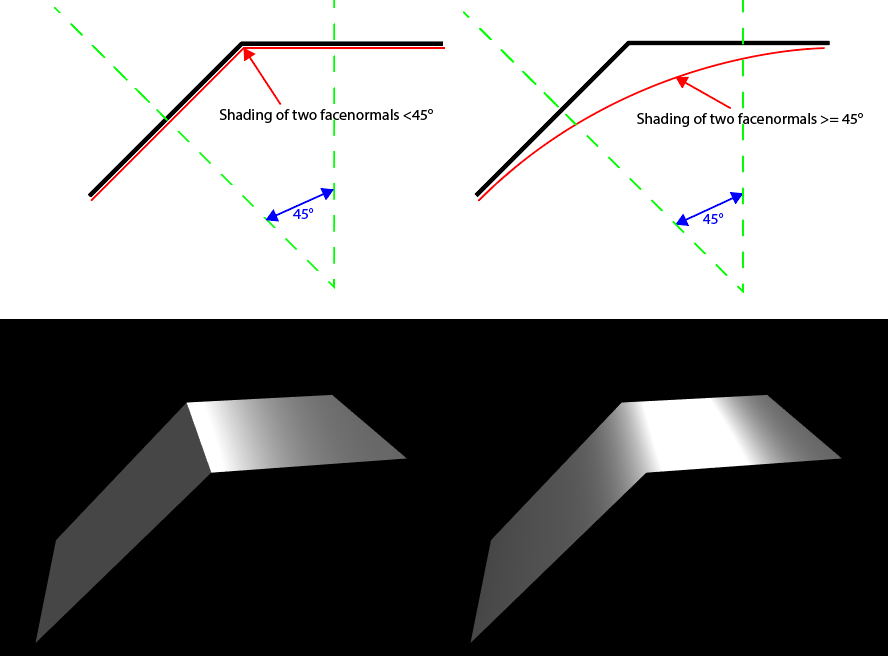
In the Process Category you can change the interpretation of the Geometry while importing. AutoNormalSmoothAngle will set the angle in degrees at which the polygons will be grouped together into one smothing group or when a phong break will occour.
FlipNormals will use the exact negative vectors of the normals of each face. FlipUV will reverse the UV Coordinates by subtracting the original UV coordinate of a Vertex from 1.
Optimize
The Optimize Category offers several options that allow for performance-wise optimization. The CollapseTransformChains takes chains of axes that are not animated and only have single children and collapses them into a single node. If the imported file contains animations any on of these axis, the optimization can not be applied.
![]()
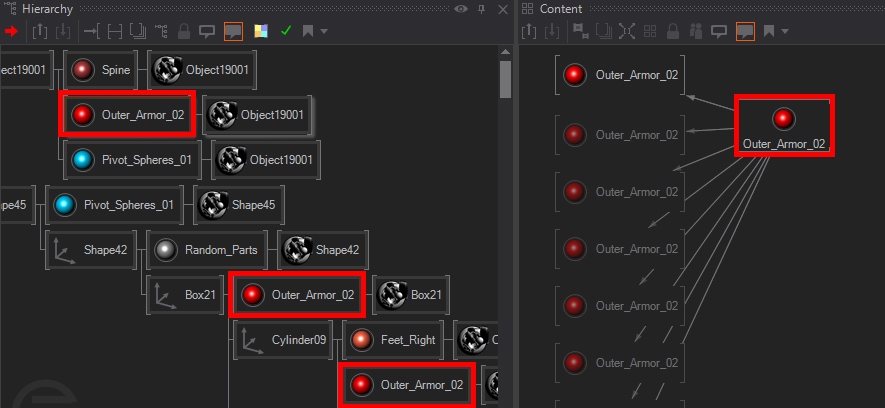
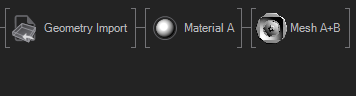
When BakeTransformations is turned on the Node bakes all Offsets of the pivots of each Subset into the resulting Mesh, so that there is no need for Axis Nodes.The CleanAnimations boolean goes trough all animations and removes all unnecessary keyframes and removes animation channels with repetitive or same keyframes, it may happen that a channel is filled with "same value" keyframes which have no function, for example always scaling 1.0 keyframes. MergeMaterials will allow the node to look at the resulting Materials and merge all that are equal to each other so that their children will be placed in the same subtree. MergeSubsets will also merge all Subsets that have the exact same parent nodes (due to baked transformations and merged materials). The following table illustrates some of these cases for better understanding.
| No Merging | Merge Materials | Merge Materials+Subsets |
|---|---|---|
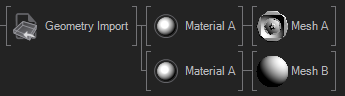 | 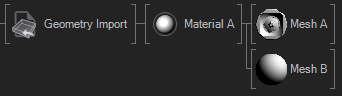 | 
|
Once the input asset has changed you might want to update the Geometry Import Node to re-import the geometry. This is easily available through the update button. The CreateNodes boolean defines whether this Node is allowed to create any new Nodes in that process. If not, it may only update existing Nodes. UpdateNodes is the equivalent boolean for updating nodes. If disabled, the importer may not update existing nodes and instead creates new ones only. The node will always first try to Update existing Nodes (if allowed) and only if that is not possible it will create new ones (if that is allowed).
Resulting File
When done you can click on the Update Button on the bottom of the Property Window. Now Ventuz will import the chosen Geometry File and create a .vzm file in the project's Geometries Folder that has the same name as the original file. Ventuz will by default generate a new folder for each imported geometry using a GUID as the folder's name. If you want to specify an own subdirectory use the SubDirectory property.
The SubDirectory string will be handled as a URI - if you want to have no Subdirectory for the imported geometry input a . and Ventuz will place the resulting files directly in the Geometries-Folder.
Any Error or Warning during the import process will be shown in the Message Log - please check there first if you expected a different result.
Geometry Import Live
Ventuz opens up new and more efficient workflows for importing 3D content by offering a live link to your content in Cinema 4D Studio. This means every change you make to a mesh in Cinema 4D will update the linked mesh in your Ventuz Scene automatically and in real time. This Chapter will discuss how to set up such a link and how to use it.
The Ventuz Plugin for Cinema4D works only with Windows Systems. Macintosh systems are not supported!
Installation
In order to use the Live Link Feature you first need to add the Ventuz Plugin to your Cinema 4D installation.
- Install Cinema 4D Studio R16 or higher.
- Open it at least once with each user that needs to use the Ventuz Plug-In.
- Find the Ventuz Installation Folder. By default, this is C:\Program Files\Ventuz Technology Group\Ventuz 6. Start the Cinema4dPluginInstaller.exe.
- Choose whether to install for the current user only or for all users. If the program does not find the needed directories you might need to specify them manually.
- Restart Cinema 4D and you are done!
Set Up the Live Link
To be able to use the live link you must have both Ventuz and Cinema 4D open on your machine.
To create the Link you first have to create the endpoint on the Cinema 4D side. To do that, select any object in the Hierarchy Tree of your Scene. By clicking on the Tags menu and finding the Ventuz Tags submenu you can add a Ventuz Setup Link to it. This tag creates an endpoint which Ventuz is able to connect to.
Now you may select any Geometry, Spline, Camera, Light or null that is a child of that object to add a synchronization link. Use the Ventuz Object Link for that.

To load your object in Ventuz you simply place a Geometry Import Live Node in the Hierarchy in your Ventuz Scene. On the bottom of the properties window you can find a Menu named Live-Link. Open it and you can see a list of all currently supported software. In each of those you see the objects with a Ventuz Setup Link Tag in the open scene in Cinema 4D. Select the one you want to use and click on Update. When opening the Dropdown menu again you can change the connected Object or disconnect completely.
Every Mesh you import this way will be saved in your project directory in the Geometries Folder named with an automatically generated UID. You are able to copy and rename it to be able to reuse the geometry as if it was imported with the Standard Geometry Import Node.
Node chains only get deleted if they a) "belong" to that importer / setup tag, b) aren't present at that place in the hierarchy coming from C4D, and c) are still linked to their original tag. So either unlinking the Axis or putting something in front of it will shield that node from deletion.
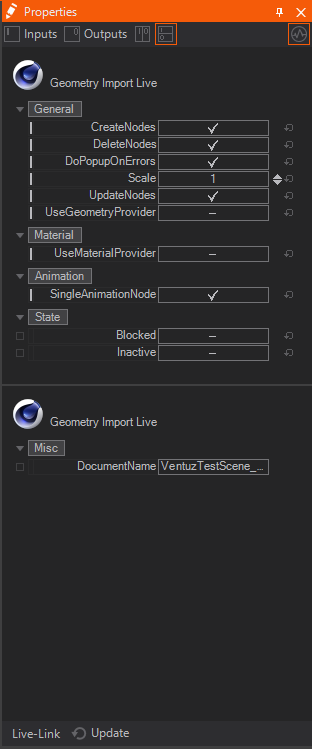
In the Output Properties, you can find the DocumentName. This is set to the last Cinema 4D Scene Name that the Geometry Live Link node was connected to.
The Document Name will only change if the Files have been saved at least one time!
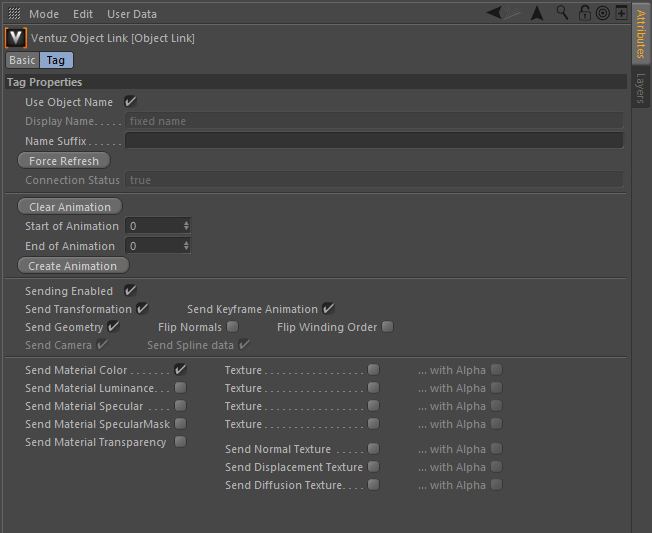
Configure the Live Link
Ventuz is able to read several properties of a Geometry from Cinema4D. To define which properties should be sent, you can configure the Ventuz Object Link Tag. Click directly on the Tag in your Cinema 4D scene's hierarchy (clicking on the Object in the Hierarchy does not do - you need to click the tag itself). Now in the Attributes Window you can adjust everything regarding that tag.
All changes to the tagged geometry or its modifiers will be automatically updated and sent to Ventuz - if activated in the Tag. Whereas every change to a property of the Tag itself needs a manual update of the Geometry Import Live Node in Ventuz to take effect.
Use Object Name will define if Ventuz should use the same Name as Cinema4D for the created Node or if you want to set a different name for it. You may also create a Name Suffix to append to the Name in the Cinema4D scene. Force Refresh will update the Nodes in your Ventuz Scene while Connection Status displays if the geometry is used for a Live Link.
The animation related properties will be discussed below. Sending Enabled controls whether to send information or not. Send Geometry defines whether information about the Mesh of the object should be sent and Send Transformation will enable sending the transformation data relative to the parent object in the scene's hierarchy. Send Camera will send the Cameras Position and animation. While if you have created a 2D Text or Spline you can enable the Send Spline data.
To use the Path somewhere else in your scene you first need to save the scene. This will also serialize the Path to a Ventuz Path File in your Geometries directory.
The Material Options define which Properties of the Material to send. If none of these options is enabled, Ventuz will not create a Material Node. Note the differences in the naming of the maps in Ventuz and Cinema4D.
| Cinema4D Term | Ventuz Term |
|---|---|
| Color | Diffuse |
| Luminance | Emissive |
| Specular | Specular |
| Normal Texture | Normal Map |
| Displacement Texture | Displacement Texture |
| Diffusion Texture | Base Color/Ambient Occlusion |
For each property you can choose to include or ignore the Texture and its Alpha Channel. The Color, Luminance, Specular and Specular Mask may have a default value in the Material and thus can be sent without using a texture. The Normal Map, Diffusion Texture and the Displacement Map may only be sent via texture.
When a Texture is set to send, but is not applied in Cinema4D, Ventuz will apply its default checker texture. Therefore, if not using a texture you should disable the Texture Flag to be sure to send a solid colored object and not a checkered one.
To have a detailed description of those terms and the different functionality of the textures see the documentation of the Ventuz Material System.
If you can not establish a link to Ventuz please check in Cinema4D: Edit->Preferences->Ventuz Live Link the IP adress / host name of the Ventuz Machine! This should be left empty, you can try "localhost/127.0.0.1" or if your Ventuz instance is on another machine type the correct adress here!
Sending Animations
The Ventuz Live Link can handle two different types of animations. Mesh Sequences and SRT (Scale Rotate Translate) animations. The least are simple keyframe animations based on bezier curves that simply translate rotate or scale the mesh in the world while the Mesh Sequence is deforming and transforming the whole mesh and may take a lot of resources depending on the complexity / vertex count and amount of frames.
Mesh Sequence / Vertex Animation
To submit a Mesh - Animation you can create it in your scene as usual in Cinema4D - add some keyframes in the scene's animation timeline and adjust some properties of your geometry or its modifiers and link them to the keyframes. To send them to Ventuz you have to first define the wanted time interval with Start/End of Animation and can then click on Create Animation. If you want to delete the Animation, click on Clear Animation. This will transfer the range for the selected Mesh Sequence.
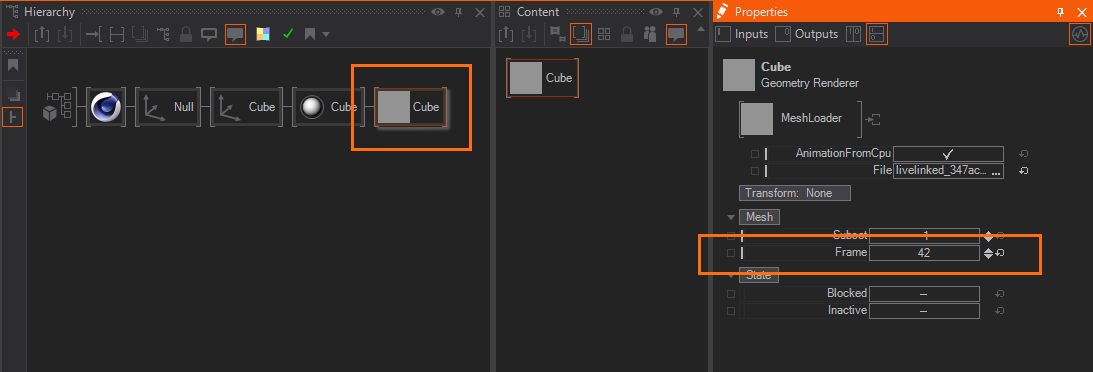
On the Ventuz side you can animate through the defined keyframes by using the Frame property of the Mesh Loader Node (not the Geometry Import Live Node). To be able to send the Animation you must make sure that you enabled the properties in the Object's Ventuz Tag.
SRT Animation
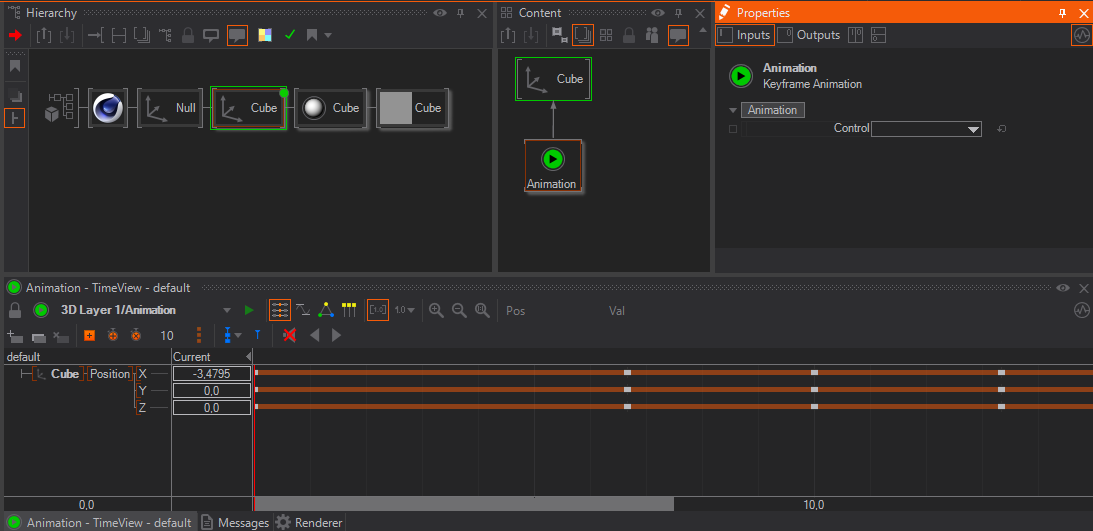
A Standard SRT Animation will be updated as soon as you added some keyframes to the geometry, for example translated and rotated it at different keyframes and hit the Update button on the Ventuz side. This will automatically create a Keyframe Animation node inside the content editor and have a binding to the respective axis.
You can set the Control Property of the Keyframe Animation to control / Start / Stop the animation as usual.