Interaction Transformation Nodes
Table of Contents
| Touch Translation | Single touch gesture to translate an axis. | |
 | Touch Rotation | Single touch gesture to rotate around an axis. |
 | Touch Orbit | Single touch gesture to rotate around multiple axis at the same time. |
 | Touch SphereOrbit | This is a more specialized version of the Touch Orbit node intended for spherical displays and other Globes. |
| Touch Transformation | Two-touch gesture to translate, rotate and scale at the same time. | |
| Touch Transformation 3D | Two-touch gesture to translate, rotate and scale at the same time - especially built for use in VR. |
These four interaction nodes form the set of transformation gestures. They operate in an object-based fashion so to activate them a touch has to hit a mesh/font/volume that is part of the subtree spanned by the interaction node. At first glance it might seem an unnecessary duplication to have dedicated translation and rotation nodes when the Touch Transformation can handle all of these transformations. However, they all are custom tailored to special use cases and achieve different effects.
The transformation nodes are derived from Touch Button and as such inherit the same properties and events to detect whether a touch is hovering inside the active area of the node or actually pressed. These can for example be used to add some custom visual feedback when the user activates the transformation node.
All of the transformation nodes have in common that the values they generate are computed by intersecting a viewing ray (starting at the camera and going through the touch position) with the X/Y-plane of the coordinate system active at the location of the node in the hierarchy and then mapping this value. The underlying meshes/fonts/volumes are only used to decide which interaction node is activated and will not affect the value generation.
In addition, all three nodes have an inherent behavior and a simplified physics simulation. There is no collision detection but objects can have a certain inertia which keeps the gesture moving after the user has released the touch. By using the Limit input properties, movement in the directions can artificially be restricted.
Touch Translation
Use for: Sliders, 2D positioning...
A single touch is used to translate the object in x/y direction. This is usually used with the X- and Y-axis aligned to the screen but rotated version are also possible in order to move objects back and forth in 3D space.
Be careful to have the vanishing points of both axes lie outside the area visible by the camera as mapping calculation close to those points is error prone.
![]()
A simple slider can be built by using the Limit input properties to restrict movement in one direction.
Touch Rotation
Use for: Slot machine style wheels, volume knob style elements, steering wheel, ...
The most important properties for Touch Rotation are the Rotation Axis and the Mapping mode. The on-axis mapping mode assumes that the user roughly looks along the rotation axis onto the top of the object (i.e. a steering wheel or the dial plate on an antique telephone). In this mode, the node will try to follow the touch as closely as possible in order to keep the same point on the surface under the touch position at all times. This makes it possible to do very precise rotations even up to the point where one can do a complete revolution. However, this mode can feel weird if the touch changes its distance from the rotation axis.
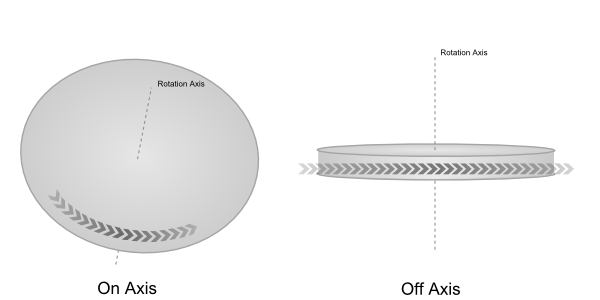
The off-axis mapping mode assumes that the rotation axis is at roughly a 90 degree angle to the viewing direction (i.e. a slot machine). When rotating, the object will only stick to the touch position up to a certain point. As the touch gets closer to the boundary of the object, a different mapping is used so that moving the touch further along will keep the object rotating at a constant speed. While one looses the feeling of the object sticking exactly to the finger, this mode feels much nicer when it comes to making an object spin.
Both modes work completely different and which one is more suitable depends on the specific case of usage.
Touch Orbit
Use for: Product presentation, earth globes, ...
The Touch Orbit node enables the user to rotate in multiple axis at the same time. A vertical movement of the touch will tilt the object where a horizontal movement rotates the object around its Y-axis. One particularity of this node is that the tilt is always done by rotating the X-axis of the gesture, not object space. This has the effect that while rotating the object, the tilt is always constant with respect to the viewer. It is thus ideal for doing a product presentation or any other situation where the user should be able to tilt the object but nonetheless be unable to look under the object. In addition, the object can be scaled by doing a two finger pinch/stretch.
The rotation is measured in degree Azimuth and degree Inclination, the former being the rotation around the Y-axis of the object and the latter the amount of tilting. Both these values as well as the amount of scaling can be restricted by using the respective Limit properties.
LimitActive activates all limits at the same time. If only a selection of properties should be restricted, simply set the other limit properties to very large values like plus and minus ten to the power of thirty.
Due to numerical reasons, the Inclination is restricted from -90 to +90 degrees even when the LimitsActive property is false. This also avoids that the object ever is upside-down.
Touch Sphere Orbit
This is a more specialized version of the Touch Orbit node intended for spherical displays and other Globes.
It differs in tracking, coordinate system and filtering:
Finger Tracking
When a touch starts, the point on the 3d mesh that is hit is remembered, and when moving the finger around the object is rotated in such way that the finger will always "stick" on the original hit location. If the finger moves outward so that the object can not be rotated in such way, the interaction stops.
The old orbit node would translate any movement in X or Y to rotation around those axis, which is more useful for small objects that one wants to rotate fully around.
There are 3 RotateModes
Default: Use one finger to rotate.
LockPole: Use one finger to rotate, but lock the north-south axis.
TwoFingerRotate: Allow two finger gesture to rotate. This may be problematic on large globes with noisy input, so it is not the default mode.
When not using LockPole, the north-south axis will become quickly misaligned, which might be a problem for your presentation. There is a normalization feature to re-align the object:
NormalizeDelay : a delay in seconds when the normalization kicks in, set to 0 to disable.
NormalizeSpeed : the speed at which the node rotates to re-align.
Coordinate System
This node reports rotation as longitude and latitude, which is more useful for dealing with geo-coordinates than the azimuth / Inclation model used by the old orbit node
Filtering
Touch input goes through some custom filtering that is unique to this node. The steps are, in this order:
ThresholdAngle: any input smaller than this angle is ignored. This can be used to filter noisy input.
Delay: Input is delayed by this many seconds. This is very effective at filtering stuttering input. This works by remembering the last time the touch stopped moving - after thresholding. Then the object is rotated from the old position where it was when touch stopped changing to the new position where is should go over the specified time, with a simple ease-out. While touching continously, it moves to the new position at a speed matching the behavior for a touch that has stopped moving.
Damping: A simple low pass filter to be used during the interaction.
Inertia: A simple low pass filter that is used after the interaction. Set to 0 to stop the orb immediately after interaction. This will override damping after interaction, but even with inertia disabled the delay feature will still work.
Delay and Damping will ensure that eventually the object will be rotated such that the hit point is exactly under the finger, if possible, within the accuracy given by the threshold angle. Inertia will rotate the object beyond that point.
ThresholdAngle and Delay work together very well, as thresholding can introduce stuttering for slow movements and Delay is very good at filtering that away.
Suggested Values:
- Start with Delay 0.25s
- Add Treshold Angle 1° if noisy input makes the object rotate even when input does not move.
- Add Damping 0.8 if needed.
- Add Inertia equal to damping if you want that.
- Tweak as you see fit.
Output
The current rotationis given as Longitude and Latitude, or in matrix form as World.
For debugging, there are the output properties TouchLongitude and TouchLatitude that hold the last intersection before any filtering. It can be useful to bind a marker to test Touch when installing a system.
Touch Transformation
Use for: Moving picture metaphor, scaling objects, ...
The Touch Transformation node combines the most common one and two finger gestures to interact with an object. A single touch can be used to translate an object. Two touches can be used to rotate the object (by doing a circular motion), scale it (pinch/stretch), and translate it (by moving all touches in the same direction).
Due to the degree of freedom with this node, there are only few practical use cases for it. Typically, a user will use the Limit properties to restrict movement in one or the other direction. In most cases however, one should try to avoid the use of the Transformation node in favor of the dedicated Translation or Rotation node.
The enabled property ApplyTransformationCenter makes sure that rotation and scaling is applied to the center of the two touches. If it is disabled the transformation is applied to the center of the object.
![]()
Touch Transformation 3D
Use for: Full transformation of objects in 3D space with VR Controllers; free rotation in 2D screen mode.
This node is an extension of the Transformation and Orbit node to provide full transformation in 3D space (e.g. Virtual Reality). With an appropriate controller it is possible to translate objects on all three axes. Additionally a free rotation is implemented and scaling with a second touch provider (second controller or two fingers in screen mode). The rotation is based on Quaternions and allows a free and intuitive rotation of objects. But this technique also implies that it is not possible to limit rotation on the XYZ axes. It is only possible to disallow the complete rotation via the DisableRotation property.
In 2D screen mode this node behaves slightly different than the Transformation and Orbit node:
- single touch rotates the object similar to the Orbit node but without limitations
- dual touch is used to translate the object in X and Y (like single touch for Transformation node), for scaling and rotation around the Z axis (like dual touch for Transformation node)
Resetting
All these nodes can be reset to specific values. This means that their transformation outputs can be overridden from the according input properties. All node have the following Reset parameters in common: ResetOnLoad specifies if the transformations should be reset if the scene is loaded. The ResetAnimation property determines how the reset should be performed. All standard easing function known from the Ease Node are available. The duration of this transition can be controlled by the ResetDuration property. Set ResetDuration to zero seconds to let the reset jump to its specified values. The ResetPolicy flags control if reset can be performed if a touch is active and if an object can be touched during a reset animation.
Customized Motion
Each of the transformation nodes automatically performs the necessary transformation implied by the gesture (i.e. a translation node moves without an explicit node in front of it). To customize the way objects behave, this implicit motion can be disabled by unchecking BehaviorMotion. When BehaviorMotion is disabled, the node will still do all of its calculation and provide the result as output properties. Those can be manually bound to an Axis node and by using Math Effect nodes like Decay or Dampener, different interaction results can be achieved.
Physics Simulation
All transformation nodes contain a simplified physics model to simulate effects like inertia or other post-motion. Subtle effects like these are crucial to convey realism or "weight" in a MultiTouch scene.
As stated before, the physics model inside Ventuz is a simplified one custom tailored for MultiTouch purposes. It is not designed to handle collisions, gravity or other factors expected in a full-fledged physics simulation.
The physics simulation is by default enabled for all Touch Transformation Nodes. To disable it, uncheck the BehaviorApply property. This is independent of whether or not the object will move (see BehaviorMotion) and just prevents the physics simulation of influencing the values generated by the mapping calculation.
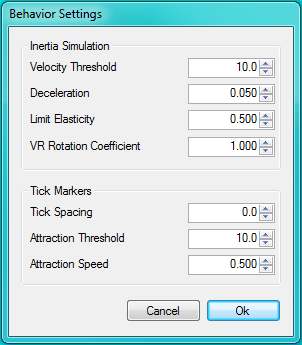
To modify the physics properties of a node, click the Edit Behavior button at the bottom of the Property Editor.
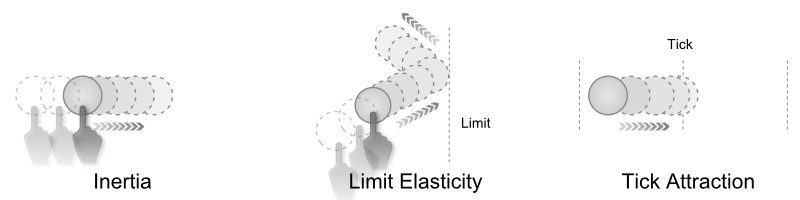
There are three forces that can be applied to the object moved by any of the transformation nodes:
- Inertia: Kicks in when the users touch leaves an object and the object travels at a velocity higher than Velocity Threshold. The inertia simulation will try to continue the users movement and slowly decrease the objects velocity to simulate the effects of friction. The amount of friction can be adjusted by changing the Deceleration factor. Only for the Transformation 3D node there is a further parameter: VR Rotation Coefficient. This parameter is only applied if the node is used with VR Controllers. It is used to increase the deceleration of the rotation to make the motion of a thrown object look more natural. Using low values objects thrown with a VR Controller rotate too fast and too long.
- Limit Elasticity: The "bounciness" of an object when it hits one of the limits specified in the nodes properties. When a limit is hit, the velocity vector of the object is multiplied by this weight and then reflected from the limit.
- Tick Attraction: Defines a uniform spacing of "snap points" called ticks. If the spacing is non-zero, a virtual tick is placed at every multiple of the spacing in the nodes mapping system. When the objects velocity falls below the Attraction Threshold, the ticks apply an attraction force to the object, slowly pulling it until it stops exactly on one of the tick positions. The rate of attraction can be adjusted using the Attraction Speed. For the Touch Transformation node, the TicksAffect property can be used to specify which type of transformation (translation, rotation, scaling) is affected by the ticks.
All these parameters are based on the nodes own mapping system instead of real world parameters like screen distance in cm. While this is often unintuitive, it is the only plausible solution to be both screen size independent and capable of handling motion that is not aligned with the screen plane.
The Machine Configuration has two options to adapt physics behavior parameter to changing screen size. As long as Scale Thresholds with Window Size is active, Ventuz will do its best to internally scale all parameters such that the user experience stays the same. For more explicit measures, an additional scaling factor that is applied to all parameters expect tick spacing has been created.