Lightsources
Table of Contents
 | Directional | Directional light source |
 | Point | Point light source |
 | Spot | Spot light source |
 | Lighting Group | Define a group of light sources |
 | PBR Directional | Directional PBR light source |
 | PBR Point | PBR Point light source |
 | PBR Spot | PBR Spot light source |
 | PBR Ambient | PBR Ambient light source |
Lighting in Realtime Rendering is a very efficient approximation of real life lighting. There are no global effects like one object casting a shadow onto another or light bouncing of one surface and lighting another. It is therefore often called direct lighting opposed to global lighting as used by raytracing software.
A triangle can be lit by one or multiple light sources. The final color of a pixel in a triangle is dependent on the shape of the objects surface, the characteristics of the light sources, the Material applied to the object as well as the Engine-Settings in the Layer Root of the 3D Layer. For each light source, a number of terms is calculated:
- Ambient: This term is independent of the light source and the viewer position. It simulates the ambient light that exists in the background and from bouncing off other surfaces and is usually rather weak.
- Diffuse: Varies the brightness of the surface based on the light direction and the surface normal. This gives an object its characteristic shape, brighter towards the light source and darker on the back side.
- Specular: Simulates the bright highlight that occurs where the reflection of the light source is visible in the surface. Note that this will only be visible on objects that have a Material defining a specularity.
When there is no light source node in the scene, Ventuz uses an internal default light source. This so called head light is positioned at the exact position of the camera, therefore shiny objects (with a high specular amount) can appear completely white. To disable the default lighting set the DefaultLight to "none" in the 3D Layer Root Node
Both the light source and the material have a color assigned to all of these terms. In addition, the material of an object can have an Emissive term that simulates light coming from the object itself.
Standard Engine vs HDR mode
Light Attenuation
This is about how light gets darker with distance. We use different formulas for different engine modes. Below is an explanation for the formulas. You can skip the math, but remember the following:
- When changing the falloff model (by changing the engine mode), all lights need to be adjusted for the new model
Every light source now has a gain property. Gain 0 will not change the light, every positive step will double the intensity of the light and every negative step will half it. So a gain of 3 will increase the intensity by a factor of 8. This is especially useful to adjust HDR lights.
HDR
In reality, light intensity decreases with the square of the distance: I = I0 * 1 / d2. Doubling the distance will quarter the light intensity.
Ventuz light-sources define a maximum radius. If the simply cut the light at a distance, we might see the cut-off point. To avoid this, we subtract the amount of light at the maximum distance (dmax), the corrected formula is:
- I = I0 * ( 1 / d2 - 1 / dmax2 )
This is the formula we use in HDR.
Standard Linear Falloff
If we do not render in HDR, we do light calculation with gamma 2.2 colors. Unfortunately, with this the physically correct formula produces bad results, as it only applies to linear colors. Instead, we use a simple linear falloff formula: The light is just faded out by distance :
- I = I0 * (1-d/dmax)
This produces good results and naturally has no cut-off point at the maximum light range.
Types of Lightsources
In order to make lighting calculation feasible, the travel of light rays through a scene cannot be simulated. Instead the terms above try to simulate the variation of brightness on a surface. The role of the light source is to specify from what direction the light falls on to the surface.
Lightsources are immaterial and therefore no geometry is rendered for them. To see the orientation and shape of a light source activate the show non-render objects.
The Directional light represents a light source that is so far away that the light rays are completely parallel to each other and the actual position of the light source becomes irrelevant. The most prominent analogy is the sun.
The Point light represent a lamp that is infinitely small in size. It emits rays into all directions, originating from a single point in space. Same as the Directional light, it has no surface area to simplify the calculation. The direction of light for a point light at any given point on a surface is equal to the vector from the point lights position to that point on the surface. A rough analogy might be a light bulb or a candle.
The Spot light differs from the point light in that it only emits light in a cone shaped volume instead of all directions uniformly. The InnerCone specifies the radius of the region that is lit at full intensity which then decreases to the OuterCone radius where the light influence of the spot ends. It also simulates brightness decreasing the farther away something is from the spot (Attenuation) and the more it is offset from the center axis of the spot towards the boundary (FallOff).
All lightsources have the Gain parameter in common. If your lightsources appear to dark while using the HDR mode, you can adjust and boost the gain of the intensity here.
An additional way of lighting your scene is by using the Sky Box and an HDRI/Irradiance Map as a lightsource.
The example below shows the same scene lit by a Direction light coming hard from the left, a Point light above the scene and a Spot light coming from the right.
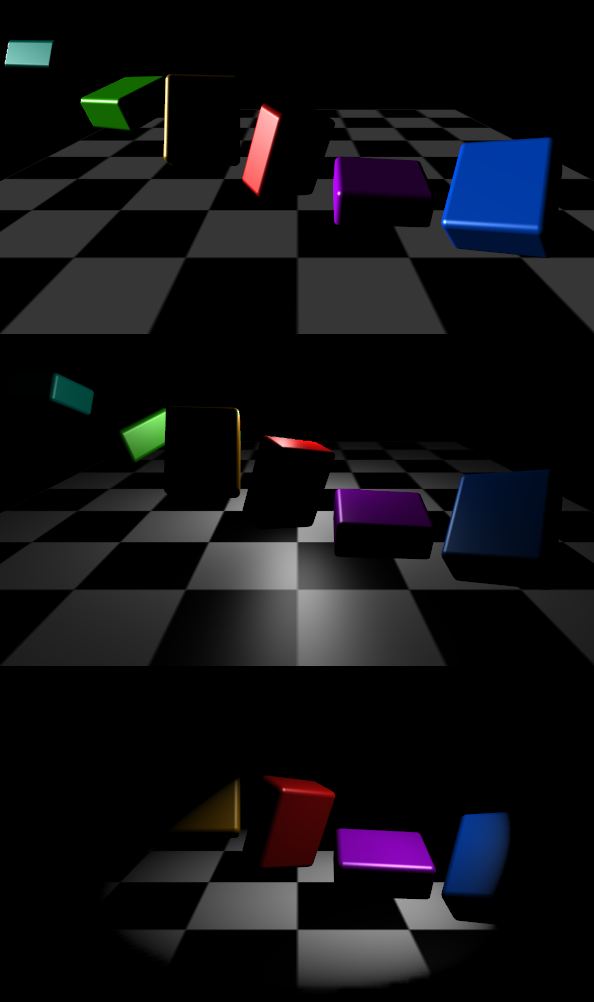
If ApplyAxis is active, the light source will be transformed by the World Matrix as for example influenced by Axis Nodes.
Using Multiple Lightsources
Multiple lightsources can be added to a scene, for example as main and fill lights as often used in a photo shoot. However, they can also be used to light separate parts of a scene differently. For example, a spot light may be used to light only one object but not affect another object, although it would theoretically be in the cone of the spot. Instead the second object could be rendered using a completely different light setup.
Lightsources are special in that they affect all nodes that are rendered after them, not just their child nodes. They are not deactivated once their subtree has been processed.
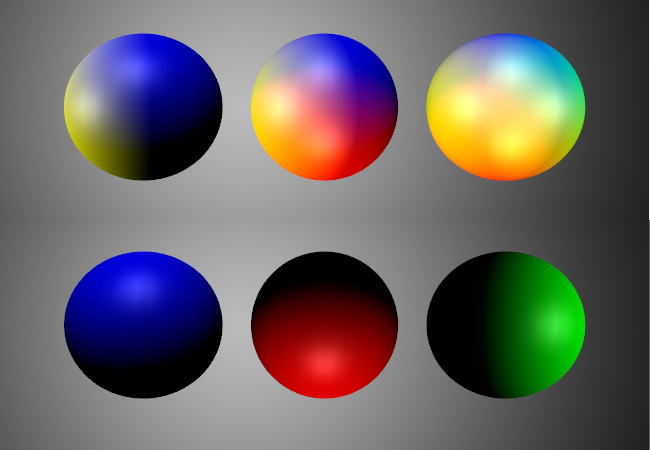
Each light source has an Input Property Index which specifies whether the light should be used in addition to existing lights (Next) or should replace the last activated light (Override). To limit the effect of light sources to certain parts of a scene, Lighting Group nodes can be used. If their Inherit property is deactivated, lights defined outside the lighting group will have no effect on the objects rendered within the lighting group. The example below shows a scene with four differently colored light sources. In the top row, each light source illuminates each sphere that comes after it in the rendering order. In the bottom row, Lighting Groups have been used to isolate each sphere together with one light source in a separate group.
Shadows
For each lightsource you can enable shadows. Shadows in Ventuz are based on Shadowmaps or Variance Shadow Map.
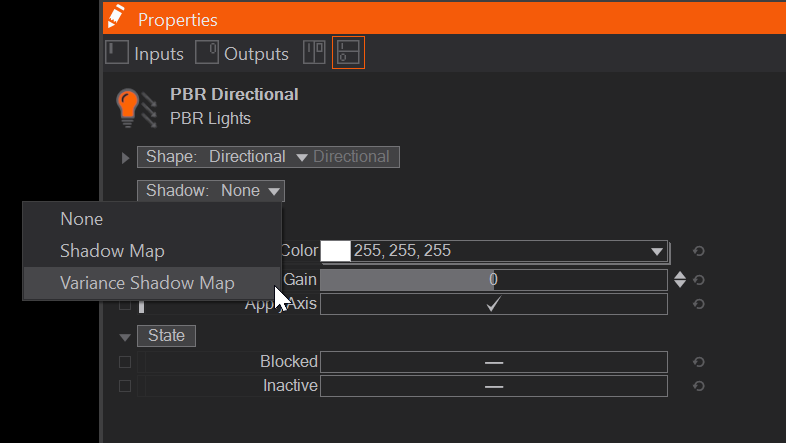
Click the Shadow drop down menu in the Lightsource Properties and select Shadowmap or VSM to enable Shadows.
Shadow Map
You can adjust the Properties for each lightsource individually.
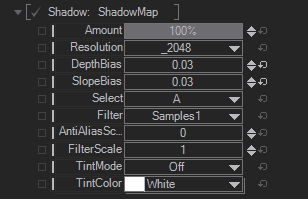
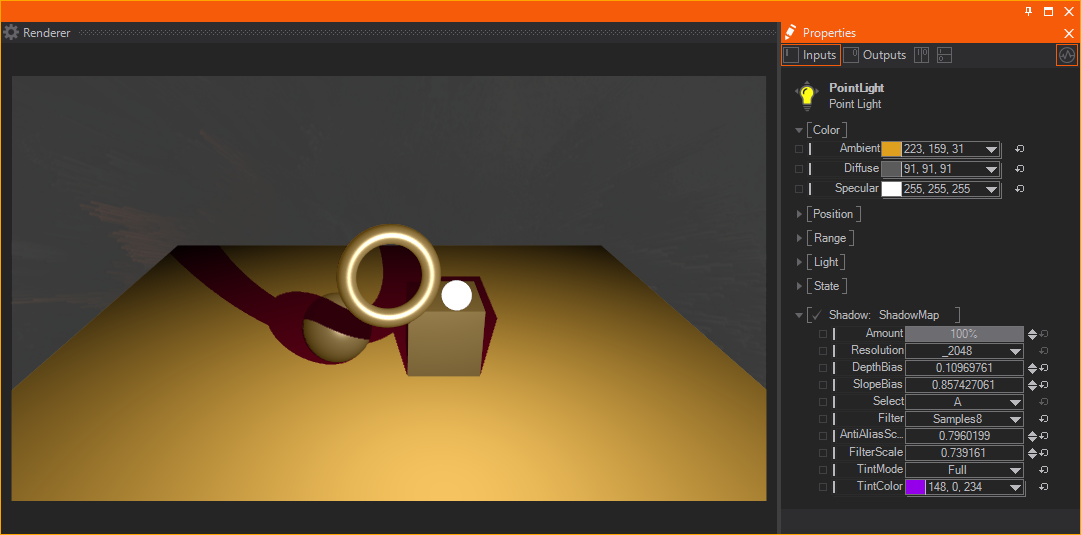
The Amount is the overall intensity of the shadows. Resolution is the shadowmap resolution and should be as small as possible. With the DepthBias and SlopeBias you adjust the sampling of the shadowmap (see How To Use Shadows for more details). You can define to have the shadows in a group by the Select drop down menu. You can set the Shadowmap in the A or B group or have it off any group. The grouping works together with the Shadow Filter. The Filter drop down menu affects the shadowmap filtering and you can select between Samples 1, Samples 4 and Samples 8. When Samples 4 or Samples 8 is selected you can also adjust the quality of the sampling by changing the AntiAliasScale and FilterScale. If the values for the Scales is 0 and not bound, the sampling scale is completely turned off in the shader and therefor the performance increases.
The Pointlight needs to render one shadowmap for each of its six sides. This can affect the performance a lot! The shadowmap resolution becomes even more critical here!
With the help of the Tint properties you can tint your shadows. This will apply the specified TintColor to the BaseColor of the affected objects after multiplying it with the AmbientColor of your light. The TintMode defines how the Tint should be applied: Full will apply the Tint Color everywhere in the same amount. Attenuated will linearly fade out the amount of the Tint over the distance to the light source.
Since Shadows are working in conjunction with Lightsource as Source, Object as Shadowcaster and at least one receiver to apply the shadow to (except for selfshadowing) you should read the See Also sections as well.
Variance Shadow Map
Overview
Up to version 8.1, Ventuz uses Percentage Closer Filtering (PCF) for shadows as described above.
With Ventuz 8.1 we introduce Variance Shadow Mapping (VSM): In order to get soft shadows with PCF you need to test many pixels of the shadow map for each pixel on screen, making large filter kernels very expensive. VSM allows to blur the shadowmap itself, so that only a single pixel of the shadow map must be tested for each pixel on screen. The blur can be implemented highly efficient, allowing for much softer shadow than would possible at reasonable effort with PCF.
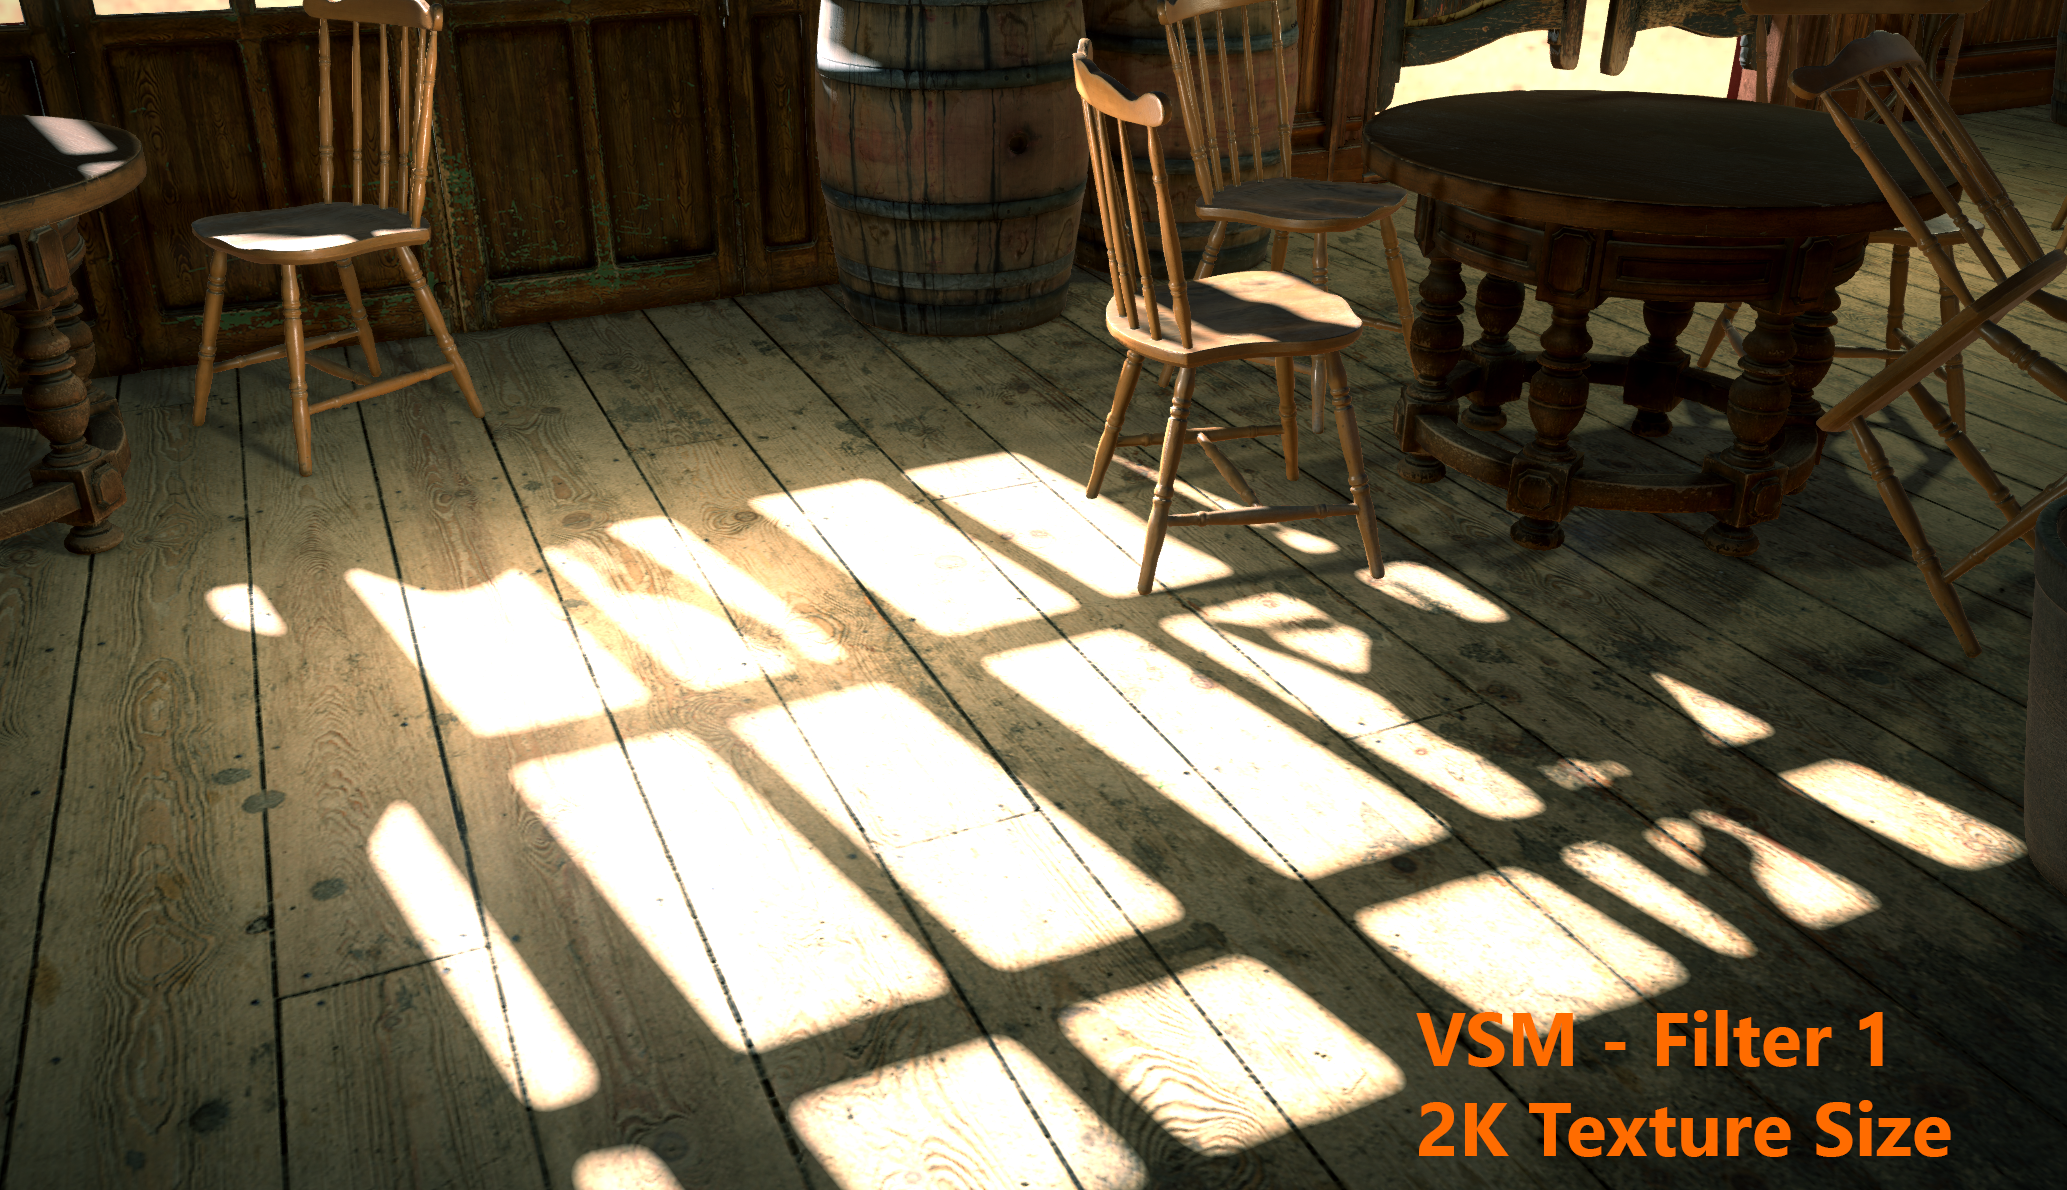
PCF shadows can look pixelated when the shadow map resolution is insufficient. With proper filter values, VSM shadows solve this problem completely : at worst, your shadow is blurry, but not blocky.
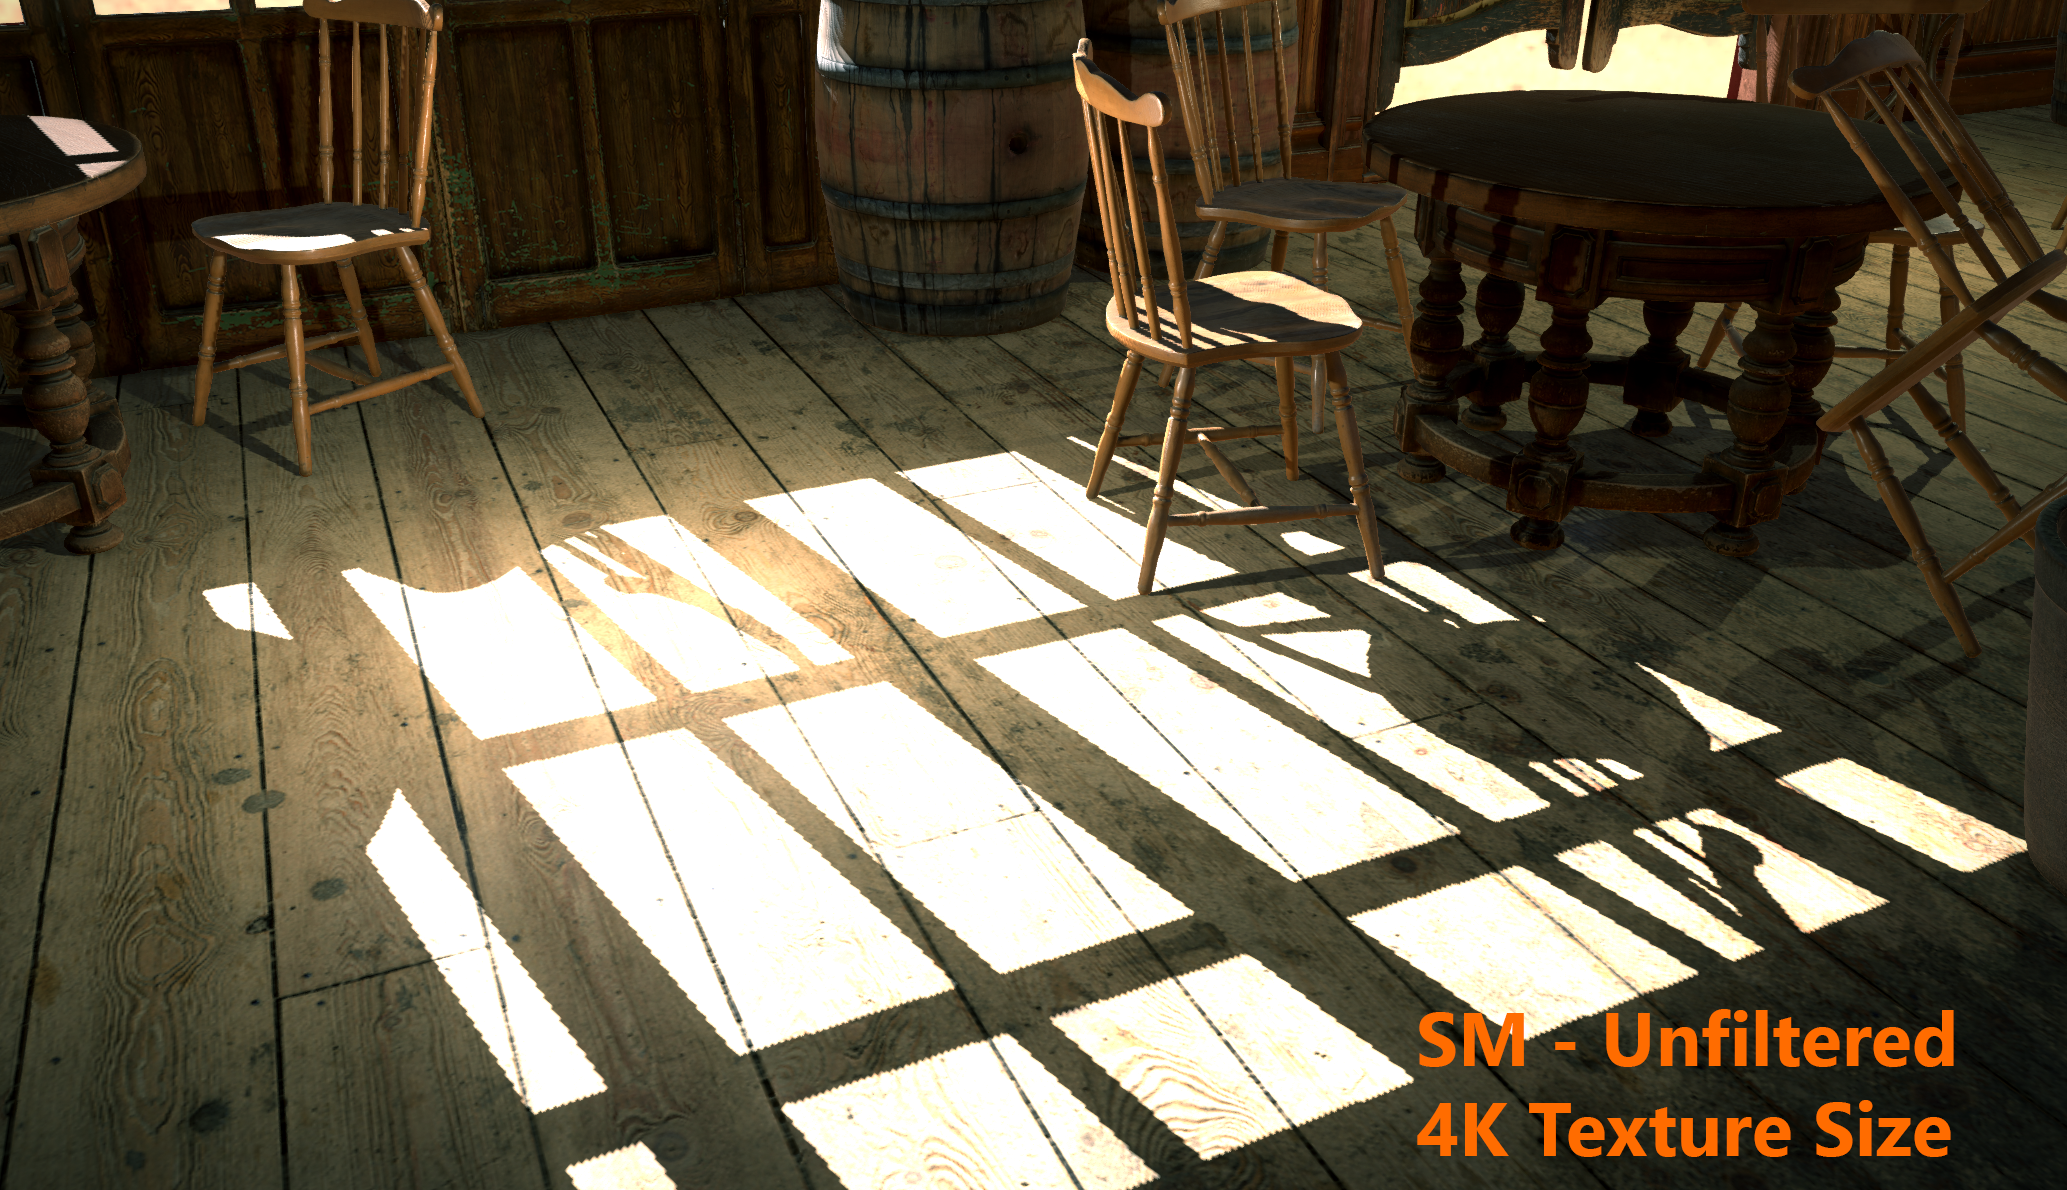
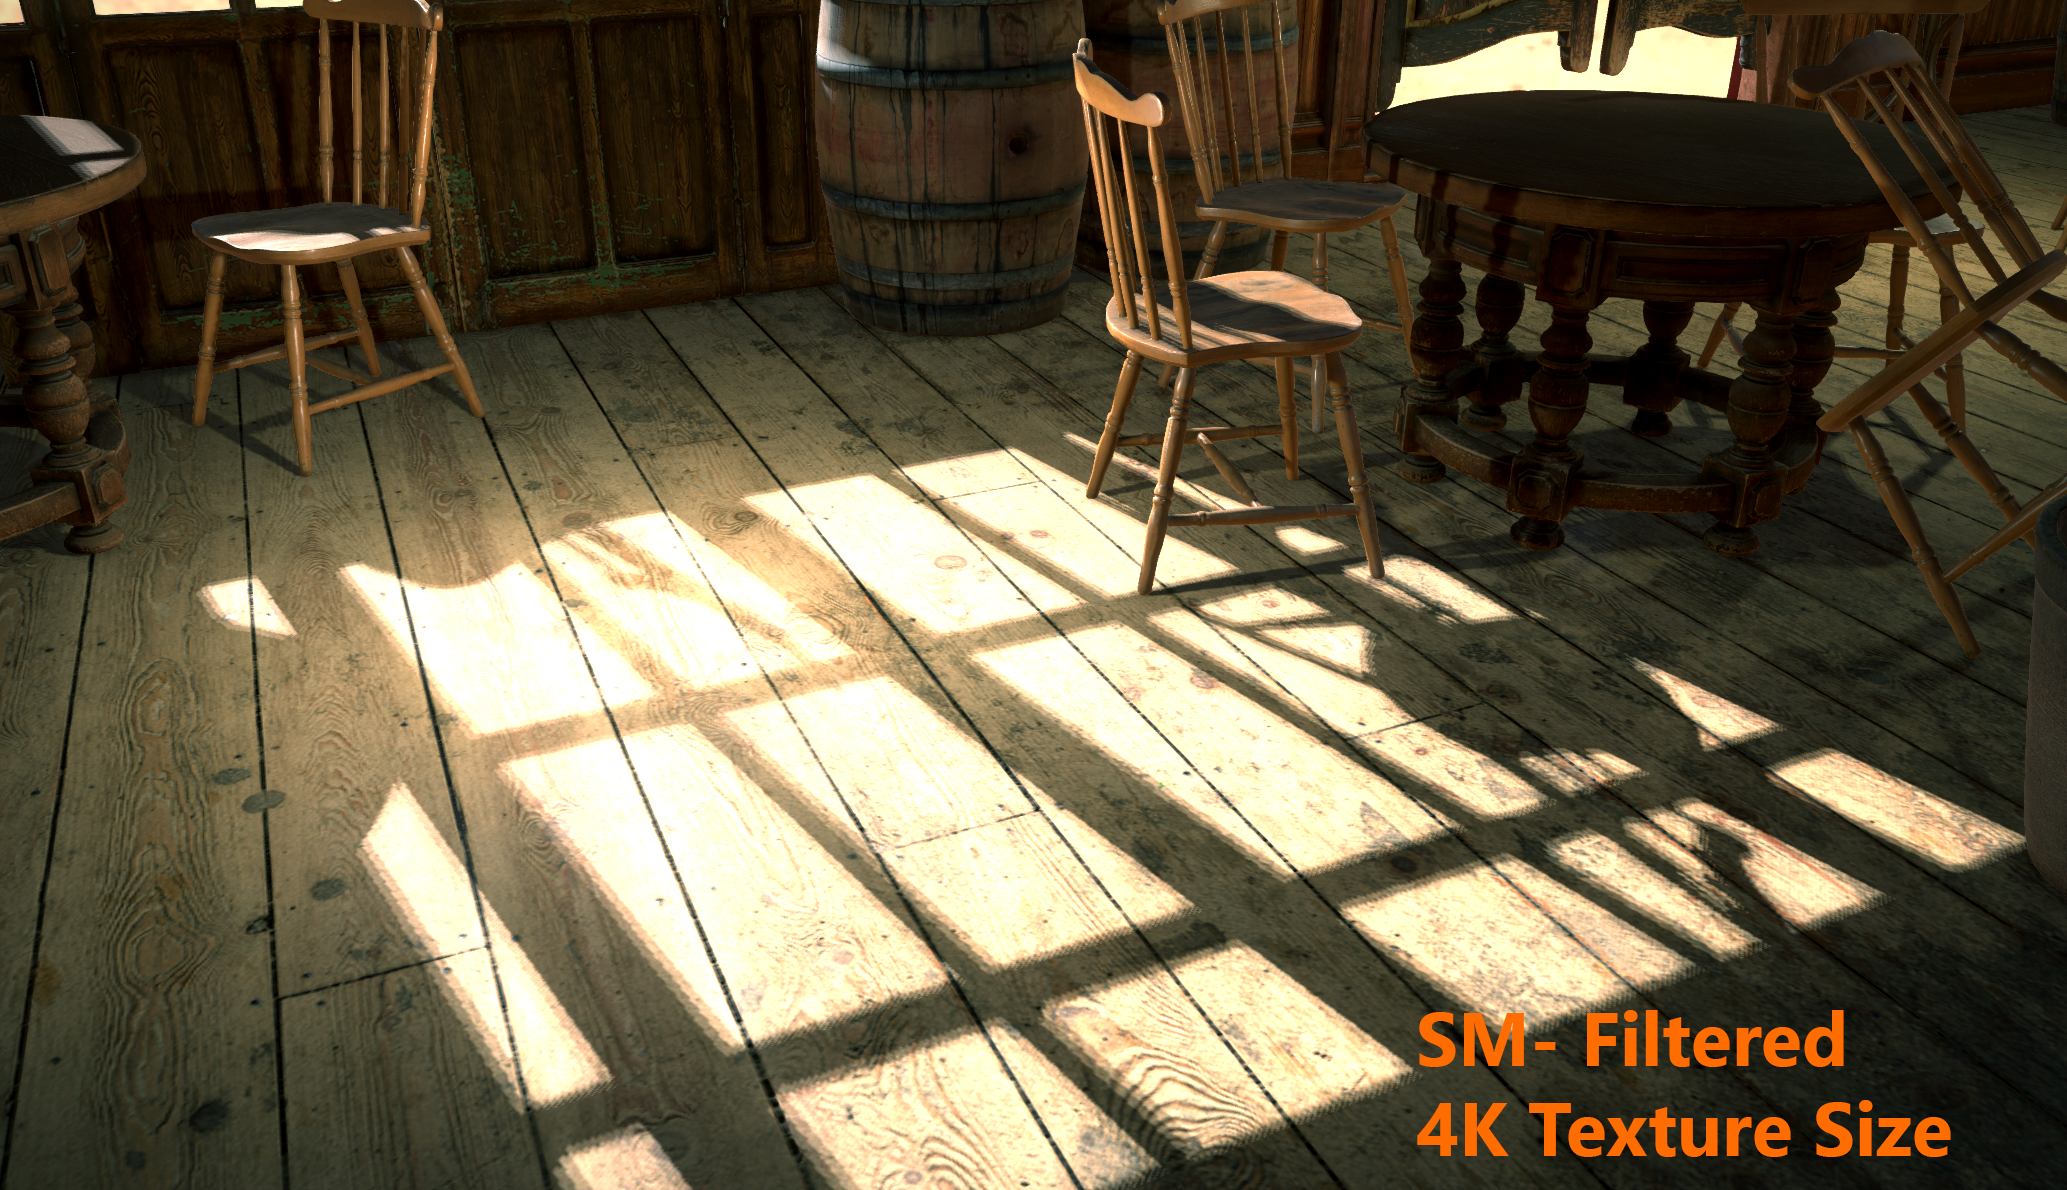
See a comparsion between Shadow Maps Un-/Filtered and VSM Un-/Filtered. Also take note that the resolution of the Variance Shadow Map is only 2k compared to the PCF, which is 4k!
| PCF Shadow Map unfiltered | PCF Shadow Map filtered |
 | 
|
| Variance Shadow Map (VSM) unfiltered | Variance Shadow Map (VSM) filtered |
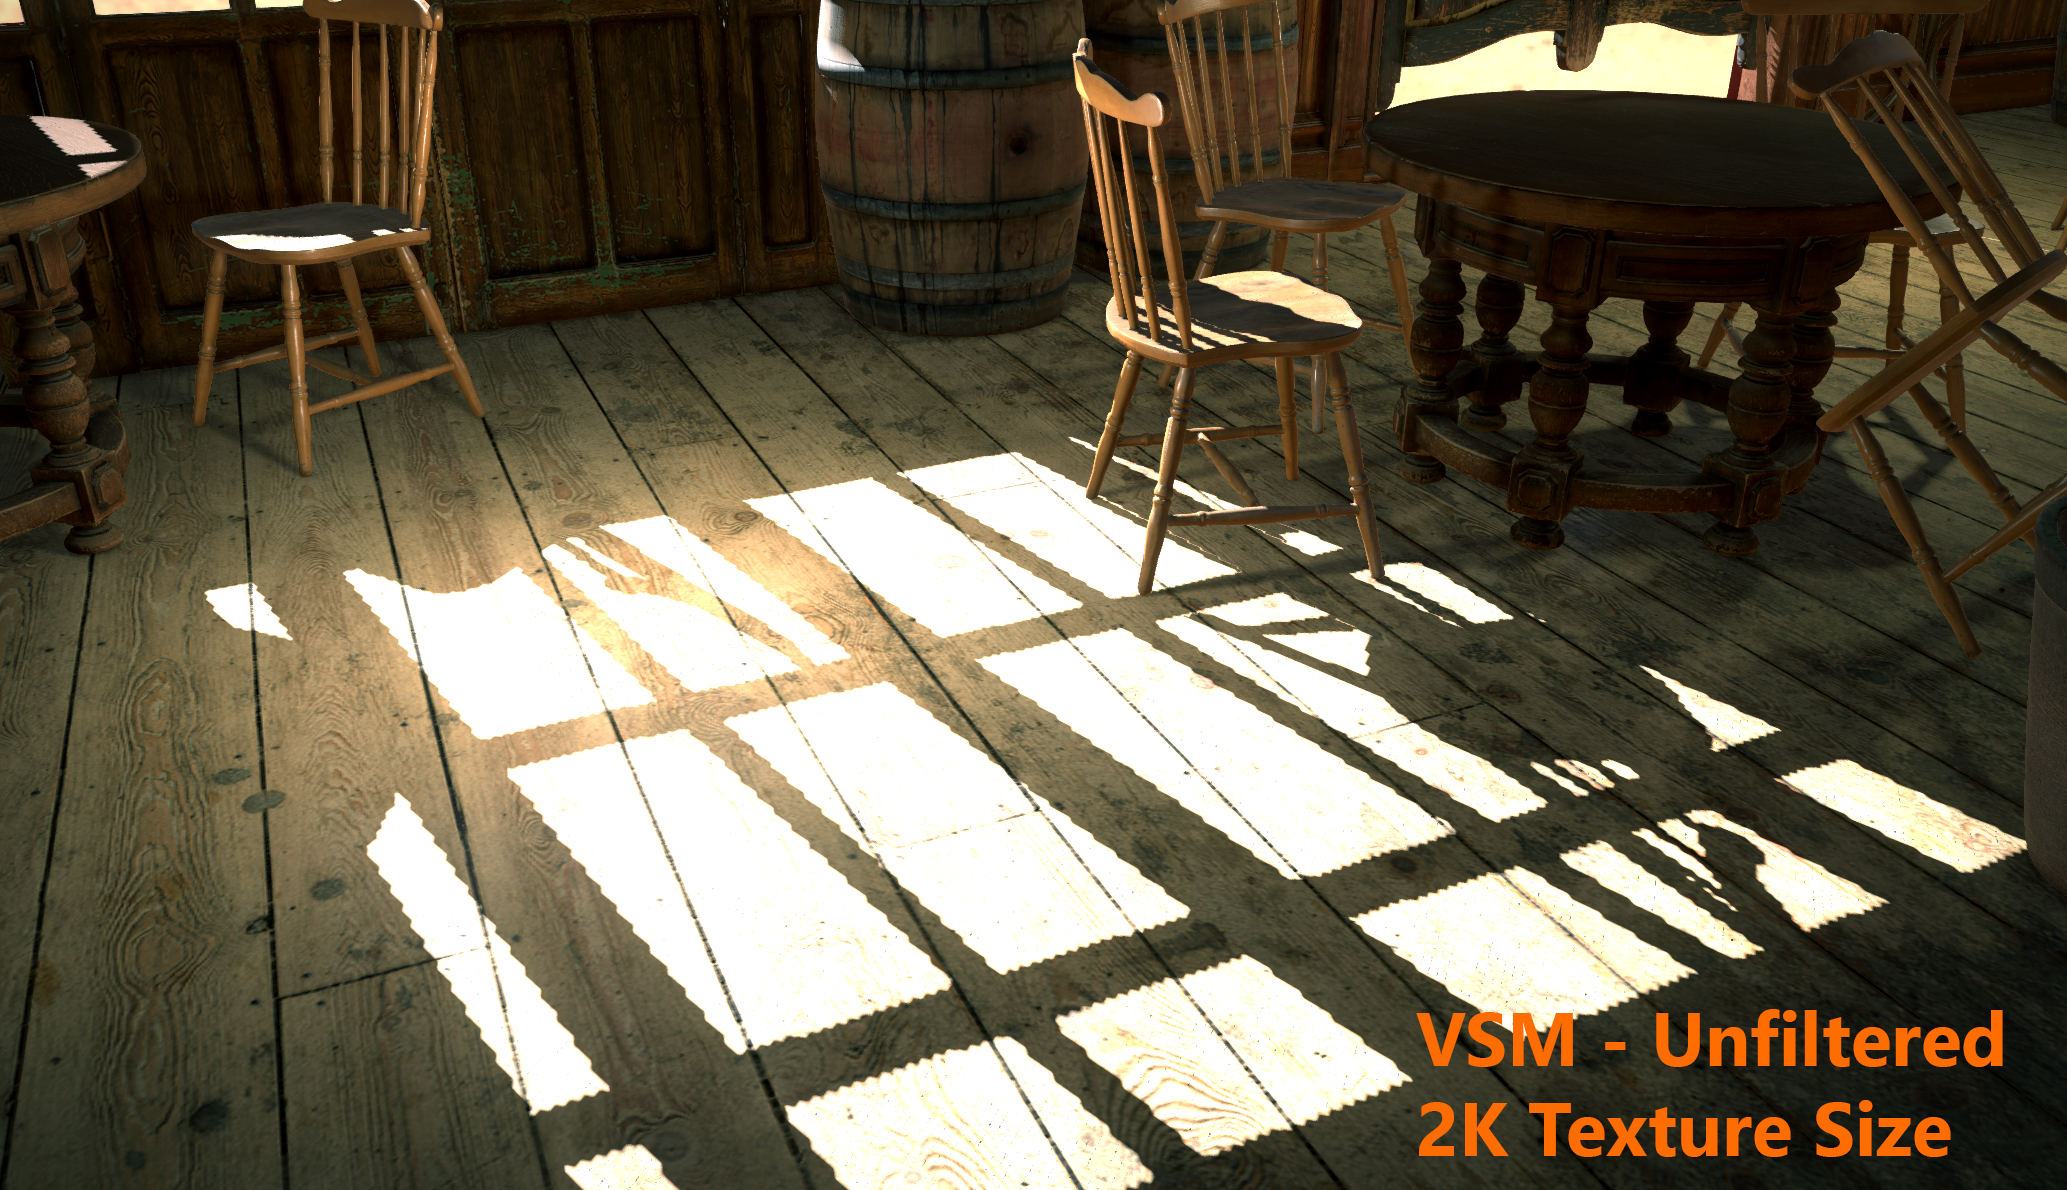 | 
|
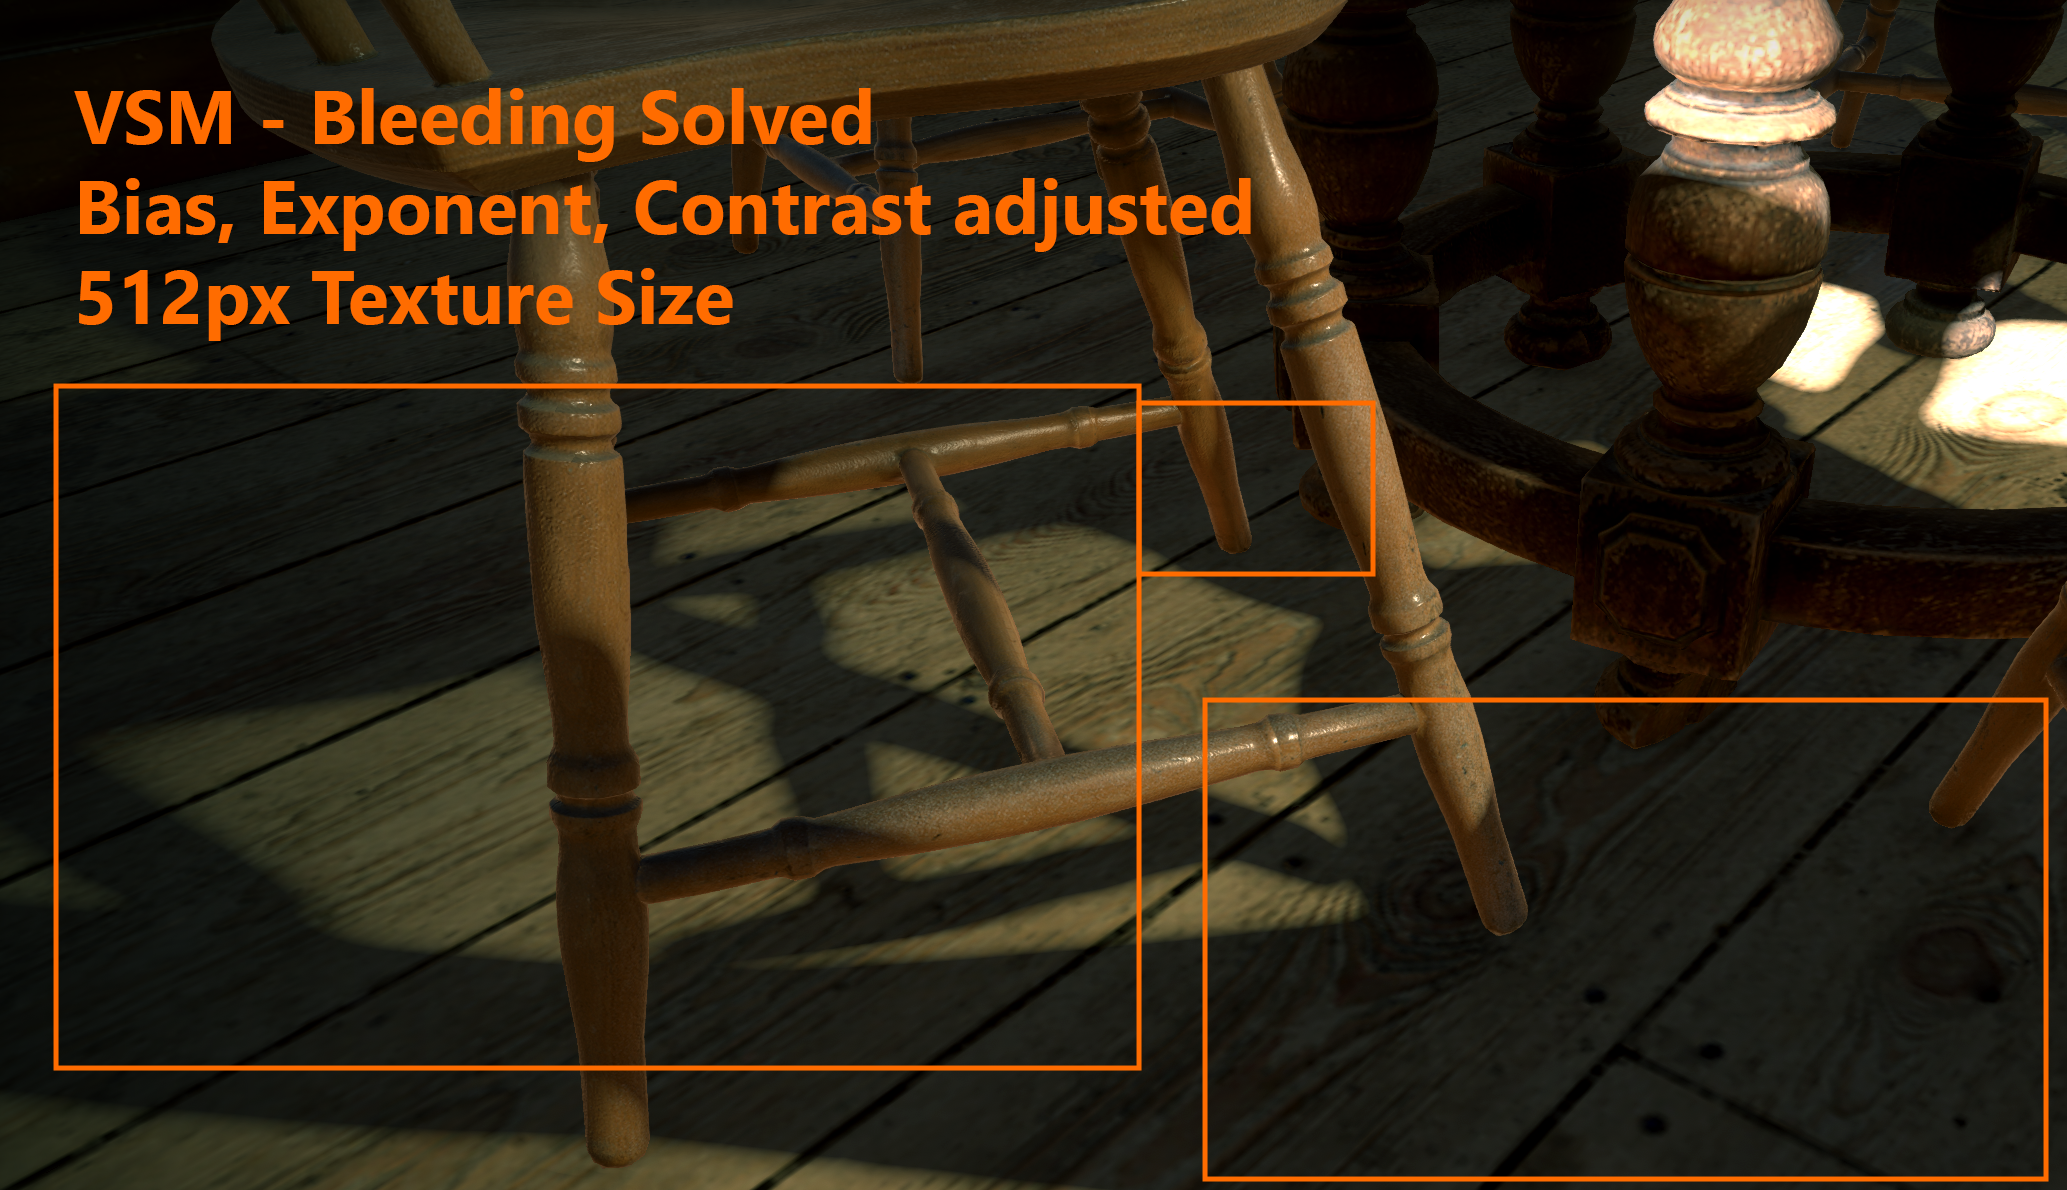
PCF shadows are cursed with shadow acne, meaning surfaces that should not be in the shadow will self-shadow randomly. This is solved by tweaking bias values, at the cost of peter panning that make objects seem to float as the shadow disconnects with the floor. Properly filtered VSM shadows do not suffer from acne or peter panning, but from light bleeding makes surfaces that should be in shadow be lit.
| VSM Light Bleeding | VSM Bleeding solved |
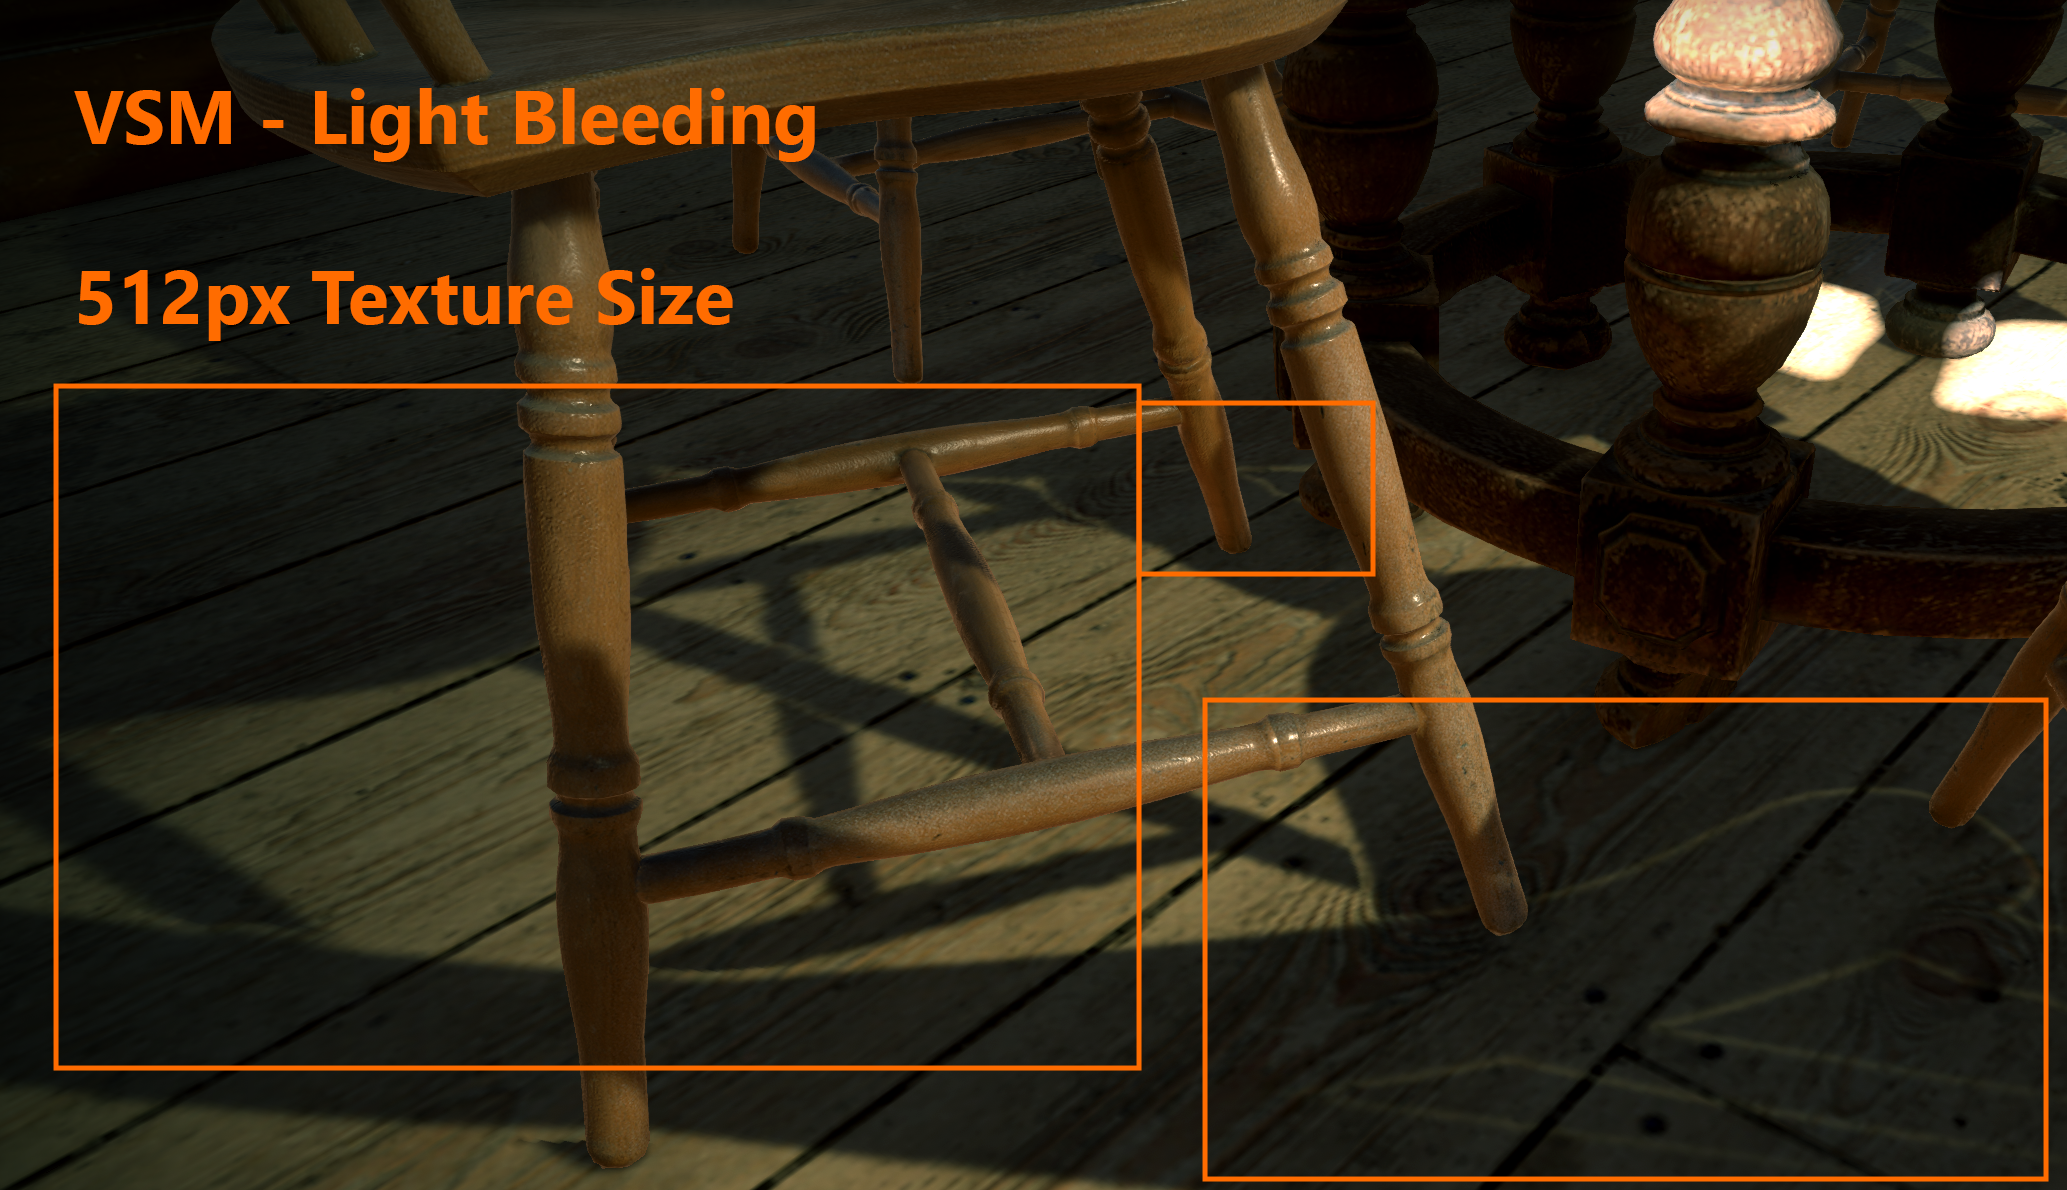 | 
|
Exponential Variance Shadow Maps (EVSM) were developed to fight light bleeding, at the cost of having a new set of parameters to tweak. EVSMs are an extension of VSMs.
How the Magic Works, Sort Of
All shadow maps render the world from the point of view of the light source, storing some representation of the distance to the surface that is hit by the light. When rendering the world normally, from the point of view of the camera, if the distance of the point rendered is larger than that stored in the shadow map, this point is not where the light hits the surface, and therefore in the shadow.
PCFs store the distance directly. Acne is created because the comparison is only exactly correct in the center of the shadow map pixel, half of it is larger (in the shadow) and half of it is smaller (lit). The "bias" parameter shifts the equation to avoid this, at the cost of Peter Panning. The other problem with PCFs is that you can not just blur or filter the shadow map: Especially at edges, interpolating the distance values will just cause more problems. Instead, for smoothing multiple samples in an area need to be fetched and then compared individually, deciding if this pixel is closer to the light or not, and then the percentage of those pixels that are closer is the filtered value. Hence the name "percentage closer filtering".
VSMs store the distance and the distance squared in the shadow map. This requires not only storing two values, it also requires a higher precision, increasing the cost of creating, storing and using the shadow map. Instead of doing a straight comparison of distance values, a statistical inequality based on the variance of the distribution is used. This calculates the probability that something is in shadow, and probability is a value that goes smoothly from 0 to 1, not a hard on or off. For this to work the shadow map must be filtered, which is why the method falls apart with small filter radius. Without filtering there is no probability thingy going on and this becomes a normal compare with acne, pixelating and all the bad stuff happening.
But we are still blurring a lot of pixels in the shadow map, mixing all the detail into one shadowmap pixel. Remember that the PCF shadows filter and compare many pixels, so that all the detail of the geometry is preserved. With VSMs we blur everything together and make one compare, something has to be lost, which is why we have light bleeding. You will notice that light bleeding comes from places where shadows from far and near objects are blurred together in the shadowmap. One way to deal with this is to warp the depth value. Exponential variance shadow maps are VSMs that store not the distance and the square of the distance, but the exponential function of both. This gives us one parameter to tweak - a multiplier before the exponential functions - and hopefully we can shift the distribution in a way that gets rid of all our light bleeding. Many ways to warp have been discussed, and one successful attempt was combining the positive exponential warp ex with the negative warp -e-x, which is unfortunately even slower to create, filter and sample.
Experimentation has shown that using the same exponent for postive and negative warp is not optimal, but having to tweak another value is not a good experience. So we provide modes where the negative exponent is set to 1.0 or half of the positive, as those values have proven to be good choices for some scenes.
| Method | What's in the shadow map | Required Precision |
|---|---|---|
| PCF | d | low |
| VSM | d, d2 | high |
| EVSM positive | ed*x, (ed*x)2 | high |
| EVSM positive & negative | ed*x, (ed*x)2, -e-d*x, (-e-d*x)2 | high |
| EVSM positive & negative one | ed*x, (ed*x)2, -e-d*1.0, (-e-d*1.0)2 | high |
| EVSM positive & half negative | ed*x, (ed*x)2, -e-d*x*0.5, (-e-d*x*0.5)2 | high |
where e is the Euler number, d is the distance in 0..1 range, and x the the "Exponent" tweaking factor.
Filtering
The default way to generate a VSM / EVSM texture is identical to PCF : render the scene from the point of view of the lightsource, with very fast depth only rendering. Then, unique to VSM / EVSM, calculate a new, high precision texture with depth and depth squared, and blur that. Unlike PCF filtering we blur the whole texture at once, so we can seperate the blur in X and Y direction. So if we blur by 10 pixels, we need to sample 10+10 = 20 pixels, not 10*10=100 pixels, a massive performance improvement that is part why VSMs allow for much better filtering.
Pointlights Need Filtered Cubemaps
Pointlights are a problem, as we need to render the world from the point of view of the light-source into a cubemap, rendering in 6 directions with 90° field of view. While the rendering itself is easy, blurring a cubemap correctly is a problem. The algorithm used is fast but will not correctly blur the edges and corners.
First of all, a fast blur needs to blur all pixels by the same radius. The difference in pixel density makes the blur seems 1.4 times smaller at the edge and 1.7 times smaller in the corners than at the center of a cubemap face.
This change in density also leads to a discontinuity that is visible as a fake shadow when a straight plane is rendered across the cubemap edge. This can be fixed with a bit of Bias.
The trick of separating Blur in X and Y runs into trouble. This works fine at the faces and edges, but doesn't work at all at the corners. We use a compromised algorithm that runs at full speed and gets rid of most of the problems, but again fake shadows can appear in the corners of the cubemap along the cubemap seams.
Tweaking
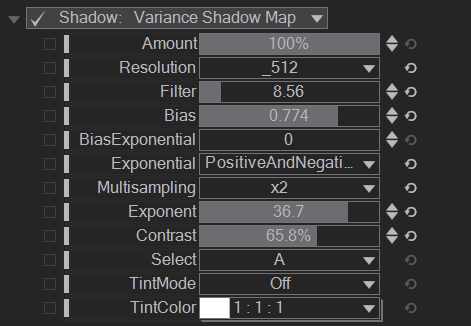
All tweaking is choosing between two bad outcomes, trying to find a sweet spot where things look acceptable. This is why you have to deal with this yourself instead of having optimal settings provided by Ventuz.
Filter is the filter diameter in pixels on the shadow map. If it is set to very low values (<3), the variance shadow map math will fall apart and you start seeing hard shadows and acne. If you use larger value (>10) you should check if you could lower the Resolution by 2 and lower the filter by 2 at the same time, for a massive performance improvement without loss in quality.
Multisampling allows to use multisampling while rendering the shadow maps. Using x4 multisampling is similar to using twice the resolution in X and Y (4 times the pixels). Multisampling has a slightly worse filtering quality than rendering at a highter resolution, but especially 4x multisampling is almost for free, as GPU hardware is hightly optimized for it. 8x Multisampling can be a bit slow and should be avoided in any context. The Filter diameter is after multisampling was resolved, and still should avoid very low values (<3).
VSM suffer a lot from light bleeding. Setting Exponential to positive and tweaking the exponent will greatly improve things, but this can lead to some edges being unfiltered in a very ugly way. If you encounter this, choose one of the more expensive "positive and negative" modes.
The Exponent is used by the exponential variants is a factor that is multiplied to the depth to scale the exponent. This tweaks the severeness of the "warp", the goal is to find a setting that minimizes light bleeding where it is most visible. Good values seem to be around 20. Note that there is no value that disables the warp. Exponent=1 is still an exponential warp, and values below 1 won't work. With "positive and negative", there are two exponent factors to be tweaked. Instead of providing two sliders, we chose to implement 3 versions of positive and negative, in most cases one of the three is near optimal:
- Positive and Negative : Both exponents factors are the same.
- Positive and Half Negative : the negative exponent factor is half the positive.
- Positive and Negative one : the negative exponent factor is fixed to one.
Although acne is rarely a problem with VSMs, there is still a Bias value to tweak if one needs it. These values do not represent any physical units but are laid out in a way that makes them simple to adjust in a 0 to 1 range. VSMs use Bias, exponential VSMs use BiasExponential, this is to enable switching back and forth between VSMs and EVSMs without needing to readjust the bias. The positive and negative modes use the ExponentialBias for positive and the normal Bias for the negative warp.
With Contrast one can try to fill fix bleeding. This treats all slightly lit areas as fully shadowed, which can completely fill shallow light bleeding, but also makes the shadows harder, defeating the whole VSM approach.
Directional Shadow Volume
You can define a shadow volume for the directional light source. Enable the LightVolume by selecting the Light Relative Volume from its drop down menu.
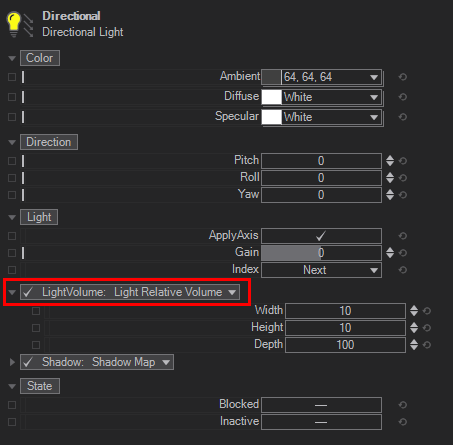
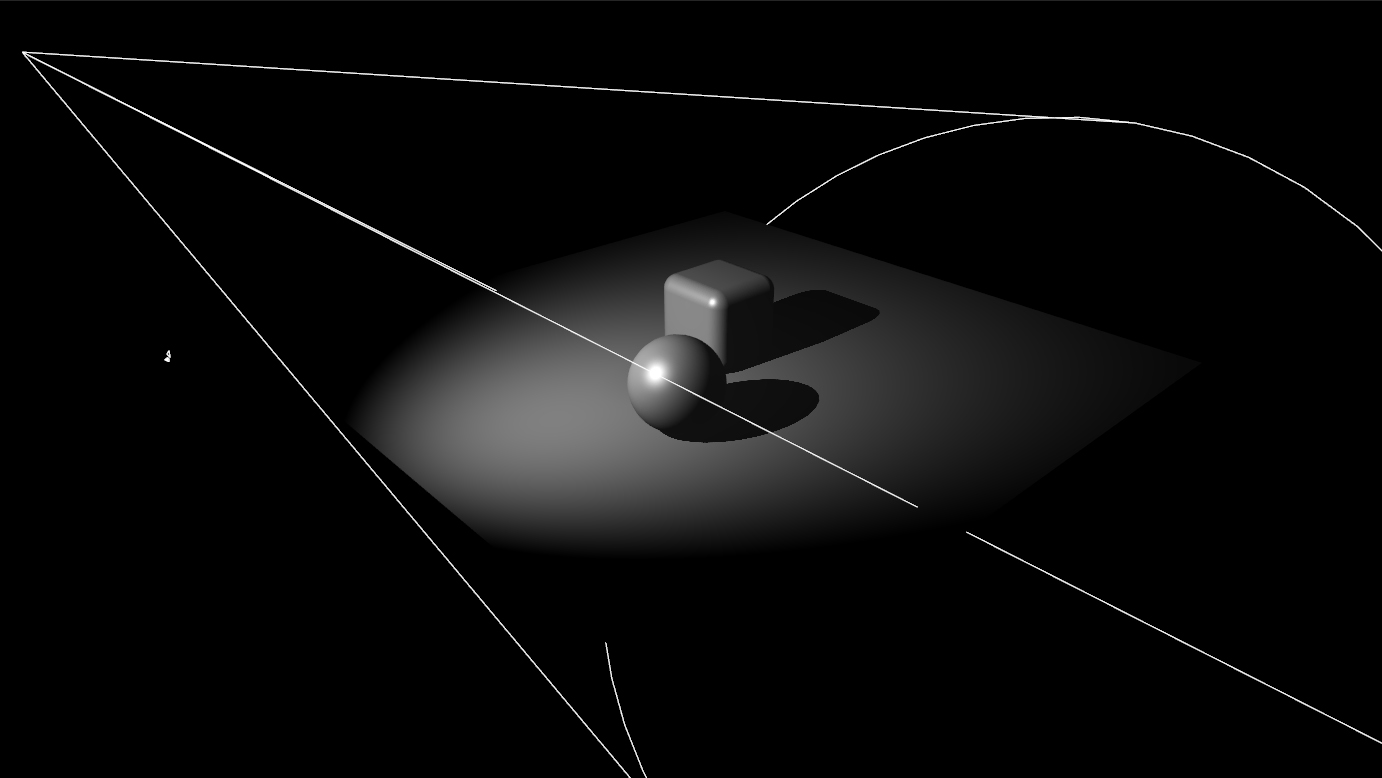
The so called shadow volume can be visualized by enabling the Show non-render objects button in the top bar.

This will show the shadow volume by rendering infinte lines, which visualize the volume bounds. By using the Width, Height and Depth properties, you can adjust the volume's boundaries. Everything that is inside the volume will act as a shadow caster. It is therefore possible to have just a part of an object throw a shadow, as long as it is inside the volume. See the screenshot below:
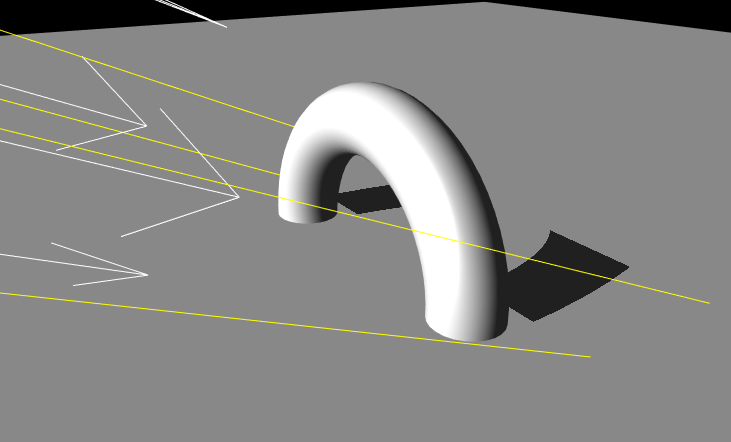
This way you can limit the boundaries of a directional shadow. Instead of using the whole scene boundaries to create the shadow map, you can now limit it and therefore safe shadow map precision, therefore performance. Before, you would need to increase the shadow Map Resolution to have at least more details when using a very huge scene. Now you can safe performance and or the resolution, by defining the volume for the directional light shadow.
Below we compare a scene, one without- and one with LightVolume used. The scene is VERY huge because the groundplane has a size of 400 units. The torus is compared really small:
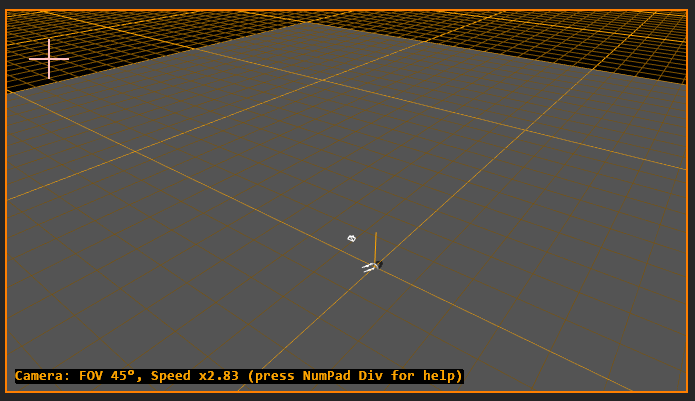
Both scenes use the same settings for the Shadow Map Resolution of _2048, same Directional Light Source and positions. The upper screen shows the Directional Light Source without the LightVolume while the lower screen shows the exact same Directional Light Source with the LightVolume enabled and adjusted to be at 10x10 units (the boundaries are indicated by the yellow lines).
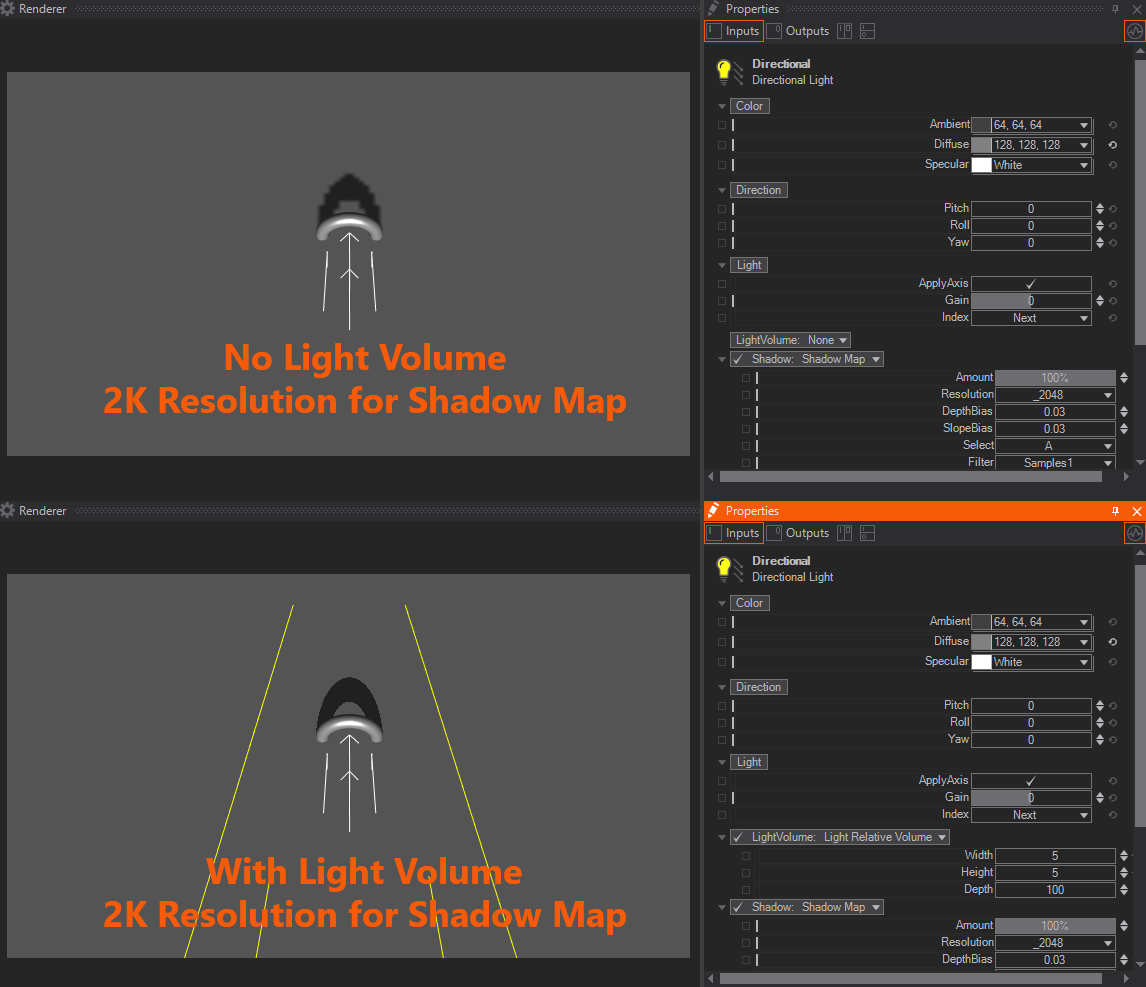
While the upper screen result is more of a blocky and pixelated shadow map, compared to the crisp and high resolution shadow map for the other, you can see, that without a defined LightVolume the whole scene (in this case the 400unit ground floor) is taken into account for the shadow map calculation. Therefore you have less pixels in the same shadow map available - since it has to cover the whole scene. If you define a LightVolume for the shadow map calculation you can define specific areas that really advance of a shadow map or are point of interest, while not wasting the space on the shadow map or resolution in other areas in the scene, which are out of focus or point of interest.
PBR Light sources
The PBR Light sources share the most properties shown above, they are just arranged slightly different to the traditional phong light sources above. PBR Light sources differ that they have just a single Color property, which links the Diffuse and Specular color and doesnt apply any kind of Ambient light. PBR Materials usally do not need any ambient since the usecase is to have a PBR SkyBox which lights up the material. Still, one can use the PBR Ambient to have a global ambient lighting for the PBR Material if needed.
PBR Light has a property group to select which light source should be used. Available are Directional-, Point-, Spot- and Ambient- shape. Each light shape property group has its own properties, which vary depending on the light shape. Basically they consist of position, orientation and other light type related properties as a traditional phong light.
The General properties are Color, Gain and ApplyAxis. As mentioned above the Color is just a single value since the specularity and diffuse would be controlled by the PBR Material properties.