Navigation

Ventuz Introduction

  • Introduction
  • Getting Started
  • Ventuz Editions
  • Ventuz Products
  • Realtime Rendering
  • Frequently Asked Questions
  • Common Mistakes
  • Deploying a Ventuz Presentation
  • Scene Performance and Tweaks

Quick Guides

  • Quick Guide Index
  • Business Logic
  • 3D Art
  • 2D Art
  • Programming
  • System Engineer

General

  • Index
  • What's New
  • Ventuz System Requirements
  • Communication Protocol Overview
  • Configuration Editor
  • Audio / Video Configuration
  • Machine Configuration
  • Web Configuration Editor and License Manager
  • GPI Configuration for Runtime or Director
  • Supported Formats
  • Supported Hardware
  • Multisampling / Anti-Aliasing
  • Input Subsystem
  • Ventuz Proprietary Files
  • Migrating Content to Ventuz 6
  • Migrating Content to Ventuz 5
  • Summary Shortcuts
  • Terminology
  • Manual Index

Ventuz Designer

  • Designer Indices
Introduction
  • Designer Introduction Index
  • Designer Overview
  • Realtime Rendering
  • Project Browser
  • Designer Interface
  • Designer Options
  • Working with Nodes
  • Hierarchy and Content Editors
  • 2D Workflow
  • 3D Workflow
  • Animation Workflow
  • Best Practices
  • Reading Data in Ventuz
  • Display Images and Movies
  • Scene Performance and Tweaks
  • Deploying a Ventuz Presentation
  • Render to Disk
User Interface
  • Designer User Interface Index
  • Designer Interface
  • Renderer Window
  • Layer Editor
  • Property Editor
  • Property Groups
  • Hierarchy Editor
  • Content Editor
  • Find and Replace
  • Toolbox
  • Animation Editor
  • Shader Editor
  • Text Editor
  • Message View
  • Scene Tree
  • Stage Editor
  • Container Outline
  • Watches Editor
  • Performance Statistics
2D Workflow
  • 2D Workflow Index
  • 2D Workflow
  • Layer Editor
  • Common Layer Properties
  • IPP Effects
  • Color Correction FX
  • Distortion FX
  • Filter FX
  • Hierarchy and Content Editors
  • Display Images and Movies
3D Workflow
  • 3D Workflow Index
  • 3D Workflow
  • Hierarchy and Content Editors
  • Renderer Window
  • Camera Navigation
  • Manipulate Objects with Gizmos
  • Layer Editor
  • Property Editor
  • Hierarchy Editor
  • Working with Nodes
  • Isolated Objects
  • Containers
  • Text Rendering
  • Character Sets
  • Geometry Import
  • Display Images and Movies
  • Particle System
  • Creating Realistic Reflections
  • Unreal Integration
  • Notch Integration
  • E2E Node Overview
Logic Workflow
  • Logic Workflow Index
  • Hierarchy and Content Editors
  • Content Editor
  • Hierarchy Editor
  • Working with Nodes
  • Property Editor
  • Containers
  • Project and Scene Data
  • Reading Data in Ventuz
  • Display Images and Movies
  • Input Subsystem
  • Multitouch
  • TUIO Protocol
  • Open Sound Control
  • Unreal Integration
  • Notch Integration
  • E2E Node Overview
Animation Workflow
  • Animation Workflow Index
  • Animation Workflow
  • Animation Editor
  • Content Editor
  • Hierarchy Editor
  • Property Editor
  • Animation and State Engine
  • Templates
  • Template Engine
  • Unreal Integration
  • Notch Integration
Project Structure
  • Project Structure Index
  • Annotations
  • Projects and Scenes
  • Project Properties
  • Project Maintenance
  • Project and Scene Data
  • Scene Management
  • Scene Statistics
  • Scene Tree
  • Performance Statistics
How Tos
  • Designer How to Index
  • How to Run Ventuz
  • How to Work with Designer
  • Ventuz Designer Drag&Drop Workflow
  • How to work with Shadows
  • How to Build Content for Multiple Screens
  • How to Use Emoijs
  • How to Build a Template
  • How to Use the Color Difference Keyer
  • How To Use the HDR Engine
  • How Create Lens Flares and Bloom
  • How to Create Visuals Loader Node
  • How to Remote Control with a Phone
  • How to use Head Mounted Displays
  • How to work with 3D Reference Layers
  • How to create a Firework Particle System
  • How to use DDS with new Block Compression modes
  • How to use the Substance Integration
  • How To Integrate Unreal
  • How To Integrate Notch
  • How To use the Vertex Integration
  • How To Control and Customize Ventuz
Reference
  • Available Nodes
  • Animation Nodes
  • Material&Color Nodes
  • Data Nodes
  • E2E Nodes
  • Geometry Nodes
  • Interaction Nodes
  • IO Nodes
  • Layers
  • Light Nodes
  • Logic Nodes
  • Render Option Nodes
  • Slides Nodes
  • Sound Nodes
  • Text Nodes
  • Texture Nodes
  • VR Nodes
  • World Nodes
  • Summary Shortcuts
  • Layer Editor Shortcuts
  • Hierarchy Editor Shortcuts
  • Content Editor Shortcuts
  • Animation Editor Shortcuts
  • Director Shortcuts

Ventuz Director

  • Index
  • Introduction
  • Environment
  • Show
  • User Interface
  • Assets
  • Taking Action
  • Property Editor
  • Shot Box
  • Project Data
  • Pages
  • Playlist
  • Timeline
  • Content References
  • Topology
  • Channels
  • Macros
  • Designing Templates
  • Plug-Ins
  • Shortcuts
  • Command Line Options
  • Application Settings
  • Glossary
  • GPI Configuration

Ventuz Runtime & Configuration

  • Runtime Index
  • Configuration Configuration Editor
  • Machine Configuration
  • Video/Audio Configuration
  • Web Configuration Editor and License Manager
  • Render Setup Editor
  • Warping and Soft-Edging Editor
  • Machine Clustering
  • Supported Hardware
  • Director Mode
  • Runtime How Tos Index
  • How to Configure Audio
  • How to Use Live Options
  • How To Play Out On Multiple Screens
  • How To Render on a Machine Cluster
  • How to Use Head Mounted Displays
  • How to Setup Spout with Ventuz
  • How to Use Newtek NDI
  • How to Use a Mixed Frame Rate Cluster
  • How to Use Tracking

How To

Designer
  • Designer How to Index
  • How to Run Ventuz
  • How to Work with Designer
  • Ventuz Designer Drag&Drop Workflow
  • How to work with Shadows
  • How to Build Content for Multiple Screens
  • How to Use Emoijs
  • How to Build a Template
  • How to Use the Color Difference Keyer
  • How To Use the HDR Engine
  • How Create Lens Flares and Bloom
  • How to Create Visuals Loader Node
  • How to Remote Control with a Phone
  • How to use Head Mounted Displays
  • How to work with 3D Reference Layers
  • How to create a Firework Particle System
  • How to use DDS with new Block Compression modes
  • How to use the Substance Integration
  • How To Integrate Unreal
  • How To Integrate Notch
  • How To build and playback Ventuz Content in Vertex
Runtime & Configuration
  • Runtime How Tos Index
  • How to Configure Audio
  • How to Use Live Options
  • How To Play Out On Multiple Screens
  • How To Render on a Machine Cluster
  • How to use Head Mounted Displays
  • How to setup Spout with Ventuz
  • How to use Newtek NDI
  • How to use a Mixed Frame Rate Cluster
  • How to use Tracking
  • How To Integrate Unreal
  • How To Integrate Notch
  • How To build and playback Ventuz Content in Vertex
Director
  • How To Control Multiple Graphics Independently From Each Other
  • How to use the Companion with Director

Ventuz Node Reference

ANIMATION
  • Mover
  • Alternator
  • Simple Control
  • Timeline Control
  • Anmation Rig
  • Keyframe Animation
  • Animation Group
COLOR/MATERIAL
  • Alpha
  • Fog
  • Ground Fog
  • Sky Box
  • Color to RGBA
  • HSLA to Color
  • RGBA to Color
  • Color Transformer
  • HLSL Shader
  • Color
  • Material
  • Color Picker
  • Substance Material
DATA
  • Database
  • Excel
  • JSON
  • RSS Feed
  • Resource Linker
  • Text File
  • XML
E2E
  • E2E Axis
  • E2E Data
  • E2E Control
  • E2E Layer
  • E2E Provider
  • E2E Node Overview
GEOMETRY
  • Rectangle
  • Rounded Rectangle
  • Gradient Rectangle
  • Overlay Rectangle
  • Cube
  • Circle
  • Sphere
  • Cylinder
  • Cone
  • Torus
  • Chart
  • Random Points
  • Mesh Loader
  • Geometry Import (Live)
  • Volume
  • Get Bounding Box
  • Arrow
  • Particle System
  • Path Renderer
  • Geometry Renderer
INTERACTION
  • Interaction Rect
  • Touch Button
  • Touch Excluder
  • Touch Marker
  • Touch Paint
  • Touch Pattern
  • Touch Proxy
  • Touch Ripples
  • Touch Transformations
  • Web Browser
  • Touch Teleport
  • Touch Simulator
INPUT/OUTPUT (I/O)
  • GPI
  • Joystick
  • Keyboard
  • MIDI
  • Mouse
  • Network
  • Open Sound Control
  • Serial
  • Timecode
  • DMX
  • HTTP
  • RamDiskWriter
LAYER
  • 3D Layers
  • 3D Layer Reference
  • 2D Layers
  • PSD Import Layer
  • E2E Layer
  • Others
LIGHT
  • Light Sources
LOGIC
  • Array Processing
  • Convert To Text
  • Cluster Synchronization
  • Counter
  • Date Time
  • Directory
  • Dispatcher
  • Enumeration
  • Expressions
  • Invert
  • Log
  • Loop Breaker
  • Math Effects
  • Matrix Operations
  • Scene Event
  • Script
  • String Operations
  • System ID
  • Text Splitter
  • Timer
  • Toggle
  • URL
  • Value Switch
  • Value Buffer
  • Variables
  • Visual Indexer
RENDER OPTIONS
  • Alpha Blending
  • Color Write
  • Alpha Testing
  • Clip Plane
  • Filter
  • Mask
  • Mirror
  • Effect
  • Render Cube Map
  • Draw Modes
  • Stencil
  • ZTesting
SOUND
  • Audio Clip
  • Sound
  • Volume Control
  • Audio Analysis
SLIDES
  • Slide Manager
  • Slide
  • Slide Port
  • Pivot
TEXT
  • Text Effects
  • Text Layouts
  • Text Rendering
TEXTURE
  • Background
  • Hatch
  • Image
  • Texture
  • SVG Loader
  • Gradient Texture
  • Live Video
  • Movie Stream
  • Movie Frame
  • Movie Clip
  • Texture Loader
  • Snapshot
  • Snapshot Framebuffer
  • Texture Saver
  • Video Source Selector
  • VIO Input
  • Spout Receiver
  • NDI Receiver
  • Substance Loader
  • QR Code
VR/AR
  • Tracked Devices
  • Draw Tracked Devices
WORLD
  • Axis
  • Billboard
  • GetWorld
  • SetWorld
  • Arrange
  • Ticker
  • Layout
  • Group
  • World Z Sort
  • YesNo
  • Switch
  • Spread
  • Filter Pass
  • Set Pass
  • Hierarchy Container
  • Scene Port
  • Content Container
  • Template Port
  • Container Info
  • Camera
  • Paths

Advanced and Development

  • Advanced and Development Index
  • Command Line Options
  • Ventuz IP Ports
  • Ventuz Machine Service
  • TUIO
  • .NET Scripting
  • HLSL Shader Programming
  • Ventuz API and SDK
  • Ventuz Extension API
  • Ventuz VIO API
  • Ventuz File Format (VFF)
  • Ventuz Stream Out API
  • Lens Calibration File for FreeD
  • E2E Node Overview
  • Unreal Integration
  • Notch Integration
Remoting
  • Remoting Index
  • Remoting Overview
  • How To Control and Customize Ventuz
  • Remoting 4
  • Remoting 4 via Websockets
  • Remoting 4 via HTTP
  • Director Remoting
  • Deprecated Remoting
  • Remoting Machine Signature

Misc

  • Presets
« Previous:
» Index «
Next: »

Z-Testing

Z-Testing This node modifies the depth information that is written by geometries into the depth buffer (Z-Buffer).

The Z-Testing Node is an Alias of the Material Node. It changes one of the tests that is performed to decide whether a fragment of an object is rendered or not. The Material Node has other options that are documented on the respective pages (see table below for more information).

Material User Interface

General

The Material Node controls the appearance of the surface of each rendered Object placed as a child in the Hierarchy. It consists of several options that can be added to its list of properties to overwrite the according options. The options are available under Material Node's Tabs that are represented by the button bar on top of the Material Definition in the Property Editor.

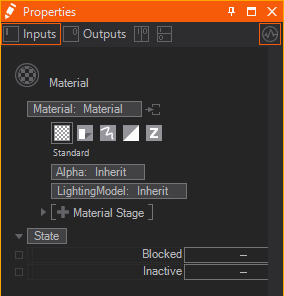
Generally these tabs exist:

Standard

Alpha Options

affects the overall transparency

Lighting Model

changes how light affects the color of a surface

Material Stages

adds textures and material stages that change the shading

Shadow Options

Shadow Options

changes the shadow related behavior

Drawing Style

Draw Mode

applies a draw mode for geometries (lines, solid, sprites etc.)

Blending

Color Write

changes the write mode to specified color channels

Alpha Blending

adjusts the blending of geometries onto the background

Testing

Alpha Testing

applies a custom test against the object's alpha

ZBuffer

defines a custom occlusion test for the geometry

To show the options of a tab simply  click on the according button. You can insert options by clicking on the Property Group's entry and choosing the wanted options from the dropdown.

All options that you do not adjust in a Material node are inherited by the Default Material or the Material node in front.

Icon and Decoration

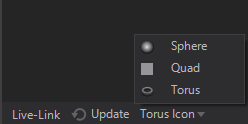
In general the Icon rendering can be changed by switching between Sphere, Quad and Torus at the bottom of the Properties Editor or via .

Based on the Property Groups that are used inside a Material Node the Icon may change.

Rendered Preview

if only Property Group's in the Standard or Shadow Options tab are used.

Rendered Preview with light blue decoration

if Property Group's in the Standard or Shadow Options tab are used together with any other Option like a certain Draw Mode or a certain Blending

Dedicated Option Icon

every Material Option has it's own dedicated Icon, that is shown whenever no other Property Group in any other tab is used.

Extraction

Material Definition

A Material node is a Hierarchy Node by nature. But it can serve as a Material Provider as well. This is useful whenever you want to use the same material in different locations of your hierarchy or once you have Hierarchy Nodes that need more materials than one applied to it (e.g. the Particle System Node). The below image shows both a Material Node and an extracted Material Node Provider together with a receiving Material Node.

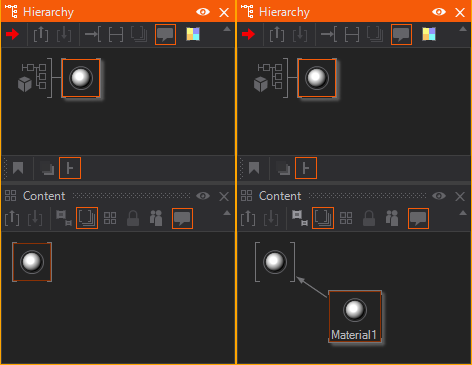
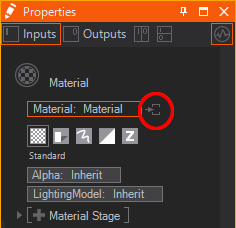
You can either place the Material node in the Content Editor to create an unbound Material Provider node. Or you can use the extract button on any node that hosts a Material Definition to extract it to a provider that can be re-used on other nodes.

Material Options

Since a Material consists of several options sometimes you want to extract some of them to a seperate Hierarchy Node. This way you can apply single Material Options to other parts of the Hierarchy Tree when already added to the Material. Just use the extract buttons next to the Material Options.

The Z-Buffer (also called Depth Buffer) is used to determine object occlusion during Rasterization. During rendering of a triangle, the Z-value of a given pixel is compared to the value stored in the Z-Buffer. Based on the Z-testing function, the triangle either is allowed to overdraw the pixel or not.

The default behavior is to accept pixels that have a Z-value that is smaller or the same as the value in the Z-Buffer, making objects closer to the camera occlude objects which are farther away. While it may seem weird at first to ever use something that is different from the default (and in the majority of cases this is the best option), using different comparison functions can be used to create interesting rendering effects or prevent rendering artifacts from happening.

Z-Testing Options

The Z-Testing Node can influence the above decision in multiple ways. You can either use a simple set of options or an advanced one.

Simple

The Test property can be deactivated to do no Z-testing at all for all children nodes. The Write property can be deactivated to just perform the Z-test but not update the values in the Z-buffer once a pixel is rendered.

In certain situations like rendering a wireframe overlay over a solid object, visual artifacts due to Z-fighting problems can be avoided by adding a small offset to the Z value calculated for a pixel. This offset is only used for the Z-testing comparison. If the pixel is drawn and updates the Z-Buffer, the original Z-value will be used. This offset is specified by a fixed offset called Bias.

Advanced

The Advanced Z-Testing options can change the test function itself to one of the following settings:

  • Inherit: The comparison function is inherited from a parent Z-testing node or the default (Less Equal) if non exists.
  • Always: A pixel is always drawn, no comparison to the value in the Z-Buffer is performed.
  • GreaterEqual: A pixel is drawn if its depth value is greater than or equal to the corresponding value stored in the Z-Buffer.
  • NotEqual: A pixel is drawn if its depth value is not the same as the corresponding value stored in the Z-Buffer.
  • Greater: A pixel is drawn if its depth value is greater (not equal) than the corresponding value stored in the Z-Buffer.
  • LessEqual: A pixel is drawn if its depth value is less than or equal to the corresponding value stored in the Z-Buffer.
  • Equal: A pixel is drawn if its depth value is exactly equal to the corresponding value stored in the Z-Buffer.
  • Less: A pixel is drawn if its depth value is less than the corresponding value stored in the Z-Buffer.
  • Never: A pixel is never drawn.

Slope can be used similar to Bias. It is multiplied with the maximum depth value of the triangle being rendered. It can be used to adapt the offset with the distance from the camera, countering Z-Buffer resolution issues.

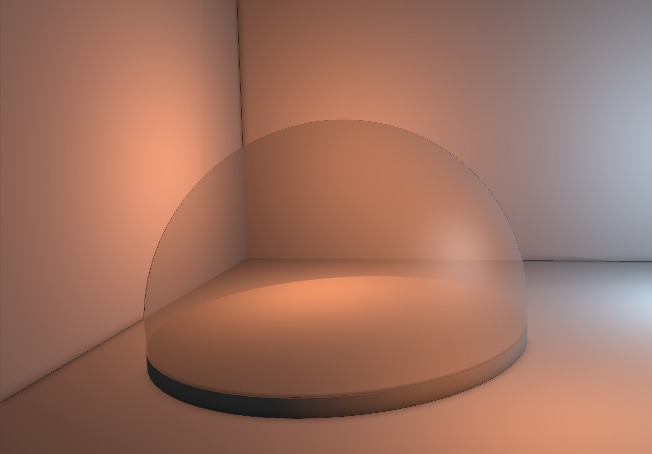
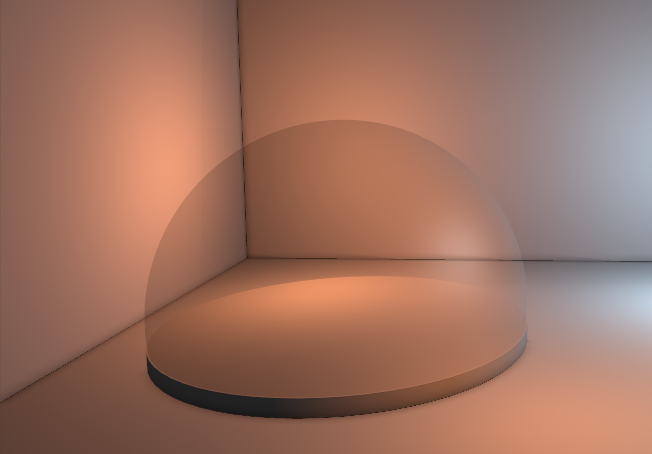
Write Normals can be turned off to prevent normals from being written. This normally is turned off only if the Write property is set to off as well. Normals are used e.g. by the Screen-Space Ambient Occlusion (SSAO) effect on 3D Layers. The SSAO would not be rendered for areas behind transparent objects, because only the depth and normals of the transparent object's surface is known. By turning off writing both Depth and Normals the SSAO is now calculated for objects behind (but not for the transparent object in the front).

Z-Write YES NO NO
Normal-Write YES YES NO

See also:
  • Introduction to Realtime Rendering

« Previous:
» Index «
Next: »
Copyright 2022 Ventuz Technology